
:max_bytes(150000):strip_icc():format(webp)/5-things-to-consider-before-buying-a-gaming-laptop-5235493-145a8c941b9f46e99d9a90bdee387893.jpg)
2024 Approved DVR Showdown TiVo Takes on Comcast
DVR Showdown: TiVo Takes on Comcast
TiVo vs Comcast, Who Wins the DVR Battle?

Ollie Mattison
Mar 27, 2024• Proven solutions
Cable, satellite, over the air broadcast, streaming internet video – never before have we had so many choices of how to receive television programming. DVR, PVR, computer hard drive, external storage device; now we have choices in how to store programs for viewing later to consider as well. So what is true and what is hype when it comes to what’s the best device? Let’s peel back the layers and look at the information.
First, what is a DVR? A DVR, or digital video recorder, is a device that records video from a source for playback at another time. It often comes with a television programming guide included so you can easily locate shows you want to record. Most DVRs come with large capacity hard drives, though some have flash memory cards as their storage medium. There are a variety of types that range from small storage capacity and two tuners, up through several tuners and massive hard drive storage ability. You also can pause and rewind live TV, which is great when you want to create your own sports instant replays. Most DVRs also allow you to watch one program that was previously recorded while two others are recording, though some have greater capacity.
A TiVo is a particular kind of DVR that was first introduced in 1999. It requires a subscription to its own programming guide that can be purchased month to month, or as a “lifetime” subscription (that means the life of the TiVo, not your life, by the way). TiVos, like cable company DVRs, can record just one show or an entire season. TiVos have a smart feature which notices which shows you are watching and recommends similar ones to you based on how you rate current programs. It also uses these ratings to suggest shows to other viewers.
Let’s look at a few of the main features of both so you can do a comparison. We’ll look at five factors.
1. TiVo vs Comcast: Cost and rent versus own
With a Comcast DVR, you are renting it from the cable company at a cost of $10 to $16 a month, depending on your market. There are no upfront costs, and should the device fail, you can swap it at no cost at your local Comcast service center. Some folks have found that the new X1 boxes are prone to crashes, so that free swap is handy.
A TiVo is yours to keep as long as it lasts or as long as you want it, whichever comes first. It has an initial cost of between $200 and $600, depending on the model. Plus, you have the subscription cost on top of the unit price, which is $15 a month or $500 for a “lifetime” subscription, which TiVo may or may not give you partial credit for should your device fail and you need a new one. Like the Comcast DVRs, some TiVo boxes are less than stable. It’s the nature of electronics. TiVos also have advertising on them, which some Comcast channels do also, like MusicChoice, but not on all of them.
2. TiVo vs Comcast: Services available
With a DVR from Comcast, you can only record shows that are broadcast on one of Comcast’s channels or play shows that are loaded into its On Demand section. A TiVo can be connected to a number of sources, including cable via a cable card, and allow you to combine all of your viewing sources into the one box. It even connects to a high definition antenna.
The TiVo with cable card has access to all of the cable On Demand services, so in that sense it can replace all of the Comcast DVRs. However, the cable card is not free. It typically runs $1.50 per card per month, up to $2.50 per card on the Frontier system.
The menus are slightly different, as you can see below.

Comcast interface

TiVo interface
TiVos also recognize SD and HD as just different versions of the same show, instead of different channels like Comcast does, so you can set your DVR to just record HD. This makes it somewhat harder to just record HD on a TiVo.
Down the road, Comcast is planning the X2 system which would have cloud recording capacity, thus ending the need for a box in your house at all. TiVo has not yet announced such a plan.
3. TiVo vs Comcast: Connection to a network
TiVos can be connected to your home computer network, and the newest one, the Roamio, comes with built-in wifi, for total freedom of use. Because it’s on the network, you can stream shows from your computer through the TiVo box for later playback. It supports channels like Netflix, Hulu Plus, and Amazon Instant. You can also stream shows to your Apple portable devices and then take the shows with you on the plane or to the gym, or use the device as a remote control. (Android devices will have the same capacity soon.) The network capacity also means you can use your computer to control the TiVo box and view content wherever you are.
Some reviewers have also noted that the network set up is not as simple as it might be, and it requires some computer knowledge and ability. Unless you have a tech person nearby, novice computer users may not wish to set up the network.
The iPhone app remote screen looks like this:

A TiVo does have limitations of who can access which channels. For instance, it does not stream HBOGo, nor does it interface with Apple’s TV programming. For that you still need an AppleTV device.
Comcast boxes simply do not network well. They are designed to broadcast the cable signals through your TV, but not on a home network. They are often easier to connect, however, just requiring a cable from the box to be plugged into the TV.
4. TiVo vs Comcast: Recording capacity
The new TiVo, the Roamio, has as many as six tuners that can record at the same time with up to 150 hours of high definition programming. You’ll never have another scheduling conflict again!
TiVos have recording capacities that range from 75 to 450 hours, depending on whether it is standard definition or high definition, and which device you are using. You can choose from three models of the Roamio. The base model costs $200 and has 75 hours of capacity. The menu and features are more limited on this one than on the others. There is a middle model priced at $400 that has the same six tuners as the high-end one but can only hold 150 hours of recordings. Then the top tier model costs $600 and has 450 hours of recording capacity, all of it in high definition.
The Comcast X1 DVR has four tuners and it can record them simultaneously. You can watch a prerecorded program while it’s recording, too. It can hold 120 hours of HD or 600 hours of SD programming.
5. TiVo vs Comcast: User interface
The Comcast X1 DVR system has a voice-activated interface and a completely different look and layout than their standard system has.

The basic Comcast remote is a multi-function remote and capable of controlling all functions, but it does not have the ability to connect to a portable device like a tablet or a smartphone to have connectivity that way like a TiVo can through an app. The remote has to be line of sight in order to work.

The TiVo device menu is in standard definition, so for those who have a high definition set up, you may find this a bit distraction or fuzzy. It does come with apps for extending what the box can do, including games for kids.
Many reviewers liked the interface on the TiVo better than the grid used on the Comcast service. The TiVo programming guide allows you to delete channels you don’t watch so you’re only looking at the channels you like. Comcast’s guide covers every channel they offer, even ones that are not available on your tier of service.

With the TiVo Roamio, connecting to a tablet allows you to be in another room and still operate the “remote” for the TiVo DVR. Download the app onto your device and you’re ready to go.
TiVo’s device remote has a sleek layout called the “peanut”.

Summary
What it all comes down to is looking at how you use your TV, where you get your sources from, and what your budget is. Each device has its own set of things that are appealing, and its own drawbacks. For flexibility of being able to use multiple sources and devices, the TiVo is the clear winner. For cost in the long run, it’s almost a draw. For ease of connection to a TV, the Comcast box comes out on top. No matter which one you pick, you’ll never run out of great programs to watch.


Ollie Mattison
Ollie Mattison is a writer and a lover of all things video.
Follow @Ollie Mattison
Ollie Mattison
Mar 27, 2024• Proven solutions
Cable, satellite, over the air broadcast, streaming internet video – never before have we had so many choices of how to receive television programming. DVR, PVR, computer hard drive, external storage device; now we have choices in how to store programs for viewing later to consider as well. So what is true and what is hype when it comes to what’s the best device? Let’s peel back the layers and look at the information.
First, what is a DVR? A DVR, or digital video recorder, is a device that records video from a source for playback at another time. It often comes with a television programming guide included so you can easily locate shows you want to record. Most DVRs come with large capacity hard drives, though some have flash memory cards as their storage medium. There are a variety of types that range from small storage capacity and two tuners, up through several tuners and massive hard drive storage ability. You also can pause and rewind live TV, which is great when you want to create your own sports instant replays. Most DVRs also allow you to watch one program that was previously recorded while two others are recording, though some have greater capacity.
A TiVo is a particular kind of DVR that was first introduced in 1999. It requires a subscription to its own programming guide that can be purchased month to month, or as a “lifetime” subscription (that means the life of the TiVo, not your life, by the way). TiVos, like cable company DVRs, can record just one show or an entire season. TiVos have a smart feature which notices which shows you are watching and recommends similar ones to you based on how you rate current programs. It also uses these ratings to suggest shows to other viewers.
Let’s look at a few of the main features of both so you can do a comparison. We’ll look at five factors.
1. TiVo vs Comcast: Cost and rent versus own
With a Comcast DVR, you are renting it from the cable company at a cost of $10 to $16 a month, depending on your market. There are no upfront costs, and should the device fail, you can swap it at no cost at your local Comcast service center. Some folks have found that the new X1 boxes are prone to crashes, so that free swap is handy.
A TiVo is yours to keep as long as it lasts or as long as you want it, whichever comes first. It has an initial cost of between $200 and $600, depending on the model. Plus, you have the subscription cost on top of the unit price, which is $15 a month or $500 for a “lifetime” subscription, which TiVo may or may not give you partial credit for should your device fail and you need a new one. Like the Comcast DVRs, some TiVo boxes are less than stable. It’s the nature of electronics. TiVos also have advertising on them, which some Comcast channels do also, like MusicChoice, but not on all of them.
2. TiVo vs Comcast: Services available
With a DVR from Comcast, you can only record shows that are broadcast on one of Comcast’s channels or play shows that are loaded into its On Demand section. A TiVo can be connected to a number of sources, including cable via a cable card, and allow you to combine all of your viewing sources into the one box. It even connects to a high definition antenna.
The TiVo with cable card has access to all of the cable On Demand services, so in that sense it can replace all of the Comcast DVRs. However, the cable card is not free. It typically runs $1.50 per card per month, up to $2.50 per card on the Frontier system.
The menus are slightly different, as you can see below.
Comcast interface
TiVo interface
TiVos also recognize SD and HD as just different versions of the same show, instead of different channels like Comcast does, so you can set your DVR to just record HD. This makes it somewhat harder to just record HD on a TiVo.
Down the road, Comcast is planning the X2 system which would have cloud recording capacity, thus ending the need for a box in your house at all. TiVo has not yet announced such a plan.
3. TiVo vs Comcast: Connection to a network
TiVos can be connected to your home computer network, and the newest one, the Roamio, comes with built-in wifi, for total freedom of use. Because it’s on the network, you can stream shows from your computer through the TiVo box for later playback. It supports channels like Netflix, Hulu Plus, and Amazon Instant. You can also stream shows to your Apple portable devices and then take the shows with you on the plane or to the gym, or use the device as a remote control. (Android devices will have the same capacity soon.) The network capacity also means you can use your computer to control the TiVo box and view content wherever you are.
Some reviewers have also noted that the network set up is not as simple as it might be, and it requires some computer knowledge and ability. Unless you have a tech person nearby, novice computer users may not wish to set up the network.
The iPhone app remote screen looks like this:
A TiVo does have limitations of who can access which channels. For instance, it does not stream HBOGo, nor does it interface with Apple’s TV programming. For that you still need an AppleTV device.
Comcast boxes simply do not network well. They are designed to broadcast the cable signals through your TV, but not on a home network. They are often easier to connect, however, just requiring a cable from the box to be plugged into the TV.
4. TiVo vs Comcast: Recording capacity
The new TiVo, the Roamio, has as many as six tuners that can record at the same time with up to 150 hours of high definition programming. You’ll never have another scheduling conflict again!
TiVos have recording capacities that range from 75 to 450 hours, depending on whether it is standard definition or high definition, and which device you are using. You can choose from three models of the Roamio. The base model costs $200 and has 75 hours of capacity. The menu and features are more limited on this one than on the others. There is a middle model priced at $400 that has the same six tuners as the high-end one but can only hold 150 hours of recordings. Then the top tier model costs $600 and has 450 hours of recording capacity, all of it in high definition.
The Comcast X1 DVR has four tuners and it can record them simultaneously. You can watch a prerecorded program while it’s recording, too. It can hold 120 hours of HD or 600 hours of SD programming.
5. TiVo vs Comcast: User interface
The Comcast X1 DVR system has a voice-activated interface and a completely different look and layout than their standard system has.
The basic Comcast remote is a multi-function remote and capable of controlling all functions, but it does not have the ability to connect to a portable device like a tablet or a smartphone to have connectivity that way like a TiVo can through an app. The remote has to be line of sight in order to work.
The TiVo device menu is in standard definition, so for those who have a high definition set up, you may find this a bit distraction or fuzzy. It does come with apps for extending what the box can do, including games for kids.
Many reviewers liked the interface on the TiVo better than the grid used on the Comcast service. The TiVo programming guide allows you to delete channels you don’t watch so you’re only looking at the channels you like. Comcast’s guide covers every channel they offer, even ones that are not available on your tier of service.
With the TiVo Roamio, connecting to a tablet allows you to be in another room and still operate the “remote” for the TiVo DVR. Download the app onto your device and you’re ready to go.
TiVo’s device remote has a sleek layout called the “peanut”.
Summary
What it all comes down to is looking at how you use your TV, where you get your sources from, and what your budget is. Each device has its own set of things that are appealing, and its own drawbacks. For flexibility of being able to use multiple sources and devices, the TiVo is the clear winner. For cost in the long run, it’s almost a draw. For ease of connection to a TV, the Comcast box comes out on top. No matter which one you pick, you’ll never run out of great programs to watch.
Ollie Mattison
Ollie Mattison is a writer and a lover of all things video.
Follow @Ollie Mattison
Dual Approaches to Audio Fades in Final Cut Pro
Two Ways to Fade In/Out Audio in Final Cut Pro

Benjamin Arango
Mar 27, 2024• Proven solutions
Creating a fade in or out effect in Final Cut Pro will make your audio amazing. However, as Final Cut Pro is for pros, not every user knows how to make fade in/out audio. In fact, it is very easy to fade audio in Final Cut Pro. This tutorial will show you how to apply effects like fade-in, fade-out, and crossfade to your audio clips using Final Cut Pro in two ways.
Part 1: Use the Modify Menu to Fade In/Out Audio
Part 2: Use Fade Handles to Fade In/Out Audio
This tutorial offers only the basics of the audio fading techniques in Apple Final Cut Pro X, which is a specialized video editing software used by professionals worldwide. If you are an amateur who is new to video editing, we suggest you begin with Wondershare Filmora for Mac (originally Wondershare Video Editor for Mac). It is a powerful yet easy-to-use software that is ideal for beginners. You can download the free trial version of Wondershare Filmora below.
Download Mac Version ](https://tools.techidaily.com/wondershare/filmora/download/ )
With this modern and extremely user-friendly tool, you’ll find that applying effects like fade-in, fade-out, or crossfade to your audio clips is very easy.
Before we get started, you can firstly detach the audio from video to better edit it. Locate your audio clip in the timeline, highlight the desired audio/video clip, right click on it, and choose Detach audio to unlink your audio from your video to edit them as separate elements.
Check more articles here, if you are also interested in other audio editing tips in Final Cut Pro or want to know how to record a voice over with FCP.
Part 1: How to Fade Audio by using the Modify Menu
You can go to the Modify menu and easily apply fade-in or fade-outs to the audio clip you are editing. The Final Cut Pro preferences also allow you to adjust the fade duration.
Step 1 : First, you have to select the audio or the video clips with audio in the timeline.

Step 2 : Select Modify> Adjust Volume> Apply Fades.

You should remember that the fades appear at the beginning and the end of each clip. The default duration of the fade is one half-second. If you want to modify that duration, you just have to drag the fade handle up to the point where your fade is supposed to begin or end.

Step 3: If you want to remove the fades, choose Modify > Adjust Volume > Remove Fades.
See more details on how to fade audio in Final Cut Pro from the following video.
Part 2: How to Fade Music by using Fade Handles
You have already learned how to find the fade handles on the screen. Now, you just have to manually drag the handle to the exact point from which you want the fade to begin or end. Just keep in mid this simple rule: fade handles at the beginning of a clip produce fade-in effects, whereas fade handles at the end give fade-out effects.
You can manually fade-in or out a portion of the audio clip on your timeline by using the fade handles. Place the pointer over the clip and you can see the fade handles appearing in the top left and right corners of the waveform. To change the sound of the fade, you’ll have to modify the shape of the fade by selecting one of the several preconfigured choices.
Using the fade handles to create crossfades:
Step 1 : To create a crossfade, first you have to select two adjacent clips in the timeline. After that choose Clip> Expand Audio (or press Control-S). You can see the waveforms on your screen expanding.
Step 2 : To overlap the audio parts of the two clips on your timeline, just drag the end point of the first clip and the start point of the second clip.
Step 3 : Now, you’ll have to drag the fade handles of each clip to the exact points where you want the fade to start and finish.

Tips: How to change fade shapes while using the fade handle
You can easily change the sound of your fades by modifying the default fade shape. For this, you’ll have to control-click a fade handle and select one of the fade preferences from the list.

- Linear: The rate of change is constant over the length of the fade.
- S-curve: Eases in and out of the fade with the midpoint at 0 dB.
- +3dB: Picks up quickly and then gradually peters out toward the end. This is the considered to be the most useful mode while choosing a quick fade.
- –3dB: Begins slowly and then toward the end picks up fast. This setting allows you to maintain a perfectly natural volume while crossfading two clips.
- Linear: Maintains a constant rate of change over the length of the fade.
- S-curve: Eases in and out of the fade with the midpoint at 0 dB.
- +3dB: Starts quickly and then slowly tapers off toward the end. This is the most useful setting for quick fades.
- –3dB: Starts slowly and then moves quickly toward the end. This is the default setting and is best for maintaining a natural volume when crossfading between two adjacent clips.
Benjamin Arango
Benjamin Arango is a writer and a lover of all things video.
Follow @Benjamin Arango
Benjamin Arango
Mar 27, 2024• Proven solutions
Creating a fade in or out effect in Final Cut Pro will make your audio amazing. However, as Final Cut Pro is for pros, not every user knows how to make fade in/out audio. In fact, it is very easy to fade audio in Final Cut Pro. This tutorial will show you how to apply effects like fade-in, fade-out, and crossfade to your audio clips using Final Cut Pro in two ways.
Part 1: Use the Modify Menu to Fade In/Out Audio
Part 2: Use Fade Handles to Fade In/Out Audio
This tutorial offers only the basics of the audio fading techniques in Apple Final Cut Pro X, which is a specialized video editing software used by professionals worldwide. If you are an amateur who is new to video editing, we suggest you begin with Wondershare Filmora for Mac (originally Wondershare Video Editor for Mac). It is a powerful yet easy-to-use software that is ideal for beginners. You can download the free trial version of Wondershare Filmora below.
Download Mac Version ](https://tools.techidaily.com/wondershare/filmora/download/ )
With this modern and extremely user-friendly tool, you’ll find that applying effects like fade-in, fade-out, or crossfade to your audio clips is very easy.
Before we get started, you can firstly detach the audio from video to better edit it. Locate your audio clip in the timeline, highlight the desired audio/video clip, right click on it, and choose Detach audio to unlink your audio from your video to edit them as separate elements.
Check more articles here, if you are also interested in other audio editing tips in Final Cut Pro or want to know how to record a voice over with FCP.
Part 1: How to Fade Audio by using the Modify Menu
You can go to the Modify menu and easily apply fade-in or fade-outs to the audio clip you are editing. The Final Cut Pro preferences also allow you to adjust the fade duration.
Step 1 : First, you have to select the audio or the video clips with audio in the timeline.
Step 2 : Select Modify> Adjust Volume> Apply Fades.
You should remember that the fades appear at the beginning and the end of each clip. The default duration of the fade is one half-second. If you want to modify that duration, you just have to drag the fade handle up to the point where your fade is supposed to begin or end.
Step 3: If you want to remove the fades, choose Modify > Adjust Volume > Remove Fades.
See more details on how to fade audio in Final Cut Pro from the following video.
Part 2: How to Fade Music by using Fade Handles
You have already learned how to find the fade handles on the screen. Now, you just have to manually drag the handle to the exact point from which you want the fade to begin or end. Just keep in mid this simple rule: fade handles at the beginning of a clip produce fade-in effects, whereas fade handles at the end give fade-out effects.
You can manually fade-in or out a portion of the audio clip on your timeline by using the fade handles. Place the pointer over the clip and you can see the fade handles appearing in the top left and right corners of the waveform. To change the sound of the fade, you’ll have to modify the shape of the fade by selecting one of the several preconfigured choices.
Using the fade handles to create crossfades:
Step 1 : To create a crossfade, first you have to select two adjacent clips in the timeline. After that choose Clip> Expand Audio (or press Control-S). You can see the waveforms on your screen expanding.
Step 2 : To overlap the audio parts of the two clips on your timeline, just drag the end point of the first clip and the start point of the second clip.
Step 3 : Now, you’ll have to drag the fade handles of each clip to the exact points where you want the fade to start and finish.
Tips: How to change fade shapes while using the fade handle
You can easily change the sound of your fades by modifying the default fade shape. For this, you’ll have to control-click a fade handle and select one of the fade preferences from the list.
- Linear: The rate of change is constant over the length of the fade.
- S-curve: Eases in and out of the fade with the midpoint at 0 dB.
- +3dB: Picks up quickly and then gradually peters out toward the end. This is the considered to be the most useful mode while choosing a quick fade.
- –3dB: Begins slowly and then toward the end picks up fast. This setting allows you to maintain a perfectly natural volume while crossfading two clips.
- Linear: Maintains a constant rate of change over the length of the fade.
- S-curve: Eases in and out of the fade with the midpoint at 0 dB.
- +3dB: Starts quickly and then slowly tapers off toward the end. This is the most useful setting for quick fades.
- –3dB: Starts slowly and then moves quickly toward the end. This is the default setting and is best for maintaining a natural volume when crossfading between two adjacent clips.
Benjamin Arango
Benjamin Arango is a writer and a lover of all things video.
Follow @Benjamin Arango
10 Best Webcam Recording Software for Windows 10
10 Best Webcam Recording Software for Windows 10

Richard Bennett
Mar 27, 2024• Proven solutions
Which webcam softwarehave you installed on your laptop or desktop? Using the right webcam software to live stream videos, screen record videos, or chat on Skype results in high-quality images, smooth streaming, and high-quality images and videos.
There is a huge number of free webcam software with advanced features yet free for you to download, and use on your PC.
But how would you determine the best webcam software to use?
Before you mounted that webcam on your desktop or laptop, you had a reason. It’s your webcam features and purpose that should guide you to select the right software for the webcam camera.
In this article, we will show you 10 webcam software for Windows in this guide. Included are the most useful factors to consider as you make your choice – complexity of use, free/paid, integrations, editing tools, and more. You will learn:
- Part 1: The Best Webcam & Screen Recorder for Windows and Mac [Video Tutorial]
- Part 2: Top 10 Best Free Webcam Software for Windows
First take a quick look of the 10 best webcam software that is available on your Windows from a video:
For Win 7 or later (64-bit)
 Secure Download
For macOS 10.14 or later
Secure Download
Part 1: The Best Webcam & Screen Recorder for Computer
You need a sound and webcam recorder to record your video tutorials, streaming videos, presentations, or any other type of video. Wondershare Filmora is the software to use. Other than its most admired friendly intuitive interface, it’s simple and easy to use-suitable for both beginners and professionals.
For Win 7 or later (64-bit)
Secure Download
For macOS 10.14 or later
Secure Download
Among the outstanding features, you’ll find in Filmora include,
- Fast-paced recording speed of up to 120 fps
- Adverse professional editing tools that are easy to use
- Simultaneous recording from both webcam and computer screen
- Compatible with 50+ different file formats
- Rich title text and tutorial features
It’s free to download. Have a try now! Join in the Wondershare Video Community and get some inspiration from other Filomora users.
Part 2: Top 10 Best Free Webcam Software for Windows
To help you evaluate which webcam software best suits your needs, I’ve featured the strengths, shortcomings, and support services in each software review.
This is the list of the best free webcam software for Windows 10.
| 1 - Logitech Capture | 2 - CyberLink Youcam |
|---|---|
| 3 - ManyCam | 4 - SplitCam |
| 5 - Bandicam | 6 - NCH - Video Capture Software |
| 7 - YAWCAM | 8 - Windows Camera |
| 9 - Fake Webcam | 10 - IP Camera Viewer |
1. Logitech Capture
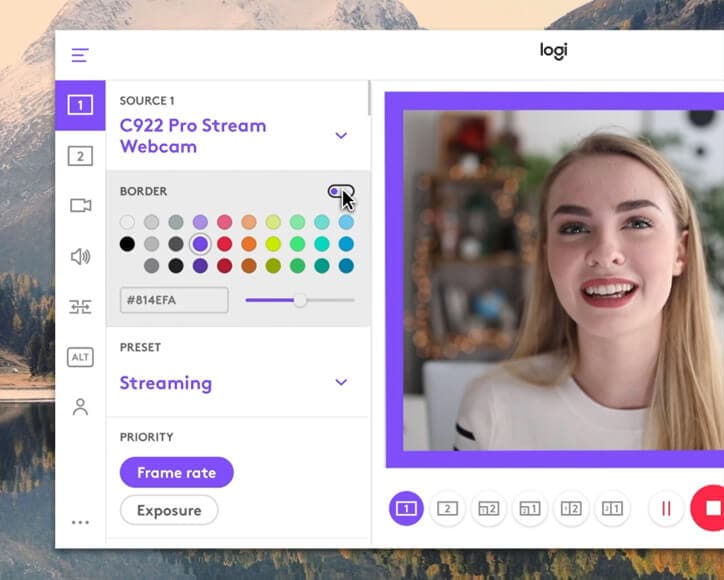
The multiple source recording feature and direct streaming app are the key strengths of this software. According to its mission statement- All-In-One Content Creation- you can use this software to record, edit, customize, and stream to your favorite channel.
Operating systems: Windows 10/8/7
Price: Free
Supported webcams: 1080P PRO STREAM, BRIO STREAM, C920s HD PRO, C922 PRO STREAM
Logitech Capture is among the few free webcam recording software for Windows 10 with studio controls applicable during recording. You can use this feature to adjust your image, create frames, adjust focus and transitions, and enable ChromaKey as you record.
In case you want to create a picture-in-picture presentation, this software allows you to use two webcams simultaneously. With the source switching and the auto-focus features, you can record the best tutorials or guides that show all dimensions and your image.
Pros
- Rich in transitions and effects
- Portrait optimization for mobile devices
- Its Capture app offers direct streaming to YouTube
- You can take passports or still images
Cons
- Limited to YouTube channel
- Account registration is mandatory
2. CyberLink Youcam
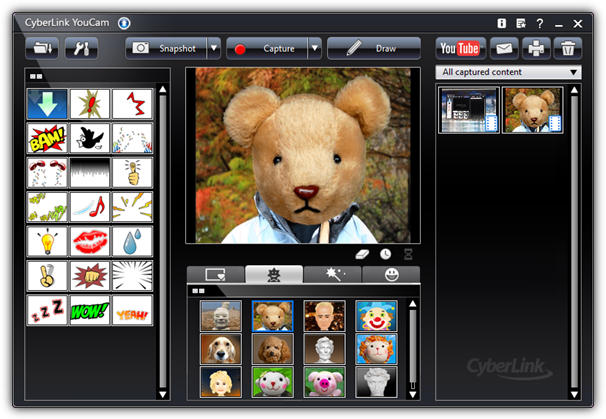
If you are used to video chatting and video recording, then, you’ll have 200+ fun effects to make your real-time videos as interesting as possible. In fact, the seamless app integration feature will keep your live streaming chats without buffering for long.
Operating systems: Windows 10/8/1.8/7
Price: Free/ Paid
Supported file formats: WMV, MP4, AVI
YouCam is the best free webcam software Windows 10 for YouTubers, business professionals, Streamers, home users, and Vloggers. It seamlessly integrates with live streaming media channels like Twitch, Wirecast, OBS Studio, Facebook Live, Xsplit, and YouTube Live.
The YouCam’s AR technology is one of its hidden treasures that will lighten up your skin by applying a natural-looking makeup. If your room is badly light, use the Live Skin Smoothing feature. Just below it is the TrueTheater Enhancement option to help you automatically adjust your facial sharpness and lighting.
Pros
- Hundreds of animated emojis
- Suitable for video conferencing services
- Plenty of interactive colorful particles and distortions
- Availability of face beautification tool
Cons
- Only limited to the Windows operating system
- Very few features for the free plan
3. ManyCam
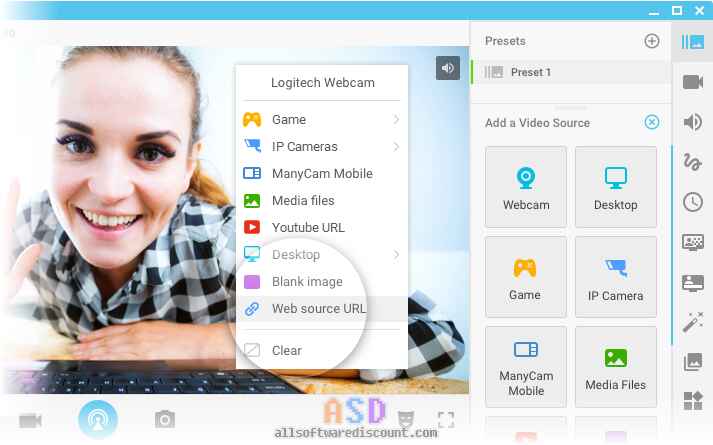
Downloading this webcam software guarantees you smooth streaming and effortless recording of videos. Also, this software will help you during game steaming, online education, mobile live streaming, and live telehealth communication.
Operating systems: Windows 10/8/7 and macOS X
Price: Free /Paid
Supported file formats: MJPEG, IP, MP4, AVI, MPEG, MOV
ManyCam is a free webcam recording software for windows 10 . It’s among the most widely used software internationally-not for many reasons, but because of its friendly intuitive user interface and live streaming tools for lessons and lecturers.
So, if you are a lecturer/teacher, you can use the Software Development Kit (SDK) to integrate the webcam with any online teaching platform. Among the features designed to facilitate better online teaching include the picture in picture, Chroma Key, multiple video sources, and screen sharing.
Pro
- Ability to stream 4K videos
- Real-time camera control settings
- No watermark even on the free plan
- Screencasting and screen recording feature
- Real-time drop and drag effects
Cons
- Expensive business subscription plans
- No Light enhancement features
- Most features are manual as opposed to being automatic

Filmora WebCame & Screen Recorder
Filmora - WebCame & Screen Recorder
• No-time delay to record webcam and screen while live streaming or gaming
• Edit recording video for marketing replay or adding game commentary
• Cross-platform supported - (Windows, Mac, iOS, Android)
Start Webcam & Screen Record Start Webcam & Screen Record Start Webcam & Screen Record Learn More >
4. SplitCam
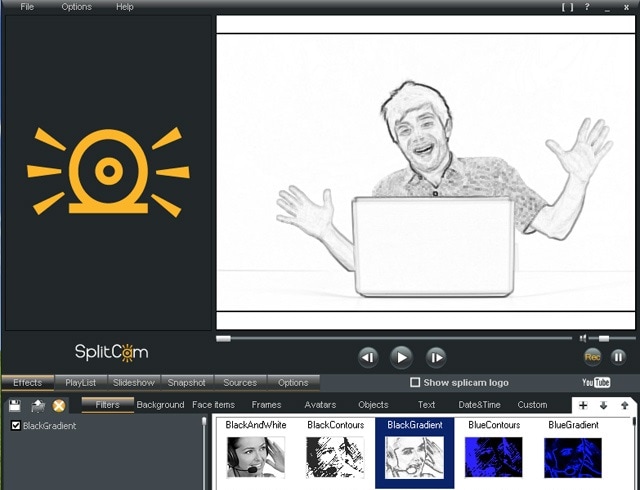
To stream your desktop/laptop screen SplitCam is the most appropriate software. With only the inbuilt virtual webcam, you can share your screen videos to media channels and IMS. Other uses of this software are recording webcam chatting , streaming live videos, and messaging.
Operating systems: Windows 10/8/7
Price: Free
SplitCam is not as popular as the other free webcam software windows 10 like ManyCam and YouCam. This is because it doesn’t integrate with some of the world’s renowned social media platforms- Facebook and Instagram. However, you can use this software to stream, take snapshots, and record videos for YouTube, Skype, Justin.tv, Gtalk, and Windows Live Messenger.
SplitCam is rich in fantastic webcam effects. Haven’t you been surprised to see someone appear to be streaming from the ocean or the Amazon Mountain? This is what you can do with SplitCam. Other cool effects are frames, texts on videos, filters, and facial items like masks and fake face glasses.
Pros
- Open and simple interface
- Integratable with the messaging apps
- Supports a wide range of resolutions ( between 320x180 and 2048x1536)
Cons
- Applicable to a small number of channels
- Supported file formats not defined
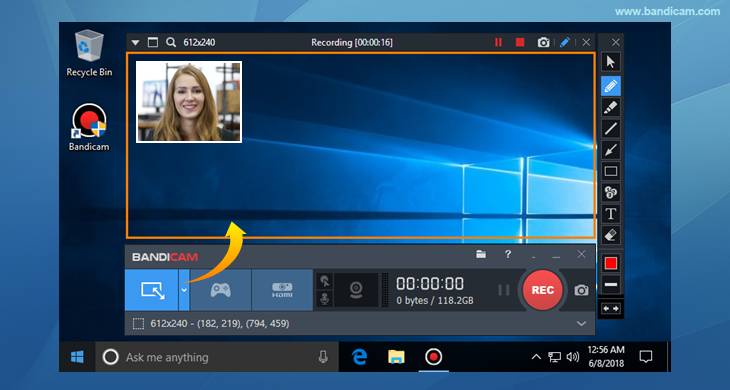
5. Bandicam
Do you want a recorder for screen recording, recording your gameplay, or capturing videos from devices like smartphones and PlayStation? Look for no other software but BandiCam. You can also merge two or more video files, remove unwanted parts, and select the only part to screen record.
Operating systems: Windows Vista, 10/8/7
Price: Free/paid
Supported file format: AVI, MP4, JPEG, TIF, GIF, PNG
Supported graphics cards: Nvidia NVENC, Nvidia NVENC (),
BandiCam is another HD webcam software Windows 10 with the capability of capturing high compression videos and games on your PC screen videos without compromising the video quality. Don’t forget to record all webinars aired in your niche.
Netflix is becoming more popular each day due to the thrilling videos. With the BandiCam screen recorder, you can record live-streamed videos on Netflix for over 24hrs. These are the tools to edit your recorded video: real-time drawing tool, webcam overlay, sound mixer, and Chroma Key.
Pros
- No hidden features
- Widescreen capture
- Can record 2D/3D videos in HD mode
- Can capture fast-paced videos of up to 144 FPS
Cons
- Not suitable for beginners
- Cannot be used to live stream videos
6. NCH - Video Capture Software

Of all the listed webcam software in this review, this software has the most diverse functions. You can record streaming videos, record your computer screen, record from external devices, and record from a webcam. It’s also perfect for recording audios and simultaneous recording from screen and webcam.
Operating systems: Windows 10, 8, 8.1, 7, XP, Vista 64 bit and Mac OS X 10.5 and above
Price: Free/paid
Supported file formats: MP4, WMV, AVI, MPG, FLV, MOV
Debut Video Capture is the only free webcam recording software for Windows 10 believed to capture or record videos from any external source. It has also preset settings for HD and TV with pre-production enhancement features like color adjustment settings, overlay buttons and frame rate, aspect ratio, and resolution settings.
If you always think of becoming rich, the Express Burn Disc Burner is the tool that will help you make money. Record the most trending videos and use this tool to burn DVDs and CDs.
Pros
- Can record videos for any social media platform
- Supports a wide range of audio and video file formats
- All features are open and easy to use
- Availability of video editing software
Cons
- Only monthly subscriptions for paid plans
- Watermark for the free download
- Difficult to record a full-screen movie
Try Filmora to Smoothly Record WebCame and Screen!
Filmora Web Camera & Screen Recorder can capture any area of the PC screen and webcam. It’s perfect to capture and record while making a live gaming match, marketing promotion, guiding a tour, and more. Plus, you can edit the recording video files in Filmora directly! Worth to have a try!
Start Webcam & Screen Recording Start Webcam & Screen Recording Start Webcam & Screen Recording Learn More >
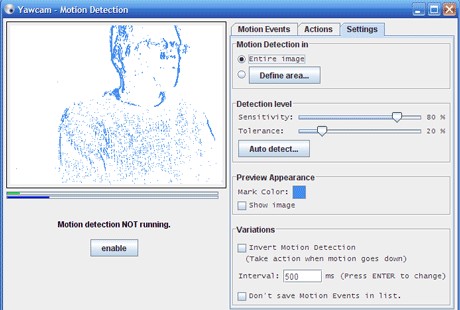
7. YAWCAM
This webcam software can be referred to as the simplest for all beginners with the will to start streaming and recording videos for personal or home use.
Supported file formats: PNG, JPG, MJPEG, GIF, JavaScript
Price: Free
Supported operating systems: Windows 2000/10/8/7/ Vista and XP
YAWCAM is an absolutely free webcam software windows 10. Why is it the simplest software to use? Just download and you will find all features on one page. Simple language commands aligned in a drop-down menu ready to be used with only one click.
Some of the best features include overlay texts and images, scheduler, motion detection, and an inbuilt webserver. For you to use this webcam software, use these supported devices; DirectX compatible webcams, DV-camera, or video capture devices.
Pros
- No watermark
- Easy to use
- Friendly user interface
Cons
- Few transitions and effects
8. Windows Camera
We all trust any app or software by Microsoft over others! If you also do, then you can download Windows Camera and use it to record videos, take snapshots and shoot videos.
Operating system: Windows 10
Price: Free
Supported devices: Xbox One, Windows, mobile
Windows Camera is among the best free webcam software for Windows 10. This is because of the software’s few but easy-to-use and effective features that are expertly designed for PCs and tablets installed with Windows 10.
The automatic photo back combined with the photo-shoot timer makes it perfect for taking selfies and passports. Using the panorama feature, you can take photos of the best scenes and share them on media platforms.
Pros
- Simplicity is its main strength
- Supports resolutions above 1080p
- Good for photographers
Cons
- Has no built-in virtual webcam
- Requires a camera to support 4K videos
9. Fake Webcam

Supported file formats: AVI, MPEG, DVD, VCD, WMV, 3GP, MP4, SVCD, MOV, ASF,
Price: Free /paid
Operating systems: Windows 7/8/10 (32/64 bit)
Fake Webcam is a free webcam software Windows 10 whose name is creatively used to suggest it almost functions like a webcam. This doesn’t fall far from the truth! You can truly use this software to broadcast, add effects and filters, record on full screen, and fake your voice.
To share or stream your photos and videos on Skype, YIM, or Gtalk, using the screen recorder would give the best results. What makes Fake Webcam stand out is the free video converter and the free video toolkit.
Pros
- Free support tools
- Supports all video and audio formats
- Can convert file formats and stream to any channel
- Availability of the screen recorder
- Integratable with almost all instant messengers
Cons
- Major tools not free(Fake Webcam and Screen recorder)
10. IP Camera Viewer
Do you run a supermarket store, mall or you’ve installed security surveillance cameras in your compound? IP Camera Viewer is the most effective webcam software for video monitoring systems.
Supported file formats: JPEG, MPEG-4, MJPEG, and
Price: Free
Operating systems: Windows 10 / 8 / 7 /2012 /Vista and XP
IP Camera Viewer is the most used free webcam recording software for windows 10 as its compatible with almost all IP camera models like Panasonic, Toshiba, Canon, D-Link, Sony, and more the 2000 others. With the capability of viewing and controlling 4 camera feeds at once, you can use this software to monitor your entire compound.
Some of the important advanced IP Camera Viewer functions include listening to webcam audios, adjust image settings, zoom or tilt images, schedule monitoring times, and detect motions.
Pros
- Automatically uploads recorded videos and photos to a server
- Compatible with almost all IP camera models
- Simple and easy to use
Cons
- No inbuilt media player
- Cannot adjust the image or video quality
You may also want to read >>> 10 Best Webcams | A Buyer’s Guide
![]()
A cross-platform for making videos anywhere for all creators

Why your video editing isn’t good enough? How about some creative inspo?
- 100 Million+ Users
- 150+ Countries and Regions
- 4 Million+ Social Media Followers
- 5 Million+ Stock Media for Use
* Secure Download

FAQs about Webcam Software for Windows
1. What is Webcam Software?
A webcam is a video camera that feeds or streams images or video in real-time to or over a computer network. And webcam software enables users to record video or stream video over the Internet.
Webcam software is an application that allows you to capture video from your laptop/desktop webcam and record or stream video over the Internet. You can use them to deliver professional videos, streaming, and online courses easily.
2. Does Windows have built-in webcam software?
Windows 10 has an in-built webcam app called Camera that lets you record videos and take pictures with your webcam. This is definitely better than downloading 3rd party webcam recording software where spyware/malware is rampant.
3. Does a webcam need software?
Yes, if the camera hardware offers depth, low-light support, night vision, etc. If you use any software on the camera, these functions are only available if the driver is installed.
Conclusion
After a keen of all the webcam software above, it’s evident that every developer had an intended purpose. You cannot therefore just randomly wake up and download any without considering its functions, supported devices, file formats, and the auxiliary apps available. All this information is contained herein.
According to some users, there are free webcam software Windows 10 that more often would not show any video images but the audio is absolutely clear. To help your fellow user, what bad experience have you ever had after recording a game using webcam software ? Kindly share your comment or suggestion on our social media platforms.
Richard Bennett
Richard Bennett is a writer and a lover of all things video.
Follow @Richard Bennett
Richard Bennett
Mar 27, 2024• Proven solutions
Which webcam softwarehave you installed on your laptop or desktop? Using the right webcam software to live stream videos, screen record videos, or chat on Skype results in high-quality images, smooth streaming, and high-quality images and videos.
There is a huge number of free webcam software with advanced features yet free for you to download, and use on your PC.
But how would you determine the best webcam software to use?
Before you mounted that webcam on your desktop or laptop, you had a reason. It’s your webcam features and purpose that should guide you to select the right software for the webcam camera.
In this article, we will show you 10 webcam software for Windows in this guide. Included are the most useful factors to consider as you make your choice – complexity of use, free/paid, integrations, editing tools, and more. You will learn:
- Part 1: The Best Webcam & Screen Recorder for Windows and Mac [Video Tutorial]
- Part 2: Top 10 Best Free Webcam Software for Windows
First take a quick look of the 10 best webcam software that is available on your Windows from a video:
For Win 7 or later (64-bit)
Secure Download
For macOS 10.14 or later
Secure Download
Part 1: The Best Webcam & Screen Recorder for Computer
You need a sound and webcam recorder to record your video tutorials, streaming videos, presentations, or any other type of video. Wondershare Filmora is the software to use. Other than its most admired friendly intuitive interface, it’s simple and easy to use-suitable for both beginners and professionals.
For Win 7 or later (64-bit)
Secure Download
For macOS 10.14 or later
Secure Download
Among the outstanding features, you’ll find in Filmora include,
- Fast-paced recording speed of up to 120 fps
- Adverse professional editing tools that are easy to use
- Simultaneous recording from both webcam and computer screen
- Compatible with 50+ different file formats
- Rich title text and tutorial features
It’s free to download. Have a try now! Join in the Wondershare Video Community and get some inspiration from other Filomora users.
Part 2: Top 10 Best Free Webcam Software for Windows
To help you evaluate which webcam software best suits your needs, I’ve featured the strengths, shortcomings, and support services in each software review.
This is the list of the best free webcam software for Windows 10.
| 1 - Logitech Capture | 2 - CyberLink Youcam |
|---|---|
| 3 - ManyCam | 4 - SplitCam |
| 5 - Bandicam | 6 - NCH - Video Capture Software |
| 7 - YAWCAM | 8 - Windows Camera |
| 9 - Fake Webcam | 10 - IP Camera Viewer |
1. Logitech Capture
The multiple source recording feature and direct streaming app are the key strengths of this software. According to its mission statement- All-In-One Content Creation- you can use this software to record, edit, customize, and stream to your favorite channel.
Operating systems: Windows 10/8/7
Price: Free
Supported webcams: 1080P PRO STREAM, BRIO STREAM, C920s HD PRO, C922 PRO STREAM
Logitech Capture is among the few free webcam recording software for Windows 10 with studio controls applicable during recording. You can use this feature to adjust your image, create frames, adjust focus and transitions, and enable ChromaKey as you record.
In case you want to create a picture-in-picture presentation, this software allows you to use two webcams simultaneously. With the source switching and the auto-focus features, you can record the best tutorials or guides that show all dimensions and your image.
Pros
- Rich in transitions and effects
- Portrait optimization for mobile devices
- Its Capture app offers direct streaming to YouTube
- You can take passports or still images
Cons
- Limited to YouTube channel
- Account registration is mandatory
2. CyberLink Youcam
If you are used to video chatting and video recording, then, you’ll have 200+ fun effects to make your real-time videos as interesting as possible. In fact, the seamless app integration feature will keep your live streaming chats without buffering for long.
Operating systems: Windows 10/8/1.8/7
Price: Free/ Paid
Supported file formats: WMV, MP4, AVI
YouCam is the best free webcam software Windows 10 for YouTubers, business professionals, Streamers, home users, and Vloggers. It seamlessly integrates with live streaming media channels like Twitch, Wirecast, OBS Studio, Facebook Live, Xsplit, and YouTube Live.
The YouCam’s AR technology is one of its hidden treasures that will lighten up your skin by applying a natural-looking makeup. If your room is badly light, use the Live Skin Smoothing feature. Just below it is the TrueTheater Enhancement option to help you automatically adjust your facial sharpness and lighting.
Pros
- Hundreds of animated emojis
- Suitable for video conferencing services
- Plenty of interactive colorful particles and distortions
- Availability of face beautification tool
Cons
- Only limited to the Windows operating system
- Very few features for the free plan
3. ManyCam
Downloading this webcam software guarantees you smooth streaming and effortless recording of videos. Also, this software will help you during game steaming, online education, mobile live streaming, and live telehealth communication.
Operating systems: Windows 10/8/7 and macOS X
Price: Free /Paid
Supported file formats: MJPEG, IP, MP4, AVI, MPEG, MOV
ManyCam is a free webcam recording software for windows 10 . It’s among the most widely used software internationally-not for many reasons, but because of its friendly intuitive user interface and live streaming tools for lessons and lecturers.
So, if you are a lecturer/teacher, you can use the Software Development Kit (SDK) to integrate the webcam with any online teaching platform. Among the features designed to facilitate better online teaching include the picture in picture, Chroma Key, multiple video sources, and screen sharing.
Pro
- Ability to stream 4K videos
- Real-time camera control settings
- No watermark even on the free plan
- Screencasting and screen recording feature
- Real-time drop and drag effects
Cons
- Expensive business subscription plans
- No Light enhancement features
- Most features are manual as opposed to being automatic
Filmora WebCame & Screen Recorder
Filmora - WebCame & Screen Recorder
• No-time delay to record webcam and screen while live streaming or gaming
• Edit recording video for marketing replay or adding game commentary
• Cross-platform supported - (Windows, Mac, iOS, Android)
Start Webcam & Screen Record Start Webcam & Screen Record Start Webcam & Screen Record Learn More >
4. SplitCam
To stream your desktop/laptop screen SplitCam is the most appropriate software. With only the inbuilt virtual webcam, you can share your screen videos to media channels and IMS. Other uses of this software are recording webcam chatting , streaming live videos, and messaging.
Operating systems: Windows 10/8/7
Price: Free
SplitCam is not as popular as the other free webcam software windows 10 like ManyCam and YouCam. This is because it doesn’t integrate with some of the world’s renowned social media platforms- Facebook and Instagram. However, you can use this software to stream, take snapshots, and record videos for YouTube, Skype, Justin.tv, Gtalk, and Windows Live Messenger.
SplitCam is rich in fantastic webcam effects. Haven’t you been surprised to see someone appear to be streaming from the ocean or the Amazon Mountain? This is what you can do with SplitCam. Other cool effects are frames, texts on videos, filters, and facial items like masks and fake face glasses.
Pros
- Open and simple interface
- Integratable with the messaging apps
- Supports a wide range of resolutions ( between 320x180 and 2048x1536)
Cons
- Applicable to a small number of channels
- Supported file formats not defined
5. Bandicam
Do you want a recorder for screen recording, recording your gameplay, or capturing videos from devices like smartphones and PlayStation? Look for no other software but BandiCam. You can also merge two or more video files, remove unwanted parts, and select the only part to screen record.
Operating systems: Windows Vista, 10/8/7
Price: Free/paid
Supported file format: AVI, MP4, JPEG, TIF, GIF, PNG
Supported graphics cards: Nvidia NVENC, Nvidia NVENC (),
BandiCam is another HD webcam software Windows 10 with the capability of capturing high compression videos and games on your PC screen videos without compromising the video quality. Don’t forget to record all webinars aired in your niche.
Netflix is becoming more popular each day due to the thrilling videos. With the BandiCam screen recorder, you can record live-streamed videos on Netflix for over 24hrs. These are the tools to edit your recorded video: real-time drawing tool, webcam overlay, sound mixer, and Chroma Key.
Pros
- No hidden features
- Widescreen capture
- Can record 2D/3D videos in HD mode
- Can capture fast-paced videos of up to 144 FPS
Cons
- Not suitable for beginners
- Cannot be used to live stream videos
6. NCH - Video Capture Software
Of all the listed webcam software in this review, this software has the most diverse functions. You can record streaming videos, record your computer screen, record from external devices, and record from a webcam. It’s also perfect for recording audios and simultaneous recording from screen and webcam.
Operating systems: Windows 10, 8, 8.1, 7, XP, Vista 64 bit and Mac OS X 10.5 and above
Price: Free/paid
Supported file formats: MP4, WMV, AVI, MPG, FLV, MOV
Debut Video Capture is the only free webcam recording software for Windows 10 believed to capture or record videos from any external source. It has also preset settings for HD and TV with pre-production enhancement features like color adjustment settings, overlay buttons and frame rate, aspect ratio, and resolution settings.
If you always think of becoming rich, the Express Burn Disc Burner is the tool that will help you make money. Record the most trending videos and use this tool to burn DVDs and CDs.
Pros
- Can record videos for any social media platform
- Supports a wide range of audio and video file formats
- All features are open and easy to use
- Availability of video editing software
Cons
- Only monthly subscriptions for paid plans
- Watermark for the free download
- Difficult to record a full-screen movie
Try Filmora to Smoothly Record WebCame and Screen!
Filmora Web Camera & Screen Recorder can capture any area of the PC screen and webcam. It’s perfect to capture and record while making a live gaming match, marketing promotion, guiding a tour, and more. Plus, you can edit the recording video files in Filmora directly! Worth to have a try!
Start Webcam & Screen Recording Start Webcam & Screen Recording Start Webcam & Screen Recording Learn More >
7. YAWCAM
This webcam software can be referred to as the simplest for all beginners with the will to start streaming and recording videos for personal or home use.
Supported file formats: PNG, JPG, MJPEG, GIF, JavaScript
Price: Free
Supported operating systems: Windows 2000/10/8/7/ Vista and XP
YAWCAM is an absolutely free webcam software windows 10. Why is it the simplest software to use? Just download and you will find all features on one page. Simple language commands aligned in a drop-down menu ready to be used with only one click.
Some of the best features include overlay texts and images, scheduler, motion detection, and an inbuilt webserver. For you to use this webcam software, use these supported devices; DirectX compatible webcams, DV-camera, or video capture devices.
Pros
- No watermark
- Easy to use
- Friendly user interface
Cons
- Few transitions and effects
8. Windows Camera
We all trust any app or software by Microsoft over others! If you also do, then you can download Windows Camera and use it to record videos, take snapshots and shoot videos.
Operating system: Windows 10
Price: Free
Supported devices: Xbox One, Windows, mobile
Windows Camera is among the best free webcam software for Windows 10. This is because of the software’s few but easy-to-use and effective features that are expertly designed for PCs and tablets installed with Windows 10.
The automatic photo back combined with the photo-shoot timer makes it perfect for taking selfies and passports. Using the panorama feature, you can take photos of the best scenes and share them on media platforms.
Pros
- Simplicity is its main strength
- Supports resolutions above 1080p
- Good for photographers
Cons
- Has no built-in virtual webcam
- Requires a camera to support 4K videos
9. Fake Webcam
Supported file formats: AVI, MPEG, DVD, VCD, WMV, 3GP, MP4, SVCD, MOV, ASF,
Price: Free /paid
Operating systems: Windows 7/8/10 (32/64 bit)
Fake Webcam is a free webcam software Windows 10 whose name is creatively used to suggest it almost functions like a webcam. This doesn’t fall far from the truth! You can truly use this software to broadcast, add effects and filters, record on full screen, and fake your voice.
To share or stream your photos and videos on Skype, YIM, or Gtalk, using the screen recorder would give the best results. What makes Fake Webcam stand out is the free video converter and the free video toolkit.
Pros
- Free support tools
- Supports all video and audio formats
- Can convert file formats and stream to any channel
- Availability of the screen recorder
- Integratable with almost all instant messengers
Cons
- Major tools not free(Fake Webcam and Screen recorder)
10. IP Camera Viewer
Do you run a supermarket store, mall or you’ve installed security surveillance cameras in your compound? IP Camera Viewer is the most effective webcam software for video monitoring systems.
Supported file formats: JPEG, MPEG-4, MJPEG, and
Price: Free
Operating systems: Windows 10 / 8 / 7 /2012 /Vista and XP
IP Camera Viewer is the most used free webcam recording software for windows 10 as its compatible with almost all IP camera models like Panasonic, Toshiba, Canon, D-Link, Sony, and more the 2000 others. With the capability of viewing and controlling 4 camera feeds at once, you can use this software to monitor your entire compound.
Some of the important advanced IP Camera Viewer functions include listening to webcam audios, adjust image settings, zoom or tilt images, schedule monitoring times, and detect motions.
Pros
- Automatically uploads recorded videos and photos to a server
- Compatible with almost all IP camera models
- Simple and easy to use
Cons
- No inbuilt media player
- Cannot adjust the image or video quality
You may also want to read >>> 10 Best Webcams | A Buyer’s Guide
![]()
A cross-platform for making videos anywhere for all creators
Why your video editing isn’t good enough? How about some creative inspo?
- 100 Million+ Users
- 150+ Countries and Regions
- 4 Million+ Social Media Followers
- 5 Million+ Stock Media for Use
* Secure Download
FAQs about Webcam Software for Windows
1. What is Webcam Software?
A webcam is a video camera that feeds or streams images or video in real-time to or over a computer network. And webcam software enables users to record video or stream video over the Internet.
Webcam software is an application that allows you to capture video from your laptop/desktop webcam and record or stream video over the Internet. You can use them to deliver professional videos, streaming, and online courses easily.
2. Does Windows have built-in webcam software?
Windows 10 has an in-built webcam app called Camera that lets you record videos and take pictures with your webcam. This is definitely better than downloading 3rd party webcam recording software where spyware/malware is rampant.
3. Does a webcam need software?
Yes, if the camera hardware offers depth, low-light support, night vision, etc. If you use any software on the camera, these functions are only available if the driver is installed.
Conclusion
After a keen of all the webcam software above, it’s evident that every developer had an intended purpose. You cannot therefore just randomly wake up and download any without considering its functions, supported devices, file formats, and the auxiliary apps available. All this information is contained herein.
According to some users, there are free webcam software Windows 10 that more often would not show any video images but the audio is absolutely clear. To help your fellow user, what bad experience have you ever had after recording a game using webcam software ? Kindly share your comment or suggestion on our social media platforms.
Richard Bennett
Richard Bennett is a writer and a lover of all things video.
Follow @Richard Bennett
Create Engaging Stop Motion Content for Instagram: A Step-by-Step Guide
How to Make a Stop Motion Video on Instagram

Liza Brown
Mar 27, 2024• Proven solutions
Instagram’s announcement that the stop motion feature will become available in the Stories section created quite a buzz on the Internet, a while ago. In 2020, the feature remains relatively unknown to social media users, even though on paper it seemed promising.
Stop motion videos, are simply sequentially taken photos that create an illusion of movement once they are played one after the other. These types of videos are growing more popular on social media, as they can make Instagram stories or any other social media feed more interesting. You are at the right place if you would like to join video content creators who already produce stop motion videos because in this article we are going to show you how to make a stop motion video on Instagram.
Part 1: How to Make a Stop Motion Video on Instagram?
The technical side of making a stop motion video on Instagram is rather simple since you can enable this feature in just a few taps. After you launch the app, you should tap on the Camera icon in the upper left corner of the screen. The new window will open where you can choose the type of Instagram story you want to create, so you can pick to go live , record a video normally or use the app’s Boomerang feature.
You will find the Stop Motion option at the end of this menu, and after you tap on it you just have to press the white button in the middle of the toolbar that is located near the bottom of the screen in order to start taking pictures.
Currently, Instagram limits the number of photos you can take with the stop motion feature to ten. Tap on the Done button that is located at the top of the screen once you completed the process of making a stop motion video and then proceed to choose stickers you would like to include in the story you created. Press the Send To button and decide if you want to share the stop motion video to your Instagram or Facebook story or with some of your Instagram followers. ;
Check the ultimate guide about how to use Instagram Stories
Cons of Making Stop Motion Videos with Instagram
Even though Instagram’s new stop motion feature offers an easy way to make your stories more interesting, it still has a few downsides. Adding sound or music to stop motion videos you create with Instagram isn’t possible at the moment, and you can’t do much more other than downloading the video to your device.
Like all other Instagram stories, stop motion videos created with this app are only available for 24 hours if you don’t save them on your phone. Moreover, downloading the stories you create with Instagram ’s stop motion tool will enable you to edit them with video editing apps for iPhone and Android devices and post them to any social media platform you choose.
In addition, the maximum number of frames a stop motion video created with Instagram can have is limited to just ten.
Frequently Asked Questions: Why Can’t I See the Stop Motion Feature in Instagram Stories?
Instagram’s stop motion feature is still in its beta stage, which means that it isn’t available on all versions of the app. So, if you can’t see this option you must go to Google Play or Apps Store and install the version of Instagram that has this feature. If the issue persists, you should opt for some other stop motion app you can use free of charge. ;
Part 2: 3 Best Stop Motion Apps you can Use to Create Animated Videos for Instagram
You shouldn’t worry if the stop motion feature isn’t available on the version of Instagram you’re using, because there are so many apps that are equipped with this tool. With so many different options on the market, finding the app that provides you with all features you need to create stop motion videos can be a difficult task. That’s why we shortlisted the three best apps for iPhones and Android devices that enable you to make animated stop motion videos for Instagram.
1. Over
Price: Free, offers in-app purchase
Compatibility: iOS, Android
Over allows you to do much more than just create stop motion videos you can post on Instagram since it is equipped with a versatile set of tools that can help you improve the brand awareness on social media. There are more than 700 templates to choose from and each of them enables you to adjust your photos and videos to the social network’s demands. However, the free version of the app offers only limited capabilities, and you must upgrade to the Pro version if you want to have access to all photo and video editing tools Over have to offer.
2. Mojo
Price: Free, offers in-app purchases

Creating content for social media with Mojo is a simple process that can be completed in just three easy steps. You don’t even need a Mojo account to start creating stories with this app. All you have to do is select an animated template, import videos or photos and edit it before tapping on the share button. There are more than a hundred animated templates to choose from, so after you pick one, you just have to add text overlays , but you must purchase Mojo Pro if you want to change aspect ratios , duplicate stories or have access to all text styles and templates.
3. Life Lapse
Price: Free, offers in-app purchases

The fact that more than a million video content creators and brands are using Life Lapse to make stop motion videos says a lot about the app’s capabilities. Unlike Over and Mojo, Life Lapse lets you set the exposure and focus locks, switch on a grid or use the ghosted image overlay. Besides capturing photos and videos, the app also allows you to import photos you want to include in the stop motion animation. Furthermore, even the free version of Life Lapse offers a variety of video editing tools that allow you to crop images or adjust saturation, brightness or white balance values in each frame.
Check more video editing apps for Instagram
Part 3: How to Create a Stop Motion Videos with Life Lapse
You don’t have to be a skilled cinematographer to make a stop motion video using the Life Lapse app. Once you’ve installed and launched Life Lapse you should create a new project by tapping on the + icon. As soon as the camera loads you’ll be asked to choose if you would like to create a photo or a video project. Tap on the photo option and start taking photos of the objects or people you want to include in your stop motion video.
The app also grants you access to a broad range of tools that will make composing the shots easier or reduce the flickering effect. Even though Life Lapse doesn’t limit the maximum duration of the stop motion videos you can create with it, an Instagram story cannot be longer than 15 seconds. Furthermore, changing a video’s aspect ratio to 9:16 is recommended, as it will enable you to know exactly how your stop motion video is going to look like after you upload it to Instagram.
Part 4: Tips for Creating Stop Motion Videos for Instagram
The process of making a stop motion animation is not technically complicated since you just need to place your phone on a tripod and take a photo each time you move an object in the shot. Even so, working on a stop motion project requires previous preparations. Here are a few tips that will help you make a better stop motion animation video.
1. Develop a concept
What is your stop motion video about? This is the first and the most important question you will have to answer before you start making a stop motion video. Developing a concept will enable you to know which props you are going to need or how many actors you have to find before you can actually start shooting. Stop motion videos can be virtually about anything, and you should choose a story that will keep the audience interested from start to finish.
2. Shoot in studio conditions
Although it is not impossible to make a stop motion video in outdoor conditions, having control over sudden light changes is. That is why it is much better to shoot stop motion videos in studio-like conditions where you can easily adjust all the parameters in accordance with the demands of the project you’re working on. In addition, it is paramount to keep your phone perfectly steady, which is why it is better to mount it on a tripod than to shoot handheld.
Conclusion
Instagram’s stop motion feature is still under development and it may be some time before you can use it to create professional-looking videos. Apps like Over or Life Lapse are a much better option for all video content creators who would like to impress their audience with stop motion videos. Which app are you using to create stop motion videos? Leave a comment and let us know.
Liza Brown
Liza Brown is a writer and a lover of all things video.
Follow @Liza Brown
Liza Brown
Mar 27, 2024• Proven solutions
Instagram’s announcement that the stop motion feature will become available in the Stories section created quite a buzz on the Internet, a while ago. In 2020, the feature remains relatively unknown to social media users, even though on paper it seemed promising.
Stop motion videos, are simply sequentially taken photos that create an illusion of movement once they are played one after the other. These types of videos are growing more popular on social media, as they can make Instagram stories or any other social media feed more interesting. You are at the right place if you would like to join video content creators who already produce stop motion videos because in this article we are going to show you how to make a stop motion video on Instagram.
Part 1: How to Make a Stop Motion Video on Instagram?
The technical side of making a stop motion video on Instagram is rather simple since you can enable this feature in just a few taps. After you launch the app, you should tap on the Camera icon in the upper left corner of the screen. The new window will open where you can choose the type of Instagram story you want to create, so you can pick to go live , record a video normally or use the app’s Boomerang feature.
You will find the Stop Motion option at the end of this menu, and after you tap on it you just have to press the white button in the middle of the toolbar that is located near the bottom of the screen in order to start taking pictures.
Currently, Instagram limits the number of photos you can take with the stop motion feature to ten. Tap on the Done button that is located at the top of the screen once you completed the process of making a stop motion video and then proceed to choose stickers you would like to include in the story you created. Press the Send To button and decide if you want to share the stop motion video to your Instagram or Facebook story or with some of your Instagram followers. ;
Check the ultimate guide about how to use Instagram Stories
Cons of Making Stop Motion Videos with Instagram
Even though Instagram’s new stop motion feature offers an easy way to make your stories more interesting, it still has a few downsides. Adding sound or music to stop motion videos you create with Instagram isn’t possible at the moment, and you can’t do much more other than downloading the video to your device.
Like all other Instagram stories, stop motion videos created with this app are only available for 24 hours if you don’t save them on your phone. Moreover, downloading the stories you create with Instagram ’s stop motion tool will enable you to edit them with video editing apps for iPhone and Android devices and post them to any social media platform you choose.
In addition, the maximum number of frames a stop motion video created with Instagram can have is limited to just ten.
Frequently Asked Questions: Why Can’t I See the Stop Motion Feature in Instagram Stories?
Instagram’s stop motion feature is still in its beta stage, which means that it isn’t available on all versions of the app. So, if you can’t see this option you must go to Google Play or Apps Store and install the version of Instagram that has this feature. If the issue persists, you should opt for some other stop motion app you can use free of charge. ;
Part 2: 3 Best Stop Motion Apps you can Use to Create Animated Videos for Instagram
You shouldn’t worry if the stop motion feature isn’t available on the version of Instagram you’re using, because there are so many apps that are equipped with this tool. With so many different options on the market, finding the app that provides you with all features you need to create stop motion videos can be a difficult task. That’s why we shortlisted the three best apps for iPhones and Android devices that enable you to make animated stop motion videos for Instagram.
1. Over
Price: Free, offers in-app purchase
Compatibility: iOS, Android
Over allows you to do much more than just create stop motion videos you can post on Instagram since it is equipped with a versatile set of tools that can help you improve the brand awareness on social media. There are more than 700 templates to choose from and each of them enables you to adjust your photos and videos to the social network’s demands. However, the free version of the app offers only limited capabilities, and you must upgrade to the Pro version if you want to have access to all photo and video editing tools Over have to offer.
2. Mojo
Price: Free, offers in-app purchases
Creating content for social media with Mojo is a simple process that can be completed in just three easy steps. You don’t even need a Mojo account to start creating stories with this app. All you have to do is select an animated template, import videos or photos and edit it before tapping on the share button. There are more than a hundred animated templates to choose from, so after you pick one, you just have to add text overlays , but you must purchase Mojo Pro if you want to change aspect ratios , duplicate stories or have access to all text styles and templates.
3. Life Lapse
Price: Free, offers in-app purchases
The fact that more than a million video content creators and brands are using Life Lapse to make stop motion videos says a lot about the app’s capabilities. Unlike Over and Mojo, Life Lapse lets you set the exposure and focus locks, switch on a grid or use the ghosted image overlay. Besides capturing photos and videos, the app also allows you to import photos you want to include in the stop motion animation. Furthermore, even the free version of Life Lapse offers a variety of video editing tools that allow you to crop images or adjust saturation, brightness or white balance values in each frame.
Check more video editing apps for Instagram
Part 3: How to Create a Stop Motion Videos with Life Lapse
You don’t have to be a skilled cinematographer to make a stop motion video using the Life Lapse app. Once you’ve installed and launched Life Lapse you should create a new project by tapping on the + icon. As soon as the camera loads you’ll be asked to choose if you would like to create a photo or a video project. Tap on the photo option and start taking photos of the objects or people you want to include in your stop motion video.
The app also grants you access to a broad range of tools that will make composing the shots easier or reduce the flickering effect. Even though Life Lapse doesn’t limit the maximum duration of the stop motion videos you can create with it, an Instagram story cannot be longer than 15 seconds. Furthermore, changing a video’s aspect ratio to 9:16 is recommended, as it will enable you to know exactly how your stop motion video is going to look like after you upload it to Instagram.
Part 4: Tips for Creating Stop Motion Videos for Instagram
The process of making a stop motion animation is not technically complicated since you just need to place your phone on a tripod and take a photo each time you move an object in the shot. Even so, working on a stop motion project requires previous preparations. Here are a few tips that will help you make a better stop motion animation video.
1. Develop a concept
What is your stop motion video about? This is the first and the most important question you will have to answer before you start making a stop motion video. Developing a concept will enable you to know which props you are going to need or how many actors you have to find before you can actually start shooting. Stop motion videos can be virtually about anything, and you should choose a story that will keep the audience interested from start to finish.
2. Shoot in studio conditions
Although it is not impossible to make a stop motion video in outdoor conditions, having control over sudden light changes is. That is why it is much better to shoot stop motion videos in studio-like conditions where you can easily adjust all the parameters in accordance with the demands of the project you’re working on. In addition, it is paramount to keep your phone perfectly steady, which is why it is better to mount it on a tripod than to shoot handheld.
Conclusion
Instagram’s stop motion feature is still under development and it may be some time before you can use it to create professional-looking videos. Apps like Over or Life Lapse are a much better option for all video content creators who would like to impress their audience with stop motion videos. Which app are you using to create stop motion videos? Leave a comment and let us know.
Liza Brown
Liza Brown is a writer and a lover of all things video.
Follow @Liza Brown
Also read:
- 2024 Approved Movie Maker Showdown Comparing Androids Top Video Editing Apps
- Updated In 2024, The Top Reasons to Choose Mp3 Converter Windows for Your Audio Needs
- Updated In 2024, Expert Analysis Top OGG Converters and Their Capabilities
- Updated Top Video Editors for Newbies Free and Paid Options
- Make Your Own Lyric Videos Best Online Makers and Editors for 2024
- New Voiceover Your Videos with Ease Top 6 PC Software for 2024
- New Best Free Whiteboard Animation Software for PC and Mac 2024 Edition
- Streamline Your Videos 10 Top-Rated Free Online Video Trimmers for 2024
- Bringing Videos to Life in VR Expert Conversion Techniques for 2024
- Updated Sync Like a Pro Audio and Video Alignment in FCPX 2024
- Steady Shots Best Android Apps for Video Stabilization for 2024
- New In 2024, Unleashing the Magic Top Lego Stop Motion Artists
- New 2024 Approved Create Cartoon Avatars From Your Photos
- Updated From Clips to Masterpiece Pro Tips for Home Movie Editing
- Updated In 2024, FCPX Not Responding? Dont Panic! Learn How to Reset and Recover
- New In 2024, Create Stunning Animated Photos with These 8 Tools
- New In 2024, Fast Forward to Fun Top 10 Free Video Speed Controller Apps
- Updated Top 5 Free Online iMovie Alternatives 2023 Update for 2024
- 2024 Approved Create Stunning Animations with These iOS and Android Apps
- In 2024, The Ultimate YouTube MP3 Converter Guide
- New Make Your Own Cartoons Top-Rated Mobile Apps for 2024
- In 2024, Unleash Your Creativity Best Vignette Apps for iOS and Android Users
- In 2024, Best Split Screen Video Apps for iOS And Android
- Updated 2024 Approved How to Transfer Videos to DVD Discs on Windows and Mac Computers
- Updated 2024 Approved From Camera to Computer Editing Sony Camcorder Videos with Ease
- New In 2024, Picture to Cartoon Transformation Tool
- Updated In 2024, Get Ready for Dramatic Effects Add Slow Mo to Your Videos for Free
- Mac Alternatives to Windows Movie Maker Top Picks
- In 2024, Fixing Wobbly Videos A Beginners Guide to Stabilization in AE
- Updated Erase Distractions Top Video Blur Apps for Face and Background for 2024
- How to Soft Reset Vivo T2 5G phone? | Dr.fone
- Overview of the Best Honor Magic5 Ultimate Screen Mirroring App | Dr.fone
- In 2024, Android to Apple How To Transfer Photos From Infinix Zero 30 5G to iPad Easily | Dr.fone
- Ultimate Guide on Tecno Camon 20 Pro 5G FRP Bypass
- How to use iSpoofer on Nokia C12? | Dr.fone
- In 2024, Set Your Preferred Job Location on LinkedIn App of your Honor 90 GT | Dr.fone
- In 2024, Latest Guide How To Bypass Meizu 21 FRP Without Computer
- Apple ID Locked or Disabled From Apple iPhone 7 Plus? 7 Mehtods You Cant-Miss
- 2024 Approved Minecraft Pixel Art Is a Trending Subject, and They Simply Consist of In-Game Pixel Artworks, Besides the Minecraft Houses, Farms, or Cities. Lets Explore the Fantastic World of Minecraft Pixel Art
- Complete Tutorial for Asus ROG Phone 7 Ultimate Hard Reset | Dr.fone
- How to Come up With the Best Pokemon Team On Nokia XR21? | Dr.fone
- How to Transfer Data from Honor X50i+ to BlackBerry | Dr.fone
- New In 2024, Discover the Best Top-Rated Video Animation Apps for Android, iPhone, and iPad
- Updated FCP X Post-Production Mastering the Art of Chroma Keying
- New From Audio to Video What to Look Out for When Converting MP3 to MP4
- In 2024, Complete Tutorial to Use GPS Joystick to Fake GPS Location On Samsung Galaxy A05s | Dr.fone
- Title: 2024 Approved DVR Showdown TiVo Takes on Comcast
- Author: Emma
- Created at : 2024-05-19 05:47:26
- Updated at : 2024-05-20 05:47:26
- Link: https://video-ai-editor.techidaily.com/2024-approved-dvr-showdown-tivo-takes-on-comcast/
- License: This work is licensed under CC BY-NC-SA 4.0.
