
:max_bytes(150000):strip_icc():format(webp)/sb10069770n-003-56a104403df78cafdaa7dd48-ba41d70c51114343aaa38409d9cdfc3f.jpg)
In 2024, Mastering Time in FCPX Freeze Frames, Slow-Mo, and More
Mastering Time in FCPX: Freeze Frames, Slow-Mo, and More
Final Cut Pro X: Freeze-Frames and Slow Motion

Benjamin Arango
Mar 27, 2024• Proven solutions
A very simple, yet very effective effect is changing the speed of a video clip. This could be a simple still-frame (also called “Freeze Frame”) or playing a clip in slow or fast motion.
This article shows you how to do this using Final Cut Pro X.
For more tutorials on slow-motion please refer to this article: Top 10 Slow Motion Video Editing Software.
Freeze-Frames and Slow Motion in Final Cut Pro X
1. STILL FRAMES

A still-frame freezes action. For instance, here is a clip of a hummingbird getting ready to land on a bird feeder. I want to create a freeze-frame of the bird in flight. (Um, yeah, I use “freeze-frame” and “still-frame” interchangeably.)
In Final Cut Pro X, put the playhead (or skimmer) on the frame you want to freeze and type Option+F.

This creates a two-second freeze-frame at the position of the playhead.

Adjust the duration of the frame by trimming the edge; just like any other clip. Here, for example, I’m making the duration of the freeze-frame 11 frames shorter.

In case you were wondering, this is what the freeze looks like. It freezes the flight of the hummingbird in the middle of playback, allowing us to add graphics or other text then resume the action as though nothing had happened.
Very cool, except….
Well, the good news is that this is fast and easy. The bad news is that we can’t change the location of the still frame.
So, here’s another way to do this.
Put the playhead (or skimmer, but I prefer the playhead) on the frame you want to freeze, select the clip, then type Shift+F.

This locates the source clip in the Browser, selects both the Browser and the clip, and matches the position of the In, Out, and playhead.

Now, with the Browser selected, type Option+F. This creates a freeze-frame of the Browser clip and places it at the location of the playhead as a connected clip in the Timeline.
As a connected clip, we can move this new freeze-frame wherever we want. However, be careful in moving the clip, because, unless you mark the original frame with a marker (type “M”), there’s no easy way to match the still frame with the source frame, once the still frame is moved somewhere else.
I use both these techniques in many different projects.
2. HOLD FRAME
A Hold Frame is similar to an in-line still frame, but with more flexibility.

Put the playhead (or skimmer) on the frame you want to hold. Then, Then, using either Modify > Retime or the “Smurf-on-a-headset” Toolbar icon, choose Hold Frame (or type: Shift+H).

This displays the orange Retime editor bar above the clip, with a small red portion indicating the Hold frame.

Change the duration of the Hold frame by dragging the small thumb at the right end of the red bar.

Add a speed ramp transition at the end of the Hold frame by clicking the downward-pointing arrow next to the word “Hold” in the Retime Editor.

To change the actual frame being held, double-click the bar icon to the LEFT of the red Hold section and choose Source Frame (Edit). This allows you to slide the Hold frame selection left or right.
NOTE: Changing the source frame is a feature that I like a LOT!
3. SLOW (or FAST) MOTION

We use slow-motion to show events that are too fast for the unaided eye to see. And fast motion to speed up very slow events. Both of these effects use what’s called a “constant speed change,” where the entire clip changes by the same amount - either faster or slower.
WE create either effect using the same tools, just different values. Here’s how.

Select the clip who’s speed you want to change. Then, using either Modify > Retime or the “Smurf” Toolbar icon, select Slow (or Fast).
Choose one of the available speeds; in this case, 50%. (Yes, you can change this to any value you want, I’ll show you how in a minute.)

Three things happen at once:
- The duration of the clip changes
- The orange Retiming bar appears over the top of the clip
- The speed of the clip changes

To reset the speed back to normal (100%), click the downward-pointing arrow in the Retiming bar and choose Normal (100%).
There are two ways to change the speed of a clip.

The easy way is to grab the small handle at the end of the clip and drag left or right. The speed will change as you drag it.
Or, for more precision, click the downward-pointing arrow in the Retiming bar and choose Custom.

This opens a new dialog allowing a number of changes:
- Reverse. Plays the clip in reverse.
- Rate. Select a specific speed change as a percentage of normal speed for a clip. Less than 100% is slow-motion. More than 100% is fast-motion.
- Duration. Select a specific duration for a clip and FCP X will calculate how fast or slow it needs to go.
- Ripple. When checked, adjusts the duration of a clip based upon the speed. When unchecked, the clip duration remains fixed even when speed changes.
You will get the smoothest speed changes when the percentage you choose divides evenly into 200. For example, 100, 66, 50, 40, 33, 25, 20, 10 and so on.
4. EXTRA CREDIT
There is one more setting to consider when slowing a clip. (This does not apply when creating fast motion.)

Using, again, either Modify > Retime or the “Smurf” menu, select Video Quality.
- Normal. This is the best choice for speeds of 50% or faster.
- Frame Blending. This is the best choice for speeds of about 20% to 50%.
- Optical Flow. This is the best choice for speeds slower than about 20%.
Frame blending puts a short dissolve between frames when running in slow motion to improve the illusion of motion. Optical Flow invents in-between frames to minimize the jerkiness of extremely slow motion.
Frame blending is relatively fast and easy. Optical Flow will look better in most cases, but takes a long time to render.
This is a basic tutorial about Apple Final Cut Pro X, a professional video editing software. However, if video editing is new to you, consider Wondershare Filmora for Mac . This is a powerful but easy-to-use tool for users just starting out. Download the free trial version below.
 Download Mac Version ](https://tools.techidaily.com/wondershare/filmora/download/ )
SUMMARY
Whether you want your clips to speed up, slow down or just plain stop, Final Cut Pro X makes the entire process easy.
Benjamin Arango
Benjamin Arango is a writer and a lover of all things video.
Follow @Benjamin Arango
Benjamin Arango
Mar 27, 2024• Proven solutions
A very simple, yet very effective effect is changing the speed of a video clip. This could be a simple still-frame (also called “Freeze Frame”) or playing a clip in slow or fast motion.
This article shows you how to do this using Final Cut Pro X.
For more tutorials on slow-motion please refer to this article: Top 10 Slow Motion Video Editing Software.
Freeze-Frames and Slow Motion in Final Cut Pro X
1. STILL FRAMES
A still-frame freezes action. For instance, here is a clip of a hummingbird getting ready to land on a bird feeder. I want to create a freeze-frame of the bird in flight. (Um, yeah, I use “freeze-frame” and “still-frame” interchangeably.)
In Final Cut Pro X, put the playhead (or skimmer) on the frame you want to freeze and type Option+F.
This creates a two-second freeze-frame at the position of the playhead.
Adjust the duration of the frame by trimming the edge; just like any other clip. Here, for example, I’m making the duration of the freeze-frame 11 frames shorter.
In case you were wondering, this is what the freeze looks like. It freezes the flight of the hummingbird in the middle of playback, allowing us to add graphics or other text then resume the action as though nothing had happened.
Very cool, except….
Well, the good news is that this is fast and easy. The bad news is that we can’t change the location of the still frame.
So, here’s another way to do this.
Put the playhead (or skimmer, but I prefer the playhead) on the frame you want to freeze, select the clip, then type Shift+F.
This locates the source clip in the Browser, selects both the Browser and the clip, and matches the position of the In, Out, and playhead.
Now, with the Browser selected, type Option+F. This creates a freeze-frame of the Browser clip and places it at the location of the playhead as a connected clip in the Timeline.
As a connected clip, we can move this new freeze-frame wherever we want. However, be careful in moving the clip, because, unless you mark the original frame with a marker (type “M”), there’s no easy way to match the still frame with the source frame, once the still frame is moved somewhere else.
I use both these techniques in many different projects.
2. HOLD FRAME
A Hold Frame is similar to an in-line still frame, but with more flexibility.
Put the playhead (or skimmer) on the frame you want to hold. Then, Then, using either Modify > Retime or the “Smurf-on-a-headset” Toolbar icon, choose Hold Frame (or type: Shift+H).
This displays the orange Retime editor bar above the clip, with a small red portion indicating the Hold frame.
Change the duration of the Hold frame by dragging the small thumb at the right end of the red bar.
Add a speed ramp transition at the end of the Hold frame by clicking the downward-pointing arrow next to the word “Hold” in the Retime Editor.
To change the actual frame being held, double-click the bar icon to the LEFT of the red Hold section and choose Source Frame (Edit). This allows you to slide the Hold frame selection left or right.
NOTE: Changing the source frame is a feature that I like a LOT!
3. SLOW (or FAST) MOTION
We use slow-motion to show events that are too fast for the unaided eye to see. And fast motion to speed up very slow events. Both of these effects use what’s called a “constant speed change,” where the entire clip changes by the same amount - either faster or slower.
WE create either effect using the same tools, just different values. Here’s how.
Select the clip who’s speed you want to change. Then, using either Modify > Retime or the “Smurf” Toolbar icon, select Slow (or Fast).
Choose one of the available speeds; in this case, 50%. (Yes, you can change this to any value you want, I’ll show you how in a minute.)
Three things happen at once:
- The duration of the clip changes
- The orange Retiming bar appears over the top of the clip
- The speed of the clip changes
To reset the speed back to normal (100%), click the downward-pointing arrow in the Retiming bar and choose Normal (100%).
There are two ways to change the speed of a clip.
The easy way is to grab the small handle at the end of the clip and drag left or right. The speed will change as you drag it.
Or, for more precision, click the downward-pointing arrow in the Retiming bar and choose Custom.
This opens a new dialog allowing a number of changes:
- Reverse. Plays the clip in reverse.
- Rate. Select a specific speed change as a percentage of normal speed for a clip. Less than 100% is slow-motion. More than 100% is fast-motion.
- Duration. Select a specific duration for a clip and FCP X will calculate how fast or slow it needs to go.
- Ripple. When checked, adjusts the duration of a clip based upon the speed. When unchecked, the clip duration remains fixed even when speed changes.
You will get the smoothest speed changes when the percentage you choose divides evenly into 200. For example, 100, 66, 50, 40, 33, 25, 20, 10 and so on.
4. EXTRA CREDIT
There is one more setting to consider when slowing a clip. (This does not apply when creating fast motion.)
Using, again, either Modify > Retime or the “Smurf” menu, select Video Quality.
- Normal. This is the best choice for speeds of 50% or faster.
- Frame Blending. This is the best choice for speeds of about 20% to 50%.
- Optical Flow. This is the best choice for speeds slower than about 20%.
Frame blending puts a short dissolve between frames when running in slow motion to improve the illusion of motion. Optical Flow invents in-between frames to minimize the jerkiness of extremely slow motion.
Frame blending is relatively fast and easy. Optical Flow will look better in most cases, but takes a long time to render.
This is a basic tutorial about Apple Final Cut Pro X, a professional video editing software. However, if video editing is new to you, consider Wondershare Filmora for Mac . This is a powerful but easy-to-use tool for users just starting out. Download the free trial version below.
Download Mac Version ](https://tools.techidaily.com/wondershare/filmora/download/ )
SUMMARY
Whether you want your clips to speed up, slow down or just plain stop, Final Cut Pro X makes the entire process easy.
Benjamin Arango
Benjamin Arango is a writer and a lover of all things video.
Follow @Benjamin Arango
The Art of Aspect Ratio: How It Shapes Your YouTube Video’s Narrative and Style
How Different YouTube Aspect Ratio Affect Your Video Style
An easy yet powerful editor
Numerous effects to choose from
Detailed tutorials provided by the official channel
The aspect ratio gets changed for different social media platforms. YouTube aspect ratio is quite different from others and here is all that you must know about it.
In this article
01 [How Different YouTube Aspect Ratio Affect Your Video Style ](#Part 1)
02 [How to Make Your Videos Look Their Best?](#Part 2)
Part 1 Is 18:9 the BEST Aspect Ratio for YouTube?
YouTube is considered to be a wider platform than those others are. Moreover, people get each type of video here and this is the reason why it becomes the best platform to make a reach to massive audience and promote your brand. However, it is worth considering having a proper YouTube video size ratio.

01How to Change Aspect Ratio to 18:9 for BETTER Videos

02What Is the Best Size For a YouTube Video/YouTube Image Sizes?
It is important to know that the YouTube ratio for videos and images may vary. However, the size is not only meant by the dimensions. Resolution and aspect ratio are also equally important for having the perfect size of the video and images. When you talk about the videos, the best dimension and resolution is considered to be 1080 by 1920p. Similarly, the aspect ratio for these videos is 16:When you create short video on YouTube then this youtube shorts aspect ratio remains the same because videos in this resolution and aspect ratio perform the best as they are in full HD.
Talking about videos, YouTube images cannot be neglected. If you will not follow the recommended size of YouTube images then you may have to face issues in posting them. YouTube images are at best when they are posted in the perfect size. Banner images on YouTube must be posted in the size of 2560 by 1440 pixels. Size of images may also change depending on the device that you are using. This can be different on desktops and tablets accordingly. On desktops, the size is 2560 by 423 and on tablets, the size becomes 1855 by 423.

03What Is the Best Frame Rate For a YouTube Video?
Frame rate is another important aspect to focus on when you are taking about posting content on YouTube. This is so important because without frame rate your video will not get the desired quality. It is must to know thing that video which you are posting must be in the actual and same frame rate in which it has been recorded. The most common frame rates for YouTube videos are 24, 48, 30, 25 and 60. However you can post the videos in any other frame rate but these are recommended the most.
It is equally important to deinterlace the content before you are posting it. This means if your video has 1080i60p and you want to convert it into 1080i30p then you will need to change the frame rate first.

Part 2 How to Make Your Videos Look Their Best?
01The Right YouTube Dimensions
You can upload videos of so many different dimensions and sizes. These start from 240P to 2160P. The smallest dimension of YouTube videos is 426 by 240 pixels. However, the largest dimensions may go till 3840 by 2160 pixels. YouTube allows all the video dimensions between these ranges. The most accurate YouTube dimension is 1920 by 1080 pixels. The guidelines that are followed on YouTube videos are pretty clear. You can get the quality of 4K if you go for the highest dimension and the quality decreases as you decrease the dimension of your video.

02Ways to Change YouTube Video Sizes
As a YouTube user, you have the option to change the video sizes and resolution so that you can get a vivid viewing experience of your videos. This may also boost the audience number on your videos. To change the video size of YouTube, you will just need to follow some simple steps that are mentioned here:
Step 1: First of all, you will have to open the video whose size you want to change. After this you will have to open the setting option from the icons that are displayed below the video.
Step 2: After opening the settings icon, you will find the option of quality. Choose that option and there you will see a list of dimensions amongst which you have to choose the one in which you wish to put your video. For example it may be 720p or less and more.
Step 3: As soon you choose the dimension or resolution the next step you have to do is go for it and click on save option and your video size is changed.
03How to Record YouTube Videos with the Right Dimensions
As you know the most familiar YouTube video aspect ratio is 16:9, so the videos cannot be created in the vertical mode. Keep in mind that you create the videos in horizontal mode. This will look professional as well as will boost your video quality too. Also it is worth considering that the video dimensions matter a lot when you are creating the videos. Do consider the device that you are using to create the video as many devices can create the videos in the highest resolution possible.
You must also know that videos with higher dimension and resolution need more space so before making the videos do have a check on your storage space too. It is also a good idea to maintain the balance between high quality videos and your storage space.
04How to Create YouTube Thumbnails That Get More Clicks
Every video creator wishes that his videos get more views. This is only possible when you will have excellent and engaging thumbnails so that they get more clicks. Here are some ideas that you can opt for your video thumbnail in order to get it more audience and views:
● Go for video still: It will be an interesting idea to add video still to your YouTube videos. By doing so you can give your audience an excitement about what they are going to experience. Video still can do the work of giving a glance to your audience and afterwards if they will see the similar things then they will be satisfied about what your deliver to them.
● Boost curiosity: sparking curiosity in your audience is another way to get more clicks on your videos thumbnails. Being curious about a particular topic makes the viewer stay up to the end. Suppose that if you pass the same message that they can easily guess then they will lose interest in your video. Try to have some spark of curiosity in the videos which will make them more engaging.
● Perk of using contrasting colors: As far YouTube videos are concerned using colors is neglected but it can be a perk to your videos and thumbnails. You can use colors to make your videos look notable and eye-catching and also suiting the YouTube platform. Colors are powerful to draw your audience’s attention but for making it hold you will have to add other elements also.
● Using the correct tools: Without proper editing, video creation is of no use. You will need to edit your videos wisely and make sure to add sparking elements to them. You may get many tools like Filmora, which can do the desired work for you. Choosing w**Wondershare Filmora Video Editor ** can be beneficial for you as you will get so many extraordinary features in this tool. Features of Filmora tool are as follows:
● This tool allows you to choose amongst several formats with a number of editing options.
● You can get a proper storage for your videos so that you need not to worry about the storage in your device.
● Videos created by this tool are of high quality and also you can create them in highest resolutions.
● You can use the feature of removing background sound and music to make your videos more appreciable.
● There are 100 layers of media to create amazing videos here.
For Win 7 or later (64-bit)
For macOS 10.12 or later
Key Takeaways from This Episode
● YouTube has the second largest audience when it comes to any social media platform. This is the reason why branding your products here is a worth investing idea.
● As each platform have different technical requirements so as YouTube. There are several things to consider while creating video to upload on YouTube. These things include correct size and dimensions, YouTube video ratio, accuratesounds, etc.
● To boost the brand and market value, these technical requirements play an important role. To meet these requirements, various tools like Filmora, etc. are used. These tools make the videos more engaging and impressive so that it can make a reach to larger audience.
The aspect ratio gets changed for different social media platforms. YouTube aspect ratio is quite different from others and here is all that you must know about it.
In this article
01 [How Different YouTube Aspect Ratio Affect Your Video Style ](#Part 1)
02 [How to Make Your Videos Look Their Best?](#Part 2)
Part 1 Is 18:9 the BEST Aspect Ratio for YouTube?
YouTube is considered to be a wider platform than those others are. Moreover, people get each type of video here and this is the reason why it becomes the best platform to make a reach to massive audience and promote your brand. However, it is worth considering having a proper YouTube video size ratio.
01How to Change Aspect Ratio to 18:9 for BETTER Videos
02What Is the Best Size For a YouTube Video/YouTube Image Sizes?
It is important to know that the YouTube ratio for videos and images may vary. However, the size is not only meant by the dimensions. Resolution and aspect ratio are also equally important for having the perfect size of the video and images. When you talk about the videos, the best dimension and resolution is considered to be 1080 by 1920p. Similarly, the aspect ratio for these videos is 16:When you create short video on YouTube then this youtube shorts aspect ratio remains the same because videos in this resolution and aspect ratio perform the best as they are in full HD.
Talking about videos, YouTube images cannot be neglected. If you will not follow the recommended size of YouTube images then you may have to face issues in posting them. YouTube images are at best when they are posted in the perfect size. Banner images on YouTube must be posted in the size of 2560 by 1440 pixels. Size of images may also change depending on the device that you are using. This can be different on desktops and tablets accordingly. On desktops, the size is 2560 by 423 and on tablets, the size becomes 1855 by 423.
03What Is the Best Frame Rate For a YouTube Video?
Frame rate is another important aspect to focus on when you are taking about posting content on YouTube. This is so important because without frame rate your video will not get the desired quality. It is must to know thing that video which you are posting must be in the actual and same frame rate in which it has been recorded. The most common frame rates for YouTube videos are 24, 48, 30, 25 and 60. However you can post the videos in any other frame rate but these are recommended the most.
It is equally important to deinterlace the content before you are posting it. This means if your video has 1080i60p and you want to convert it into 1080i30p then you will need to change the frame rate first.
Part 2 How to Make Your Videos Look Their Best?
01The Right YouTube Dimensions
You can upload videos of so many different dimensions and sizes. These start from 240P to 2160P. The smallest dimension of YouTube videos is 426 by 240 pixels. However, the largest dimensions may go till 3840 by 2160 pixels. YouTube allows all the video dimensions between these ranges. The most accurate YouTube dimension is 1920 by 1080 pixels. The guidelines that are followed on YouTube videos are pretty clear. You can get the quality of 4K if you go for the highest dimension and the quality decreases as you decrease the dimension of your video.
02Ways to Change YouTube Video Sizes
As a YouTube user, you have the option to change the video sizes and resolution so that you can get a vivid viewing experience of your videos. This may also boost the audience number on your videos. To change the video size of YouTube, you will just need to follow some simple steps that are mentioned here:
Step 1: First of all, you will have to open the video whose size you want to change. After this you will have to open the setting option from the icons that are displayed below the video.
Step 2: After opening the settings icon, you will find the option of quality. Choose that option and there you will see a list of dimensions amongst which you have to choose the one in which you wish to put your video. For example it may be 720p or less and more.
Step 3: As soon you choose the dimension or resolution the next step you have to do is go for it and click on save option and your video size is changed.
03How to Record YouTube Videos with the Right Dimensions
As you know the most familiar YouTube video aspect ratio is 16:9, so the videos cannot be created in the vertical mode. Keep in mind that you create the videos in horizontal mode. This will look professional as well as will boost your video quality too. Also it is worth considering that the video dimensions matter a lot when you are creating the videos. Do consider the device that you are using to create the video as many devices can create the videos in the highest resolution possible.
You must also know that videos with higher dimension and resolution need more space so before making the videos do have a check on your storage space too. It is also a good idea to maintain the balance between high quality videos and your storage space.
04How to Create YouTube Thumbnails That Get More Clicks
Every video creator wishes that his videos get more views. This is only possible when you will have excellent and engaging thumbnails so that they get more clicks. Here are some ideas that you can opt for your video thumbnail in order to get it more audience and views:
● Go for video still: It will be an interesting idea to add video still to your YouTube videos. By doing so you can give your audience an excitement about what they are going to experience. Video still can do the work of giving a glance to your audience and afterwards if they will see the similar things then they will be satisfied about what your deliver to them.
● Boost curiosity: sparking curiosity in your audience is another way to get more clicks on your videos thumbnails. Being curious about a particular topic makes the viewer stay up to the end. Suppose that if you pass the same message that they can easily guess then they will lose interest in your video. Try to have some spark of curiosity in the videos which will make them more engaging.
● Perk of using contrasting colors: As far YouTube videos are concerned using colors is neglected but it can be a perk to your videos and thumbnails. You can use colors to make your videos look notable and eye-catching and also suiting the YouTube platform. Colors are powerful to draw your audience’s attention but for making it hold you will have to add other elements also.
● Using the correct tools: Without proper editing, video creation is of no use. You will need to edit your videos wisely and make sure to add sparking elements to them. You may get many tools like Filmora, which can do the desired work for you. Choosing w**Wondershare Filmora Video Editor ** can be beneficial for you as you will get so many extraordinary features in this tool. Features of Filmora tool are as follows:
● This tool allows you to choose amongst several formats with a number of editing options.
● You can get a proper storage for your videos so that you need not to worry about the storage in your device.
● Videos created by this tool are of high quality and also you can create them in highest resolutions.
● You can use the feature of removing background sound and music to make your videos more appreciable.
● There are 100 layers of media to create amazing videos here.
For Win 7 or later (64-bit)
For macOS 10.12 or later
Key Takeaways from This Episode
● YouTube has the second largest audience when it comes to any social media platform. This is the reason why branding your products here is a worth investing idea.
● As each platform have different technical requirements so as YouTube. There are several things to consider while creating video to upload on YouTube. These things include correct size and dimensions, YouTube video ratio, accuratesounds, etc.
● To boost the brand and market value, these technical requirements play an important role. To meet these requirements, various tools like Filmora, etc. are used. These tools make the videos more engaging and impressive so that it can make a reach to larger audience.
FCP in the Spotlight: 10 Renowned Movies Made with Final Cut Pro
Top 10 Famous Movies Made By Final Cut Pro
Benjamin Arango
Mar 27, 2024• Proven solutions
Developed as video editing software that has been developed by Apple, Final Cut Pro began life as software designed to made simple video editing accessible for video hobbyists and independent filmmakers. However, in recent years the capabilities of Final Cut Pro have evolved significantly and we are now seeing major Hollywood movies also being edited with this software.
Do you want to turn your own video into a Hollywood film-like video? Check this guide on How to make big-budget cinematic look video with Final Cut Pro.
You may also like: 8 Best Movie Trailer Template for After Effects
Top 10 Movies Made by Final Cut Pro
Let’s take a look at ten major movies that have been edited using Final Cut Pro.

1. The Social Network (2010)
Based on the rise of the phenomenon that we now know as Facebook, The Social Network starred Jesse Eisenberg, Andrew Garfield and Justin Timberlake. The movie performed well at the box office and was also positively received by movie critics.
The film won an Academy Award for Best Editing, collected by Kirk Baxter and Angus Wall. They used Final Cut Pro to edit the film, and one of the things they really like about the software is the ability to do multiple timelines. Final Cut Pro was also used in this movie to enable face replacement in a number of scenes. Two of the key characters in the movie are twins, and so the scenes were filmed with actors (who weren’t twins) and then the editing software was used to create the illusion that they were twins. Digital matte paintings was another feature of this movie that relied on the functionality of Final Cut Pro.

2. The Girl with the Dragon Tattoo (2011)
This was the US adaptation of the earlier Swedish film of the same name - based on the novel by Stieg Larsson. Starring Daniel Craig and Rooney Mara, the story is a crime thriller trying to uncover the secrets surrounding the disappearance of a young girl from a wealthy family.
One of the challenges with this movie was that there were a lot of invisible effects throughout the film. Final Cut Pro was used to achieve the shot stabilization and the visual enhancements - everything from matte painting to creating seasonal elements such as snow.

3. John Carter (2011)
A science fiction adventure, this film performed so badly at the box office that it caused major financial problems for its studio Disney.
The editing of the John Carter movie was a particular challenge as a lot of the action was shot twice during the troubled production. The editor Eric Zumbrunnen used Final Cut Pro to piece the various elements together. With a huge range of CGI and creature effects to deal with, the editing process on this movie was extremely complex. Final Cut Pro was used to create a lot of the background detail need to bring the green screen scenes to life.

4. 500 Days of Summer (2009)
This was a cute, quirky romantic comedy starring Joseph Gordon-Levitt and Zooey Deschanel.
Editing on the movie was by Alan Edward Bell in DVCPro HD format on Final Cut Pro. Because the storyline of the movie unfolds in a non-linear timeline, the workflow feature of Final Cut Pro made it easier to manage the sequencing of the different scenes. There were also 250 invisible effects which were created using Final Cut Pro’s editing features.

5. X-Men Origins: Wolverine (2009)
Continuing the X-Men franchise, this installment traces Wolverine’s childhood and the relationship with his brother. It didn’t really appeal to X-Men fans or movie critics.
Editing on the movie was by Nicolas De Toth and Megan Gill. There were a number of continuity glitches identified during the production of this movie but De Toth and Gill used Final Pro Cut to keep a consistent flow to the narrative. What is interesting about the editing on this movie is that all the cutting of the scenes required was done on Final Cut Pro 5, taking advantage of the software’s HD abilities and also the multi-clip features.

6. Burn After Reading (2008)
A black comedy from the talented brothers Joel and Ethan Coen, they wrote, produced, edited, and directed the movie.
The Coen brothers used Final Cut Pro on this movie because it was simple and easy to use - they were blocking together the rough cuts as the scenes were being shot, and Final Cut Pro gave them the flexibility that they needed to edit quickly. On this movie most of the action was shot using Sony cameras but there were several scenes on which a RED camera was added when an additional camera was needed. Even though there is a significantly different workflow between the two types of camera, the RED material was able to be integrated smoothly with the Sony footage.

7. No Country for Old Men (2007)
A neo-Western thriller from Coen brothers. They directed, wrote, and edited this production.
The movie was also nominated for an Academy Award for Best Editing for editor Roderick Jaynes (a pseudonym for Joel and Ethan Coen).
Directing and editing a movie brings the two processes a lot closer together for the Coen brothers. An easy to use product such as Final Cut Pro ensures that they can construct the movie’s narrative using the timeline features of the product. This movie marked a chance in approach for the Coen brothers, who took advantage of the better resolution DVCPRO HD for their cutting process compared to earlier films that were cut at DV resolution.

8. 300 (2007)
Based on a graphic novel by Frank Miller, this is the fictionalized retelling of the Battle Termopylae - part of the Persian Wars. Directed by Zack Snyder, the movie was filmed with a super-imposition chroma key technique to help replicate the imagery of the original comic book. Editing on the movie was by William Hoy.
To capture the graphic novel look and feel of the film’s images, editor Hoy used a number of the key Final Cut Pro features such as the adjustment layer and blending modes to create depth and mood. With the look and feel of this movie so dependent on the effects created, editor Hoy spent a lot of time debating what was being added visually to each shot and how this would impact the length and continuity of each scene.

9. Sky Captain and the World of Tomorrow (2004)
With big name stars (Gwyneth Paltrow and Jude Law), this was an unusual film that used digital artists to build multi-layered 2D and 3D backgrounds for live action footage, with hand-drawn storyboards recreated as computer-generated 3D animatics. Critically it was well received but didn’t set the box office alight.
Editing on the movie was by Sabrina Plisco.
Final Cut Pro was particularly critical to create a scene between two characters that was shot in a physical set (unlike the digital soundstage that was used for the rest of the movie). Final Cut Pro allowed the filmmakers to line up the animatics with the live onstage footage. One of the challenges with this movie is that the editors had to manually assign time-codes to each take - the clips were then rendered out and sorted so that they could be used on a Final Cut Pro SD workstation. This approach was also used to create the master off-line cut. Batch lists of the cuts were then imported into Final Cut Pro.

10. Cold Mountain (2003)
This is an epic Civil War drama based on the novel by Charles Frazier. Starring Jude Law, Nicole Kidman, and Renee Zellweger this was critically acclaimed and performed reasonably well at the box office.
The movie was also nominated for an Academy Award for Best Editing let by editor Walter Murch.
This was really seen as the breakthrough movie for the use of Final Cut Pro in Hollywood Movies. An entire book has been produced analysing how editor Murch used Final Cut Pro to edit the movie and analysis its impact on future cinema productions. Editor Murch believes that the use of Final Cut Pro on this movie indirected affected the ultimate creative outcome. In particular, the use of the DVD authoring capabilities on Final Cut Pro meant that the editing team was able to look at the material more often, sharing it with more people, and changing the way that they looked at certain scenes.
While Hollywood movies require editing tools of the highest order, the range of effects that you can achieve using Final Cut Pro is impressive - as well as the standard ripple, roll, slip, slide, scrub, razor blade and time remapping edit functions, Final Cut Pro also comes with a range of video transitions and a range of video and audio filters that will take your film project to the next level.
It is clear that Final Cut Pro is definitely now a star in the editing of Hollywood movies, it is time to make it a star in editing your movies as well.
Benjamin Arango
Benjamin Arango is a writer and a lover of all things video.
Follow @Benjamin Arango
Benjamin Arango
Mar 27, 2024• Proven solutions
Developed as video editing software that has been developed by Apple, Final Cut Pro began life as software designed to made simple video editing accessible for video hobbyists and independent filmmakers. However, in recent years the capabilities of Final Cut Pro have evolved significantly and we are now seeing major Hollywood movies also being edited with this software.
Do you want to turn your own video into a Hollywood film-like video? Check this guide on How to make big-budget cinematic look video with Final Cut Pro.
You may also like: 8 Best Movie Trailer Template for After Effects
Top 10 Movies Made by Final Cut Pro
Let’s take a look at ten major movies that have been edited using Final Cut Pro.
1. The Social Network (2010)
Based on the rise of the phenomenon that we now know as Facebook, The Social Network starred Jesse Eisenberg, Andrew Garfield and Justin Timberlake. The movie performed well at the box office and was also positively received by movie critics.
The film won an Academy Award for Best Editing, collected by Kirk Baxter and Angus Wall. They used Final Cut Pro to edit the film, and one of the things they really like about the software is the ability to do multiple timelines. Final Cut Pro was also used in this movie to enable face replacement in a number of scenes. Two of the key characters in the movie are twins, and so the scenes were filmed with actors (who weren’t twins) and then the editing software was used to create the illusion that they were twins. Digital matte paintings was another feature of this movie that relied on the functionality of Final Cut Pro.
2. The Girl with the Dragon Tattoo (2011)
This was the US adaptation of the earlier Swedish film of the same name - based on the novel by Stieg Larsson. Starring Daniel Craig and Rooney Mara, the story is a crime thriller trying to uncover the secrets surrounding the disappearance of a young girl from a wealthy family.
One of the challenges with this movie was that there were a lot of invisible effects throughout the film. Final Cut Pro was used to achieve the shot stabilization and the visual enhancements - everything from matte painting to creating seasonal elements such as snow.
3. John Carter (2011)
A science fiction adventure, this film performed so badly at the box office that it caused major financial problems for its studio Disney.
The editing of the John Carter movie was a particular challenge as a lot of the action was shot twice during the troubled production. The editor Eric Zumbrunnen used Final Cut Pro to piece the various elements together. With a huge range of CGI and creature effects to deal with, the editing process on this movie was extremely complex. Final Cut Pro was used to create a lot of the background detail need to bring the green screen scenes to life.
4. 500 Days of Summer (2009)
This was a cute, quirky romantic comedy starring Joseph Gordon-Levitt and Zooey Deschanel.
Editing on the movie was by Alan Edward Bell in DVCPro HD format on Final Cut Pro. Because the storyline of the movie unfolds in a non-linear timeline, the workflow feature of Final Cut Pro made it easier to manage the sequencing of the different scenes. There were also 250 invisible effects which were created using Final Cut Pro’s editing features.
5. X-Men Origins: Wolverine (2009)
Continuing the X-Men franchise, this installment traces Wolverine’s childhood and the relationship with his brother. It didn’t really appeal to X-Men fans or movie critics.
Editing on the movie was by Nicolas De Toth and Megan Gill. There were a number of continuity glitches identified during the production of this movie but De Toth and Gill used Final Pro Cut to keep a consistent flow to the narrative. What is interesting about the editing on this movie is that all the cutting of the scenes required was done on Final Cut Pro 5, taking advantage of the software’s HD abilities and also the multi-clip features.
6. Burn After Reading (2008)
A black comedy from the talented brothers Joel and Ethan Coen, they wrote, produced, edited, and directed the movie.
The Coen brothers used Final Cut Pro on this movie because it was simple and easy to use - they were blocking together the rough cuts as the scenes were being shot, and Final Cut Pro gave them the flexibility that they needed to edit quickly. On this movie most of the action was shot using Sony cameras but there were several scenes on which a RED camera was added when an additional camera was needed. Even though there is a significantly different workflow between the two types of camera, the RED material was able to be integrated smoothly with the Sony footage.
7. No Country for Old Men (2007)
A neo-Western thriller from Coen brothers. They directed, wrote, and edited this production.
The movie was also nominated for an Academy Award for Best Editing for editor Roderick Jaynes (a pseudonym for Joel and Ethan Coen).
Directing and editing a movie brings the two processes a lot closer together for the Coen brothers. An easy to use product such as Final Cut Pro ensures that they can construct the movie’s narrative using the timeline features of the product. This movie marked a chance in approach for the Coen brothers, who took advantage of the better resolution DVCPRO HD for their cutting process compared to earlier films that were cut at DV resolution.
8. 300 (2007)
Based on a graphic novel by Frank Miller, this is the fictionalized retelling of the Battle Termopylae - part of the Persian Wars. Directed by Zack Snyder, the movie was filmed with a super-imposition chroma key technique to help replicate the imagery of the original comic book. Editing on the movie was by William Hoy.
To capture the graphic novel look and feel of the film’s images, editor Hoy used a number of the key Final Cut Pro features such as the adjustment layer and blending modes to create depth and mood. With the look and feel of this movie so dependent on the effects created, editor Hoy spent a lot of time debating what was being added visually to each shot and how this would impact the length and continuity of each scene.
9. Sky Captain and the World of Tomorrow (2004)
With big name stars (Gwyneth Paltrow and Jude Law), this was an unusual film that used digital artists to build multi-layered 2D and 3D backgrounds for live action footage, with hand-drawn storyboards recreated as computer-generated 3D animatics. Critically it was well received but didn’t set the box office alight.
Editing on the movie was by Sabrina Plisco.
Final Cut Pro was particularly critical to create a scene between two characters that was shot in a physical set (unlike the digital soundstage that was used for the rest of the movie). Final Cut Pro allowed the filmmakers to line up the animatics with the live onstage footage. One of the challenges with this movie is that the editors had to manually assign time-codes to each take - the clips were then rendered out and sorted so that they could be used on a Final Cut Pro SD workstation. This approach was also used to create the master off-line cut. Batch lists of the cuts were then imported into Final Cut Pro.
10. Cold Mountain (2003)
This is an epic Civil War drama based on the novel by Charles Frazier. Starring Jude Law, Nicole Kidman, and Renee Zellweger this was critically acclaimed and performed reasonably well at the box office.
The movie was also nominated for an Academy Award for Best Editing let by editor Walter Murch.
This was really seen as the breakthrough movie for the use of Final Cut Pro in Hollywood Movies. An entire book has been produced analysing how editor Murch used Final Cut Pro to edit the movie and analysis its impact on future cinema productions. Editor Murch believes that the use of Final Cut Pro on this movie indirected affected the ultimate creative outcome. In particular, the use of the DVD authoring capabilities on Final Cut Pro meant that the editing team was able to look at the material more often, sharing it with more people, and changing the way that they looked at certain scenes.
While Hollywood movies require editing tools of the highest order, the range of effects that you can achieve using Final Cut Pro is impressive - as well as the standard ripple, roll, slip, slide, scrub, razor blade and time remapping edit functions, Final Cut Pro also comes with a range of video transitions and a range of video and audio filters that will take your film project to the next level.
It is clear that Final Cut Pro is definitely now a star in the editing of Hollywood movies, it is time to make it a star in editing your movies as well.
Benjamin Arango
Benjamin Arango is a writer and a lover of all things video.
Follow @Benjamin Arango
Learn Video Editing for Free: Top Software for Beginners
Top 15 Free Video Editing Software for Beginners [Very Easy to Use]

Ollie Mattison
Mar 27, 2024• Proven solutions
If you are not a video-making expert, own a video studio, or have a video specialist to trim and shoot video features, then don’t worry!
We are here to take you on the tour of the easiest video editing software that would promise a professional-looking end-product despite being absolutely inexperienced!
In my opinion, an ideal video editing software should be easy for everyone to get started. It could be simple video editing software, but it at least contains all the basic features you want. My recommendation is Wondershare Filmora, which compromises usability and capability to the best. It not only comes with all common video editing tools at your fingertips but also features you may need to bring your videos to the next level.
- 15 Best Easy Video Editing Software
- Basic Features You Need in an Easy Video Editing Software
- Why Video Editing Matters Nowadays?
- Basic Video Editing Terms You Should Know
Watch Video to Take a Quick View of the 18 Best Video Editors
Filmora Video Editor is an expert in creating and editing videos with outstanding functions and features. The easy-to-use interface will help you much! It offers versions for Windows, Mac, Android and iOS! Worth to have a try!
Try Free Video Editor Try Free Video Editor Try Free Video Editor Learn More >
15 Best Easy Video Editing Software
Below are the brief detail of easy video editors for PC, giving you more editing scalability than mobile-based editing apps. So if you are seeking easy video editing software for YouTube or website then look no further!
1. Wondershare Filmora - Easy Video Editing Software, Unlimited Video Sharing
Compatibility: Windows, Mac, Android, iPhone and iPad.
Wondershare Filmora paves the way to share videos instantly with family and friends, whatever it’s on YouTube, computer, mobile devices, or TV, you’ll choose your way.
For Win 7 or later (64-bit)
 Secure Download
For macOS 10.14 or later
Secure Download
You can directly upload the video to YouTube, as well as an optional message sending to Facebook and Twitter.
Preset profiles are included in output videos for playing on mobile devices like iPhone, iPad, iPod, PSP, etc. No further conversion required. A build-in DVD tool allows you to burn video to a high-quality DVD for watching on TV with your home DVD player.
Filmstock Stock Media Library ](https://filmstock.wondershare.com/creative-theme-tutorial?spm=rs.filmora%5Fweb&source%5Fchannel=seo%5Farticle )
Download the free trial version of Wondershare Filmora for your Mac/Windows version below, start to make your stunning home movies today!
2. Blender
Compatibility: Windows, Mac, and Linux.
This is free and open-source software, originally designed as a 3D animation suite but also has a use video editor. This editor lets you carry out basic actions like video cutting and video splicing. Hence, it is an easy video cutter and easy video joiner. It can also perform more advanced tasks such as video masking.
3. Lightworks
Compatibility: Windows, Mac, and Linux.
Lightworks is a free easy to use video editing software that comes with High precision video trimming, 720p video export for YouTube, Multicam support, and support of a large range of video formats. Its free version has ample features enough for most of the users. Although the paid pro version costs $25 a month.
4. Shotcut
Compatibility: Windows, Mac, and Linux.
Shotcut is a free, open-source video editing software, packed with ample features with wide range video formats support, timeline editing, 4K HD resolution support, and have several tutorials video.

Wondershare Filmora Video Editor
Filmora - No Watermark Video Editing Software
• Easily edit and export video files without watermark
• offers popular effects and filters for making your video professional
• Cross-platform supported - (Windows, Mac, iOS, Android)
Try Video Editor without Watermark Try Video Editor without Watermark Try Video Editor without Watermark Learn More >
5. VSDC
Compatibility: Windows
VSDC, an easy video editing software for windows, is a free video editing software, having an easy-to-learn powerful suite of features including audio editing and color correction. Although a paid version, pro, costs $19.99, having visual waveform, image stabilization and voice over support.
6. Machete Lite
Compatibility: Windows
Machete Lite is a free yet the simplest video editing software perfect for simple editing tasks. Only AVI and WMV files are supported in its free version. Its full version costs $19.95 having audio editing and more file type support, unlike the free version.
7. Avidemux
Compatibility: Windows, Mac, and Linux
Avoided is the simplest video editing software, perfect for beginners. It allows performing simple editing features like Encoding, simple cutting, and filtering with an easy-to-use interface.
8. Hitfilm Express
Compatibility: Windows and Mac
HitFilm Express is a free video editing software with features ranging from basic editing features like trimming, audio editing, and slicing to advance tools and features. Its free version supports over 180 special effects. There’s a built-in YouTube uploading.
Finding a Way to Edit Video for Free? Try This Out!
Filmora Video Editor brings you all the convenience of editing videos with handy functions. You can make your creative ideas into realize! More importantly, your edited video can export without a watermark!
Try It Free Try It Free Try It Free Learn More >
9. iMovie
Compatibility: Mac
If you are a beginner and searching for a good video editing software to get your hands clean on editing then iMovie editor is perfect for you. It is an easy video editing software for mac having an easy drag and drop interface. Features like Video trimming, split-screen, audio editing, pre-made transitions library, and 4K resolution support.
10. Openshot
Compatibility: Windows, Mac, and Linux
It is a free open source video editing software with an easy-to-use interface. Features like unlimited layers and tracks, time-mapping, real-time previews, trimming, snapping, clip resizing, curve-based keyframe animations etc. It offers more than enough features for free software.
11. Movie Maker
Compatibility: Windows
It is an easy video maker and editing software for beginners which can be downloaded from any third-party and use it to make and share high-quality movies.
12. Lumen5
Compatibility: Windows and Mac
It’s a perfect web-based video editing tool, best for Social Media promotion Campaigns with an easy drag-and-drop interface.
![]()
A cross-platform for making videos anywhere for all creators

Why your video editing isn’t good enough? How about some creative inspo?
- 100 Million+ Users
- 150+ Countries and Regions
- 4 Million+ Social Media Followers
- 5 Million+ Stock Media for Use
* Secure Download

13. Adobe Spark
Compatibility: Windows and Mac
Adobe Sparks is also a web-based easy video editor, similar to Lumen5. It offers an easy user interface but is a little restricted when it comes to offering a bank of images and footage to use.
14. Videopad
Compatibility: Windows
VideoPad is a simple video editing software for beginners, maybe not suitable for professional use. It has features like 3D Video Editing, Sound Effects and pre-made transitions Library, Reduce Camera Shakes and Multiple Resolutions export support.
15. Freemake
Compatibility: Windows
Freemake is a free video converter that is used to convert and alter videos that can modify and convert videos, embed videos to websites, and extract audio from video clips simply and fast. It supports above 500 video file formats and is compatible with multiple audio and image file formats for slideshows and video clip creation.
Basic Features You Need in an Easy Video Editing Software
A software having:
- Easy montage maker
- Easy video cutter
- Easy video joiner
- Compositing multiple elements together
- Color grading
- Motion tracking
- Stabilization
- Titles
- Background replacement
- Basic color correction
- Cross dissolves and fade-to-black transitions
- Audio crossfades
- Audio level adjustment using keyframes
- Auto synchronization of additional audio tracks
- Image position adjustment using keyframes
- Footage speed adjustments
- Basic color correction
- Footage bins for roughly organizing imported footage
Why Video Editing Matters Nowadays?
If videos aren’t a primary focus of your content marketing plan, the probability is it’s soon going to be certain! Every next production is turning into video-based content, be it content marketers or SEOs.
Around 50% of the content marketers are using Facebook and YouTube channels for the sake of video distribution since online activity spent on watching videos is 50%.
Moreover, by 2021, video is going to be projected to account for more than 80% out of all internet traffic.
Therefore, it has become a need to focus on video content if you are looking to grow the organic traffic of your publications.

Filmora Free Video Editor
Create AI-Generated Video with Filmora
Filmora Free video editor offers a ChatGPT plug-in and AI tools to enhance your creative vision. Make your idea into reality.
Try It Free Try It Free Try It Free Learn More >
Basic Video Editing Terms You Should Know
Below are some of the important yet basic terms that you should know related to videography in general and video editing in specific as well, whether you are a beginner or professional.
Aspect ratio:
The aspect ratio is the ratio of width and height of a video. Examples of the most used aspect ratios are: 4:3, 16:9, 1.85:1.
Refer to the image given below for a better understanding.

B-roll:
B-roll facilities one with the flexibility, when editing, to the video editing rules as it is an add-on picture that makes a previously incoherent scene seamless.
As shown in the image below, B-roll is used to insert which can make the transition easy to look on the eyes.
Bit rate:
Bit rate, also known as data rate, refers to the amount of data used for every second within the video. It is most commonly expressed in kilobits per second (kbps).
Close up:
Close-up refers to the shots that frame to subject tightly.
For instance, if it is a person, then the close-up covers solely his face.
Color temperature:
Color temperature refers to the light visibility in a shot. Color temperature is expressed in Kelvin. The scale of color temperature ranges from cool to warm.
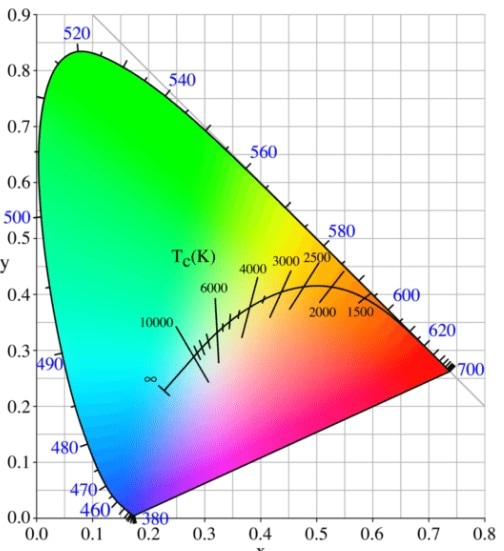
Composition:
Composition entails the process of combining multiple footages using video editing software.
Compression:
Compression is the process of minimizing the quantity of data utilized in a video file. It helps make in the process of uploading and downloading quite faster. This also leaves you with ample space for more of your publications.
Crop factor:
Crop factor refers to a number that expresses the ratio of the imaging area of a sensor to a full-frame sensor. It typically ranges from 1.3 to 2.0.
Cut-in
Cut-in refers to showing a specific part of a subject in order to emphasize a certain aspect or emotion. For instance, hand gestures may show nervousness, enthusiasm, agitation, etc.
Foley:
Often times the original sound of the scene captured in the video is not captured as naturally as they were supposed to sound like in reality. Hence, Foley is when you reproduce those sounds for that video.
Frame rate:
Frame rate refers to the video capturing by a shutter in a second or shutter cycling rate through opening and closing. Some of the common frame rates are 24, 25, 29.97, 30, etc. The frame rate is expressed in frames per second (fps).
High definition media interface:
HDMI is the connectors that digitally transfer audio and HD video to a television. This is helpful if you intend to work on a bigger screen or wish to share some of your productions.
Resolution:
Resolution refers to the horizontal and vertical pixels of your video. For instance 640×480 for SD and 1280×720 for HD. Sometimes resolution refers only to the number of pixels that paper vertically. For example 480p, 720p, and 1080p respectively.
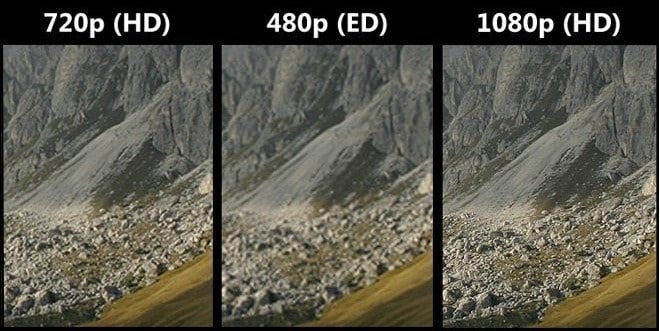
J-Cut:
J-cut refers to the editing technique in which the audio from a next scene is overlapped with the image from the previous scene, such that the audio segment of the next scene begins playing prior to its picture.
Jumpcut:
Jumpcut editing techniques refer to an abrupt transition between the two consecutive frames. The entity in the video containing jump cuts appears to jump along with the scene from one place to another. This looks disruptive to the audience.
L-Cut:
L-cut is exactly opposite to J-cut where the audio from the next scene overlays the image from the next scene to play the audio after an image has been displayed in the video.
Lower third:
As the name suggests, the lower third is derived from the rule of third which refers to the type of title, mostly used by vloggers, broadcasters, interviewers, and you tubers.
Memory bank:
You can understand the term by thinking of a memory box where we keep certain things as a memory of the events in someone’s life. Memory bank serves the same purpose through the use of video. It often uses natural sounds, document travel or merely store moments in routine life.
Press kit:
Press kit is used to provide information regarding your productions to the press for promotional purposes. Such information is often background including synopsis, crew, cast’s bios Q&A with the director, production stills and its reviews.
Shot list:
The shot list refers to the checklist related to the shots that a videographer plans to include in his/her content. This may help you save time and gear with efficient planning and handling. This gives a sense of direction to your production.
Storyboard:
A storyboard is a drawing to illustrate the scenes in the video. This gives a direct and organized way to visualize the needs for the shots or animation.
Sync:
Synchronization, aka sync, refers to the alignment of audio with video imaging.
Rule of thirds:
The rule of third is a grid that helps you to compose interesting and balanced shots to make your productions aesthetically pleasing. The grid is similar to a tic-tac-toe board since it segregates the picture into 9 segments. It helps bring points of interest to be aligned with the lines or intersection given in the grid.
Three-point lighting:
This helps one to diminish the shadows for image balancing and provides an appealing contrast. These three lights are commonly known as fill, key, and backlight.

Tilts:
Tilts refer to the vertical transitions that your camera. This is the opposite of pans.

Pans:
Pans refer to the horizontal movements of your camera. This is exactly contrary to tilts.
White balance:
White balance refers to the process where the unrealistic color casts are removed in order to render a white object to be actually white in your photo, and not have other tints.
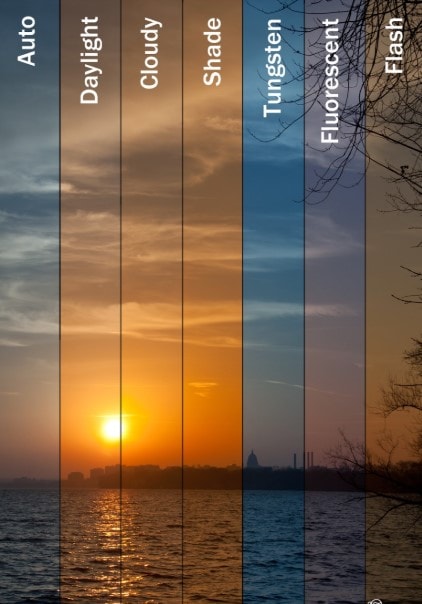
Wide-angle:
A wide-angel lens refers to a short focal length of a lens. This brings more of a subject rather than a subject being captured by a normal lens at equal distances.
Non-linear editing:
NLEs is a non-destructive editing technique that allows one to access any frame in a video clip regardless of the sequence in the clip. It gives you the freedom to easily include effects, transitions, fades, etc. which cannot be achieved with linear editing
Pixel aspect ratio:
Pixels are several tiny squares that build up an image in a video. Whereas, aspect ratio refers to the ratio of width to height of a video. Hence, the pixel aspect ratio (PAR) is the ratio of width to height of the pixels.
Conclusion
Be it Instagram stories, YouTube product testimonials, or Facebook ads, using these easy-to-use video editing software will elevate your content into a professional and slick look.
So, I hope you are now ready to get started.
Lights, camera, action!
For Win 7 or later (64-bit)
Secure Download
For macOS 10.14 or later
Secure Download
Click here to get Filmora for PC by email
or Try Filmora App for mobile >>>
download filmora app for ios ](https://app.adjust.com/b0k9hf2%5F4bsu85t ) download filmora app for android ](https://app.adjust.com/b0k9hf2%5F4bsu85t )
Ollie Mattison
Ollie Mattison is a writer and a lover of all things video.
Follow @Ollie Mattison
Ollie Mattison
Mar 27, 2024• Proven solutions
If you are not a video-making expert, own a video studio, or have a video specialist to trim and shoot video features, then don’t worry!
We are here to take you on the tour of the easiest video editing software that would promise a professional-looking end-product despite being absolutely inexperienced!
In my opinion, an ideal video editing software should be easy for everyone to get started. It could be simple video editing software, but it at least contains all the basic features you want. My recommendation is Wondershare Filmora, which compromises usability and capability to the best. It not only comes with all common video editing tools at your fingertips but also features you may need to bring your videos to the next level.
- 15 Best Easy Video Editing Software
- Basic Features You Need in an Easy Video Editing Software
- Why Video Editing Matters Nowadays?
- Basic Video Editing Terms You Should Know
Watch Video to Take a Quick View of the 18 Best Video Editors
Filmora Video Editor is an expert in creating and editing videos with outstanding functions and features. The easy-to-use interface will help you much! It offers versions for Windows, Mac, Android and iOS! Worth to have a try!
Try Free Video Editor Try Free Video Editor Try Free Video Editor Learn More >
15 Best Easy Video Editing Software
Below are the brief detail of easy video editors for PC, giving you more editing scalability than mobile-based editing apps. So if you are seeking easy video editing software for YouTube or website then look no further!
1. Wondershare Filmora - Easy Video Editing Software, Unlimited Video Sharing
Compatibility: Windows, Mac, Android, iPhone and iPad.
Wondershare Filmora paves the way to share videos instantly with family and friends, whatever it’s on YouTube, computer, mobile devices, or TV, you’ll choose your way.
For Win 7 or later (64-bit)
Secure Download
For macOS 10.14 or later
Secure Download
You can directly upload the video to YouTube, as well as an optional message sending to Facebook and Twitter.
Preset profiles are included in output videos for playing on mobile devices like iPhone, iPad, iPod, PSP, etc. No further conversion required. A build-in DVD tool allows you to burn video to a high-quality DVD for watching on TV with your home DVD player.
Filmstock Stock Media Library ](https://filmstock.wondershare.com/creative-theme-tutorial?spm=rs.filmora%5Fweb&source%5Fchannel=seo%5Farticle )
Download the free trial version of Wondershare Filmora for your Mac/Windows version below, start to make your stunning home movies today!
2. Blender
Compatibility: Windows, Mac, and Linux.
This is free and open-source software, originally designed as a 3D animation suite but also has a use video editor. This editor lets you carry out basic actions like video cutting and video splicing. Hence, it is an easy video cutter and easy video joiner. It can also perform more advanced tasks such as video masking.
3. Lightworks
Compatibility: Windows, Mac, and Linux.
Lightworks is a free easy to use video editing software that comes with High precision video trimming, 720p video export for YouTube, Multicam support, and support of a large range of video formats. Its free version has ample features enough for most of the users. Although the paid pro version costs $25 a month.
4. Shotcut
Compatibility: Windows, Mac, and Linux.
Shotcut is a free, open-source video editing software, packed with ample features with wide range video formats support, timeline editing, 4K HD resolution support, and have several tutorials video.
Wondershare Filmora Video Editor
Filmora - No Watermark Video Editing Software
• Easily edit and export video files without watermark
• offers popular effects and filters for making your video professional
• Cross-platform supported - (Windows, Mac, iOS, Android)
Try Video Editor without Watermark Try Video Editor without Watermark Try Video Editor without Watermark Learn More >
5. VSDC
Compatibility: Windows
VSDC, an easy video editing software for windows, is a free video editing software, having an easy-to-learn powerful suite of features including audio editing and color correction. Although a paid version, pro, costs $19.99, having visual waveform, image stabilization and voice over support.
6. Machete Lite
Compatibility: Windows
Machete Lite is a free yet the simplest video editing software perfect for simple editing tasks. Only AVI and WMV files are supported in its free version. Its full version costs $19.95 having audio editing and more file type support, unlike the free version.
7. Avidemux
Compatibility: Windows, Mac, and Linux
Avoided is the simplest video editing software, perfect for beginners. It allows performing simple editing features like Encoding, simple cutting, and filtering with an easy-to-use interface.
8. Hitfilm Express
Compatibility: Windows and Mac
HitFilm Express is a free video editing software with features ranging from basic editing features like trimming, audio editing, and slicing to advance tools and features. Its free version supports over 180 special effects. There’s a built-in YouTube uploading.
Finding a Way to Edit Video for Free? Try This Out!
Filmora Video Editor brings you all the convenience of editing videos with handy functions. You can make your creative ideas into realize! More importantly, your edited video can export without a watermark!
Try It Free Try It Free Try It Free Learn More >
9. iMovie
Compatibility: Mac
If you are a beginner and searching for a good video editing software to get your hands clean on editing then iMovie editor is perfect for you. It is an easy video editing software for mac having an easy drag and drop interface. Features like Video trimming, split-screen, audio editing, pre-made transitions library, and 4K resolution support.
10. Openshot
Compatibility: Windows, Mac, and Linux
It is a free open source video editing software with an easy-to-use interface. Features like unlimited layers and tracks, time-mapping, real-time previews, trimming, snapping, clip resizing, curve-based keyframe animations etc. It offers more than enough features for free software.
11. Movie Maker
Compatibility: Windows
It is an easy video maker and editing software for beginners which can be downloaded from any third-party and use it to make and share high-quality movies.
12. Lumen5
Compatibility: Windows and Mac
It’s a perfect web-based video editing tool, best for Social Media promotion Campaigns with an easy drag-and-drop interface.
![]()
A cross-platform for making videos anywhere for all creators
Why your video editing isn’t good enough? How about some creative inspo?
- 100 Million+ Users
- 150+ Countries and Regions
- 4 Million+ Social Media Followers
- 5 Million+ Stock Media for Use
* Secure Download
13. Adobe Spark
Compatibility: Windows and Mac
Adobe Sparks is also a web-based easy video editor, similar to Lumen5. It offers an easy user interface but is a little restricted when it comes to offering a bank of images and footage to use.
14. Videopad
Compatibility: Windows
VideoPad is a simple video editing software for beginners, maybe not suitable for professional use. It has features like 3D Video Editing, Sound Effects and pre-made transitions Library, Reduce Camera Shakes and Multiple Resolutions export support.
15. Freemake
Compatibility: Windows
Freemake is a free video converter that is used to convert and alter videos that can modify and convert videos, embed videos to websites, and extract audio from video clips simply and fast. It supports above 500 video file formats and is compatible with multiple audio and image file formats for slideshows and video clip creation.
Basic Features You Need in an Easy Video Editing Software
A software having:
- Easy montage maker
- Easy video cutter
- Easy video joiner
- Compositing multiple elements together
- Color grading
- Motion tracking
- Stabilization
- Titles
- Background replacement
- Basic color correction
- Cross dissolves and fade-to-black transitions
- Audio crossfades
- Audio level adjustment using keyframes
- Auto synchronization of additional audio tracks
- Image position adjustment using keyframes
- Footage speed adjustments
- Basic color correction
- Footage bins for roughly organizing imported footage
Why Video Editing Matters Nowadays?
If videos aren’t a primary focus of your content marketing plan, the probability is it’s soon going to be certain! Every next production is turning into video-based content, be it content marketers or SEOs.
Around 50% of the content marketers are using Facebook and YouTube channels for the sake of video distribution since online activity spent on watching videos is 50%.
Moreover, by 2021, video is going to be projected to account for more than 80% out of all internet traffic.
Therefore, it has become a need to focus on video content if you are looking to grow the organic traffic of your publications.
Filmora Free Video Editor
Create AI-Generated Video with Filmora
Filmora Free video editor offers a ChatGPT plug-in and AI tools to enhance your creative vision. Make your idea into reality.
Try It Free Try It Free Try It Free Learn More >
Basic Video Editing Terms You Should Know
Below are some of the important yet basic terms that you should know related to videography in general and video editing in specific as well, whether you are a beginner or professional.
Aspect ratio:
The aspect ratio is the ratio of width and height of a video. Examples of the most used aspect ratios are: 4:3, 16:9, 1.85:1.
Refer to the image given below for a better understanding.
B-roll:
B-roll facilities one with the flexibility, when editing, to the video editing rules as it is an add-on picture that makes a previously incoherent scene seamless.
As shown in the image below, B-roll is used to insert which can make the transition easy to look on the eyes.
Bit rate:
Bit rate, also known as data rate, refers to the amount of data used for every second within the video. It is most commonly expressed in kilobits per second (kbps).
Close up:
Close-up refers to the shots that frame to subject tightly.
For instance, if it is a person, then the close-up covers solely his face.
Color temperature:
Color temperature refers to the light visibility in a shot. Color temperature is expressed in Kelvin. The scale of color temperature ranges from cool to warm.
Composition:
Composition entails the process of combining multiple footages using video editing software.
Compression:
Compression is the process of minimizing the quantity of data utilized in a video file. It helps make in the process of uploading and downloading quite faster. This also leaves you with ample space for more of your publications.
Crop factor:
Crop factor refers to a number that expresses the ratio of the imaging area of a sensor to a full-frame sensor. It typically ranges from 1.3 to 2.0.
Cut-in
Cut-in refers to showing a specific part of a subject in order to emphasize a certain aspect or emotion. For instance, hand gestures may show nervousness, enthusiasm, agitation, etc.
Foley:
Often times the original sound of the scene captured in the video is not captured as naturally as they were supposed to sound like in reality. Hence, Foley is when you reproduce those sounds for that video.
Frame rate:
Frame rate refers to the video capturing by a shutter in a second or shutter cycling rate through opening and closing. Some of the common frame rates are 24, 25, 29.97, 30, etc. The frame rate is expressed in frames per second (fps).
High definition media interface:
HDMI is the connectors that digitally transfer audio and HD video to a television. This is helpful if you intend to work on a bigger screen or wish to share some of your productions.
Resolution:
Resolution refers to the horizontal and vertical pixels of your video. For instance 640×480 for SD and 1280×720 for HD. Sometimes resolution refers only to the number of pixels that paper vertically. For example 480p, 720p, and 1080p respectively.
J-Cut:
J-cut refers to the editing technique in which the audio from a next scene is overlapped with the image from the previous scene, such that the audio segment of the next scene begins playing prior to its picture.
Jumpcut:
Jumpcut editing techniques refer to an abrupt transition between the two consecutive frames. The entity in the video containing jump cuts appears to jump along with the scene from one place to another. This looks disruptive to the audience.
L-Cut:
L-cut is exactly opposite to J-cut where the audio from the next scene overlays the image from the next scene to play the audio after an image has been displayed in the video.
Lower third:
As the name suggests, the lower third is derived from the rule of third which refers to the type of title, mostly used by vloggers, broadcasters, interviewers, and you tubers.
Memory bank:
You can understand the term by thinking of a memory box where we keep certain things as a memory of the events in someone’s life. Memory bank serves the same purpose through the use of video. It often uses natural sounds, document travel or merely store moments in routine life.
Press kit:
Press kit is used to provide information regarding your productions to the press for promotional purposes. Such information is often background including synopsis, crew, cast’s bios Q&A with the director, production stills and its reviews.
Shot list:
The shot list refers to the checklist related to the shots that a videographer plans to include in his/her content. This may help you save time and gear with efficient planning and handling. This gives a sense of direction to your production.
Storyboard:
A storyboard is a drawing to illustrate the scenes in the video. This gives a direct and organized way to visualize the needs for the shots or animation.
Sync:
Synchronization, aka sync, refers to the alignment of audio with video imaging.
Rule of thirds:
The rule of third is a grid that helps you to compose interesting and balanced shots to make your productions aesthetically pleasing. The grid is similar to a tic-tac-toe board since it segregates the picture into 9 segments. It helps bring points of interest to be aligned with the lines or intersection given in the grid.
Three-point lighting:
This helps one to diminish the shadows for image balancing and provides an appealing contrast. These three lights are commonly known as fill, key, and backlight.
Tilts:
Tilts refer to the vertical transitions that your camera. This is the opposite of pans.
Pans:
Pans refer to the horizontal movements of your camera. This is exactly contrary to tilts.
White balance:
White balance refers to the process where the unrealistic color casts are removed in order to render a white object to be actually white in your photo, and not have other tints.
Wide-angle:
A wide-angel lens refers to a short focal length of a lens. This brings more of a subject rather than a subject being captured by a normal lens at equal distances.
Non-linear editing:
NLEs is a non-destructive editing technique that allows one to access any frame in a video clip regardless of the sequence in the clip. It gives you the freedom to easily include effects, transitions, fades, etc. which cannot be achieved with linear editing
Pixel aspect ratio:
Pixels are several tiny squares that build up an image in a video. Whereas, aspect ratio refers to the ratio of width to height of a video. Hence, the pixel aspect ratio (PAR) is the ratio of width to height of the pixels.
Conclusion
Be it Instagram stories, YouTube product testimonials, or Facebook ads, using these easy-to-use video editing software will elevate your content into a professional and slick look.
So, I hope you are now ready to get started.
Lights, camera, action!
For Win 7 or later (64-bit)
Secure Download
For macOS 10.14 or later
Secure Download
Click here to get Filmora for PC by email
or Try Filmora App for mobile >>>
download filmora app for ios ](https://app.adjust.com/b0k9hf2%5F4bsu85t ) download filmora app for android ](https://app.adjust.com/b0k9hf2%5F4bsu85t )
Ollie Mattison
Ollie Mattison is a writer and a lover of all things video.
Follow @Ollie Mattison
Also read:
- Rotate Videos Online Best Web-Based Solutions for 2024
- New Elevate Your Brand 10 Top-Notch Intro Maker Websites for 2024
- In 2024, The Animators Toolkit 8 Essential Software for Mac and Windows
- 2024 Approved Fast Video Editing on Mac Tips and Tricks for Speedy Video Cutting
- New 2024 Approved Top 10 Best GIF Speed Changers
- New In 2024, Transform Your Videos in Minutes The Best Way to Resize for Social Media
- Updated In 2024, Heres a Step-by-Step Guide for the PowerDirector Color Match Process! Also, Check Out the Professional and Quick PowerDirector Alternative if You Find It a Bit Time-Consuming and Manual
- Updated How to Make a Time Lapse Video in Final Cut Pro for 2024
- Updated Unlock the Power of Facebook Video A Step-by-Step Aspect Ratio Guide for 2024
- Maximize Your Reach The Essential Guide to Facebook Video Aspect Ratios for 2024
- New 2024 Approved No-Cost Video Editing Top Online Solutions Ranked
- 2024 Approved Mac Movie Magic 8 Enchanting Video Editing Software Options
- Fixing the Shake Essential Techniques for Smoother Videos in AE
- New to Video Editing? Here Are the Best Free Tools Desktop/Online/Mobile
- Cut Your Videos for Free The Top 5 Tools We Love
- Updated MP3 to MP4 A Step-by-Step Guide to Successful Conversion for 2024
- Updated Top-Rated Video Voice Over Software for PC - Review and Download for 2024
- Updated In 2024, Improve Your Videos Audio Quality Removing Background Noise in FCPX
- New In 2024, VN Video Editor Pro Apk - Is It A Worthy Video Editing App?
- New The Ultimate Guide to Video Editing on Your Phone IPhone and Android Apps for 2024
- New 2024 Approved Video Invitation Apps That Will Make Your Event Unforgettable
- In 2024, Beginners Guide Top Cartoon Video Makers Online and Offline
- Windows Video Editing Top iMovie Alternatives for PC
- Video Invitation Essentials Top Apps for iOS and Android Users for 2024
- Green Screen on a Mac Top Software Options Explored for 2024
- Revolutionize Your Video Content High-Quality Made Simple for 2024
- Updated 2024 Approved Protect Your Privacy 10 Best Free Face Blurring Apps for Images and Clips
- New Take Your Videos to the Next Level 3D Effect Tutorials for Windows Computers for 2024
- Quality Matters A Guide to Converting Video to MP3 without Loss for 2024
- New 2024 Approved From Slow to Fast How to Create Time Lapses in Final Cut Pro
- Updated Elevate Your Vlog Game Top 10 Mobile Video Editing Apps
- In 2024, Elevate Your Content 5 Top-Notch Reaction Video Makers
- In 2024, The Ultimate Guide to Downloading KineMaster on Mac
- Updated The Ultimate List 10 Final Cut Pro X Competitors Worth Exploring for 2024
- Updated 2024 Approved The Ultimate List 10 Best Free Online Subtitle Creators
- Minitool Movie Maker Review A Comprehensive Look and Best Alternatives for 2024
- New Free to Use The 10 Best Open-Source Video Editing Tools
- Get Final Cut Pro With Cheapest Price, Check Education Bundle for 2024
- In 2024, No-Shake Guarantee Free Video Stabilizers for PC and Mac
- New In 2024, The Ultimate 16X9 Ratio Calculator Guide 5 Surprising Insights
- Updated In 2024, Get That Analog Look Top VHS Effect Apps for iPhone and Android
- New Create Cinematic Masterpieces A Guide to Android Video Editors for 2024
- New Experience the Future Top 4K Video Demos You Wont Want to Miss
- Updated Solve Avidemux No Audio Problem Updated Guide
- MKV Video Trimming Made Easy Best Mac Apps 2023
- New Heres My Picks for the Top 5 Free and Simple AVI Video Editing Software
- New 2024 Approved Record Your Gameplay 3 Beginner-Friendly Options
- New In 2024, Mastering FCP Audio A Step-by-Step Guide for Video Editors
- Updated 2024 Approved Screen Recording 101 How to Use Filmora Scrn for Desktop Capture
- Updated The Best VLC Trimmer for Mac Zero Quality Loss, Every Time for 2024
- Recommended Best Applications for Mirroring Your Meizu 21 Screen | Dr.fone
- How To Change Your SIM PIN Code on Your Honor Magic 6 Phone
- 8 Solutions to Fix Find My Friends Location Not Available On Xiaomi Redmi K70 Pro | Dr.fone
- How do you play HEVC/H.265 files on Samsung Galaxy M34 5G?
- In 2024, Best Ways on How to Unlock/Bypass/Swipe/Remove Vivo S17 Pro Fingerprint Lock
- In 2024, Can Life360 Track You When Your Vivo X Fold 2 is off? | Dr.fone
- Your Complete Guide To Reset Motorola Moto G84 5G | Dr.fone
- In 2024, A How-To Guide on Bypassing Apple iPhone XS Max iCloud Activation Lock
- Can You Unlock iPhone 6s Plus After Forgetting the Passcode?
- 2024 Approved Cloud Stop Motion Software Features, Guidelines, and Alternatives
- In 2024, Ultimate Guide from Xiaomi Redmi Note 12 4G FRP Bypass
- How To Change Your SIM PIN Code on Your Nokia C32 Phone
- Fake the Location to Get Around the MLB Blackouts on Honor Play 7T | Dr.fone
- Title: In 2024, Mastering Time in FCPX Freeze Frames, Slow-Mo, and More
- Author: Emma
- Created at : 2024-05-19 05:47:54
- Updated at : 2024-05-20 05:47:54
- Link: https://video-ai-editor.techidaily.com/in-2024-mastering-time-in-fcpx-freeze-frames-slow-mo-and-more/
- License: This work is licensed under CC BY-NC-SA 4.0.
