
:max_bytes(150000):strip_icc():format(webp)/GettyImages-541916248-593842a43df78c537be2cf44.jpg)
New 2024 Approved Best 5 Aspect Ratio Calculators Online
Aspect Ratio Made Easy: Top Calculators for Designers
Best 5 Aspect Ratio Calculators Online
An easy yet powerful editor
Numerous effects to choose from
Detailed tutorials provided by the official channel
Have you noticed how certain old movies play with black padding on either side of the screen while watching the television?

With this guide of the best five aspect ratio calculators online we’ve put together for you, you cannot go wrong!
In this article
01 [Typical Aspect Ratios and Sizes of Screens and Videos](#Part 1)
02 [How Do I Know the Aspect Ratio of My Video?](#Part 2)
03 [How Can I Change the Aspect Ratio of an Image Online?](#Part 3)
04 [How to Change the Aspect Ratio in Filmora/Filmora Pro?](#Part 4)
Part 1 Part 1: Typical Aspect Ratios and Sizes of Screens and Videos
An aspect ratio is a measurement representing the ratio between the width and height of a screen or a video. It determines the length of your video or screen. Not only screens and videos, but you can use the concept also in images.
And, it is written as ‘x:y’ where ‘x’ is the width and ‘y’ is the height.
There isn’t any one-size-fits-all when we need to use the video aspect ratios. Aspect ratios are generally selected based on where the video will post, how it will be visible, and what aim it usually serves.
Videos utilized for social media will vary from trailers shows or movies shown in theaters. There are common aspect ratios for modern televisions, but broadcasters can consider using the aspect ratio that operates great with their audience and content.
Since most videos showcase through standard online video platforms, custom aspect ratios are not commonly used.
Here are a few standard aspect ratios that you can use for live streaming and other video creation:

16:9
A 16:9 aspect ratio represents a wide rectangle. It is also called “1.71:1,” the most accessible form of the ratio, mathematically speaking.
This ratio is mainly used in video creation and streaming and is considered the international standard format for cinema and television.
Many also tend to use this highly famous aspect ratio on their sites.
It is also more cost-effective to use screens compatible with this ratio instead of their predecessors. The standardization of computer monitors and televisions saved producers both the money and time spent in the research field.
One of the ideal resolutions you can use with a 16:9 aspect ratio is 4Kor 3840 pixels by 2160 pixels.
1:1
The 1:1 video aspect ratio is one of the ideal squares used with square television sets.
It is much less in demand but usually visible on social media platforms like Facebook or Instagram.
Many cameras still have a square setting even though it’s not the most commonly used aspect ratio.
4:3
The 4:3 aspect ratio was the general screen size for computer monitors and televisions before 16:9 and 16:10. The reason for the switch was the HDTV birth. It’s because the 16:9 and 16:10 aspect ratios allow for better resolutions than 4:3 do.
This aspect ratio was still considered for Apple iPads until they released the 2018 iPad Pro.
3:2
The 3:2 aspect ratio was primarily seen in classic 35 mm still photography still used on tablets, laptops, and various game consoles in the handheld form.
Many micro- to medium-sized cameras still use the 3:2 aspect ratio settings, but broadcasters rarely use it today.
21:9
The 21:9 aspect ratios have a pretty specific purpose. It is often called cinematic widescreen or ultra-widescreen.
It is also helpful for films with an anamorphic format. Anamorphic format videos create an optical illusion that offers a 360-degree view.
You are likely to look for the videos with this aspect ratio in notable museums, theme parks, theaters, and the like.
9:16
A 9:16 aspect ratio is for tall videos. This aspect ratio became famous after the launch of smartphones with video capabilities.
For instance, the optimal measure for an Instagram story is 1080 px by 1920 px, and thus its ratio comes out as 9:16. The same goes for other famous apps with “story” features, including Snapchat and Facebook.
This makes sense because the iPhone camera’s video setting can record footage in both 16:9 and 9:16.
Part 2 How Do I Know the Aspect Ratio of My Video?

Most cameras with video capabilities are available with various aspect ratio settings. This helps you decide which aspect ratio you’d like your video to have before recording it.
If you are looking to determine the aspect ratio of a video already shot, you can easily access additional information for the file.
The information button is a small “i” in a circle on Mac. Move on to right-click a file and select “Properties“ on your PC.
It may give you the actual width and height of the video, but you can divide the two to find the aspect ratio.
However, you don’t need to hassle as we’ll enlist the best five aspect ratio calculators online below.
01Calculate Aspect Ratio

Our first pick-in aspect ratio calculator online is used simply by entering Common Presets. Then, there are tabs where you can enter Ratio Width, Ratio Height, Pixels Width, and Pixels Height.
It can help determine the aspect ratio of both the images and the videos.
Pros
Good user interface
Simple tabs for inputs
Fast loading speed
Cons
Pretty confusing for beginners to know which inputs to enter
02Digital Rebellion Aspect Ratio Calculator

Again, here’s an aspect ratio calculator online that is pretty straightforward than the one on the previous list. It helps you identify both the pixel dimensions and aspect ratios of the images and videos.
You’re only required to enter your inputs in Calculate and Preset tab to get Resolution as outcomes.
Pros
It can also be used to calculate pixel dimensions
Interactive user interface
No ads
Cons
Pretty confusing when it comes to entering Preset
03Toolstud Aspect Ratio Calculator

This aspect ratio calculator online is the simplest on our list as you’re only required to enter the Width-Height of an image or screen whose aspect ratio needs to be calculated.
Plus, the best part is that it gives you the detailed analysis of Calculation in terms of Size, Aspect Ratio, Angle of Diagonal, and Length of Diagonal etc.
Pros
Detailed calculation
Only needs to enter width and height
Simple user interface
Cons
A bit slow in processing
04Aspect Ratio Calculator

Again, this is the most straightforward aspect ratio calculator online with fewer complexities than others on the list. You must enter your desired width for an image or a video to get the outcome as an idea; height is a must to maintain that height.
Or, you can enter both the width and height to know the aspect ratio, dimensions, and mode.
Pros
Detailed calculation
Easy to calculate
A guide on how to use it
Cons
Slow user interface
05Calculator Online

You need to enter width and height within this tool and select among the common ratios to know the aspect ratio. However, it’s pretty unknown and confusing whether it’s applicable on both the images and videos or not.
Pros
Interactive user interface
With a guide on how to use
Various options
Cons
Display ads
Part 3 How Can I Change the Aspect Ratio of an Image Online?
You need to select among the aspect ratio calculator mentioned above online or go for the particular one for images.
Here, we’ll use Kapwing to resize the image dimensions within its editor.
Step 1: Visit Kapwing official website as follows
Go to https://www.kapwing.com/tools/resize-image

Step 2: Enter its editor
Now, you’re within its editor. Upload your image, which needs to change in terms of aspect ratio.

Step 3: Select output
Now, you need to choose the output. Make sure you haven’t selected the image to do this. There’s an output size on the left panel, which you can choose among 1:1, 9:16, 16:9, 5:4, and 4:5, and custom size.

Part 4 How to Change the Aspect Ratio in Filmora/Filmora Pro?

Wondershare Filmora - Best Video Editor for Mac/Windows
5,481,435 people have downloaded it.
Build unique custom animations without breaking a sweat.
Focus on creating epic stories and leave the details to Filmora’s auto features.
Start a creative adventure with drag & drop effects and endless possibilities.
Filmora simplifies advanced features to save you time and effort.
Filmora cuts out repetition so you can move on to your next creative breakthrough.
To permanently change the aspect ratio, you need a video editor or converter as one of the best aspect ratio calculators online.
Here, we’d like to recommend a significant aspect ratio changer - Wondershare Filmora Video Editor , which allows you to create both the 4:3, 9:16, 16:9, and 1:1 aspect ratio videos quite simply. You can conveniently share the created videos on YouTube, Apple TV, Vimeo, and mobile devices.
The Filmora also assists you in changing the project aspect ratio after launching the video editor program. Hit the drop-down tab and go through the 16:9, 1:1, 9:16, 4:3, and 21:9 aspect ratios to select among.

Key Takeaways from This Episode
● A complete overview of aspect ratio calculators.
● Understanding 5 best aspect ratio calculators.
● An ideal aspect ratio calculator to permanently change the video’s aspect ratio.
Have you noticed how certain old movies play with black padding on either side of the screen while watching the television?
With this guide of the best five aspect ratio calculators online we’ve put together for you, you cannot go wrong!
In this article
01 [Typical Aspect Ratios and Sizes of Screens and Videos](#Part 1)
02 [How Do I Know the Aspect Ratio of My Video?](#Part 2)
03 [How Can I Change the Aspect Ratio of an Image Online?](#Part 3)
04 [How to Change the Aspect Ratio in Filmora/Filmora Pro?](#Part 4)
Part 1 Part 1: Typical Aspect Ratios and Sizes of Screens and Videos
An aspect ratio is a measurement representing the ratio between the width and height of a screen or a video. It determines the length of your video or screen. Not only screens and videos, but you can use the concept also in images.
And, it is written as ‘x:y’ where ‘x’ is the width and ‘y’ is the height.
There isn’t any one-size-fits-all when we need to use the video aspect ratios. Aspect ratios are generally selected based on where the video will post, how it will be visible, and what aim it usually serves.
Videos utilized for social media will vary from trailers shows or movies shown in theaters. There are common aspect ratios for modern televisions, but broadcasters can consider using the aspect ratio that operates great with their audience and content.
Since most videos showcase through standard online video platforms, custom aspect ratios are not commonly used.
Here are a few standard aspect ratios that you can use for live streaming and other video creation:
16:9
A 16:9 aspect ratio represents a wide rectangle. It is also called “1.71:1,” the most accessible form of the ratio, mathematically speaking.
This ratio is mainly used in video creation and streaming and is considered the international standard format for cinema and television.
Many also tend to use this highly famous aspect ratio on their sites.
It is also more cost-effective to use screens compatible with this ratio instead of their predecessors. The standardization of computer monitors and televisions saved producers both the money and time spent in the research field.
One of the ideal resolutions you can use with a 16:9 aspect ratio is 4Kor 3840 pixels by 2160 pixels.
1:1
The 1:1 video aspect ratio is one of the ideal squares used with square television sets.
It is much less in demand but usually visible on social media platforms like Facebook or Instagram.
Many cameras still have a square setting even though it’s not the most commonly used aspect ratio.
4:3
The 4:3 aspect ratio was the general screen size for computer monitors and televisions before 16:9 and 16:10. The reason for the switch was the HDTV birth. It’s because the 16:9 and 16:10 aspect ratios allow for better resolutions than 4:3 do.
This aspect ratio was still considered for Apple iPads until they released the 2018 iPad Pro.
3:2
The 3:2 aspect ratio was primarily seen in classic 35 mm still photography still used on tablets, laptops, and various game consoles in the handheld form.
Many micro- to medium-sized cameras still use the 3:2 aspect ratio settings, but broadcasters rarely use it today.
21:9
The 21:9 aspect ratios have a pretty specific purpose. It is often called cinematic widescreen or ultra-widescreen.
It is also helpful for films with an anamorphic format. Anamorphic format videos create an optical illusion that offers a 360-degree view.
You are likely to look for the videos with this aspect ratio in notable museums, theme parks, theaters, and the like.
9:16
A 9:16 aspect ratio is for tall videos. This aspect ratio became famous after the launch of smartphones with video capabilities.
For instance, the optimal measure for an Instagram story is 1080 px by 1920 px, and thus its ratio comes out as 9:16. The same goes for other famous apps with “story” features, including Snapchat and Facebook.
This makes sense because the iPhone camera’s video setting can record footage in both 16:9 and 9:16.
Part 2 How Do I Know the Aspect Ratio of My Video?
Most cameras with video capabilities are available with various aspect ratio settings. This helps you decide which aspect ratio you’d like your video to have before recording it.
If you are looking to determine the aspect ratio of a video already shot, you can easily access additional information for the file.
The information button is a small “i” in a circle on Mac. Move on to right-click a file and select “Properties“ on your PC.
It may give you the actual width and height of the video, but you can divide the two to find the aspect ratio.
However, you don’t need to hassle as we’ll enlist the best five aspect ratio calculators online below.
01Calculate Aspect Ratio
Our first pick-in aspect ratio calculator online is used simply by entering Common Presets. Then, there are tabs where you can enter Ratio Width, Ratio Height, Pixels Width, and Pixels Height.
It can help determine the aspect ratio of both the images and the videos.
Pros
Good user interface
Simple tabs for inputs
Fast loading speed
Cons
Pretty confusing for beginners to know which inputs to enter
02Digital Rebellion Aspect Ratio Calculator
Again, here’s an aspect ratio calculator online that is pretty straightforward than the one on the previous list. It helps you identify both the pixel dimensions and aspect ratios of the images and videos.
You’re only required to enter your inputs in Calculate and Preset tab to get Resolution as outcomes.
Pros
It can also be used to calculate pixel dimensions
Interactive user interface
No ads
Cons
Pretty confusing when it comes to entering Preset
03Toolstud Aspect Ratio Calculator
This aspect ratio calculator online is the simplest on our list as you’re only required to enter the Width-Height of an image or screen whose aspect ratio needs to be calculated.
Plus, the best part is that it gives you the detailed analysis of Calculation in terms of Size, Aspect Ratio, Angle of Diagonal, and Length of Diagonal etc.
Pros
Detailed calculation
Only needs to enter width and height
Simple user interface
Cons
A bit slow in processing
04Aspect Ratio Calculator
Again, this is the most straightforward aspect ratio calculator online with fewer complexities than others on the list. You must enter your desired width for an image or a video to get the outcome as an idea; height is a must to maintain that height.
Or, you can enter both the width and height to know the aspect ratio, dimensions, and mode.
Pros
Detailed calculation
Easy to calculate
A guide on how to use it
Cons
Slow user interface
05Calculator Online
You need to enter width and height within this tool and select among the common ratios to know the aspect ratio. However, it’s pretty unknown and confusing whether it’s applicable on both the images and videos or not.
Pros
Interactive user interface
With a guide on how to use
Various options
Cons
Display ads
Part 3 How Can I Change the Aspect Ratio of an Image Online?
You need to select among the aspect ratio calculator mentioned above online or go for the particular one for images.
Here, we’ll use Kapwing to resize the image dimensions within its editor.
Step 1: Visit Kapwing official website as follows
Go to https://www.kapwing.com/tools/resize-image
Step 2: Enter its editor
Now, you’re within its editor. Upload your image, which needs to change in terms of aspect ratio.
Step 3: Select output
Now, you need to choose the output. Make sure you haven’t selected the image to do this. There’s an output size on the left panel, which you can choose among 1:1, 9:16, 16:9, 5:4, and 4:5, and custom size.
Part 4 How to Change the Aspect Ratio in Filmora/Filmora Pro?
Wondershare Filmora - Best Video Editor for Mac/Windows
5,481,435 people have downloaded it.
Build unique custom animations without breaking a sweat.
Focus on creating epic stories and leave the details to Filmora’s auto features.
Start a creative adventure with drag & drop effects and endless possibilities.
Filmora simplifies advanced features to save you time and effort.
Filmora cuts out repetition so you can move on to your next creative breakthrough.
To permanently change the aspect ratio, you need a video editor or converter as one of the best aspect ratio calculators online.
Here, we’d like to recommend a significant aspect ratio changer - Wondershare Filmora Video Editor , which allows you to create both the 4:3, 9:16, 16:9, and 1:1 aspect ratio videos quite simply. You can conveniently share the created videos on YouTube, Apple TV, Vimeo, and mobile devices.
The Filmora also assists you in changing the project aspect ratio after launching the video editor program. Hit the drop-down tab and go through the 16:9, 1:1, 9:16, 4:3, and 21:9 aspect ratios to select among.
Key Takeaways from This Episode
● A complete overview of aspect ratio calculators.
● Understanding 5 best aspect ratio calculators.
● An ideal aspect ratio calculator to permanently change the video’s aspect ratio.
Capture Your Best: Top 10 Webcam Recording Software for Windows 10
10 Best Webcam Recording Software for Windows 10

Richard Bennett
Mar 27, 2024• Proven solutions
Which webcam softwarehave you installed on your laptop or desktop? Using the right webcam software to live stream videos, screen record videos, or chat on Skype results in high-quality images, smooth streaming, and high-quality images and videos.
There is a huge number of free webcam software with advanced features yet free for you to download, and use on your PC.
But how would you determine the best webcam software to use?
Before you mounted that webcam on your desktop or laptop, you had a reason. It’s your webcam features and purpose that should guide you to select the right software for the webcam camera.
In this article, we will show you 10 webcam software for Windows in this guide. Included are the most useful factors to consider as you make your choice – complexity of use, free/paid, integrations, editing tools, and more. You will learn:
- Part 1: The Best Webcam & Screen Recorder for Windows and Mac [Video Tutorial]
- Part 2: Top 10 Best Free Webcam Software for Windows
First take a quick look of the 10 best webcam software that is available on your Windows from a video:
For Win 7 or later (64-bit)
 Secure Download
For macOS 10.14 or later
Secure Download
Part 1: The Best Webcam & Screen Recorder for Computer
You need a sound and webcam recorder to record your video tutorials, streaming videos, presentations, or any other type of video. Wondershare Filmora is the software to use. Other than its most admired friendly intuitive interface, it’s simple and easy to use-suitable for both beginners and professionals.
For Win 7 or later (64-bit)
Secure Download
For macOS 10.14 or later
Secure Download
Among the outstanding features, you’ll find in Filmora include,
- Fast-paced recording speed of up to 120 fps
- Adverse professional editing tools that are easy to use
- Simultaneous recording from both webcam and computer screen
- Compatible with 50+ different file formats
- Rich title text and tutorial features
It’s free to download. Have a try now! Join in the Wondershare Video Community and get some inspiration from other Filomora users.
Part 2: Top 10 Best Free Webcam Software for Windows
To help you evaluate which webcam software best suits your needs, I’ve featured the strengths, shortcomings, and support services in each software review.
This is the list of the best free webcam software for Windows 10.
| 1 - Logitech Capture | 2 - CyberLink Youcam |
|---|---|
| 3 - ManyCam | 4 - SplitCam |
| 5 - Bandicam | 6 - NCH - Video Capture Software |
| 7 - YAWCAM | 8 - Windows Camera |
| 9 - Fake Webcam | 10 - IP Camera Viewer |
1. Logitech Capture
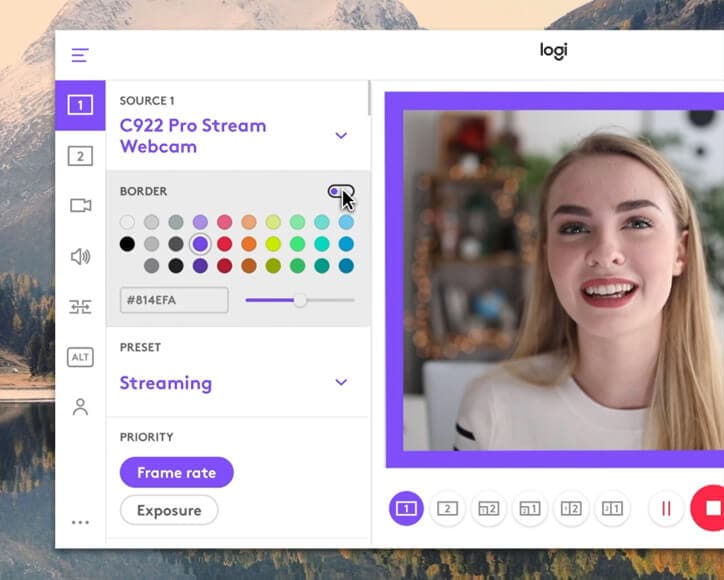
The multiple source recording feature and direct streaming app are the key strengths of this software. According to its mission statement- All-In-One Content Creation- you can use this software to record, edit, customize, and stream to your favorite channel.
Operating systems: Windows 10/8/7
Price: Free
Supported webcams: 1080P PRO STREAM, BRIO STREAM, C920s HD PRO, C922 PRO STREAM
Logitech Capture is among the few free webcam recording software for Windows 10 with studio controls applicable during recording. You can use this feature to adjust your image, create frames, adjust focus and transitions, and enable ChromaKey as you record.
In case you want to create a picture-in-picture presentation, this software allows you to use two webcams simultaneously. With the source switching and the auto-focus features, you can record the best tutorials or guides that show all dimensions and your image.
Pros
- Rich in transitions and effects
- Portrait optimization for mobile devices
- Its Capture app offers direct streaming to YouTube
- You can take passports or still images
Cons
- Limited to YouTube channel
- Account registration is mandatory
2. CyberLink Youcam
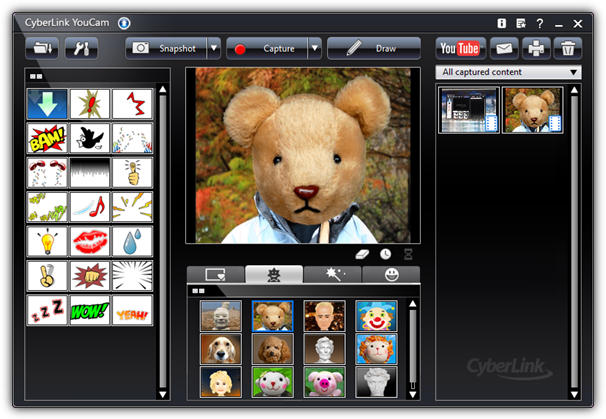
If you are used to video chatting and video recording, then, you’ll have 200+ fun effects to make your real-time videos as interesting as possible. In fact, the seamless app integration feature will keep your live streaming chats without buffering for long.
Operating systems: Windows 10/8/1.8/7
Price: Free/ Paid
Supported file formats: WMV, MP4, AVI
YouCam is the best free webcam software Windows 10 for YouTubers, business professionals, Streamers, home users, and Vloggers. It seamlessly integrates with live streaming media channels like Twitch, Wirecast, OBS Studio, Facebook Live, Xsplit, and YouTube Live.
The YouCam’s AR technology is one of its hidden treasures that will lighten up your skin by applying a natural-looking makeup. If your room is badly light, use the Live Skin Smoothing feature. Just below it is the TrueTheater Enhancement option to help you automatically adjust your facial sharpness and lighting.
Pros
- Hundreds of animated emojis
- Suitable for video conferencing services
- Plenty of interactive colorful particles and distortions
- Availability of face beautification tool
Cons
- Only limited to the Windows operating system
- Very few features for the free plan
3. ManyCam
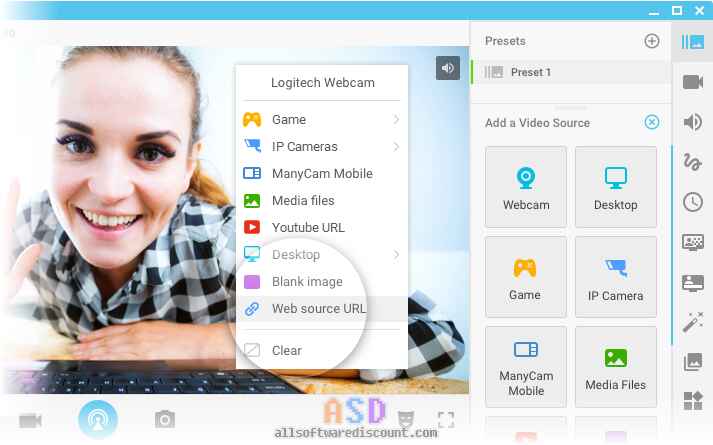
Downloading this webcam software guarantees you smooth streaming and effortless recording of videos. Also, this software will help you during game steaming, online education, mobile live streaming, and live telehealth communication.
Operating systems: Windows 10/8/7 and macOS X
Price: Free /Paid
Supported file formats: MJPEG, IP, MP4, AVI, MPEG, MOV
ManyCam is a free webcam recording software for windows 10 . It’s among the most widely used software internationally-not for many reasons, but because of its friendly intuitive user interface and live streaming tools for lessons and lecturers.
So, if you are a lecturer/teacher, you can use the Software Development Kit (SDK) to integrate the webcam with any online teaching platform. Among the features designed to facilitate better online teaching include the picture in picture, Chroma Key, multiple video sources, and screen sharing.
Pro
- Ability to stream 4K videos
- Real-time camera control settings
- No watermark even on the free plan
- Screencasting and screen recording feature
- Real-time drop and drag effects
Cons
- Expensive business subscription plans
- No Light enhancement features
- Most features are manual as opposed to being automatic

Filmora WebCame & Screen Recorder
Filmora - WebCame & Screen Recorder
• No-time delay to record webcam and screen while live streaming or gaming
• Edit recording video for marketing replay or adding game commentary
• Cross-platform supported - (Windows, Mac, iOS, Android)
Start Webcam & Screen Record Start Webcam & Screen Record Start Webcam & Screen Record Learn More >
4. SplitCam
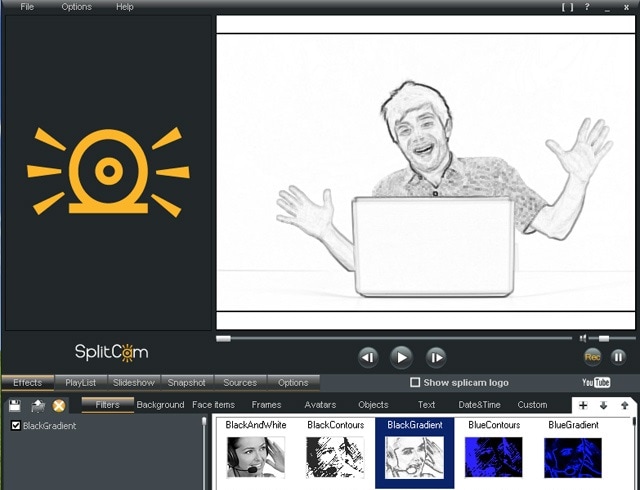
To stream your desktop/laptop screen SplitCam is the most appropriate software. With only the inbuilt virtual webcam, you can share your screen videos to media channels and IMS. Other uses of this software are recording webcam chatting , streaming live videos, and messaging.
Operating systems: Windows 10/8/7
Price: Free
SplitCam is not as popular as the other free webcam software windows 10 like ManyCam and YouCam. This is because it doesn’t integrate with some of the world’s renowned social media platforms- Facebook and Instagram. However, you can use this software to stream, take snapshots, and record videos for YouTube, Skype, Justin.tv, Gtalk, and Windows Live Messenger.
SplitCam is rich in fantastic webcam effects. Haven’t you been surprised to see someone appear to be streaming from the ocean or the Amazon Mountain? This is what you can do with SplitCam. Other cool effects are frames, texts on videos, filters, and facial items like masks and fake face glasses.
Pros
- Open and simple interface
- Integratable with the messaging apps
- Supports a wide range of resolutions ( between 320x180 and 2048x1536)
Cons
- Applicable to a small number of channels
- Supported file formats not defined
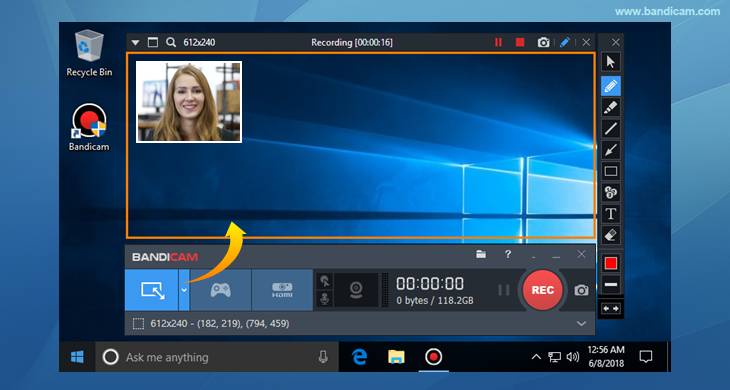
5. Bandicam
Do you want a recorder for screen recording, recording your gameplay, or capturing videos from devices like smartphones and PlayStation? Look for no other software but BandiCam. You can also merge two or more video files, remove unwanted parts, and select the only part to screen record.
Operating systems: Windows Vista, 10/8/7
Price: Free/paid
Supported file format: AVI, MP4, JPEG, TIF, GIF, PNG
Supported graphics cards: Nvidia NVENC, Nvidia NVENC (),
BandiCam is another HD webcam software Windows 10 with the capability of capturing high compression videos and games on your PC screen videos without compromising the video quality. Don’t forget to record all webinars aired in your niche.
Netflix is becoming more popular each day due to the thrilling videos. With the BandiCam screen recorder, you can record live-streamed videos on Netflix for over 24hrs. These are the tools to edit your recorded video: real-time drawing tool, webcam overlay, sound mixer, and Chroma Key.
Pros
- No hidden features
- Widescreen capture
- Can record 2D/3D videos in HD mode
- Can capture fast-paced videos of up to 144 FPS
Cons
- Not suitable for beginners
- Cannot be used to live stream videos
6. NCH - Video Capture Software

Of all the listed webcam software in this review, this software has the most diverse functions. You can record streaming videos, record your computer screen, record from external devices, and record from a webcam. It’s also perfect for recording audios and simultaneous recording from screen and webcam.
Operating systems: Windows 10, 8, 8.1, 7, XP, Vista 64 bit and Mac OS X 10.5 and above
Price: Free/paid
Supported file formats: MP4, WMV, AVI, MPG, FLV, MOV
Debut Video Capture is the only free webcam recording software for Windows 10 believed to capture or record videos from any external source. It has also preset settings for HD and TV with pre-production enhancement features like color adjustment settings, overlay buttons and frame rate, aspect ratio, and resolution settings.
If you always think of becoming rich, the Express Burn Disc Burner is the tool that will help you make money. Record the most trending videos and use this tool to burn DVDs and CDs.
Pros
- Can record videos for any social media platform
- Supports a wide range of audio and video file formats
- All features are open and easy to use
- Availability of video editing software
Cons
- Only monthly subscriptions for paid plans
- Watermark for the free download
- Difficult to record a full-screen movie
Try Filmora to Smoothly Record WebCame and Screen!
Filmora Web Camera & Screen Recorder can capture any area of the PC screen and webcam. It’s perfect to capture and record while making a live gaming match, marketing promotion, guiding a tour, and more. Plus, you can edit the recording video files in Filmora directly! Worth to have a try!
Start Webcam & Screen Recording Start Webcam & Screen Recording Start Webcam & Screen Recording Learn More >
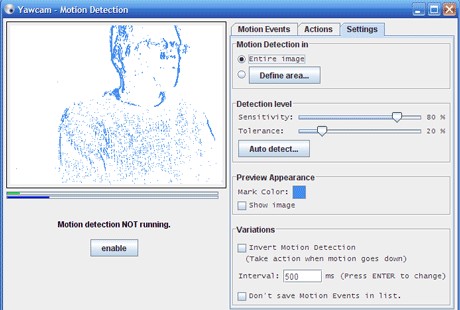
7. YAWCAM
This webcam software can be referred to as the simplest for all beginners with the will to start streaming and recording videos for personal or home use.
Supported file formats: PNG, JPG, MJPEG, GIF, JavaScript
Price: Free
Supported operating systems: Windows 2000/10/8/7/ Vista and XP
YAWCAM is an absolutely free webcam software windows 10. Why is it the simplest software to use? Just download and you will find all features on one page. Simple language commands aligned in a drop-down menu ready to be used with only one click.
Some of the best features include overlay texts and images, scheduler, motion detection, and an inbuilt webserver. For you to use this webcam software, use these supported devices; DirectX compatible webcams, DV-camera, or video capture devices.
Pros
- No watermark
- Easy to use
- Friendly user interface
Cons
- Few transitions and effects
8. Windows Camera
We all trust any app or software by Microsoft over others! If you also do, then you can download Windows Camera and use it to record videos, take snapshots and shoot videos.
Operating system: Windows 10
Price: Free
Supported devices: Xbox One, Windows, mobile
Windows Camera is among the best free webcam software for Windows 10. This is because of the software’s few but easy-to-use and effective features that are expertly designed for PCs and tablets installed with Windows 10.
The automatic photo back combined with the photo-shoot timer makes it perfect for taking selfies and passports. Using the panorama feature, you can take photos of the best scenes and share them on media platforms.
Pros
- Simplicity is its main strength
- Supports resolutions above 1080p
- Good for photographers
Cons
- Has no built-in virtual webcam
- Requires a camera to support 4K videos
9. Fake Webcam

Supported file formats: AVI, MPEG, DVD, VCD, WMV, 3GP, MP4, SVCD, MOV, ASF,
Price: Free /paid
Operating systems: Windows 7/8/10 (32/64 bit)
Fake Webcam is a free webcam software Windows 10 whose name is creatively used to suggest it almost functions like a webcam. This doesn’t fall far from the truth! You can truly use this software to broadcast, add effects and filters, record on full screen, and fake your voice.
To share or stream your photos and videos on Skype, YIM, or Gtalk, using the screen recorder would give the best results. What makes Fake Webcam stand out is the free video converter and the free video toolkit.
Pros
- Free support tools
- Supports all video and audio formats
- Can convert file formats and stream to any channel
- Availability of the screen recorder
- Integratable with almost all instant messengers
Cons
- Major tools not free(Fake Webcam and Screen recorder)
10. IP Camera Viewer
Do you run a supermarket store, mall or you’ve installed security surveillance cameras in your compound? IP Camera Viewer is the most effective webcam software for video monitoring systems.
Supported file formats: JPEG, MPEG-4, MJPEG, and
Price: Free
Operating systems: Windows 10 / 8 / 7 /2012 /Vista and XP
IP Camera Viewer is the most used free webcam recording software for windows 10 as its compatible with almost all IP camera models like Panasonic, Toshiba, Canon, D-Link, Sony, and more the 2000 others. With the capability of viewing and controlling 4 camera feeds at once, you can use this software to monitor your entire compound.
Some of the important advanced IP Camera Viewer functions include listening to webcam audios, adjust image settings, zoom or tilt images, schedule monitoring times, and detect motions.
Pros
- Automatically uploads recorded videos and photos to a server
- Compatible with almost all IP camera models
- Simple and easy to use
Cons
- No inbuilt media player
- Cannot adjust the image or video quality
You may also want to read >>> 10 Best Webcams | A Buyer’s Guide
![]()
A cross-platform for making videos anywhere for all creators

Why your video editing isn’t good enough? How about some creative inspo?
- 100 Million+ Users
- 150+ Countries and Regions
- 4 Million+ Social Media Followers
- 5 Million+ Stock Media for Use
* Secure Download

FAQs about Webcam Software for Windows
1. What is Webcam Software?
A webcam is a video camera that feeds or streams images or video in real-time to or over a computer network. And webcam software enables users to record video or stream video over the Internet.
Webcam software is an application that allows you to capture video from your laptop/desktop webcam and record or stream video over the Internet. You can use them to deliver professional videos, streaming, and online courses easily.
2. Does Windows have built-in webcam software?
Windows 10 has an in-built webcam app called Camera that lets you record videos and take pictures with your webcam. This is definitely better than downloading 3rd party webcam recording software where spyware/malware is rampant.
3. Does a webcam need software?
Yes, if the camera hardware offers depth, low-light support, night vision, etc. If you use any software on the camera, these functions are only available if the driver is installed.
Conclusion
After a keen of all the webcam software above, it’s evident that every developer had an intended purpose. You cannot therefore just randomly wake up and download any without considering its functions, supported devices, file formats, and the auxiliary apps available. All this information is contained herein.
According to some users, there are free webcam software Windows 10 that more often would not show any video images but the audio is absolutely clear. To help your fellow user, what bad experience have you ever had after recording a game using webcam software ? Kindly share your comment or suggestion on our social media platforms.


Richard Bennett
Richard Bennett is a writer and a lover of all things video.
Follow @Richard Bennett
Richard Bennett
Mar 27, 2024• Proven solutions
Which webcam softwarehave you installed on your laptop or desktop? Using the right webcam software to live stream videos, screen record videos, or chat on Skype results in high-quality images, smooth streaming, and high-quality images and videos.
There is a huge number of free webcam software with advanced features yet free for you to download, and use on your PC.
But how would you determine the best webcam software to use?
Before you mounted that webcam on your desktop or laptop, you had a reason. It’s your webcam features and purpose that should guide you to select the right software for the webcam camera.
In this article, we will show you 10 webcam software for Windows in this guide. Included are the most useful factors to consider as you make your choice – complexity of use, free/paid, integrations, editing tools, and more. You will learn:
- Part 1: The Best Webcam & Screen Recorder for Windows and Mac [Video Tutorial]
- Part 2: Top 10 Best Free Webcam Software for Windows
First take a quick look of the 10 best webcam software that is available on your Windows from a video:
For Win 7 or later (64-bit)
Secure Download
For macOS 10.14 or later
Secure Download
Part 1: The Best Webcam & Screen Recorder for Computer
You need a sound and webcam recorder to record your video tutorials, streaming videos, presentations, or any other type of video. Wondershare Filmora is the software to use. Other than its most admired friendly intuitive interface, it’s simple and easy to use-suitable for both beginners and professionals.
For Win 7 or later (64-bit)
Secure Download
For macOS 10.14 or later
Secure Download
Among the outstanding features, you’ll find in Filmora include,
- Fast-paced recording speed of up to 120 fps
- Adverse professional editing tools that are easy to use
- Simultaneous recording from both webcam and computer screen
- Compatible with 50+ different file formats
- Rich title text and tutorial features
It’s free to download. Have a try now! Join in the Wondershare Video Community and get some inspiration from other Filomora users.
Part 2: Top 10 Best Free Webcam Software for Windows
To help you evaluate which webcam software best suits your needs, I’ve featured the strengths, shortcomings, and support services in each software review.
This is the list of the best free webcam software for Windows 10.
| 1 - Logitech Capture | 2 - CyberLink Youcam |
|---|---|
| 3 - ManyCam | 4 - SplitCam |
| 5 - Bandicam | 6 - NCH - Video Capture Software |
| 7 - YAWCAM | 8 - Windows Camera |
| 9 - Fake Webcam | 10 - IP Camera Viewer |
1. Logitech Capture
The multiple source recording feature and direct streaming app are the key strengths of this software. According to its mission statement- All-In-One Content Creation- you can use this software to record, edit, customize, and stream to your favorite channel.
Operating systems: Windows 10/8/7
Price: Free
Supported webcams: 1080P PRO STREAM, BRIO STREAM, C920s HD PRO, C922 PRO STREAM
Logitech Capture is among the few free webcam recording software for Windows 10 with studio controls applicable during recording. You can use this feature to adjust your image, create frames, adjust focus and transitions, and enable ChromaKey as you record.
In case you want to create a picture-in-picture presentation, this software allows you to use two webcams simultaneously. With the source switching and the auto-focus features, you can record the best tutorials or guides that show all dimensions and your image.
Pros
- Rich in transitions and effects
- Portrait optimization for mobile devices
- Its Capture app offers direct streaming to YouTube
- You can take passports or still images
Cons
- Limited to YouTube channel
- Account registration is mandatory
2. CyberLink Youcam
If you are used to video chatting and video recording, then, you’ll have 200+ fun effects to make your real-time videos as interesting as possible. In fact, the seamless app integration feature will keep your live streaming chats without buffering for long.
Operating systems: Windows 10/8/1.8/7
Price: Free/ Paid
Supported file formats: WMV, MP4, AVI
YouCam is the best free webcam software Windows 10 for YouTubers, business professionals, Streamers, home users, and Vloggers. It seamlessly integrates with live streaming media channels like Twitch, Wirecast, OBS Studio, Facebook Live, Xsplit, and YouTube Live.
The YouCam’s AR technology is one of its hidden treasures that will lighten up your skin by applying a natural-looking makeup. If your room is badly light, use the Live Skin Smoothing feature. Just below it is the TrueTheater Enhancement option to help you automatically adjust your facial sharpness and lighting.
Pros
- Hundreds of animated emojis
- Suitable for video conferencing services
- Plenty of interactive colorful particles and distortions
- Availability of face beautification tool
Cons
- Only limited to the Windows operating system
- Very few features for the free plan
3. ManyCam
Downloading this webcam software guarantees you smooth streaming and effortless recording of videos. Also, this software will help you during game steaming, online education, mobile live streaming, and live telehealth communication.
Operating systems: Windows 10/8/7 and macOS X
Price: Free /Paid
Supported file formats: MJPEG, IP, MP4, AVI, MPEG, MOV
ManyCam is a free webcam recording software for windows 10 . It’s among the most widely used software internationally-not for many reasons, but because of its friendly intuitive user interface and live streaming tools for lessons and lecturers.
So, if you are a lecturer/teacher, you can use the Software Development Kit (SDK) to integrate the webcam with any online teaching platform. Among the features designed to facilitate better online teaching include the picture in picture, Chroma Key, multiple video sources, and screen sharing.
Pro
- Ability to stream 4K videos
- Real-time camera control settings
- No watermark even on the free plan
- Screencasting and screen recording feature
- Real-time drop and drag effects
Cons
- Expensive business subscription plans
- No Light enhancement features
- Most features are manual as opposed to being automatic
Filmora WebCame & Screen Recorder
Filmora - WebCame & Screen Recorder
• No-time delay to record webcam and screen while live streaming or gaming
• Edit recording video for marketing replay or adding game commentary
• Cross-platform supported - (Windows, Mac, iOS, Android)
Start Webcam & Screen Record Start Webcam & Screen Record Start Webcam & Screen Record Learn More >
4. SplitCam
To stream your desktop/laptop screen SplitCam is the most appropriate software. With only the inbuilt virtual webcam, you can share your screen videos to media channels and IMS. Other uses of this software are recording webcam chatting , streaming live videos, and messaging.
Operating systems: Windows 10/8/7
Price: Free
SplitCam is not as popular as the other free webcam software windows 10 like ManyCam and YouCam. This is because it doesn’t integrate with some of the world’s renowned social media platforms- Facebook and Instagram. However, you can use this software to stream, take snapshots, and record videos for YouTube, Skype, Justin.tv, Gtalk, and Windows Live Messenger.
SplitCam is rich in fantastic webcam effects. Haven’t you been surprised to see someone appear to be streaming from the ocean or the Amazon Mountain? This is what you can do with SplitCam. Other cool effects are frames, texts on videos, filters, and facial items like masks and fake face glasses.
Pros
- Open and simple interface
- Integratable with the messaging apps
- Supports a wide range of resolutions ( between 320x180 and 2048x1536)
Cons
- Applicable to a small number of channels
- Supported file formats not defined
5. Bandicam
Do you want a recorder for screen recording, recording your gameplay, or capturing videos from devices like smartphones and PlayStation? Look for no other software but BandiCam. You can also merge two or more video files, remove unwanted parts, and select the only part to screen record.
Operating systems: Windows Vista, 10/8/7
Price: Free/paid
Supported file format: AVI, MP4, JPEG, TIF, GIF, PNG
Supported graphics cards: Nvidia NVENC, Nvidia NVENC (),
BandiCam is another HD webcam software Windows 10 with the capability of capturing high compression videos and games on your PC screen videos without compromising the video quality. Don’t forget to record all webinars aired in your niche.
Netflix is becoming more popular each day due to the thrilling videos. With the BandiCam screen recorder, you can record live-streamed videos on Netflix for over 24hrs. These are the tools to edit your recorded video: real-time drawing tool, webcam overlay, sound mixer, and Chroma Key.
Pros
- No hidden features
- Widescreen capture
- Can record 2D/3D videos in HD mode
- Can capture fast-paced videos of up to 144 FPS
Cons
- Not suitable for beginners
- Cannot be used to live stream videos
6. NCH - Video Capture Software
Of all the listed webcam software in this review, this software has the most diverse functions. You can record streaming videos, record your computer screen, record from external devices, and record from a webcam. It’s also perfect for recording audios and simultaneous recording from screen and webcam.
Operating systems: Windows 10, 8, 8.1, 7, XP, Vista 64 bit and Mac OS X 10.5 and above
Price: Free/paid
Supported file formats: MP4, WMV, AVI, MPG, FLV, MOV
Debut Video Capture is the only free webcam recording software for Windows 10 believed to capture or record videos from any external source. It has also preset settings for HD and TV with pre-production enhancement features like color adjustment settings, overlay buttons and frame rate, aspect ratio, and resolution settings.
If you always think of becoming rich, the Express Burn Disc Burner is the tool that will help you make money. Record the most trending videos and use this tool to burn DVDs and CDs.
Pros
- Can record videos for any social media platform
- Supports a wide range of audio and video file formats
- All features are open and easy to use
- Availability of video editing software
Cons
- Only monthly subscriptions for paid plans
- Watermark for the free download
- Difficult to record a full-screen movie
Try Filmora to Smoothly Record WebCame and Screen!
Filmora Web Camera & Screen Recorder can capture any area of the PC screen and webcam. It’s perfect to capture and record while making a live gaming match, marketing promotion, guiding a tour, and more. Plus, you can edit the recording video files in Filmora directly! Worth to have a try!
Start Webcam & Screen Recording Start Webcam & Screen Recording Start Webcam & Screen Recording Learn More >
7. YAWCAM
This webcam software can be referred to as the simplest for all beginners with the will to start streaming and recording videos for personal or home use.
Supported file formats: PNG, JPG, MJPEG, GIF, JavaScript
Price: Free
Supported operating systems: Windows 2000/10/8/7/ Vista and XP
YAWCAM is an absolutely free webcam software windows 10. Why is it the simplest software to use? Just download and you will find all features on one page. Simple language commands aligned in a drop-down menu ready to be used with only one click.
Some of the best features include overlay texts and images, scheduler, motion detection, and an inbuilt webserver. For you to use this webcam software, use these supported devices; DirectX compatible webcams, DV-camera, or video capture devices.
Pros
- No watermark
- Easy to use
- Friendly user interface
Cons
- Few transitions and effects
8. Windows Camera
We all trust any app or software by Microsoft over others! If you also do, then you can download Windows Camera and use it to record videos, take snapshots and shoot videos.
Operating system: Windows 10
Price: Free
Supported devices: Xbox One, Windows, mobile
Windows Camera is among the best free webcam software for Windows 10. This is because of the software’s few but easy-to-use and effective features that are expertly designed for PCs and tablets installed with Windows 10.
The automatic photo back combined with the photo-shoot timer makes it perfect for taking selfies and passports. Using the panorama feature, you can take photos of the best scenes and share them on media platforms.
Pros
- Simplicity is its main strength
- Supports resolutions above 1080p
- Good for photographers
Cons
- Has no built-in virtual webcam
- Requires a camera to support 4K videos
9. Fake Webcam
Supported file formats: AVI, MPEG, DVD, VCD, WMV, 3GP, MP4, SVCD, MOV, ASF,
Price: Free /paid
Operating systems: Windows 7/8/10 (32/64 bit)
Fake Webcam is a free webcam software Windows 10 whose name is creatively used to suggest it almost functions like a webcam. This doesn’t fall far from the truth! You can truly use this software to broadcast, add effects and filters, record on full screen, and fake your voice.
To share or stream your photos and videos on Skype, YIM, or Gtalk, using the screen recorder would give the best results. What makes Fake Webcam stand out is the free video converter and the free video toolkit.
Pros
- Free support tools
- Supports all video and audio formats
- Can convert file formats and stream to any channel
- Availability of the screen recorder
- Integratable with almost all instant messengers
Cons
- Major tools not free(Fake Webcam and Screen recorder)
10. IP Camera Viewer
Do you run a supermarket store, mall or you’ve installed security surveillance cameras in your compound? IP Camera Viewer is the most effective webcam software for video monitoring systems.
Supported file formats: JPEG, MPEG-4, MJPEG, and
Price: Free
Operating systems: Windows 10 / 8 / 7 /2012 /Vista and XP
IP Camera Viewer is the most used free webcam recording software for windows 10 as its compatible with almost all IP camera models like Panasonic, Toshiba, Canon, D-Link, Sony, and more the 2000 others. With the capability of viewing and controlling 4 camera feeds at once, you can use this software to monitor your entire compound.
Some of the important advanced IP Camera Viewer functions include listening to webcam audios, adjust image settings, zoom or tilt images, schedule monitoring times, and detect motions.
Pros
- Automatically uploads recorded videos and photos to a server
- Compatible with almost all IP camera models
- Simple and easy to use
Cons
- No inbuilt media player
- Cannot adjust the image or video quality
You may also want to read >>> 10 Best Webcams | A Buyer’s Guide
![]()
A cross-platform for making videos anywhere for all creators
Why your video editing isn’t good enough? How about some creative inspo?
- 100 Million+ Users
- 150+ Countries and Regions
- 4 Million+ Social Media Followers
- 5 Million+ Stock Media for Use
* Secure Download
FAQs about Webcam Software for Windows
1. What is Webcam Software?
A webcam is a video camera that feeds or streams images or video in real-time to or over a computer network. And webcam software enables users to record video or stream video over the Internet.
Webcam software is an application that allows you to capture video from your laptop/desktop webcam and record or stream video over the Internet. You can use them to deliver professional videos, streaming, and online courses easily.
2. Does Windows have built-in webcam software?
Windows 10 has an in-built webcam app called Camera that lets you record videos and take pictures with your webcam. This is definitely better than downloading 3rd party webcam recording software where spyware/malware is rampant.
3. Does a webcam need software?
Yes, if the camera hardware offers depth, low-light support, night vision, etc. If you use any software on the camera, these functions are only available if the driver is installed.
Conclusion
After a keen of all the webcam software above, it’s evident that every developer had an intended purpose. You cannot therefore just randomly wake up and download any without considering its functions, supported devices, file formats, and the auxiliary apps available. All this information is contained herein.
According to some users, there are free webcam software Windows 10 that more often would not show any video images but the audio is absolutely clear. To help your fellow user, what bad experience have you ever had after recording a game using webcam software ? Kindly share your comment or suggestion on our social media platforms.
Richard Bennett
Richard Bennett is a writer and a lover of all things video.
Follow @Richard Bennett
Unleash Your Creativity: Top-Rated 3D Animation Software for All Levels
Best 3D Animation Software Free and Paid

Shanoon Cox
Mar 27, 2024• Proven solutions
Are you in search of some of the best 3D animation software? There are several uses of the 3D animation software creator, like creating movies, creating characters, adding voiceovers to the characters, etc.
The 3D animation maker has a great deal to explore, which is fun. If you are familiar with 2D animation editors or love animation just for fun, you can try the free 3D animation software.
Although you can find a great number of animation software in the market, we can trust only a few of them completely. In this article, you can explore the best 3D animation software, which is free, paid, and trending on the popularity charts.
Recommended 3D Animation Software - Filmora
If you want more controls on 3D animation videos, here we recommend using Filmora .
You need to build a white plane to start making 3D animation with keyframes easily. Filmora offers six different types of keyframes to let your animation become smooth and natural.
Besides, auto color correction and audio mixer will upgrade your 3D animation video to a new level. You can also apply light flares effects to make amazing 3D animation. Now, free download it to have a try!
Download Mac Version ](https://tools.techidaily.com/wondershare/filmora/download/ )
Below is a comparison table where you can find the best free 3D animation makers. Some 3D animation makers are easy to use. Take a look!
| Price | OS | Pros | Features | |
|---|---|---|---|---|
| Blender | Free | Windows, Linux, and macOS | Best 3d animation software; Active community globally | Powerful rendering support |
| Wings 3D | Free | Windows, Linux, Unix and Mac OS X | Easy 3d animation software; Open source and completely free | Its interface is customizable |
| K-3D | Free | GNU/Linux, MacOS X, FreeBSD, Windows | Intuitive 3d animation maker; Node-based visualization pipeline. | Endless redo feature |
| Source Filmmaker | Free | Windows | Any games can be used in this animation maker | Game lovers will like it |
| Mixamo Maya | Free $225 per month $1,785 per year $5,085 every 3 years | Windows, MacOS and Linux Windows, MacOS and Linux | Vivid and high-quality animated 3D characters Time Editor to edit animation faster; You can collect motion capture data | Belong to adobe family Easy to use Motion graphics |
| Cinema 4D | $61.19 per month $734.40 per year | Windows, MacOS and Linux | Intuitive interface to make 3D animation | Fluid workflow to start editing for beginners |
| Houdini | $1,995/year | Windows, MacOs | Powerful VEX to make excellent 3D animations | Quick guide for learners |
| ZBrush MotionBuilder | $39.95 per month $2,045 per year $5,830 every 3 year | Windows Vista and MacOs Windows and Linux | Ideal for 3D amination. Adjust animation in moments . | Amazing sculpting tools. Simple to make adjustment. |
Part 1: Best Free 3D Animation Software
1. Blender
Pros:
- Both manual and auto-tracking
- Camera restoration is powerful
- Curve editor and dope sheets
- Customize layout and interface
An open-source professional, free 3D animation software, Blender is used to host various applications like visual effects, animated feature films, video games, and more. The Blender supports the entire 3D tree, including rigging, modeling, animating, simulating, compositing, rendering, and tracking motion. The features of Blender are:
Features:
- CPU, GPU, VR rendering support.
- Masking and textured brushes for 3D painting.
- Add-ons and customized tools with Python scripting
- Bridge fill, edge slide, grid, inset.

2. Wings 3D
Pros:
- Various modeling tools to make 3D effects.
- Completely free for use for commercial usage.
- Include a forum to communicate with users.
An easy-to-use, unconventional sector modeler, Wings 3D is a powerful 3D animation software. Whether you are a commercial 3D animation creator or a non-professional, Wings 3D is a free and open-source 3D animation software. The features of Winds 3D include:
Features:
- Customized interface.
- Support for materials and lights.
- Built-in AutoUV mapping facility

3.K-3D
Pros:
- Intuitive interface to make 3D effects
- Can always go back to undo operations
- Free-to-use
One of the best 3D animation software is K-3D. K-3D features a procedural engine plugin for its content. It is a free 3D animation software that supports polygonal modeling. A visual pipeline architecture combines the flexible plugins that make the K-3D software a powerful and versatile tool. The features include:
Features:
- Consistent and intuitive.
- Consist of basic tools for animation, patches, curves, and NURVS.
- Parametric workflow.
- It can be run on Windows, macOS X, Linux, and FreeBSD.

4.Source Filmmaker
Pros :
- The virtual movie set with lights, actors, props, and cameras.
- Create your movies and add features as per your requirement.
- Manages the entire workflow needed to make a movie into one single system.
This 3D animation software lets you make a movie inside the game engine Source. Wondering how? It is because whatever assets are present in the game, the Source Filmmaker uses them. So, the game’s assets are used by SFM in the film and vice versa. The features of this movie-making tool include:
Features:
- Renders power of a modern gaming PC.
- Whatever you see in the game is what you get in the movie.
- Completely free to download

5**_._**Mixamo
Pros:
- Download multiple animations at one go.
- Fast character and animation browsing.
With a straightforward and faster workflow, the Mixamo 3D software’s newest user experience and interface make it too easy to instantly find, create, organize, and share assets and animation. The features of this 3D animation software include:
Features:
- User experience is streamlined.
- Fully customizable animation packs.
- The faster and more accurate search function.

Part 2: Best Paid 3D Animation Software
6**_._**Maya
Pros:
- Perfect accuracy and control.
- Create flying logos, title sequences, branding, etc.
- Higher performance in a high fidelity environment
If you want to create or develop games, 3D scenes, movies, or characters, Maya is one of the best 3D animation software tools available. Although a paid software, Maya 3D animation creator does complete justice to its various coloring, animating, and modeling features.
Maya LT - Create 3D characters and environments for your indie game with a more cost-effective tool based on production-proven 3D products. Buy now! The features are:
Features:
- 30 days of a free trial
- Uncomplicated software
- Create complex technical effects
- High-level animation edits

7**_._**Cinema 4D
Pros:
- Dissect complete scenes
- Customized with a huge range of assets
A faster 3D animation software tool than Maya, Cinema 4D offers a gentle curve for learning but does not cover all like Maya. The high-speed feature makes the Cinema 4D software desirable in television, advertisements, and various motion graphics. The features are:
Features:
- Extensive library of preset scenes, material, and objects
- Develop concepts without time modeling

8.Houdini
Pros:
- Time-space motion path handles
- Support import and export to a range of formats
- Robust built-in rendering solution
Developed by the Toronto-based Side Effects Software, Houdini covers every major part that a 3D animation software should do. This 3D animation maker was adapted by the PRISMS group of procedural generation software tools. Houdini’s keen focus on procedural generation differentiates it from other 3D animation creators. The features of this 3D animation software are:
Features:
- Powerful and accessible 3D animation experience
- Rigging animate characters
- Add Character FX like fur, hair, etc.

9.ZBrush
Pros:
- A fantastic selection of sculpting tools.
- Easy to handle millions of polygons.
ZBrush 4 offers a smart technique to communicate your work with a director or online. Saved camera angles can be switched using a timeline. This improves productivity or creates intricate turntable animations. Animate between morph targets and model positions to check UV maps and facial expressions. Watch your model move with ZSpheres. Layer animation can animate between textures and PolyPaint variants. Import music or use ZBrush to create a demo reel with exact animation synchronization. The timeline interface features auto magnification, jump cuts, and relaxation. The timeline features let you present your work effectively. ZBrush is a modeling and sculpting application for organic structures.
Features:
- Several things can be animated, including layers, subtool visibility, backdrop colors, poly frame display, ZSpheres, camera angles, subdivision levels, and more.
- Your mesh animation can be exported to Modo in MDD format.
- Streamlines and expedites the movement of the face.

9.MotionBuilder:
Pros:
- Develop captivating animations for the characters.
- Participate in activities that require teamwork.
- Modify the animations in an instant.
MotionBuilder is a very specialized animation software that lets you work with 3D animation. The program is only available in a paid version, and the user interface is in two languages. You can save time by using the app to apply moves that have already been used to new characters. The animations can be watched in real-time. MotionBuilder can also be used with other Autodesk programs like Maya, 3ds Max, and others.
Features:
- Move your characters in a manner that is consistent with reality.
- Easily make adjustments and adjustments to animations.

Conclusion
This is the list of the free and paid best 3D animation software. So, whenever you are confused and need any assistance regarding 3D animation software, go through this article and find the right solution. Undoubtedly, Filmora is one of the best tools for 3D animation. With a range of features like ease of interface access, preset animation effects, multiple tracks to add various videos, and more, a complete package ensures a great 3D animation software usage tool. Just a little trial and error can make you perfect.
Download Mac Version ](https://tools.techidaily.com/wondershare/filmora/download/ )
Shanoon Cox
Shanoon Cox is a writer and a lover of all things video.
Follow @Shanoon Cox
Shanoon Cox
Mar 27, 2024• Proven solutions
Are you in search of some of the best 3D animation software? There are several uses of the 3D animation software creator, like creating movies, creating characters, adding voiceovers to the characters, etc.
The 3D animation maker has a great deal to explore, which is fun. If you are familiar with 2D animation editors or love animation just for fun, you can try the free 3D animation software.
Although you can find a great number of animation software in the market, we can trust only a few of them completely. In this article, you can explore the best 3D animation software, which is free, paid, and trending on the popularity charts.
Recommended 3D Animation Software - Filmora
If you want more controls on 3D animation videos, here we recommend using Filmora .
You need to build a white plane to start making 3D animation with keyframes easily. Filmora offers six different types of keyframes to let your animation become smooth and natural.
Besides, auto color correction and audio mixer will upgrade your 3D animation video to a new level. You can also apply light flares effects to make amazing 3D animation. Now, free download it to have a try!
Download Mac Version ](https://tools.techidaily.com/wondershare/filmora/download/ )
Below is a comparison table where you can find the best free 3D animation makers. Some 3D animation makers are easy to use. Take a look!
| Price | OS | Pros | Features | |
|---|---|---|---|---|
| Blender | Free | Windows, Linux, and macOS | Best 3d animation software; Active community globally | Powerful rendering support |
| Wings 3D | Free | Windows, Linux, Unix and Mac OS X | Easy 3d animation software; Open source and completely free | Its interface is customizable |
| K-3D | Free | GNU/Linux, MacOS X, FreeBSD, Windows | Intuitive 3d animation maker; Node-based visualization pipeline. | Endless redo feature |
| Source Filmmaker | Free | Windows | Any games can be used in this animation maker | Game lovers will like it |
| Mixamo Maya | Free $225 per month $1,785 per year $5,085 every 3 years | Windows, MacOS and Linux Windows, MacOS and Linux | Vivid and high-quality animated 3D characters Time Editor to edit animation faster; You can collect motion capture data | Belong to adobe family Easy to use Motion graphics |
| Cinema 4D | $61.19 per month $734.40 per year | Windows, MacOS and Linux | Intuitive interface to make 3D animation | Fluid workflow to start editing for beginners |
| Houdini | $1,995/year | Windows, MacOs | Powerful VEX to make excellent 3D animations | Quick guide for learners |
| ZBrush MotionBuilder | $39.95 per month $2,045 per year $5,830 every 3 year | Windows Vista and MacOs Windows and Linux | Ideal for 3D amination. Adjust animation in moments . | Amazing sculpting tools. Simple to make adjustment. |
Part 1: Best Free 3D Animation Software
1. Blender
Pros:
- Both manual and auto-tracking
- Camera restoration is powerful
- Curve editor and dope sheets
- Customize layout and interface
An open-source professional, free 3D animation software, Blender is used to host various applications like visual effects, animated feature films, video games, and more. The Blender supports the entire 3D tree, including rigging, modeling, animating, simulating, compositing, rendering, and tracking motion. The features of Blender are:
Features:
- CPU, GPU, VR rendering support.
- Masking and textured brushes for 3D painting.
- Add-ons and customized tools with Python scripting
- Bridge fill, edge slide, grid, inset.
2. Wings 3D
Pros:
- Various modeling tools to make 3D effects.
- Completely free for use for commercial usage.
- Include a forum to communicate with users.
An easy-to-use, unconventional sector modeler, Wings 3D is a powerful 3D animation software. Whether you are a commercial 3D animation creator or a non-professional, Wings 3D is a free and open-source 3D animation software. The features of Winds 3D include:
Features:
- Customized interface.
- Support for materials and lights.
- Built-in AutoUV mapping facility
3.K-3D
Pros:
- Intuitive interface to make 3D effects
- Can always go back to undo operations
- Free-to-use
One of the best 3D animation software is K-3D. K-3D features a procedural engine plugin for its content. It is a free 3D animation software that supports polygonal modeling. A visual pipeline architecture combines the flexible plugins that make the K-3D software a powerful and versatile tool. The features include:
Features:
- Consistent and intuitive.
- Consist of basic tools for animation, patches, curves, and NURVS.
- Parametric workflow.
- It can be run on Windows, macOS X, Linux, and FreeBSD.
4.Source Filmmaker
Pros :
- The virtual movie set with lights, actors, props, and cameras.
- Create your movies and add features as per your requirement.
- Manages the entire workflow needed to make a movie into one single system.
This 3D animation software lets you make a movie inside the game engine Source. Wondering how? It is because whatever assets are present in the game, the Source Filmmaker uses them. So, the game’s assets are used by SFM in the film and vice versa. The features of this movie-making tool include:
Features:
- Renders power of a modern gaming PC.
- Whatever you see in the game is what you get in the movie.
- Completely free to download
5**_._**Mixamo
Pros:
- Download multiple animations at one go.
- Fast character and animation browsing.
With a straightforward and faster workflow, the Mixamo 3D software’s newest user experience and interface make it too easy to instantly find, create, organize, and share assets and animation. The features of this 3D animation software include:
Features:
- User experience is streamlined.
- Fully customizable animation packs.
- The faster and more accurate search function.
Part 2: Best Paid 3D Animation Software
6**_._**Maya
Pros:
- Perfect accuracy and control.
- Create flying logos, title sequences, branding, etc.
- Higher performance in a high fidelity environment
If you want to create or develop games, 3D scenes, movies, or characters, Maya is one of the best 3D animation software tools available. Although a paid software, Maya 3D animation creator does complete justice to its various coloring, animating, and modeling features.
Maya LT - Create 3D characters and environments for your indie game with a more cost-effective tool based on production-proven 3D products. Buy now! The features are:
Features:
- 30 days of a free trial
- Uncomplicated software
- Create complex technical effects
- High-level animation edits
7**_._**Cinema 4D
Pros:
- Dissect complete scenes
- Customized with a huge range of assets
A faster 3D animation software tool than Maya, Cinema 4D offers a gentle curve for learning but does not cover all like Maya. The high-speed feature makes the Cinema 4D software desirable in television, advertisements, and various motion graphics. The features are:
Features:
- Extensive library of preset scenes, material, and objects
- Develop concepts without time modeling
8.Houdini
Pros:
- Time-space motion path handles
- Support import and export to a range of formats
- Robust built-in rendering solution
Developed by the Toronto-based Side Effects Software, Houdini covers every major part that a 3D animation software should do. This 3D animation maker was adapted by the PRISMS group of procedural generation software tools. Houdini’s keen focus on procedural generation differentiates it from other 3D animation creators. The features of this 3D animation software are:
Features:
- Powerful and accessible 3D animation experience
- Rigging animate characters
- Add Character FX like fur, hair, etc.
9.ZBrush
Pros:
- A fantastic selection of sculpting tools.
- Easy to handle millions of polygons.
ZBrush 4 offers a smart technique to communicate your work with a director or online. Saved camera angles can be switched using a timeline. This improves productivity or creates intricate turntable animations. Animate between morph targets and model positions to check UV maps and facial expressions. Watch your model move with ZSpheres. Layer animation can animate between textures and PolyPaint variants. Import music or use ZBrush to create a demo reel with exact animation synchronization. The timeline interface features auto magnification, jump cuts, and relaxation. The timeline features let you present your work effectively. ZBrush is a modeling and sculpting application for organic structures.
Features:
- Several things can be animated, including layers, subtool visibility, backdrop colors, poly frame display, ZSpheres, camera angles, subdivision levels, and more.
- Your mesh animation can be exported to Modo in MDD format.
- Streamlines and expedites the movement of the face.
9.MotionBuilder:
Pros:
- Develop captivating animations for the characters.
- Participate in activities that require teamwork.
- Modify the animations in an instant.
MotionBuilder is a very specialized animation software that lets you work with 3D animation. The program is only available in a paid version, and the user interface is in two languages. You can save time by using the app to apply moves that have already been used to new characters. The animations can be watched in real-time. MotionBuilder can also be used with other Autodesk programs like Maya, 3ds Max, and others.
Features:
- Move your characters in a manner that is consistent with reality.
- Easily make adjustments and adjustments to animations.
Conclusion
This is the list of the free and paid best 3D animation software. So, whenever you are confused and need any assistance regarding 3D animation software, go through this article and find the right solution. Undoubtedly, Filmora is one of the best tools for 3D animation. With a range of features like ease of interface access, preset animation effects, multiple tracks to add various videos, and more, a complete package ensures a great 3D animation software usage tool. Just a little trial and error can make you perfect.
Download Mac Version ](https://tools.techidaily.com/wondershare/filmora/download/ )
Shanoon Cox
Shanoon Cox is a writer and a lover of all things video.
Follow @Shanoon Cox
Free Split-Screen Video Maker: Online and Offline Options
Best Split Screen Video Editor [Online & Offline]

Ollie Mattison
Mar 27, 2024• Proven solutions
The effect that comes up after adding two or more screens in a single frame is called split screen, and the tool that enables the users to do this is a split screen video editor. These split screens have significant importance in post-production tasks. That said, the following sections discuss about the tools that enable you to create split screen videos, and explain the process of doing so.
As mentioned above, the split screen effect lets you add two or more screens in a single frame. When multiple activities occur at the same time but at different locations, they all can be shown on one screen by placing their corresponding footages side-by-side or in any other arrangement that the split screen video maker allows.
Best Split Screen Video Editing Software for Windows and Mac [Free & Paid]
After understanding what split screen is, it becomes both obvious and mandatory to know about some of the most used split screen video editor applications, and how they help you in adding the effect to your movies. Following is a list of a couple of such programs:
1. iMovie
A proprietary of Apple, iMovie is available for both iOS and macOS, and is absolutely free of cost. Even though the tool lacks some advanced options for fine editing, it still offers a good platform to those planning their career in post-production industry. With simple UI, it is easy to learn iMovie.
The step-by-step instructions given below explain how to use iMovie to add split screen effect to your videos:
Step 1: Add Footages to iMovie
After importing the footages to the Media Bin in iMovie, drag the first one to the Timeline, and then drag the second one above the first layer.
Step 2: Select the Split Screen Effect
Select the top video layer in the Timeline, and choose Split Screen from the screen type drop-down list at the top.
Step 3: Select Split Screen Preset
Choose a position for the selected layer from the Position drop-down list at the top, and use the Slide slider to adjust the speed of the appearance of the footage.
Pros
- iMovie is free to download and use
- The program is available for both macOS and iOS
Cons
- Allows only up to two videos to be used in split screen
You can get iMovie from here: https://www.apple.com/in/imovie/
2. Wondershare Filmora Editor
One of the most robust apps that is compared with post-production applications like Adobe Premiere Pro and Final Cut Pro X, Wondershare Filmora is also a video editor that helps split screen easily. The software is available for Windows and Mac computers, and provides prompt technical support to its consumers. Although Filmora that packed with more advanced tools is also available, most of the times Filmora serves the purpose pretty well.
You can learn how to add split screen effect in Wondershare Filmora by following the steps given below:
Step 1: Import Footages to Filmora
Launch Wondershare Filmora, click anywhere inside the Media window in the upper-left section, and import all the videos you want to use to create the split screen effect.
Step 2: Choose a Split Screen Preset
Click Split Screen from the standard toolbar at the top, click and drag your preferred preset to the Timeline, and then extend the duration of the effect in the Timeline by dragging its handle.
Step 3: Add Videos to Split Screen

Click ADVANCED from the bottom-right area of the Media pane, on the Advanced Split Screen Edit box, drag the first video from the left pane, and drop it on your preferred section in the right. Repeat the process to add all the other videos to their corresponding sections. Adjust their time of appearance by dragging their thumbnail in the Timeline of the box, and click OK.
Pros
- Wondershare Filmora is lightweight and is less resource intensive
- Allows as many as 6 videos to be added to create split screen effect
- Has 30+ split screen presets
Cons
- A couple of windows are required to be opened while working with split screen
3 . VSDC
VSDC is a free and efficient split screen video maker. In fact, the program is a full-fledged post-production application that can be used to edit the videos to prepare industry-standard clips for presentations, broadcasting, and commercial and private distribution. The best thing about VSDC is, it is absolutely free of cost, and doesn’t add any watermarks to the output files.
The instructions given below explain how to use the split screen feature in VSDC:
Step 1: Add Video Footages
Click Add object from the standard toolbar at the top, click Video, and select and add the first footage to the preview window. Repeat the process to add more video(s) as needed.
Step 2: Add Split Screen Effect
Grab any of the side handles of the video you added last, and drag it inward to reduce its size proportionally. Repeat the process to reduce the size of the other video(s) that is/are now revealed from beneath the one you just adjusted in order to create the split screen effect.
Pros
- Absolutely free to use
- Allows practically unlimited number of footages to be added to create the split screen videos
Cons
- No presets for automatic video positioning are available for split screen effect
You can get VSDC free video editor from here: http://www.videosoftdev.com/
4. Shotcut
A free and opensource editing tool, Shotcut can also be used as a split screen video maker to produce industry-standard movies and documentaries. Shotcut is available for FreeBSD, Windows, Linux, and macOS, and comes in both x64 and x86 variants. Being a free program, Shotcut doesn’t require any activation or registration.
The procedure that follows explains how to use Shortcut as a free split screen video editor:
Step 1: Add Clips to the Timeline
Import the footages to the Shotcut’s media bin, drag one of the clips from the bin to the Timeline at the bottom, and then press Ctrl + I on your keyboard to add more video tracks. You can press this shortcut key for another couple of times depending on the number films you want to use for the split screen effect. Next, drag each film from the bin to their corresponding tracks. Note: Make sure NOT to place all the clips on the same track, and that each of them is on a different, its own, video layer.
Step 2: Adjust the First Video
Select the last video you added to the Timeline (it should be the topmost track), click Filters from above the Timeline, click the + button from the upper-left corner, click Size and Position from the list that appears next, and select the clip’s position from the Preset drop-down list.
Step 3: Adjust Other Videos
Select the second video in the Timeline and repeat the process to set its position, and do the same for all other footages that you added in order to create the split screen effect.
Pros
- Available for FreeBSD, Windows, Linux, and macOS platforms
- If using presets, as many as 4 videos can be added for split screen effect
Cons
- Working with split screen manually may require practice and some calculations to position the clips on the screen correctly
You can get Shotcut from here: https://shotcut.org/
5. Lightworks
Used by the professionals to edit and prepare movies like Pulp Fiction, The Cure, L.A. Confidential, Bruce Almighty, The Wolf of Wall Street, etc., Lightworks is, in true means, a complete and full-fledged post-production application to create industry-standard outputs. The main reason for the app’s wide userbase is that it is a cross-platform software that is available for Linux, Mac, and Windows computers.
To use Lightworks as split screen video maker, you can follow the instructions given below:
Step 1: Add Tracks in Timeline
After importing the clips to Lightworks, leave them in the Media Bin for now, right-click anywhere in the Timeline at the bottom, go to Tracks, click Add multiple, and from the Number to add drop-down list, choose the number of tracks you want to add to the Timeline. Click Add to confirm the changes.
Step 2: Disable Auto Sync
Right-click anywhere in the Timeline, and click to deselect Auto track sync.
Step 3: Add Clips to Timeline
Drag the clips from the Media Bin to the Timeline. Make sure to place each footage on a different track, and that all the tracks are on top of each other. Optionally, right-click the audio that was added along with the clips, and click Remove from the context menu. Use this method to remove all the audios or leave the one you want to have. Note: Removing the audio tracks ensures that they do not overlap during the playback.
Step 4: Enable Split Screen
Click VFX from above the preview window, click the + (Add new effects) icon from the top of the left pane, select the DVE category from the upper-right corner of the left pane, scroll down the left pane to the Split-screen Presets section, and double-click your preferred split screen preset to add the effect to the participating clips.
Pros
- Even the free variant has split screen feature
- A complete post-production tool that doesn’t require any other program for finalizing the things
Cons
- Not many split screen presets are available
Download Lightworks free version from here: https://www.lwks.com/
6. Adobe Premiere Pro
One of the most appreciated and widely used post-production applications for Windows and Mac computers, Adobe Premiere Pro has been professionals’ first choice when it comes to video editing, irrespective of the fact that it has a steep learning curve, and is also a resource intensive software to work with.
The steps below explain how to use Adobe Premiere Pro as a split screen video maker:
Step 1: Add Videos to Timeline
After importing the clips to the Project window, drag each of them to the Timeline, and place them in their separate tracks one above the other.
Step 2: Position and Crop
Select the topmost video track in the Timeline, go to Effect Controls panel from the top of the upper-left pane, and use the Position slider to position the video to your preferred area of the screen. Repeat this process for all the clips in the Timeline you want to add to split screen.
Step 3: Crop the Clips
Search for the Crop effect in the Effects pane present at the lower-left corner, drag and drop the effect on each of the clips in the timeline, and use the Crop slider in the Effect Controls pane to crop the videos as needed. Optionally use the keyframes to add sliding animations to give more professional look to the split screen effect.
Pros
- Most robust and efficient video editing tool
- Allows practically unlimited number of videos to be used for split screen
Cons
- Requires subscription that needs to be renewed regularly
For more details about making split screen with Pr, check How to create a split screen in Premiere Pro
7. Final Cut Pro X
Available only for Mac computers at the time of this writing, Final Cut Pro X or FCPX gives tough competition to Adobe Premiere Pro. Since Apple devices are famous for their speedy processing, professionals any day prefer FCPX over Adobe Premiere Pro if they own a Mac PC running macOS.
You can use FCPX as split screen video maker by following the steps given below:
Step 1: Place Footages in the Timeline
As mentioned earlier, add the clips on top of each other on separate tracks in the Timeline of FCPX.
Step 2: Position and Crop
Select the first clip in the Timeline, from the Transform section of the Video Inspector pane in the right, use the Position slider to move the clip to your preferred side of the screen, and use the sliders from the Crop section to crop the footage to adjust the portion of interest. Repeat the process for the other video tracks as well to get your desired split screen effect in Final Cut Pro X.
Pros
- Offers quick and easy way to add split screen effect
- Allows practically unlimited number of videos to be used for split screen
Cons
- Doesn’t have any particular preset for split screen effect
You may also like: How to create a PIP video with Final Cut Pro X
Best Free Online Split Screen Video Editors
Apart from the desktop programs discussed above, there are a couple of web tools that can be used as split screen video maker online free. Two of the most used ones are introduced below:
1. Kapwing Collage Maker
Although Kapwing offers several other online tools like video resizer, meme generator, slideshow maker, etc., the solution that can be considered split screen video editor is Kapwing Collage Maker. This web app allows you to select a template to get started, and the rest of the process is simple.
The following steps explain how to create a split screen video with Kapwing:
Step 1: Add Clips to Preset
Go to the https://www.kapwing.com/collage link, click to select your preferred split screen preset, click REPLACE on one of the segments of the split screen on the next page, and select and upload the first video. Next, click REPLACE on the other segment(s), and select and upload the other videos as well.
Step 2: Reposition and Publish
Click and drag each of the added clips to reposition them on the screen, use the other tools to crop and adjust the videos as needed, and click Publish from the top-right corner. Note: Optionally you can click Timeline from the top of the preview window, adjust the timings and other settings as needed on the next page, and click Done. After this, you can go ahead and hit Publish to create the split screen effect out of the uploaded videos.
Pros
- Free to use
- Allows as many as 4 videos to create split screen effect
Cons
- Requires you to register and sign in to remove the watermark from the output file
2. WeVideo
Yet another split screen video maker online free solution, WeVideo offers almost desktop program-like experience while creating split screen effects. Even though all the subscription plans that the vendor offers are chargeable, the Education plan can be tried for 30 days for free, post which the teachers are required to pay to continue using the web tool.
The following steps explain how to get split screen effect with WeVideo:
Step 1: Import Videos
Visit https://www.wevideo.com and on the main window, click Video from under the Create a new section at the top, select a layout on the Let’s get started box, and click START EDITING from the bottom right corner. Next, click ADD in the My media window in the upper-left section, click BROWSE TO SELECT on the Import media box, and add the videos you want to use in the split screen effect.
Step 2: Add Clips to Timeline
As explained earlier, drag the videos from the My media pane and drop them in the Timeline. Make sure to place every video in its separate layer, and that all the layers are on top of each other.
Step 3: Create Split Screen Effect
Select any clip in the Timeline, and click the Open clip editor icon from the upper-left area of the track. On the next page, use the Scale slider to reduce the size of the selected clip, and from the preview window in the right, drag to reposition the video to your preferred location on the screen. Click SAVE CHANGES from the bottom of the left pane to confirm the settings. Repeat the process for the second clip in the Timeline to resize and reposition it on the screen. Click FINISH from the upper-right corner, on the next box, enter a name for the video in the available field, click SET, choose your preferred settings on the next page, and click EXPORT from the bottom-right corner to produce the split screen video.
Pros
- Free to use
- Allows multiple videos to be used for split screen
Cons
- Paid subscription is needed to remove watermark from the outputs
FAQs About Split Screen Video Editors
Why you should use split screen effect in video?
There are a couple of reasons you may want to use split screen effect in your video. Some of the most common uses include:
- Showing multiple actions by the same or different characters at the same time, without changing the screen
- Comparing multiple objects or picture quality. This can be done only when the entities in question are placed side-by-side
- Making your video look more professional
- Showing different effects on the same screen
Can I create a split screen video with Windows Movie Maker or Windows 10 Photos app?
No, you cannot. Although these tools enable you to resize the videos, since they don’t allow multi-tracked Timelines, no video clips can be placed one above the other which is an essential part for any split screen video maker to create the effect. However, as discussed above, there are several post-production tools, offline and online, that allow you to make split screen videos easily and without any cost.
Conclusion
Split screen video editor tools are both paid and free. Regardless of the program you use to create the effect, the output files always look more professional and informative. Furthermore, things become way simpler if the split screen video maker has simple UI, is less resource intensive, and is easy to use as it is the case with Wondershare Filmora.
Ollie Mattison
Ollie Mattison is a writer and a lover of all things video.
Follow @Ollie Mattison
Ollie Mattison
Mar 27, 2024• Proven solutions
The effect that comes up after adding two or more screens in a single frame is called split screen, and the tool that enables the users to do this is a split screen video editor. These split screens have significant importance in post-production tasks. That said, the following sections discuss about the tools that enable you to create split screen videos, and explain the process of doing so.
As mentioned above, the split screen effect lets you add two or more screens in a single frame. When multiple activities occur at the same time but at different locations, they all can be shown on one screen by placing their corresponding footages side-by-side or in any other arrangement that the split screen video maker allows.
Best Split Screen Video Editing Software for Windows and Mac [Free & Paid]
After understanding what split screen is, it becomes both obvious and mandatory to know about some of the most used split screen video editor applications, and how they help you in adding the effect to your movies. Following is a list of a couple of such programs:
1. iMovie
A proprietary of Apple, iMovie is available for both iOS and macOS, and is absolutely free of cost. Even though the tool lacks some advanced options for fine editing, it still offers a good platform to those planning their career in post-production industry. With simple UI, it is easy to learn iMovie.
The step-by-step instructions given below explain how to use iMovie to add split screen effect to your videos:
Step 1: Add Footages to iMovie
After importing the footages to the Media Bin in iMovie, drag the first one to the Timeline, and then drag the second one above the first layer.
Step 2: Select the Split Screen Effect
Select the top video layer in the Timeline, and choose Split Screen from the screen type drop-down list at the top.
Step 3: Select Split Screen Preset
Choose a position for the selected layer from the Position drop-down list at the top, and use the Slide slider to adjust the speed of the appearance of the footage.
Pros
- iMovie is free to download and use
- The program is available for both macOS and iOS
Cons
- Allows only up to two videos to be used in split screen
You can get iMovie from here: https://www.apple.com/in/imovie/
2. Wondershare Filmora Editor
One of the most robust apps that is compared with post-production applications like Adobe Premiere Pro and Final Cut Pro X, Wondershare Filmora is also a video editor that helps split screen easily. The software is available for Windows and Mac computers, and provides prompt technical support to its consumers. Although Filmora that packed with more advanced tools is also available, most of the times Filmora serves the purpose pretty well.
You can learn how to add split screen effect in Wondershare Filmora by following the steps given below:
Step 1: Import Footages to Filmora
Launch Wondershare Filmora, click anywhere inside the Media window in the upper-left section, and import all the videos you want to use to create the split screen effect.
Step 2: Choose a Split Screen Preset
Click Split Screen from the standard toolbar at the top, click and drag your preferred preset to the Timeline, and then extend the duration of the effect in the Timeline by dragging its handle.
Step 3: Add Videos to Split Screen
Click ADVANCED from the bottom-right area of the Media pane, on the Advanced Split Screen Edit box, drag the first video from the left pane, and drop it on your preferred section in the right. Repeat the process to add all the other videos to their corresponding sections. Adjust their time of appearance by dragging their thumbnail in the Timeline of the box, and click OK.
Pros
- Wondershare Filmora is lightweight and is less resource intensive
- Allows as many as 6 videos to be added to create split screen effect
- Has 30+ split screen presets
Cons
- A couple of windows are required to be opened while working with split screen
3 . VSDC
VSDC is a free and efficient split screen video maker. In fact, the program is a full-fledged post-production application that can be used to edit the videos to prepare industry-standard clips for presentations, broadcasting, and commercial and private distribution. The best thing about VSDC is, it is absolutely free of cost, and doesn’t add any watermarks to the output files.
The instructions given below explain how to use the split screen feature in VSDC:
Step 1: Add Video Footages
Click Add object from the standard toolbar at the top, click Video, and select and add the first footage to the preview window. Repeat the process to add more video(s) as needed.
Step 2: Add Split Screen Effect
Grab any of the side handles of the video you added last, and drag it inward to reduce its size proportionally. Repeat the process to reduce the size of the other video(s) that is/are now revealed from beneath the one you just adjusted in order to create the split screen effect.
Pros
- Absolutely free to use
- Allows practically unlimited number of footages to be added to create the split screen videos
Cons
- No presets for automatic video positioning are available for split screen effect
You can get VSDC free video editor from here: http://www.videosoftdev.com/
4. Shotcut
A free and opensource editing tool, Shotcut can also be used as a split screen video maker to produce industry-standard movies and documentaries. Shotcut is available for FreeBSD, Windows, Linux, and macOS, and comes in both x64 and x86 variants. Being a free program, Shotcut doesn’t require any activation or registration.
The procedure that follows explains how to use Shortcut as a free split screen video editor:
Step 1: Add Clips to the Timeline
Import the footages to the Shotcut’s media bin, drag one of the clips from the bin to the Timeline at the bottom, and then press Ctrl + I on your keyboard to add more video tracks. You can press this shortcut key for another couple of times depending on the number films you want to use for the split screen effect. Next, drag each film from the bin to their corresponding tracks. Note: Make sure NOT to place all the clips on the same track, and that each of them is on a different, its own, video layer.
Step 2: Adjust the First Video
Select the last video you added to the Timeline (it should be the topmost track), click Filters from above the Timeline, click the + button from the upper-left corner, click Size and Position from the list that appears next, and select the clip’s position from the Preset drop-down list.
Step 3: Adjust Other Videos
Select the second video in the Timeline and repeat the process to set its position, and do the same for all other footages that you added in order to create the split screen effect.
Pros
- Available for FreeBSD, Windows, Linux, and macOS platforms
- If using presets, as many as 4 videos can be added for split screen effect
Cons
- Working with split screen manually may require practice and some calculations to position the clips on the screen correctly
You can get Shotcut from here: https://shotcut.org/
5. Lightworks
Used by the professionals to edit and prepare movies like Pulp Fiction, The Cure, L.A. Confidential, Bruce Almighty, The Wolf of Wall Street, etc., Lightworks is, in true means, a complete and full-fledged post-production application to create industry-standard outputs. The main reason for the app’s wide userbase is that it is a cross-platform software that is available for Linux, Mac, and Windows computers.
To use Lightworks as split screen video maker, you can follow the instructions given below:
Step 1: Add Tracks in Timeline
After importing the clips to Lightworks, leave them in the Media Bin for now, right-click anywhere in the Timeline at the bottom, go to Tracks, click Add multiple, and from the Number to add drop-down list, choose the number of tracks you want to add to the Timeline. Click Add to confirm the changes.
Step 2: Disable Auto Sync
Right-click anywhere in the Timeline, and click to deselect Auto track sync.
Step 3: Add Clips to Timeline
Drag the clips from the Media Bin to the Timeline. Make sure to place each footage on a different track, and that all the tracks are on top of each other. Optionally, right-click the audio that was added along with the clips, and click Remove from the context menu. Use this method to remove all the audios or leave the one you want to have. Note: Removing the audio tracks ensures that they do not overlap during the playback.
Step 4: Enable Split Screen
Click VFX from above the preview window, click the + (Add new effects) icon from the top of the left pane, select the DVE category from the upper-right corner of the left pane, scroll down the left pane to the Split-screen Presets section, and double-click your preferred split screen preset to add the effect to the participating clips.
Pros
- Even the free variant has split screen feature
- A complete post-production tool that doesn’t require any other program for finalizing the things
Cons
- Not many split screen presets are available
Download Lightworks free version from here: https://www.lwks.com/
6. Adobe Premiere Pro
One of the most appreciated and widely used post-production applications for Windows and Mac computers, Adobe Premiere Pro has been professionals’ first choice when it comes to video editing, irrespective of the fact that it has a steep learning curve, and is also a resource intensive software to work with.
The steps below explain how to use Adobe Premiere Pro as a split screen video maker:
Step 1: Add Videos to Timeline
After importing the clips to the Project window, drag each of them to the Timeline, and place them in their separate tracks one above the other.
Step 2: Position and Crop
Select the topmost video track in the Timeline, go to Effect Controls panel from the top of the upper-left pane, and use the Position slider to position the video to your preferred area of the screen. Repeat this process for all the clips in the Timeline you want to add to split screen.
Step 3: Crop the Clips
Search for the Crop effect in the Effects pane present at the lower-left corner, drag and drop the effect on each of the clips in the timeline, and use the Crop slider in the Effect Controls pane to crop the videos as needed. Optionally use the keyframes to add sliding animations to give more professional look to the split screen effect.
Pros
- Most robust and efficient video editing tool
- Allows practically unlimited number of videos to be used for split screen
Cons
- Requires subscription that needs to be renewed regularly
For more details about making split screen with Pr, check How to create a split screen in Premiere Pro
7. Final Cut Pro X
Available only for Mac computers at the time of this writing, Final Cut Pro X or FCPX gives tough competition to Adobe Premiere Pro. Since Apple devices are famous for their speedy processing, professionals any day prefer FCPX over Adobe Premiere Pro if they own a Mac PC running macOS.
You can use FCPX as split screen video maker by following the steps given below:
Step 1: Place Footages in the Timeline
As mentioned earlier, add the clips on top of each other on separate tracks in the Timeline of FCPX.
Step 2: Position and Crop
Select the first clip in the Timeline, from the Transform section of the Video Inspector pane in the right, use the Position slider to move the clip to your preferred side of the screen, and use the sliders from the Crop section to crop the footage to adjust the portion of interest. Repeat the process for the other video tracks as well to get your desired split screen effect in Final Cut Pro X.
Pros
- Offers quick and easy way to add split screen effect
- Allows practically unlimited number of videos to be used for split screen
Cons
- Doesn’t have any particular preset for split screen effect
You may also like: How to create a PIP video with Final Cut Pro X
Best Free Online Split Screen Video Editors
Apart from the desktop programs discussed above, there are a couple of web tools that can be used as split screen video maker online free. Two of the most used ones are introduced below:
1. Kapwing Collage Maker
Although Kapwing offers several other online tools like video resizer, meme generator, slideshow maker, etc., the solution that can be considered split screen video editor is Kapwing Collage Maker. This web app allows you to select a template to get started, and the rest of the process is simple.
The following steps explain how to create a split screen video with Kapwing:
Step 1: Add Clips to Preset
Go to the https://www.kapwing.com/collage link, click to select your preferred split screen preset, click REPLACE on one of the segments of the split screen on the next page, and select and upload the first video. Next, click REPLACE on the other segment(s), and select and upload the other videos as well.
Step 2: Reposition and Publish
Click and drag each of the added clips to reposition them on the screen, use the other tools to crop and adjust the videos as needed, and click Publish from the top-right corner. Note: Optionally you can click Timeline from the top of the preview window, adjust the timings and other settings as needed on the next page, and click Done. After this, you can go ahead and hit Publish to create the split screen effect out of the uploaded videos.
Pros
- Free to use
- Allows as many as 4 videos to create split screen effect
Cons
- Requires you to register and sign in to remove the watermark from the output file
2. WeVideo
Yet another split screen video maker online free solution, WeVideo offers almost desktop program-like experience while creating split screen effects. Even though all the subscription plans that the vendor offers are chargeable, the Education plan can be tried for 30 days for free, post which the teachers are required to pay to continue using the web tool.
The following steps explain how to get split screen effect with WeVideo:
Step 1: Import Videos
Visit https://www.wevideo.com and on the main window, click Video from under the Create a new section at the top, select a layout on the Let’s get started box, and click START EDITING from the bottom right corner. Next, click ADD in the My media window in the upper-left section, click BROWSE TO SELECT on the Import media box, and add the videos you want to use in the split screen effect.
Step 2: Add Clips to Timeline
As explained earlier, drag the videos from the My media pane and drop them in the Timeline. Make sure to place every video in its separate layer, and that all the layers are on top of each other.
Step 3: Create Split Screen Effect
Select any clip in the Timeline, and click the Open clip editor icon from the upper-left area of the track. On the next page, use the Scale slider to reduce the size of the selected clip, and from the preview window in the right, drag to reposition the video to your preferred location on the screen. Click SAVE CHANGES from the bottom of the left pane to confirm the settings. Repeat the process for the second clip in the Timeline to resize and reposition it on the screen. Click FINISH from the upper-right corner, on the next box, enter a name for the video in the available field, click SET, choose your preferred settings on the next page, and click EXPORT from the bottom-right corner to produce the split screen video.
Pros
- Free to use
- Allows multiple videos to be used for split screen
Cons
- Paid subscription is needed to remove watermark from the outputs
FAQs About Split Screen Video Editors
Why you should use split screen effect in video?
There are a couple of reasons you may want to use split screen effect in your video. Some of the most common uses include:
- Showing multiple actions by the same or different characters at the same time, without changing the screen
- Comparing multiple objects or picture quality. This can be done only when the entities in question are placed side-by-side
- Making your video look more professional
- Showing different effects on the same screen
Can I create a split screen video with Windows Movie Maker or Windows 10 Photos app?
No, you cannot. Although these tools enable you to resize the videos, since they don’t allow multi-tracked Timelines, no video clips can be placed one above the other which is an essential part for any split screen video maker to create the effect. However, as discussed above, there are several post-production tools, offline and online, that allow you to make split screen videos easily and without any cost.
Conclusion
Split screen video editor tools are both paid and free. Regardless of the program you use to create the effect, the output files always look more professional and informative. Furthermore, things become way simpler if the split screen video maker has simple UI, is less resource intensive, and is easy to use as it is the case with Wondershare Filmora.
Ollie Mattison
Ollie Mattison is a writer and a lover of all things video.
Follow @Ollie Mattison
Also read:
- Top 5 Best Free MOV Video Joiners
- Steady as a Rock 3 Proven Methods for Stabilizing Video in AE for 2024
- 2024 Approved Introducing Tips on How to Convert and Download 4K Video in MP4 Format or Any Other Video Formats Like AVI, MOV and WMV
- New In 2024, Mastering Motion Blur in Final Cut Pro A Step-by-Step Tutorial
- New In 2024, Mastering AVI File Editing How to Split, Cut, and Trim with Confidence
- New The Ultimate List 10 Free Android Video Editing Apps with No Watermark for 2024
- Updated In 2024, Top 10 Video Editing Apps for Android Devices
- Updated 2024 Approved The Secret to a Stunning Facebook Video Cover Size and Optimization Hacks
- Updated Android Video Editing 101 Choosing the Right Movie Maker App
- New Cut, Clip, and Perfect Trimming Videos with Kapwing Online
- New In 2024, Mac Users Rejoice Top 5 Windows Movie Maker Equivalent Video Editors
- Updated Premiere Rush Too Expensive? Check Out These 4 Affordable Alternatives for 2024
- New 10 Essential Online Resources for Generating Perfect Waveforms
- Updated 2024 Approved Power Up Your Audio The Best Professional Editing Software
- New Voice Recognition Converting Spoken Words to Text for 2024
- Updated 2024 Approved Free Video Wobble Fixers for Windows, macOS, and More
- New Free Video Editing Made Easy A Jaycut Tutorial for Beginners
- New Video to Cartoon Conversion Made Easy A Beginners Guide
- 2024 Approved Online Tools to Delete TikTok Watermarks for Free
- Updated Head-to-Head Showdown Final Cut Pro or LumaFusion for Video Editing?
- New 2024 Approved Create Stunning Movies Online for Free Top 9 Options
- New Adjust and Shine Best Video Brightness Apps
- New Vlog Like a Pro 10 Essential Editing Apps for iOS and Android
- 2024 Approved Cut and Trim Videos for Free The Best Software
- New In 2024, Unlock Professional-Looking Videos Top 10 Free Green Screen Apps
- Updated Best Free Green Screen Apps for Android and iOS for 2024
- Updated Final Cut Pro Tutorial Collection
- New 2024 Approved Convert and Download 4K Videos in MP4 Format A Beginners Guide
- New Best FCPX Tutorial Collection Channels and Websites for 2024
- New Editing Videos in Mavericks Tips, Tricks, and Techniques
- 2024 Approved Whats Hot on the App Store Top iPhone Apps , Ranked
- Updated In 2024, Mobile Video Magic Top Brightening and Editing Apps
- Updated In 2024, Free Video Stabilization Software to Enhance Your Clips
- Updated Common Platforms
- How To Repair iPhone 15 Plus System Issues? | Dr.fone
- Why Does My Google Pixel 8 Pro Keep Turning Off By Itself? 6 Fixes Are Here | Dr.fone
- In 2024, Disabling iPhone 13 mini Parental Restrictions With/Without Password | Dr.fone
- Pokémon Go Cooldown Chart On Samsung Galaxy F34 5G | Dr.fone
- In 2024, How to Delete iCloud Account From Apple iPhone 6 without Password?
- 2024 Approved Top 10 Best Free Android Video Editors Free&Paid
- How to Reset Poco M6 5G without Losing Data | Dr.fone
- In 2024, Pokemon Go No GPS Signal? Heres Every Possible Solution On Vivo S17e | Dr.fone
- 3 Ways to Unlock Your Apple iPhone 15 Pro Max for Free
- 2024 Approved Best Animated Text Generator
- How to fix iCloud lock from your iPhone 6s Plus and iPad
- My Videos Arent Playing on Vivo Y28 5G – What Can I Do? | Dr.fone
- 11 Best Location Changers for Vivo Y100A | Dr.fone
- In 2024, A Detailed Pokemon Go PvP Tier List to Make you a Pro Trainer For Apple iPhone 15 | Dr.fone
- A Quick Guide to ZTE FRP Bypass Instantly
- In 2024, How to Transfer Contacts from Realme 11 Pro+ to Other Android Devices Using Bluetooth? | Dr.fone
- In 2024, Easter Eggstravaganza Get Your Wondershare Filmora Promo Code Now
- How To Get Out of Recovery or DFU Mode on iPhone 11 Pro Max? | Dr.fone
- How Can I Use a Fake GPS Without Mock Location On Infinix Note 30 5G? | Dr.fone
- In 2024, How to Check Distance and Radius on Google Maps For your Nokia G42 5G | Dr.fone
- How To Activate and Use Life360 Ghost Mode On Oppo Find X7 | Dr.fone
- Unova Stone Pokémon Go Evolution List and How Catch Them For Honor Magic 5 Lite | Dr.fone
- AddROM Bypass An Android Tool to Unlock FRP Lock Screen For your Infinix Smart 8 HD
- Ways to stop parent tracking your ZTE Axon 40 Lite | Dr.fone
- 2024 Approved Montage Makes It Easy to Create and Share Videos. This Article Will Explain What It Can Do and Show You Examples of Movies that Use Montage
- Pokemon Go No GPS Signal? Heres Every Possible Solution On Motorola Moto G24 | Dr.fone
- Will the iPogo Get You Banned and How to Solve It On Samsung Galaxy S23 Tactical Edition | Dr.fone
- How Can I Catch the Regional Pokémon without Traveling On OnePlus Ace 2V | Dr.fone
- How to Fix the Apple iPhone 7 Plus GPS not Working Issue | Dr.fone
- Fixed Freeze Panes not Working in Excel 2019 | Stellar
- The way to recover deleted photos on Motorola Edge+ (2023) without backup.
- Title: New 2024 Approved Best 5 Aspect Ratio Calculators Online
- Author: Emma
- Created at : 2024-05-19 05:48:22
- Updated at : 2024-05-20 05:48:22
- Link: https://video-ai-editor.techidaily.com/new-2024-approved-best-5-aspect-ratio-calculators-online/
- License: This work is licensed under CC BY-NC-SA 4.0.
