
:max_bytes(150000):strip_icc():format(webp)/HotelTransylvaniaTransformania-71f0792728254936864ad509c847c73c.jpg)
New 2024 Approved Best of the Best Top Webcam Recording Tools for Windows 10
Best of the Best: Top Webcam Recording Tools for Windows 10
10 Best Webcam Recording Software for Windows 10

Richard Bennett
Mar 27, 2024• Proven solutions
Which webcam softwarehave you installed on your laptop or desktop? Using the right webcam software to live stream videos, screen record videos, or chat on Skype results in high-quality images, smooth streaming, and high-quality images and videos.
There is a huge number of free webcam software with advanced features yet free for you to download, and use on your PC.
But how would you determine the best webcam software to use?
Before you mounted that webcam on your desktop or laptop, you had a reason. It’s your webcam features and purpose that should guide you to select the right software for the webcam camera.
In this article, we will show you 10 webcam software for Windows in this guide. Included are the most useful factors to consider as you make your choice – complexity of use, free/paid, integrations, editing tools, and more. You will learn:
- Part 1: The Best Webcam & Screen Recorder for Windows and Mac [Video Tutorial]
- Part 2: Top 10 Best Free Webcam Software for Windows
First take a quick look of the 10 best webcam software that is available on your Windows from a video:
For Win 7 or later (64-bit)
 Secure Download
For macOS 10.14 or later
Secure Download
Part 1: The Best Webcam & Screen Recorder for Computer
You need a sound and webcam recorder to record your video tutorials, streaming videos, presentations, or any other type of video. Wondershare Filmora is the software to use. Other than its most admired friendly intuitive interface, it’s simple and easy to use-suitable for both beginners and professionals.
For Win 7 or later (64-bit)
Secure Download
For macOS 10.14 or later
Secure Download
Among the outstanding features, you’ll find in Filmora include,
- Fast-paced recording speed of up to 120 fps
- Adverse professional editing tools that are easy to use
- Simultaneous recording from both webcam and computer screen
- Compatible with 50+ different file formats
- Rich title text and tutorial features
It’s free to download. Have a try now! Join in the Wondershare Video Community and get some inspiration from other Filomora users.
Part 2: Top 10 Best Free Webcam Software for Windows
To help you evaluate which webcam software best suits your needs, I’ve featured the strengths, shortcomings, and support services in each software review.
This is the list of the best free webcam software for Windows 10.
| 1 - Logitech Capture | 2 - CyberLink Youcam |
|---|---|
| 3 - ManyCam | 4 - SplitCam |
| 5 - Bandicam | 6 - NCH - Video Capture Software |
| 7 - YAWCAM | 8 - Windows Camera |
| 9 - Fake Webcam | 10 - IP Camera Viewer |
1. Logitech Capture
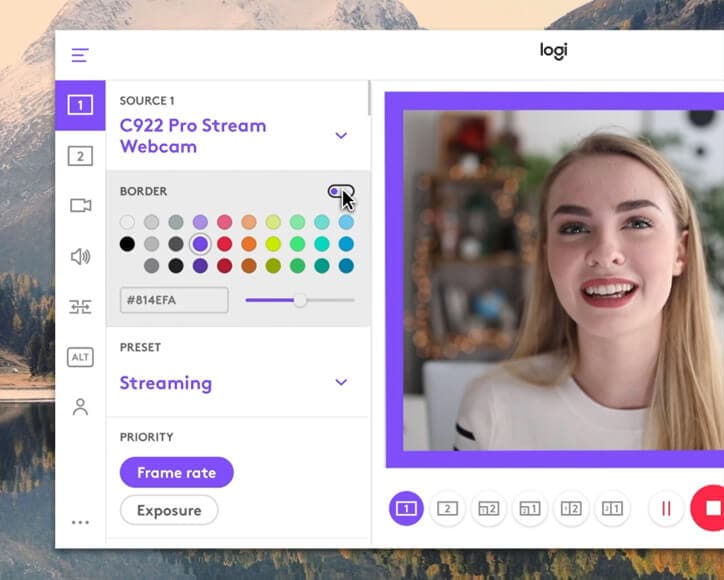
The multiple source recording feature and direct streaming app are the key strengths of this software. According to its mission statement- All-In-One Content Creation- you can use this software to record, edit, customize, and stream to your favorite channel.
Operating systems: Windows 10/8/7
Price: Free
Supported webcams: 1080P PRO STREAM, BRIO STREAM, C920s HD PRO, C922 PRO STREAM
Logitech Capture is among the few free webcam recording software for Windows 10 with studio controls applicable during recording. You can use this feature to adjust your image, create frames, adjust focus and transitions, and enable ChromaKey as you record.
In case you want to create a picture-in-picture presentation, this software allows you to use two webcams simultaneously. With the source switching and the auto-focus features, you can record the best tutorials or guides that show all dimensions and your image.
Pros
- Rich in transitions and effects
- Portrait optimization for mobile devices
- Its Capture app offers direct streaming to YouTube
- You can take passports or still images
Cons
- Limited to YouTube channel
- Account registration is mandatory
2. CyberLink Youcam
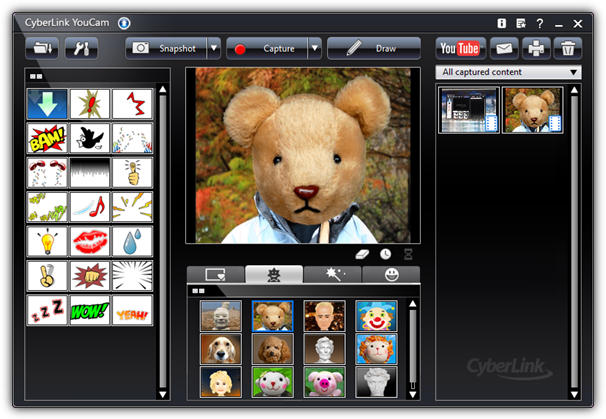
If you are used to video chatting and video recording, then, you’ll have 200+ fun effects to make your real-time videos as interesting as possible. In fact, the seamless app integration feature will keep your live streaming chats without buffering for long.
Operating systems: Windows 10/8/1.8/7
Price: Free/ Paid
Supported file formats: WMV, MP4, AVI
YouCam is the best free webcam software Windows 10 for YouTubers, business professionals, Streamers, home users, and Vloggers. It seamlessly integrates with live streaming media channels like Twitch, Wirecast, OBS Studio, Facebook Live, Xsplit, and YouTube Live.
The YouCam’s AR technology is one of its hidden treasures that will lighten up your skin by applying a natural-looking makeup. If your room is badly light, use the Live Skin Smoothing feature. Just below it is the TrueTheater Enhancement option to help you automatically adjust your facial sharpness and lighting.
Pros
- Hundreds of animated emojis
- Suitable for video conferencing services
- Plenty of interactive colorful particles and distortions
- Availability of face beautification tool
Cons
- Only limited to the Windows operating system
- Very few features for the free plan
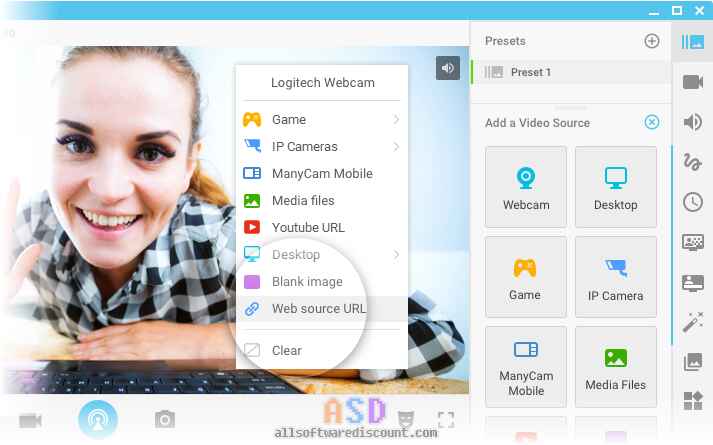
3. ManyCam
Downloading this webcam software guarantees you smooth streaming and effortless recording of videos. Also, this software will help you during game steaming, online education, mobile live streaming, and live telehealth communication.
Operating systems: Windows 10/8/7 and macOS X
Price: Free /Paid
Supported file formats: MJPEG, IP, MP4, AVI, MPEG, MOV
ManyCam is a free webcam recording software for windows 10 . It’s among the most widely used software internationally-not for many reasons, but because of its friendly intuitive user interface and live streaming tools for lessons and lecturers.
So, if you are a lecturer/teacher, you can use the Software Development Kit (SDK) to integrate the webcam with any online teaching platform. Among the features designed to facilitate better online teaching include the picture in picture, Chroma Key, multiple video sources, and screen sharing.
Pro
- Ability to stream 4K videos
- Real-time camera control settings
- No watermark even on the free plan
- Screencasting and screen recording feature
- Real-time drop and drag effects
Cons
- Expensive business subscription plans
- No Light enhancement features
- Most features are manual as opposed to being automatic

Filmora WebCame & Screen Recorder
Filmora - WebCame & Screen Recorder
• No-time delay to record webcam and screen while live streaming or gaming
• Edit recording video for marketing replay or adding game commentary
• Cross-platform supported - (Windows, Mac, iOS, Android)
Start Webcam & Screen Record Start Webcam & Screen Record Start Webcam & Screen Record Learn More >
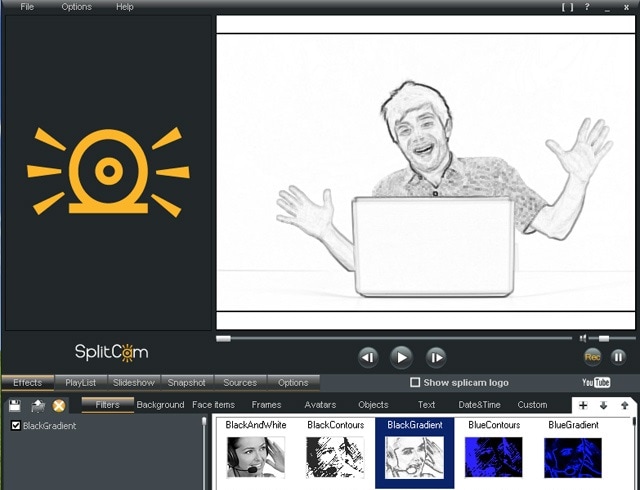
4. SplitCam
To stream your desktop/laptop screen SplitCam is the most appropriate software. With only the inbuilt virtual webcam, you can share your screen videos to media channels and IMS. Other uses of this software are recording webcam chatting , streaming live videos, and messaging.
Operating systems: Windows 10/8/7
Price: Free
SplitCam is not as popular as the other free webcam software windows 10 like ManyCam and YouCam. This is because it doesn’t integrate with some of the world’s renowned social media platforms- Facebook and Instagram. However, you can use this software to stream, take snapshots, and record videos for YouTube, Skype, Justin.tv, Gtalk, and Windows Live Messenger.
SplitCam is rich in fantastic webcam effects. Haven’t you been surprised to see someone appear to be streaming from the ocean or the Amazon Mountain? This is what you can do with SplitCam. Other cool effects are frames, texts on videos, filters, and facial items like masks and fake face glasses.
Pros
- Open and simple interface
- Integratable with the messaging apps
- Supports a wide range of resolutions ( between 320x180 and 2048x1536)
Cons
- Applicable to a small number of channels
- Supported file formats not defined
5. Bandicam
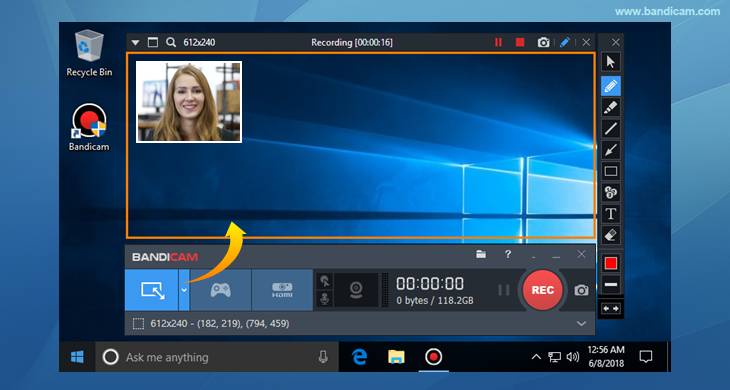
Do you want a recorder for screen recording, recording your gameplay, or capturing videos from devices like smartphones and PlayStation? Look for no other software but BandiCam. You can also merge two or more video files, remove unwanted parts, and select the only part to screen record.
Operating systems: Windows Vista, 10/8/7
Price: Free/paid
Supported file format: AVI, MP4, JPEG, TIF, GIF, PNG
Supported graphics cards: Nvidia NVENC, Nvidia NVENC (),
BandiCam is another HD webcam software Windows 10 with the capability of capturing high compression videos and games on your PC screen videos without compromising the video quality. Don’t forget to record all webinars aired in your niche.
Netflix is becoming more popular each day due to the thrilling videos. With the BandiCam screen recorder, you can record live-streamed videos on Netflix for over 24hrs. These are the tools to edit your recorded video: real-time drawing tool, webcam overlay, sound mixer, and Chroma Key.
Pros
- No hidden features
- Widescreen capture
- Can record 2D/3D videos in HD mode
- Can capture fast-paced videos of up to 144 FPS
Cons
- Not suitable for beginners
- Cannot be used to live stream videos
6. NCH - Video Capture Software

Of all the listed webcam software in this review, this software has the most diverse functions. You can record streaming videos, record your computer screen, record from external devices, and record from a webcam. It’s also perfect for recording audios and simultaneous recording from screen and webcam.
Operating systems: Windows 10, 8, 8.1, 7, XP, Vista 64 bit and Mac OS X 10.5 and above
Price: Free/paid
Supported file formats: MP4, WMV, AVI, MPG, FLV, MOV
Debut Video Capture is the only free webcam recording software for Windows 10 believed to capture or record videos from any external source. It has also preset settings for HD and TV with pre-production enhancement features like color adjustment settings, overlay buttons and frame rate, aspect ratio, and resolution settings.
If you always think of becoming rich, the Express Burn Disc Burner is the tool that will help you make money. Record the most trending videos and use this tool to burn DVDs and CDs.
Pros
- Can record videos for any social media platform
- Supports a wide range of audio and video file formats
- All features are open and easy to use
- Availability of video editing software
Cons
- Only monthly subscriptions for paid plans
- Watermark for the free download
- Difficult to record a full-screen movie
Try Filmora to Smoothly Record WebCame and Screen!
Filmora Web Camera & Screen Recorder can capture any area of the PC screen and webcam. It’s perfect to capture and record while making a live gaming match, marketing promotion, guiding a tour, and more. Plus, you can edit the recording video files in Filmora directly! Worth to have a try!
Start Webcam & Screen Recording Start Webcam & Screen Recording Start Webcam & Screen Recording Learn More >
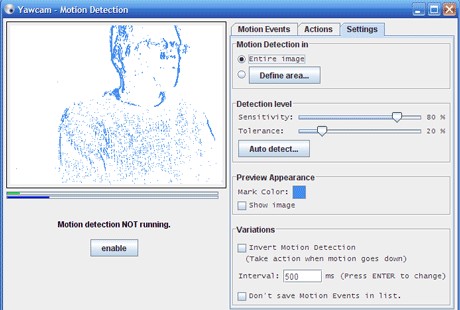
7. YAWCAM
This webcam software can be referred to as the simplest for all beginners with the will to start streaming and recording videos for personal or home use.
Supported file formats: PNG, JPG, MJPEG, GIF, JavaScript
Price: Free
Supported operating systems: Windows 2000/10/8/7/ Vista and XP
YAWCAM is an absolutely free webcam software windows 10. Why is it the simplest software to use? Just download and you will find all features on one page. Simple language commands aligned in a drop-down menu ready to be used with only one click.
Some of the best features include overlay texts and images, scheduler, motion detection, and an inbuilt webserver. For you to use this webcam software, use these supported devices; DirectX compatible webcams, DV-camera, or video capture devices.
Pros
- No watermark
- Easy to use
- Friendly user interface
Cons
- Few transitions and effects
8. Windows Camera
We all trust any app or software by Microsoft over others! If you also do, then you can download Windows Camera and use it to record videos, take snapshots and shoot videos.
Operating system: Windows 10
Price: Free
Supported devices: Xbox One, Windows, mobile
Windows Camera is among the best free webcam software for Windows 10. This is because of the software’s few but easy-to-use and effective features that are expertly designed for PCs and tablets installed with Windows 10.
The automatic photo back combined with the photo-shoot timer makes it perfect for taking selfies and passports. Using the panorama feature, you can take photos of the best scenes and share them on media platforms.
Pros
- Simplicity is its main strength
- Supports resolutions above 1080p
- Good for photographers
Cons
- Has no built-in virtual webcam
- Requires a camera to support 4K videos
9. Fake Webcam

Supported file formats: AVI, MPEG, DVD, VCD, WMV, 3GP, MP4, SVCD, MOV, ASF,
Price: Free /paid
Operating systems: Windows 7/8/10 (32/64 bit)
Fake Webcam is a free webcam software Windows 10 whose name is creatively used to suggest it almost functions like a webcam. This doesn’t fall far from the truth! You can truly use this software to broadcast, add effects and filters, record on full screen, and fake your voice.
To share or stream your photos and videos on Skype, YIM, or Gtalk, using the screen recorder would give the best results. What makes Fake Webcam stand out is the free video converter and the free video toolkit.
Pros
- Free support tools
- Supports all video and audio formats
- Can convert file formats and stream to any channel
- Availability of the screen recorder
- Integratable with almost all instant messengers
Cons
- Major tools not free(Fake Webcam and Screen recorder)
10. IP Camera Viewer
Do you run a supermarket store, mall or you’ve installed security surveillance cameras in your compound? IP Camera Viewer is the most effective webcam software for video monitoring systems.
Supported file formats: JPEG, MPEG-4, MJPEG, and
Price: Free
Operating systems: Windows 10 / 8 / 7 /2012 /Vista and XP
IP Camera Viewer is the most used free webcam recording software for windows 10 as its compatible with almost all IP camera models like Panasonic, Toshiba, Canon, D-Link, Sony, and more the 2000 others. With the capability of viewing and controlling 4 camera feeds at once, you can use this software to monitor your entire compound.
Some of the important advanced IP Camera Viewer functions include listening to webcam audios, adjust image settings, zoom or tilt images, schedule monitoring times, and detect motions.
Pros
- Automatically uploads recorded videos and photos to a server
- Compatible with almost all IP camera models
- Simple and easy to use
Cons
- No inbuilt media player
- Cannot adjust the image or video quality
You may also want to read >>> 10 Best Webcams | A Buyer’s Guide
![]()
A cross-platform for making videos anywhere for all creators

Why your video editing isn’t good enough? How about some creative inspo?
- 100 Million+ Users
- 150+ Countries and Regions
- 4 Million+ Social Media Followers
- 5 Million+ Stock Media for Use
* Secure Download

FAQs about Webcam Software for Windows
1. What is Webcam Software?
A webcam is a video camera that feeds or streams images or video in real-time to or over a computer network. And webcam software enables users to record video or stream video over the Internet.
Webcam software is an application that allows you to capture video from your laptop/desktop webcam and record or stream video over the Internet. You can use them to deliver professional videos, streaming, and online courses easily.
2. Does Windows have built-in webcam software?
Windows 10 has an in-built webcam app called Camera that lets you record videos and take pictures with your webcam. This is definitely better than downloading 3rd party webcam recording software where spyware/malware is rampant.
3. Does a webcam need software?
Yes, if the camera hardware offers depth, low-light support, night vision, etc. If you use any software on the camera, these functions are only available if the driver is installed.
Conclusion
After a keen of all the webcam software above, it’s evident that every developer had an intended purpose. You cannot therefore just randomly wake up and download any without considering its functions, supported devices, file formats, and the auxiliary apps available. All this information is contained herein.
According to some users, there are free webcam software Windows 10 that more often would not show any video images but the audio is absolutely clear. To help your fellow user, what bad experience have you ever had after recording a game using webcam software ? Kindly share your comment or suggestion on our social media platforms.


Richard Bennett
Richard Bennett is a writer and a lover of all things video.
Follow @Richard Bennett
Richard Bennett
Mar 27, 2024• Proven solutions
Which webcam softwarehave you installed on your laptop or desktop? Using the right webcam software to live stream videos, screen record videos, or chat on Skype results in high-quality images, smooth streaming, and high-quality images and videos.
There is a huge number of free webcam software with advanced features yet free for you to download, and use on your PC.
But how would you determine the best webcam software to use?
Before you mounted that webcam on your desktop or laptop, you had a reason. It’s your webcam features and purpose that should guide you to select the right software for the webcam camera.
In this article, we will show you 10 webcam software for Windows in this guide. Included are the most useful factors to consider as you make your choice – complexity of use, free/paid, integrations, editing tools, and more. You will learn:
- Part 1: The Best Webcam & Screen Recorder for Windows and Mac [Video Tutorial]
- Part 2: Top 10 Best Free Webcam Software for Windows
First take a quick look of the 10 best webcam software that is available on your Windows from a video:
For Win 7 or later (64-bit)
Secure Download
For macOS 10.14 or later
Secure Download
Part 1: The Best Webcam & Screen Recorder for Computer
You need a sound and webcam recorder to record your video tutorials, streaming videos, presentations, or any other type of video. Wondershare Filmora is the software to use. Other than its most admired friendly intuitive interface, it’s simple and easy to use-suitable for both beginners and professionals.
For Win 7 or later (64-bit)
Secure Download
For macOS 10.14 or later
Secure Download
Among the outstanding features, you’ll find in Filmora include,
- Fast-paced recording speed of up to 120 fps
- Adverse professional editing tools that are easy to use
- Simultaneous recording from both webcam and computer screen
- Compatible with 50+ different file formats
- Rich title text and tutorial features
It’s free to download. Have a try now! Join in the Wondershare Video Community and get some inspiration from other Filomora users.
Part 2: Top 10 Best Free Webcam Software for Windows
To help you evaluate which webcam software best suits your needs, I’ve featured the strengths, shortcomings, and support services in each software review.
This is the list of the best free webcam software for Windows 10.
| 1 - Logitech Capture | 2 - CyberLink Youcam |
|---|---|
| 3 - ManyCam | 4 - SplitCam |
| 5 - Bandicam | 6 - NCH - Video Capture Software |
| 7 - YAWCAM | 8 - Windows Camera |
| 9 - Fake Webcam | 10 - IP Camera Viewer |
1. Logitech Capture
The multiple source recording feature and direct streaming app are the key strengths of this software. According to its mission statement- All-In-One Content Creation- you can use this software to record, edit, customize, and stream to your favorite channel.
Operating systems: Windows 10/8/7
Price: Free
Supported webcams: 1080P PRO STREAM, BRIO STREAM, C920s HD PRO, C922 PRO STREAM
Logitech Capture is among the few free webcam recording software for Windows 10 with studio controls applicable during recording. You can use this feature to adjust your image, create frames, adjust focus and transitions, and enable ChromaKey as you record.
In case you want to create a picture-in-picture presentation, this software allows you to use two webcams simultaneously. With the source switching and the auto-focus features, you can record the best tutorials or guides that show all dimensions and your image.
Pros
- Rich in transitions and effects
- Portrait optimization for mobile devices
- Its Capture app offers direct streaming to YouTube
- You can take passports or still images
Cons
- Limited to YouTube channel
- Account registration is mandatory
2. CyberLink Youcam
If you are used to video chatting and video recording, then, you’ll have 200+ fun effects to make your real-time videos as interesting as possible. In fact, the seamless app integration feature will keep your live streaming chats without buffering for long.
Operating systems: Windows 10/8/1.8/7
Price: Free/ Paid
Supported file formats: WMV, MP4, AVI
YouCam is the best free webcam software Windows 10 for YouTubers, business professionals, Streamers, home users, and Vloggers. It seamlessly integrates with live streaming media channels like Twitch, Wirecast, OBS Studio, Facebook Live, Xsplit, and YouTube Live.
The YouCam’s AR technology is one of its hidden treasures that will lighten up your skin by applying a natural-looking makeup. If your room is badly light, use the Live Skin Smoothing feature. Just below it is the TrueTheater Enhancement option to help you automatically adjust your facial sharpness and lighting.
Pros
- Hundreds of animated emojis
- Suitable for video conferencing services
- Plenty of interactive colorful particles and distortions
- Availability of face beautification tool
Cons
- Only limited to the Windows operating system
- Very few features for the free plan
3. ManyCam
Downloading this webcam software guarantees you smooth streaming and effortless recording of videos. Also, this software will help you during game steaming, online education, mobile live streaming, and live telehealth communication.
Operating systems: Windows 10/8/7 and macOS X
Price: Free /Paid
Supported file formats: MJPEG, IP, MP4, AVI, MPEG, MOV
ManyCam is a free webcam recording software for windows 10 . It’s among the most widely used software internationally-not for many reasons, but because of its friendly intuitive user interface and live streaming tools for lessons and lecturers.
So, if you are a lecturer/teacher, you can use the Software Development Kit (SDK) to integrate the webcam with any online teaching platform. Among the features designed to facilitate better online teaching include the picture in picture, Chroma Key, multiple video sources, and screen sharing.
Pro
- Ability to stream 4K videos
- Real-time camera control settings
- No watermark even on the free plan
- Screencasting and screen recording feature
- Real-time drop and drag effects
Cons
- Expensive business subscription plans
- No Light enhancement features
- Most features are manual as opposed to being automatic
Filmora WebCame & Screen Recorder
Filmora - WebCame & Screen Recorder
• No-time delay to record webcam and screen while live streaming or gaming
• Edit recording video for marketing replay or adding game commentary
• Cross-platform supported - (Windows, Mac, iOS, Android)
Start Webcam & Screen Record Start Webcam & Screen Record Start Webcam & Screen Record Learn More >
4. SplitCam
To stream your desktop/laptop screen SplitCam is the most appropriate software. With only the inbuilt virtual webcam, you can share your screen videos to media channels and IMS. Other uses of this software are recording webcam chatting , streaming live videos, and messaging.
Operating systems: Windows 10/8/7
Price: Free
SplitCam is not as popular as the other free webcam software windows 10 like ManyCam and YouCam. This is because it doesn’t integrate with some of the world’s renowned social media platforms- Facebook and Instagram. However, you can use this software to stream, take snapshots, and record videos for YouTube, Skype, Justin.tv, Gtalk, and Windows Live Messenger.
SplitCam is rich in fantastic webcam effects. Haven’t you been surprised to see someone appear to be streaming from the ocean or the Amazon Mountain? This is what you can do with SplitCam. Other cool effects are frames, texts on videos, filters, and facial items like masks and fake face glasses.
Pros
- Open and simple interface
- Integratable with the messaging apps
- Supports a wide range of resolutions ( between 320x180 and 2048x1536)
Cons
- Applicable to a small number of channels
- Supported file formats not defined
5. Bandicam
Do you want a recorder for screen recording, recording your gameplay, or capturing videos from devices like smartphones and PlayStation? Look for no other software but BandiCam. You can also merge two or more video files, remove unwanted parts, and select the only part to screen record.
Operating systems: Windows Vista, 10/8/7
Price: Free/paid
Supported file format: AVI, MP4, JPEG, TIF, GIF, PNG
Supported graphics cards: Nvidia NVENC, Nvidia NVENC (),
BandiCam is another HD webcam software Windows 10 with the capability of capturing high compression videos and games on your PC screen videos without compromising the video quality. Don’t forget to record all webinars aired in your niche.
Netflix is becoming more popular each day due to the thrilling videos. With the BandiCam screen recorder, you can record live-streamed videos on Netflix for over 24hrs. These are the tools to edit your recorded video: real-time drawing tool, webcam overlay, sound mixer, and Chroma Key.
Pros
- No hidden features
- Widescreen capture
- Can record 2D/3D videos in HD mode
- Can capture fast-paced videos of up to 144 FPS
Cons
- Not suitable for beginners
- Cannot be used to live stream videos
6. NCH - Video Capture Software
Of all the listed webcam software in this review, this software has the most diverse functions. You can record streaming videos, record your computer screen, record from external devices, and record from a webcam. It’s also perfect for recording audios and simultaneous recording from screen and webcam.
Operating systems: Windows 10, 8, 8.1, 7, XP, Vista 64 bit and Mac OS X 10.5 and above
Price: Free/paid
Supported file formats: MP4, WMV, AVI, MPG, FLV, MOV
Debut Video Capture is the only free webcam recording software for Windows 10 believed to capture or record videos from any external source. It has also preset settings for HD and TV with pre-production enhancement features like color adjustment settings, overlay buttons and frame rate, aspect ratio, and resolution settings.
If you always think of becoming rich, the Express Burn Disc Burner is the tool that will help you make money. Record the most trending videos and use this tool to burn DVDs and CDs.
Pros
- Can record videos for any social media platform
- Supports a wide range of audio and video file formats
- All features are open and easy to use
- Availability of video editing software
Cons
- Only monthly subscriptions for paid plans
- Watermark for the free download
- Difficult to record a full-screen movie
Try Filmora to Smoothly Record WebCame and Screen!
Filmora Web Camera & Screen Recorder can capture any area of the PC screen and webcam. It’s perfect to capture and record while making a live gaming match, marketing promotion, guiding a tour, and more. Plus, you can edit the recording video files in Filmora directly! Worth to have a try!
Start Webcam & Screen Recording Start Webcam & Screen Recording Start Webcam & Screen Recording Learn More >
7. YAWCAM
This webcam software can be referred to as the simplest for all beginners with the will to start streaming and recording videos for personal or home use.
Supported file formats: PNG, JPG, MJPEG, GIF, JavaScript
Price: Free
Supported operating systems: Windows 2000/10/8/7/ Vista and XP
YAWCAM is an absolutely free webcam software windows 10. Why is it the simplest software to use? Just download and you will find all features on one page. Simple language commands aligned in a drop-down menu ready to be used with only one click.
Some of the best features include overlay texts and images, scheduler, motion detection, and an inbuilt webserver. For you to use this webcam software, use these supported devices; DirectX compatible webcams, DV-camera, or video capture devices.
Pros
- No watermark
- Easy to use
- Friendly user interface
Cons
- Few transitions and effects
8. Windows Camera
We all trust any app or software by Microsoft over others! If you also do, then you can download Windows Camera and use it to record videos, take snapshots and shoot videos.
Operating system: Windows 10
Price: Free
Supported devices: Xbox One, Windows, mobile
Windows Camera is among the best free webcam software for Windows 10. This is because of the software’s few but easy-to-use and effective features that are expertly designed for PCs and tablets installed with Windows 10.
The automatic photo back combined with the photo-shoot timer makes it perfect for taking selfies and passports. Using the panorama feature, you can take photos of the best scenes and share them on media platforms.
Pros
- Simplicity is its main strength
- Supports resolutions above 1080p
- Good for photographers
Cons
- Has no built-in virtual webcam
- Requires a camera to support 4K videos
9. Fake Webcam
Supported file formats: AVI, MPEG, DVD, VCD, WMV, 3GP, MP4, SVCD, MOV, ASF,
Price: Free /paid
Operating systems: Windows 7/8/10 (32/64 bit)
Fake Webcam is a free webcam software Windows 10 whose name is creatively used to suggest it almost functions like a webcam. This doesn’t fall far from the truth! You can truly use this software to broadcast, add effects and filters, record on full screen, and fake your voice.
To share or stream your photos and videos on Skype, YIM, or Gtalk, using the screen recorder would give the best results. What makes Fake Webcam stand out is the free video converter and the free video toolkit.
Pros
- Free support tools
- Supports all video and audio formats
- Can convert file formats and stream to any channel
- Availability of the screen recorder
- Integratable with almost all instant messengers
Cons
- Major tools not free(Fake Webcam and Screen recorder)
10. IP Camera Viewer
Do you run a supermarket store, mall or you’ve installed security surveillance cameras in your compound? IP Camera Viewer is the most effective webcam software for video monitoring systems.
Supported file formats: JPEG, MPEG-4, MJPEG, and
Price: Free
Operating systems: Windows 10 / 8 / 7 /2012 /Vista and XP
IP Camera Viewer is the most used free webcam recording software for windows 10 as its compatible with almost all IP camera models like Panasonic, Toshiba, Canon, D-Link, Sony, and more the 2000 others. With the capability of viewing and controlling 4 camera feeds at once, you can use this software to monitor your entire compound.
Some of the important advanced IP Camera Viewer functions include listening to webcam audios, adjust image settings, zoom or tilt images, schedule monitoring times, and detect motions.
Pros
- Automatically uploads recorded videos and photos to a server
- Compatible with almost all IP camera models
- Simple and easy to use
Cons
- No inbuilt media player
- Cannot adjust the image or video quality
You may also want to read >>> 10 Best Webcams | A Buyer’s Guide
![]()
A cross-platform for making videos anywhere for all creators
Why your video editing isn’t good enough? How about some creative inspo?
- 100 Million+ Users
- 150+ Countries and Regions
- 4 Million+ Social Media Followers
- 5 Million+ Stock Media for Use
* Secure Download
FAQs about Webcam Software for Windows
1. What is Webcam Software?
A webcam is a video camera that feeds or streams images or video in real-time to or over a computer network. And webcam software enables users to record video or stream video over the Internet.
Webcam software is an application that allows you to capture video from your laptop/desktop webcam and record or stream video over the Internet. You can use them to deliver professional videos, streaming, and online courses easily.
2. Does Windows have built-in webcam software?
Windows 10 has an in-built webcam app called Camera that lets you record videos and take pictures with your webcam. This is definitely better than downloading 3rd party webcam recording software where spyware/malware is rampant.
3. Does a webcam need software?
Yes, if the camera hardware offers depth, low-light support, night vision, etc. If you use any software on the camera, these functions are only available if the driver is installed.
Conclusion
After a keen of all the webcam software above, it’s evident that every developer had an intended purpose. You cannot therefore just randomly wake up and download any without considering its functions, supported devices, file formats, and the auxiliary apps available. All this information is contained herein.
According to some users, there are free webcam software Windows 10 that more often would not show any video images but the audio is absolutely clear. To help your fellow user, what bad experience have you ever had after recording a game using webcam software ? Kindly share your comment or suggestion on our social media platforms.
Richard Bennett
Richard Bennett is a writer and a lover of all things video.
Follow @Richard Bennett
A Beginner’s Guide to M4R Conversion: Key Concepts to Grasp
Before You Learn M4R Converter: Some Things You Should Know
An easy yet powerful editor
Numerous effects to choose from
Detailed tutorials provided by the official channel
M4R is an audio file extension that was created by Apple to separate regular songs and audio from ringtones
As for methods of converting from your more general file extension formats to M4R, we’ve prepared a whole guide below — where we’ve outlined some of the more important things that you should know about M4R converters and how to use them.
In this article
01 [Why Convert Mp3 to M4R?](#Part 1)
02 [How to Convert Mp3 to M4R?](#Part 2)
03 [How to Convert M4A to M4R?](#Part 3)
Part 1 Why Convert MP3 to M4R?
Let’s start with a bit of an overview of M4R and M4R Converters first! We touched upon this subject in the introduction, but we thought it would be best to expand on the subject here for better understanding. First, let’s talk about what an M4R converter is usually like. Then, let’s talk about why someone might convert from MP3 to M4R.
01M4R Converter Key Features
Here’s a list of some key features that you should look for in an M4R Converter:
● Your average M4R Converter should allow you to convert to M4R from general audio files. That includes the following: MP3, WAV, WMA, AIFF, AMR, FLAC, MKA, WMV, and so much more.
● It should also allow you to ‘extract’ audio from videos (whether it is a MPEG-4, MOV, AVI, etc.)
● The M4R converter would prove even more useful if it allowed you to trim small segments of audio or video (with exact start and end time) so that you can specify which part should play as a ringtone.
● A method of previewing trimmed content prior to conversion would also be helpful so that you won’t have to undergo the process again and again.
● Its settings should also be adjustable or the interface intuitive, allowing you to easily choose or discover the output folder, adjust audio bitrate, and so on.
02Best Three Reasons Why Convert MP3 to M4R
There are several reasons why you might want to use an M4R converter to change from MP3 to M4R, these reasons include:
● Creating iPhone Ringtone: The main purpose of converting to M4R is, of course, to create iPhone ringtones. This file extension was created by Apple specifically to differentiate between songs and ringtones. And, if you’re a regular iOS user but are not a fan of the basic iOS ringtones, learning how to create M4R files would be beneficial in opening your horizons.
● Transfer Ringtones to iPhone: Of course, once the M4R is created for use, it would need to be transferred. This is much easier if it stays in this format!
● Making General M4R Audio: Although not as common, some users see the benefit of using M4R audio for other reasons (i.e., content creators sometimes use M4R audio as a sound-effect for videos). Thus, knowing how to convert from MP3 to MP4 usually proves to be useful for them.
Part 2 How to Convert Mp3 to M4R?
Now, let’s start with a more in-depth tutorial on how to actually convert MP3 to M4R! In this case, specifically, we’ll be providing three different examples. Starting with an online solution and then following it up with the general iTunes conversion and the more involved software conversion!
01How to Convert MP3 to M4R Online?
As mentioned, the first M4R Converter on this list is an online one! There are plenty of these kinds of online converter tools available, and they all pretty much work the same way, so the example we’ll be showing below is more of an all-purpose kind of affair. However, just in case you’re curious, the tool we’ll be using for our examples is the Converter from Audio Tool Set!
**Step 1: Visit Online Converter Website!
First! Open the M4R Converter online tool that you want to use! If you want to follow along with our examples, a URL has been provided for you below:

**Step 2: Upload MP3 File
Next, it’s time to upload the MP3 file that you want to convert to M4R!
Usually, all you have to do for this is click the ‘Upload’ button or drag-and-drop the file onto the specified area. But, in some cases, the M4R converter may also allow you to upload via a link or from cloud-based storage (i.e., Dropbox.)

**Step 3: Select M4R as Output Format!
Once your MP3 file has been uploaded, select the format that you want it to be converted into. This may have defaulted to M4R or you may be given the chance to choose yourself (as is shown in the image below.)

**Step 4: Select Convert!
The next thing you need to do is to simply select the ‘CONVERT’ option to begin processing the change from MP3 to M4R!

**Step 5: Download Converter M4R!
Once the conversion is done, you should now have been given the option to download the finished M4R. Click ‘DOWNLOAD’ and you’re done!

012. How to convert MP3 to M4R on iTunes?
Of course, as an Apple File Extension, it only makes sense that Apple provides its users an easy way to convert general audio to M4R! In this case, we’ll be showing you another method to convert from MP3 to M4R with Apple’s own iTunes! Of course, if you want to follow along with this next example, you’ll have to download and install the software (for Windows users) before proceeding.
**Step 1: Add File or Folder to Library!
Once you have iTunes installed, launch the program and go to ‘File’ > ‘Add File to Library’ or ‘Add Folder to Library’ to upload the MP3 file(s) that you want to convert to M4R!

**Step 2: Select MP3 and Adjust Timing!
Since M4R ringtones are limited to 40 seconds only, you’ll need to adjust timing prior to conversion if you want the ringtone to start and end at a specific time.
This is possible to do by selecting the song from your library and right clicking so you can access the ‘OPTIONS’ tab (shown below)! Under the Options tab, you’ll be able to specify the start and stop time for your chosen MP3!
Click ‘OK’ when done in order to save any changes!

**Step 3: Convert to Version!
Next, with the MP3 file still selected, go to the ‘FILE’ tab (shown in the image below) and then click ‘CONVERT’ > ‘Create Version’!

**Step 4: Go to the Destination Folder!
After the conversion has been finished, locate the file’s destination folder. You’ll notice that the file extension of the file is .M4A but this is easy enough to change.
Just rename the file extension to .M4R (example shown below) and click ‘YES’ to confirm the change! In this way, you’ve managed to convert MP3 to M4R with iTunes!

013. How to Convert MP3 to M4R Online Free with Ringtone Maker?
For this last example of converting MP3 to M4R, we’ve decided to show-off the ringtone maker, Wondershare TunesGo! This program is, of course, more than just a ringtone maker, but the function that we’ll be exploring will be the process of making an iPhone Ringtone from an MP3 file to an M4R (start to finish!)
**Step 1: Launch Program and Connect iPhone to Computer!
First, launch the M4R converter software on your desktop and connect your iPhone to your computer! If you want to use the program that we’re showing off in this example, the URL has been provided below:

**Step 2: Select Ringtone Maker
Once the program has been launched, go to the ‘MUSIC’ tab and select “Ringtone Maker” (pointed out in the image below.)

**Step 3: Select Music File!
A secondary window should appear after you select the ‘Ringtone Maker’ option. Here, the first thing you have to do is upload the music file that you want to convert.
For the software that we’re using as an example, you can choose to upload ‘Local Music’ from your computer or ‘Device Music’ from the music that you have stored in your connected iPhone. We’ll be explaining the different methods to select a music file in the three following steps!

**Step 4: Local Upload - Open!
If you select ‘Local Music’ a system window will appear asking you to select the music file that you want to convert to M4R. Do so and click ‘OPEN!’

**Step 5: Device Music - SELECT!
For the ‘Device Music’ option, another program window will appear. This time, with all the music on your device. You can select the music file you want to convert from here! Click ‘Select’ when done!

**Step 6: TunesGo Library!
For the last method of selecting a music file, all you have to do is select a file from the ‘MUSIC’ tab of TunesGo, right-click on said file, and then select ‘Ringtone Maker’ on the pop-up that appears (shown below).

**Step 7: Trim and Save!
Once you’ve chosen the music file you want to convert, you can now:
● Trim the file to specify which part of the file you want to convert (40 seconds only for a proper Ringtone!)
● Use the ‘Ringtone Audition’ option to preview your trimmed audio.
● And, finally, you can save the finished ringtone directly to your PC or Device!
In this way, not only have you managed to convert from MP3 to M4R cleanly, but you can also use it right away on either your PC or iPhone!

Part 3 How to Convert M4A to M4R?
Another Apple extension file that you might recognize is M4A! This was mentioned briefly in a previous tutorial, but it might be more familiar to others as ‘compressed’ Apple Music. This is what your audio becomes when processed through iTunes. It’s also known as MPEG-4 Audio, and its main purpose is to compress the size of an audio file (compared to MP3) without compromising the quality.
01How to convert M4A to M4R on Windows?
This process was mentioned briefly in Part 2, Section 3 of this article, but we’ll be going through the easiest method of converting M4A to M4R on Windows below! This method is possible only because the formats are pretty much the same. The only difference lies in how they are categorized.
**Step 1: View File Extensions!
The first step to convert M4A to M4R is to open the folder in which your M4A audio is stored. There, make sure that you have ‘File Name Extensions’ selected under the ‘VIEW’ tab (pointed out in the image below).
This will allow you to view and edit the file extension of a given file.

**Step 2: Rename M4A to M4R!
Next, select the M4A that you want to convert and right-click so that you can choose the ‘Rename’ option on the pop-up that appears.

**Step 3: Change M4A to M4R
With ‘File Name Extensions’ on, you can edit the file extension as well! Of course, this is not possible for all conversions. But, as mentioned, since M4A and M4R files are pretty much the same, you can do so without damaging the file!
Meaning, you can change M4A to M4R without worrying about it being unusable!

012. How to Convert M4A to M4R with iTunes
This process was already explained in Part 2, Section 2 of this article. But, since it’s important to provide this perspective we’ll be going through the process again. This time, with the intention of converting an M4A music file to an M4R!
**Step 1: Add File to iTunes Library!
First, add the M4A file to your iTunes library! (You can use the drag-and-drop feature or select ‘Add File’ or ‘Add folder’ under the ‘FILE’ tab).

**Step 2: Create to M4R!
Once your M4A audio file has been uploaded, make sure that it’s selected and then select ‘Create Version’ for it (the option can be found under the ‘FILE’ tab > ‘Convert’!)

**Step 3: Convert M4A to M4R
Once the version of the file has been created (which comes out as M4A), you can use the method we showed in Section 3, Part 1 of this article to change the M4A to M4R simply by rewriting the file extension name.

03How to Convert M4A to M4R Online
For this next part, we’ll be echoing another one of our earlier tutorials! Only, this time, we’ll be focusing on converting M4A to M4R online with an M4R converter online! Specifically, the one we introduced previously — Audio Tool Set!
**Step 1: Online M4R Converter
Audio Tool Set offers an M4A to M4R converter that you can select under the ‘CONVERT AUDIO’ tab!

**Step 2: Upload M4A File!
Once you’ve been moved to the free M4A to M4R converter, select the ‘UPLOAD M4A’ option to browse your PC for the M4A file that you want to convert.

**Step 3: Confirm M4R Conversion Format!
If you’re using the M4A to M4R Converter you can skip this step. But, if not, make sure that you have chosen ‘M4R’ as your desired conversion format!

**Step 4: Convert M4A to M4R!
With all of that in order, select ‘CONVERT’ to move forward.

**Step 5: Download Converted M4R!
Finally, with the conversion done, you can now download the converted file to use as you will! This can be done by selecting the ‘DOWNLOAD’ option!

04How to Create and How to Open an M4A File?
If you want detailed instructions on how to create an M4A file, please refer to Part 2, Section 2 of this article, or Part 3, Section 2. In both sections, we demonstrated how one can create an M4A file by using the ‘Create Version’ feature that iTunes offers.
In that same vein, if you want to be able to open an M4A file, iTunes is your best bet! Although, it should also be said that some of the more advanced media players (and audio players), like QuickTime or Media Player, can open M4A files as well!

05Which Other Formats M4A Can Be Converted into and Why?
There are numerous file formats that you can convert M4A into. If you want examples: you can convert M4A to M4R, MP3 to M4A, WAV to M4A, FLAC to M4A, OGG to M4A, WMA to M4A, and so much more! Of course, if you want more advanced M4A conversions, you might want to consider using a more advanced tool. One such M4A converter that we recommend is Filmora Pro!
Wondershare Filmora Video Editor is an all-in-one video editing software that will allow you to convert M4A to M4R (and all sorts of other audio and video file formats) so that you can make use of the file for all your projects! The best part of using a video editor like Filmora, of course, is that once you’ve converted the file, you can use it immediately — there’s no need to wait, you can finish your project right then and there, making it unnecessary for you to go searching for any other solution.

Wondershare Filmora - Best Video Editor for Mac/Windows
5,481,435 people have downloaded it.
Build unique custom animations without breaking a sweat.
Focus on creating epic stories and leave the details to Filmora’s auto features.
Start a creative adventure with drag & drop effects and endless possibilities.
Filmora simplifies advanced features to save you time and effort.
Filmora cuts out repetition so you can move on to your next creative breakthrough.
Key Takeaways from This Episode
● What’s the point of M4R Converters? Well, it’s most relevant to iOS users! Especially those who are tired of listening to the same boring tones on their phone over and over again!
● The M4R file format was created by Apple to differentiate music from ringtones. And, by becoming familiar with the process (which we’ve illustrated in many details in the article above), you can flex your creativity a bit and control just what tones are coming out of your phone!
● It’s not all that difficult to create M4Rs either! There are several methods that you can try — online, iTunes, third-party software, and so much more!
● And, you can make these ringtones from pretty much any format — whether you’re converting from MP3, MOV, WAV, FLAC, WMA, etc.
M4R is an audio file extension that was created by Apple to separate regular songs and audio from ringtones
As for methods of converting from your more general file extension formats to M4R, we’ve prepared a whole guide below — where we’ve outlined some of the more important things that you should know about M4R converters and how to use them.
In this article
01 [Why Convert Mp3 to M4R?](#Part 1)
02 [How to Convert Mp3 to M4R?](#Part 2)
03 [How to Convert M4A to M4R?](#Part 3)
Part 1 Why Convert MP3 to M4R?
Let’s start with a bit of an overview of M4R and M4R Converters first! We touched upon this subject in the introduction, but we thought it would be best to expand on the subject here for better understanding. First, let’s talk about what an M4R converter is usually like. Then, let’s talk about why someone might convert from MP3 to M4R.
01M4R Converter Key Features
Here’s a list of some key features that you should look for in an M4R Converter:
● Your average M4R Converter should allow you to convert to M4R from general audio files. That includes the following: MP3, WAV, WMA, AIFF, AMR, FLAC, MKA, WMV, and so much more.
● It should also allow you to ‘extract’ audio from videos (whether it is a MPEG-4, MOV, AVI, etc.)
● The M4R converter would prove even more useful if it allowed you to trim small segments of audio or video (with exact start and end time) so that you can specify which part should play as a ringtone.
● A method of previewing trimmed content prior to conversion would also be helpful so that you won’t have to undergo the process again and again.
● Its settings should also be adjustable or the interface intuitive, allowing you to easily choose or discover the output folder, adjust audio bitrate, and so on.
02Best Three Reasons Why Convert MP3 to M4R
There are several reasons why you might want to use an M4R converter to change from MP3 to M4R, these reasons include:
● Creating iPhone Ringtone: The main purpose of converting to M4R is, of course, to create iPhone ringtones. This file extension was created by Apple specifically to differentiate between songs and ringtones. And, if you’re a regular iOS user but are not a fan of the basic iOS ringtones, learning how to create M4R files would be beneficial in opening your horizons.
● Transfer Ringtones to iPhone: Of course, once the M4R is created for use, it would need to be transferred. This is much easier if it stays in this format!
● Making General M4R Audio: Although not as common, some users see the benefit of using M4R audio for other reasons (i.e., content creators sometimes use M4R audio as a sound-effect for videos). Thus, knowing how to convert from MP3 to MP4 usually proves to be useful for them.
Part 2 How to Convert Mp3 to M4R?
Now, let’s start with a more in-depth tutorial on how to actually convert MP3 to M4R! In this case, specifically, we’ll be providing three different examples. Starting with an online solution and then following it up with the general iTunes conversion and the more involved software conversion!
01How to Convert MP3 to M4R Online?
As mentioned, the first M4R Converter on this list is an online one! There are plenty of these kinds of online converter tools available, and they all pretty much work the same way, so the example we’ll be showing below is more of an all-purpose kind of affair. However, just in case you’re curious, the tool we’ll be using for our examples is the Converter from Audio Tool Set!
**Step 1: Visit Online Converter Website!
First! Open the M4R Converter online tool that you want to use! If you want to follow along with our examples, a URL has been provided for you below:
**Step 2: Upload MP3 File
Next, it’s time to upload the MP3 file that you want to convert to M4R!
Usually, all you have to do for this is click the ‘Upload’ button or drag-and-drop the file onto the specified area. But, in some cases, the M4R converter may also allow you to upload via a link or from cloud-based storage (i.e., Dropbox.)
**Step 3: Select M4R as Output Format!
Once your MP3 file has been uploaded, select the format that you want it to be converted into. This may have defaulted to M4R or you may be given the chance to choose yourself (as is shown in the image below.)
**Step 4: Select Convert!
The next thing you need to do is to simply select the ‘CONVERT’ option to begin processing the change from MP3 to M4R!
**Step 5: Download Converter M4R!
Once the conversion is done, you should now have been given the option to download the finished M4R. Click ‘DOWNLOAD’ and you’re done!
012. How to convert MP3 to M4R on iTunes?
Of course, as an Apple File Extension, it only makes sense that Apple provides its users an easy way to convert general audio to M4R! In this case, we’ll be showing you another method to convert from MP3 to M4R with Apple’s own iTunes! Of course, if you want to follow along with this next example, you’ll have to download and install the software (for Windows users) before proceeding.
**Step 1: Add File or Folder to Library!
Once you have iTunes installed, launch the program and go to ‘File’ > ‘Add File to Library’ or ‘Add Folder to Library’ to upload the MP3 file(s) that you want to convert to M4R!
**Step 2: Select MP3 and Adjust Timing!
Since M4R ringtones are limited to 40 seconds only, you’ll need to adjust timing prior to conversion if you want the ringtone to start and end at a specific time.
This is possible to do by selecting the song from your library and right clicking so you can access the ‘OPTIONS’ tab (shown below)! Under the Options tab, you’ll be able to specify the start and stop time for your chosen MP3!
Click ‘OK’ when done in order to save any changes!
**Step 3: Convert to Version!
Next, with the MP3 file still selected, go to the ‘FILE’ tab (shown in the image below) and then click ‘CONVERT’ > ‘Create Version’!
**Step 4: Go to the Destination Folder!
After the conversion has been finished, locate the file’s destination folder. You’ll notice that the file extension of the file is .M4A but this is easy enough to change.
Just rename the file extension to .M4R (example shown below) and click ‘YES’ to confirm the change! In this way, you’ve managed to convert MP3 to M4R with iTunes!
013. How to Convert MP3 to M4R Online Free with Ringtone Maker?
For this last example of converting MP3 to M4R, we’ve decided to show-off the ringtone maker, Wondershare TunesGo! This program is, of course, more than just a ringtone maker, but the function that we’ll be exploring will be the process of making an iPhone Ringtone from an MP3 file to an M4R (start to finish!)
**Step 1: Launch Program and Connect iPhone to Computer!
First, launch the M4R converter software on your desktop and connect your iPhone to your computer! If you want to use the program that we’re showing off in this example, the URL has been provided below:
**Step 2: Select Ringtone Maker
Once the program has been launched, go to the ‘MUSIC’ tab and select “Ringtone Maker” (pointed out in the image below.)
**Step 3: Select Music File!
A secondary window should appear after you select the ‘Ringtone Maker’ option. Here, the first thing you have to do is upload the music file that you want to convert.
For the software that we’re using as an example, you can choose to upload ‘Local Music’ from your computer or ‘Device Music’ from the music that you have stored in your connected iPhone. We’ll be explaining the different methods to select a music file in the three following steps!
**Step 4: Local Upload - Open!
If you select ‘Local Music’ a system window will appear asking you to select the music file that you want to convert to M4R. Do so and click ‘OPEN!’
**Step 5: Device Music - SELECT!
For the ‘Device Music’ option, another program window will appear. This time, with all the music on your device. You can select the music file you want to convert from here! Click ‘Select’ when done!
**Step 6: TunesGo Library!
For the last method of selecting a music file, all you have to do is select a file from the ‘MUSIC’ tab of TunesGo, right-click on said file, and then select ‘Ringtone Maker’ on the pop-up that appears (shown below).
**Step 7: Trim and Save!
Once you’ve chosen the music file you want to convert, you can now:
● Trim the file to specify which part of the file you want to convert (40 seconds only for a proper Ringtone!)
● Use the ‘Ringtone Audition’ option to preview your trimmed audio.
● And, finally, you can save the finished ringtone directly to your PC or Device!
In this way, not only have you managed to convert from MP3 to M4R cleanly, but you can also use it right away on either your PC or iPhone!
Part 3 How to Convert M4A to M4R?
Another Apple extension file that you might recognize is M4A! This was mentioned briefly in a previous tutorial, but it might be more familiar to others as ‘compressed’ Apple Music. This is what your audio becomes when processed through iTunes. It’s also known as MPEG-4 Audio, and its main purpose is to compress the size of an audio file (compared to MP3) without compromising the quality.
01How to convert M4A to M4R on Windows?
This process was mentioned briefly in Part 2, Section 3 of this article, but we’ll be going through the easiest method of converting M4A to M4R on Windows below! This method is possible only because the formats are pretty much the same. The only difference lies in how they are categorized.
**Step 1: View File Extensions!
The first step to convert M4A to M4R is to open the folder in which your M4A audio is stored. There, make sure that you have ‘File Name Extensions’ selected under the ‘VIEW’ tab (pointed out in the image below).
This will allow you to view and edit the file extension of a given file.
**Step 2: Rename M4A to M4R!
Next, select the M4A that you want to convert and right-click so that you can choose the ‘Rename’ option on the pop-up that appears.
**Step 3: Change M4A to M4R
With ‘File Name Extensions’ on, you can edit the file extension as well! Of course, this is not possible for all conversions. But, as mentioned, since M4A and M4R files are pretty much the same, you can do so without damaging the file!
Meaning, you can change M4A to M4R without worrying about it being unusable!
012. How to Convert M4A to M4R with iTunes
This process was already explained in Part 2, Section 2 of this article. But, since it’s important to provide this perspective we’ll be going through the process again. This time, with the intention of converting an M4A music file to an M4R!
**Step 1: Add File to iTunes Library!
First, add the M4A file to your iTunes library! (You can use the drag-and-drop feature or select ‘Add File’ or ‘Add folder’ under the ‘FILE’ tab).
**Step 2: Create to M4R!
Once your M4A audio file has been uploaded, make sure that it’s selected and then select ‘Create Version’ for it (the option can be found under the ‘FILE’ tab > ‘Convert’!)
**Step 3: Convert M4A to M4R
Once the version of the file has been created (which comes out as M4A), you can use the method we showed in Section 3, Part 1 of this article to change the M4A to M4R simply by rewriting the file extension name.
03How to Convert M4A to M4R Online
For this next part, we’ll be echoing another one of our earlier tutorials! Only, this time, we’ll be focusing on converting M4A to M4R online with an M4R converter online! Specifically, the one we introduced previously — Audio Tool Set!
**Step 1: Online M4R Converter
Audio Tool Set offers an M4A to M4R converter that you can select under the ‘CONVERT AUDIO’ tab!
**Step 2: Upload M4A File!
Once you’ve been moved to the free M4A to M4R converter, select the ‘UPLOAD M4A’ option to browse your PC for the M4A file that you want to convert.
**Step 3: Confirm M4R Conversion Format!
If you’re using the M4A to M4R Converter you can skip this step. But, if not, make sure that you have chosen ‘M4R’ as your desired conversion format!
**Step 4: Convert M4A to M4R!
With all of that in order, select ‘CONVERT’ to move forward.
**Step 5: Download Converted M4R!
Finally, with the conversion done, you can now download the converted file to use as you will! This can be done by selecting the ‘DOWNLOAD’ option!
04How to Create and How to Open an M4A File?
If you want detailed instructions on how to create an M4A file, please refer to Part 2, Section 2 of this article, or Part 3, Section 2. In both sections, we demonstrated how one can create an M4A file by using the ‘Create Version’ feature that iTunes offers.
In that same vein, if you want to be able to open an M4A file, iTunes is your best bet! Although, it should also be said that some of the more advanced media players (and audio players), like QuickTime or Media Player, can open M4A files as well!
05Which Other Formats M4A Can Be Converted into and Why?
There are numerous file formats that you can convert M4A into. If you want examples: you can convert M4A to M4R, MP3 to M4A, WAV to M4A, FLAC to M4A, OGG to M4A, WMA to M4A, and so much more! Of course, if you want more advanced M4A conversions, you might want to consider using a more advanced tool. One such M4A converter that we recommend is Filmora Pro!
Wondershare Filmora Video Editor is an all-in-one video editing software that will allow you to convert M4A to M4R (and all sorts of other audio and video file formats) so that you can make use of the file for all your projects! The best part of using a video editor like Filmora, of course, is that once you’ve converted the file, you can use it immediately — there’s no need to wait, you can finish your project right then and there, making it unnecessary for you to go searching for any other solution.
Wondershare Filmora - Best Video Editor for Mac/Windows
5,481,435 people have downloaded it.
Build unique custom animations without breaking a sweat.
Focus on creating epic stories and leave the details to Filmora’s auto features.
Start a creative adventure with drag & drop effects and endless possibilities.
Filmora simplifies advanced features to save you time and effort.
Filmora cuts out repetition so you can move on to your next creative breakthrough.
Key Takeaways from This Episode
● What’s the point of M4R Converters? Well, it’s most relevant to iOS users! Especially those who are tired of listening to the same boring tones on their phone over and over again!
● The M4R file format was created by Apple to differentiate music from ringtones. And, by becoming familiar with the process (which we’ve illustrated in many details in the article above), you can flex your creativity a bit and control just what tones are coming out of your phone!
● It’s not all that difficult to create M4Rs either! There are several methods that you can try — online, iTunes, third-party software, and so much more!
● And, you can make these ringtones from pretty much any format — whether you’re converting from MP3, MOV, WAV, FLAC, WMA, etc.
The Ultimate Guide to Video Editing on Windows 11: Free and Paid Tools
A video editor is something that you still need to make basic adjustments to the media clips before they can be shared with your family, friends, and colleagues. When discussing a video editor for Windows 11, you have several options to choose the best one.
However, your decision to prefer one application over all others mainly relies on a couple of factors, such as budget, the type of PC hardware, the number of formats the program supports, etc. Therefore, the following sections enlist some desktop and web apps that can be considered while selecting a Windows 11 video editor to make things easier.
In this article
01 Part 1: Best Video Editing Software for Windows 11
02 Part 2: Best Online Video Editors for Windows 11
03 Part 3: FAQs About Windows 11 Video Editors
Part 1: Best Video Editing Soft ware for Windows 11
Some of the best free video editors, along with a few in-app purchase options, that can be used on your Windows 11 computers are listed below
1. Microsoft Photos (in-built)
Microsoft Photos is a built-in app in Windows 11. Although the program is a default application to view the slideshow, image info, compare images, photos, album, import photos, edited image date, save images, change the app’s look Image enhancement filter, rotate, crop, add more folders to Photos, quickly find photos, create a video and share, delete, and copy images using Photos. It is easy to use for non-professionals. Microsoft Photos is a basic app. It doesn’t have advanced tools that can be used as a professional video editor for Windows 11.
Some noteworthy attributes:
- Price: Free
- Editing Options: Add 3D and slow-motion effects, add animated text, etc.
- Points to Remember: Offers basic editing options, and no advanced tools are available.

2. Wondershare Filmora
Wondershare Filmora is an easy-to-use yet powerful video editor that gives tough competition to some industry-standard applications like Adobe Premiere Pro, Final Cut Pro X, etc. The app follows a layered timeline approach to add elements and objects. In addition, the outputs that Filmora produces can be directly published to your preferred social media platform.
If you find Filmora is not opening in Windows 11, try the methods below to fix it.
For Win 7 or later (64-bit)
For macOS 10.14 or later
Some noteworthy attributes:
- Price: Unlimited free trial. $79.99/year after 20% $59.99 for a perpetual plan
- Editing Options: Add titles, elements, effects, split-screen, and much more
- Points to Remember: Requires some initial basic understanding of video editing tools.

3. CyberLink PowerDirector
PowerDirector is yet another professional video editor for Windows 11. Although the tool is available in multiple variants, the one that is named ‘PowerDirector Essential’ is free to use without any limits. On the other hand, the paid illustrations can be bought on a monthly or annual subscription basis, or a lifetime license can be purchased for unlimited accessibility. The software can be used to edit videos professionally or prepare slideshows out of the images as needed.
Some noteworthy attributes:
- Price: Free trial. PowerDirector 20 Ultra - $99.99. PowerDirector 20 Ultimate - $139.99. PowerDirector 365 - $69.99 offers a discount of 25% after the discount price of $51.99 per year.
- Editing Options: AI-based audio enhancements, object detection, and much more
- Points to Remember: PowerDirector Essential lacks some advanced editing features.
4. VSDC Fre e Video Editor
VSDC is a free tool to edit and produce fine videos for vlogs, occasions, and professional uses. The application is populated with many powerful features that most competitors don’t offer, not at least for free. Furthermore, the application is lightweight and doesn’t put any overhead on the processor when used.
Some noteworthy attributes:
- Price: Free and Pro version is also available for just $19.99.
- Editing Options: Chroma key, 360o video creation, color correction, zoom, etc.
- Points to Remember: Lacks some advanced tools like motion tracking, stabilizer, etc
5. HitFilm Express
HitFilm Express is a Windows 11 video editor offering professional-level editing options, advanced VFX tools, and much more. The best thing is that the application is free to download and use and can be used well to produce industry-standard films that can be distributed for personal viewing or commercial gains.
Watch the video tutorial below if you find any issues installing HitFilm Express.
Some noteworthy attributes:
- Price: Free
- Editing Options: Adding new videos, audios, transition effects, cropping, and adding text.
- Points to Remember: Also available as a Pro variant with advanced editing features.
6 . Adobe Premiere Pro
One of the most used video editing tools is trusted and recommended by many professionals . Adobe Premiere Pro can edit and produce commercial-level videos and movies that can be broadcasted on TVs, cinema theaters, and other OTT platforms. Furthermore, the application is versatile and is compatible with almost all Adobe products.
Some noteworthy attributes:
- Price:$20.99 per month for an annual term. USD $239.88 per year, USD $31.49 per month
- Editing Options: VFX, motion tracking, chroma key, and more.
- Points to Remember: Driver version 472.12 is required for the NVIDIA graphics card
7 . Lightworks
Lightworks is the most common video editor for Windows 11 that was used to edit and add effects to various Hollywood movies like Pulp Fiction, Braveheart, The Wolf of Wall Street, etc. The built-in Media QC system automatically checks and adjusts the clips to meet international standards so they can be distributed for commercial gains.
Some noteworthy attributes:
- Price: Free, Lightwork create $9.99 per month and for Pro version costs $23.99 per month.
- Editing Options: Automatic media quality check and adjustments, fine editing, etc.
- Points to Remember A basic understanding of how editing tools work is required.
Part 2: Best Online Video Editors for Windows 11
In addition to the desktop applications to edit the videos, some web-based video editing apps are also available that don’t need any installation, and all the processes are done using a web browser. The rendering is done on the apps’ corresponding vendors’ server, thus keeping your PC and its processor free from any overhead they may have to deal with.
Some of the best online video editors for Windows 11 include:
1. Clipchamp
Clipchamp is an extremely intuitive web-based video editor for Windows 11 recently acquired by Microsoft. The self-explanatory options and menus that the online app offers help you edit and produce professional-level industry-standard media clips even if you have no initial experience in the domain.
In addition, Clipchamp is also compatible with common Cloud storage services, including OneDrive, Google Drive, Dropbox, and several web tools like Zoom, Pinterest, LinkedIn, etc.
Go to Clipchamp video editor: https://clipchamp.com/en/
Some noteworthy attributes:
- Price: Free / USD $72 per year / USD $156 per year / USD $324 per year
- Editing Options: Add audio, trim, split, merge, flip, color correction, etc.
- Points to Remember: It doesn’t work on Firefox. It would be best if you had MS Edge or Google Chrome.
3. Kapwing
Kapwing is another online Windows 11 video editor that is equipped with plenty of assets offered by some of the popular providers like Pexels, Unsplash, Giphy, etc. Using Kapwing to edit videos is as simple as uploading them, using self-explanatory tools and icons to make the modifications, choosing an output format, and beginning rendering. Furthermore, the web app allows collaborative edits where a team of video editors can use the platform to edit the same video from the comforts of their home.
Visit Kapwing: https://www.kapwing.com/
Some noteworthy attributes:
- Price: Free. $16 per month paid year and $16 per month per user paid yearly {for teams}.
- Editing Options: Timeline-based approach, split, merge, trim, add music, etc.
- Points to Remember: Only the file of 250MB size can be uploaded with the free account
4. Lu men5
Lumen5 is one among those that many marketing companies across the globe trust. Because the web app also enables you to create videos and edit existing ones, many vloggers and renowned organizations use the platform for quick and easy processing and fast rendering to their preferred output format.
Visit Lumen5 website: https://lumen5.com/video-editor/
Some noteworthy attributes:
Price: Free
**Starter Plan $**29 per month.
Premium plan $79 per month.
A business plan is $199 per month.
Annual Billing for the starter plan is $228 per year. The premium plan is $588 per year, and the business plan is $1788 per year.
Editing Options: Add text, trim, merge, compress, resize, etc.
Points to Remember: Free account adds Lumen5 watermark on the exported videos
Part 3: FAQs About Windows 11 Video Editors
1. Does Windows 11 have Movie Maker?
The short answer is, no, it doesn’t. Microsoft removed Movie Maker from its operating systems long ago. Now, in Windows 11, it’s the Photos app that does all the work that Movie Maker used to do earlier.
2. Should you upgrade to Windows 11 for video editing?
Although Windows 11 is new and offers several advanced features, at the time of this writing, not all third-party apps have been upgraded by their corresponding vendors to become compatible with the OS. Therefore, you are suggested to wait until Windows 11 is rolled out for all the regions of the globe, and most of the apps, if not all, start working flawlessly on this new operating system.
02 Part 2: Best Online Video Editors for Windows 11
03 Part 3: FAQs About Windows 11 Video Editors
Part 1: Best Video Editing Soft ware for Windows 11
Some of the best free video editors, along with a few in-app purchase options, that can be used on your Windows 11 computers are listed below
1. Microsoft Photos (in-built)
Microsoft Photos is a built-in app in Windows 11. Although the program is a default application to view the slideshow, image info, compare images, photos, album, import photos, edited image date, save images, change the app’s look Image enhancement filter, rotate, crop, add more folders to Photos, quickly find photos, create a video and share, delete, and copy images using Photos. It is easy to use for non-professionals. Microsoft Photos is a basic app. It doesn’t have advanced tools that can be used as a professional video editor for Windows 11.
Some noteworthy attributes:
- Price: Free
- Editing Options: Add 3D and slow-motion effects, add animated text, etc.
- Points to Remember: Offers basic editing options, and no advanced tools are available.
2. Wondershare Filmora
Wondershare Filmora is an easy-to-use yet powerful video editor that gives tough competition to some industry-standard applications like Adobe Premiere Pro, Final Cut Pro X, etc. The app follows a layered timeline approach to add elements and objects. In addition, the outputs that Filmora produces can be directly published to your preferred social media platform.
If you find Filmora is not opening in Windows 11, try the methods below to fix it.
For Win 7 or later (64-bit)
For macOS 10.14 or later
Some noteworthy attributes:
- Price: Unlimited free trial. $79.99/year after 20% $59.99 for a perpetual plan
- Editing Options: Add titles, elements, effects, split-screen, and much more
- Points to Remember: Requires some initial basic understanding of video editing tools.
3. CyberLink PowerDirector
PowerDirector is yet another professional video editor for Windows 11. Although the tool is available in multiple variants, the one that is named ‘PowerDirector Essential’ is free to use without any limits. On the other hand, the paid illustrations can be bought on a monthly or annual subscription basis, or a lifetime license can be purchased for unlimited accessibility. The software can be used to edit videos professionally or prepare slideshows out of the images as needed.
Some noteworthy attributes:
- Price: Free trial. PowerDirector 20 Ultra - $99.99. PowerDirector 20 Ultimate - $139.99. PowerDirector 365 - $69.99 offers a discount of 25% after the discount price of $51.99 per year.
- Editing Options: AI-based audio enhancements, object detection, and much more
- Points to Remember: PowerDirector Essential lacks some advanced editing features.
4. VSDC Fre e Video Editor
VSDC is a free tool to edit and produce fine videos for vlogs, occasions, and professional uses. The application is populated with many powerful features that most competitors don’t offer, not at least for free. Furthermore, the application is lightweight and doesn’t put any overhead on the processor when used.
Some noteworthy attributes:
- Price: Free and Pro version is also available for just $19.99.
- Editing Options: Chroma key, 360o video creation, color correction, zoom, etc.
- Points to Remember: Lacks some advanced tools like motion tracking, stabilizer, etc
5. HitFilm Express
HitFilm Express is a Windows 11 video editor offering professional-level editing options, advanced VFX tools, and much more. The best thing is that the application is free to download and use and can be used well to produce industry-standard films that can be distributed for personal viewing or commercial gains.
Watch the video tutorial below if you find any issues installing HitFilm Express.
Some noteworthy attributes:
- Price: Free
- Editing Options: Adding new videos, audios, transition effects, cropping, and adding text.
- Points to Remember: Also available as a Pro variant with advanced editing features.
6 . Adobe Premiere Pro
One of the most used video editing tools is trusted and recommended by many professionals . Adobe Premiere Pro can edit and produce commercial-level videos and movies that can be broadcasted on TVs, cinema theaters, and other OTT platforms. Furthermore, the application is versatile and is compatible with almost all Adobe products.
Some noteworthy attributes:
- Price:$20.99 per month for an annual term. USD $239.88 per year, USD $31.49 per month
- Editing Options: VFX, motion tracking, chroma key, and more.
- Points to Remember: Driver version 472.12 is required for the NVIDIA graphics card
7 . Lightworks
Lightworks is the most common video editor for Windows 11 that was used to edit and add effects to various Hollywood movies like Pulp Fiction, Braveheart, The Wolf of Wall Street, etc. The built-in Media QC system automatically checks and adjusts the clips to meet international standards so they can be distributed for commercial gains.
Some noteworthy attributes:
- Price: Free, Lightwork create $9.99 per month and for Pro version costs $23.99 per month.
- Editing Options: Automatic media quality check and adjustments, fine editing, etc.
- Points to Remember A basic understanding of how editing tools work is required.
Part 2: Best Online Video Editors for Windows 11
In addition to the desktop applications to edit the videos, some web-based video editing apps are also available that don’t need any installation, and all the processes are done using a web browser. The rendering is done on the apps’ corresponding vendors’ server, thus keeping your PC and its processor free from any overhead they may have to deal with.
Some of the best online video editors for Windows 11 include:
1. Clipchamp
Clipchamp is an extremely intuitive web-based video editor for Windows 11 recently acquired by Microsoft. The self-explanatory options and menus that the online app offers help you edit and produce professional-level industry-standard media clips even if you have no initial experience in the domain.
In addition, Clipchamp is also compatible with common Cloud storage services, including OneDrive, Google Drive, Dropbox, and several web tools like Zoom, Pinterest, LinkedIn, etc.
Go to Clipchamp video editor: https://clipchamp.com/en/
Some noteworthy attributes:
- Price: Free / USD $72 per year / USD $156 per year / USD $324 per year
- Editing Options: Add audio, trim, split, merge, flip, color correction, etc.
- Points to Remember: It doesn’t work on Firefox. It would be best if you had MS Edge or Google Chrome.
3. Kapwing
Kapwing is another online Windows 11 video editor that is equipped with plenty of assets offered by some of the popular providers like Pexels, Unsplash, Giphy, etc. Using Kapwing to edit videos is as simple as uploading them, using self-explanatory tools and icons to make the modifications, choosing an output format, and beginning rendering. Furthermore, the web app allows collaborative edits where a team of video editors can use the platform to edit the same video from the comforts of their home.
Visit Kapwing: https://www.kapwing.com/
Some noteworthy attributes:
- Price: Free. $16 per month paid year and $16 per month per user paid yearly {for teams}.
- Editing Options: Timeline-based approach, split, merge, trim, add music, etc.
- Points to Remember: Only the file of 250MB size can be uploaded with the free account
4. Lu men5
Lumen5 is one among those that many marketing companies across the globe trust. Because the web app also enables you to create videos and edit existing ones, many vloggers and renowned organizations use the platform for quick and easy processing and fast rendering to their preferred output format.
Visit Lumen5 website: https://lumen5.com/video-editor/
Some noteworthy attributes:
Price: Free
**Starter Plan $**29 per month.
Premium plan $79 per month.
A business plan is $199 per month.
Annual Billing for the starter plan is $228 per year. The premium plan is $588 per year, and the business plan is $1788 per year.
Editing Options: Add text, trim, merge, compress, resize, etc.
Points to Remember: Free account adds Lumen5 watermark on the exported videos
Part 3: FAQs About Windows 11 Video Editors
1. Does Windows 11 have Movie Maker?
The short answer is, no, it doesn’t. Microsoft removed Movie Maker from its operating systems long ago. Now, in Windows 11, it’s the Photos app that does all the work that Movie Maker used to do earlier.
2. Should you upgrade to Windows 11 for video editing?
Although Windows 11 is new and offers several advanced features, at the time of this writing, not all third-party apps have been upgraded by their corresponding vendors to become compatible with the OS. Therefore, you are suggested to wait until Windows 11 is rolled out for all the regions of the globe, and most of the apps, if not all, start working flawlessly on this new operating system.
Final Cut Pro Tutorial: Building a Stunning Video Slideshow
Complete Guide on How to Create a Video Slideshow with Final Cut Pro

Liza Brown
Mar 27, 2024• Proven solutions
A video slideshow is video footage produced by presenting a series of still images in a prearranged sequence. In the context of computer-based visualization, the term slideshow refers to turning existing images into upbeat, attention-grabbing videos.
Final Cut Pro is advanced video-editing software used by professional video editors and filmmakers to create impressive videos and animations. Its high-tech features allow users to add various kinds of effects to their videos to make them look worth watching. You can also create video slideshows with FCP and give your still images a new look.
Read this article section to learn how to make video slideshows with FCP and Wondershare Filmora.
- Part 1: How to Create a Video Slideshow in Final Cut Pro?
- Part 2: Where to Find FCP Video Slideshow Templates for Free?
- Part 3: How to Adopt Templates in Final Cut Pro?
- Part 4: How to Add Music and Text in a Video Slideshow with Final Cut Pro?
- Part 5: How to Make a Slideshow in an Easier yet Better Way?
- Part 6: How to make a simple Slideshow Free & Online?
Part 1: How to Create a Video Slideshow in Final Cut Pro?
Final Cut Pro is an amazing software that makes slideshow creation as simple as ABC. You need not use any template; instead, you can sequence images on the timeline and add a few transitions and audio effects to create a video slideshow. Here’s how you can do this:
- Open Final Cut Pro, go to File, and click on New Project;
- Now, it’s time to import the still images you want to use to Final Cut Pro. For this purpose, tap File > Import > Files and select all photos from your computer, and click Import. Keep selecting until all images have been imported.
- Go to the Browser pane and drag your photos to the Timeline of Final Cut Pro. Make sure you follow the order in which you want these images to appear in the slideshow. You can also drag each image individually and drop it to your desired place before or after other images. The video slideshow will display images in the order they are placed in the Timeline.
- To add various transitions between your images, take the cursor to the target location in the timeline, go to the Menu and click Effects and Video Transitions. Now select the type of transition you want to add such as Wipe or Fade. You can also open other transitions from the submenu. This way, your desired effect will appear at your selected location in the Timeline.
- You can also add audio effects to your video slideshow. For this purpose, click File > Import > Files. Now, select your favorite audio file from the FCP’s library or your computer and click Once the audio file has been imported to the Browser pan of FCP, drag that file to the Timeline.
- To add opening or closing credits, click Effects > Video Generators. Now, double-click Text and Text From the newly opened window, click Controls and type your desired text to be displayed in your video slideshow. Now, click Video and drag the video box into the Timeline to your desired location where it should appear.
- To export your video slideshow, click File > Export > QuickTime Movie. Based on your requirement, select your desired video quality and click OK.
Part 2: Where to Find Video Slideshow Templates for Free?
Templates make it easier for you to design unique slideshow videos with Final Cut Pro. Both premium and free templates are available online with different styles such as product showcases, wedding albums, social media promos, and corporate events, etc.
Given below are some websites where you can find some of the best slideshow templates and create amazing video slideshows without effort.
Motion Array
Motion array is famous for providing both free and paid templates and plugins for FCPX. Get all the things you need for your FCPX here.

As a resource library built for Filmora, FilmStock provides tons of media and effects for you to choose from. You can adopt different styles in one video, or make a video collection with a consistent tone by applying packages in FilmStock.

Design Shack
Download thousands of free and premium FCP slideshow templates for product showcases, corporate events, weddings, and much more.

For more slideshow templates please refer to this article: 10 Best Sites to Download Free Slideshow Templates .
Part 3: How to Adopt Templates in Final Cut Pro?
Adopting templates to create amazing video slideshows with Final Cut Pro is very easy. Follow these steps to download and use templates with FCP:
- Download your favorite template online. Once downloaded, go to the folder containing the folder, unzip it, and locate the installable file.

- Copy and paste the folder where FCP can find it. If you don’t have Apple Motion, right-click on the FCP icon and select Show Package Contents from the dropdown menu. Now, navigate to the Titles or Generators folder.
- Open FCP and go to Titles and Generators sidebar.
- Search for the Title or Generator you installed under each label.
- Or use the search bar to find your installed Title or Generator.
- Drag the template to the FCP timeline.
- Use the Published Parameters panel to edit the template. Check all parameters to see editing options available.


Part 4: How to Add Music and Text in a Video Slideshow with Final Cut Pro?
You can add your favorite music or audio effects and text to your video slideshow with FCP. A variety of jingles and sound effects are available in Final Cut Pro that can be used in your video slideshow for free. If the build-in sound effects do not seem interesting, record your own audio and create your audio effects. FCP also allows users to import music files from their computers and add them to video slideshows.
To add music, click File > Import > Files. Now, either select the music file to be added from the FCP library or your computer and click Import. Finally, drag the imported file to the Timeline. It will be added to your video slideshow.
To add text, go to the Browser window, select Effects, click Video Generators, and double-click Text and Text again. Now, click Controls and enter the text you want to add to your video slideshow. Finally, click Video and drag your video box with the text into the desired location in the Final Cut Pro Timeline.
Click here to learn more about how to make a slideshow with music.
Part 5: How to Make a Slideshow in an Easier yet Better Way?
Do you want to create an amazing video slideshow conveniently? Try Wondershare Filmora X, a user-friendly and high-performance video-editing software that allows you to create unique video slideshows without advanced skills. Simply choose your favorite music, adjust photos’ duration, and add transitions and effects.
Follow these steps to make a slideshow with Wondershare Filmora X:
- Open Wondershare Filmora, add multiple photos into the applications. Adding multiple folders would make it easy for you to sort the images.
- Adjust the duration for each photo to your desired length.
- Add background music and royalty-free sound. For enhanced user experience, use the media library.
- Drag and drop all images you want to add to the timeline and set their hue, aspect ratio, saturation, contrast, and brightness.
- Add transitions between images.
- Use filters and overlays to improve your slideshow’s appearance. Since this is a core step, make sure you spend ample time on it.
- Export your video slideshow to your desired format and quality.


Don’t worry if you are a beginner and don’t have the advanced skills to create a video slideshow. There are multiple websites like Canva where you build amazing slideshows for free and impress your family and friends. Given below are simple steps to create video slideshows online.
Part 6: How to make a simple Slideshow Free & Online?
- First of all, log in to your Canva account using Gmail or Facebook and open a new page. Search for your desired Slideshow design.
- Find your favorite template by using the search tool. Select a template you want to add to your video slideshow and move to the next step.
- Go to the Canva’s library where you can find a variety of charts, images, photos, icons, and illustrations. To add any of these graphics to your page, use the Drag and Drop tool. For clear images, use the photo effects tool.
- Now, select all the images and illustrations you want and customize your slideshow using background, sound effects, font style, animations, color scheme, and animated sticker GIFs.
- Once you have finished the customization, preview your slideshow and make sure everything looks perfect. If you are happy with the result, download the slideshow in MP4, PPT JPEG, PDF, PNG, or any other format as per your requirement. For live telecast, press the Present button or share the link on your Facebook or Instagram account.
Conclusion
If you want to impress your family and friends with your video-editing skills, there’s no better option than creating an impressive video slideshow. You can give a pleasant surprise to your siblings or astonish your loved ones by making a video slideshow of their memorable images.
Several video-editing tools are available where you can design, edit, and recreate innovative video slideshows. The two best software are Final Cut Pro and Wondershare Filmora X, both of which are user-friendly and offer amazing features. You just have to simply import all images, arrange them in proper order, choose your favorite theme or template, and add transitions and audio effects, and download the slideshow in your desired format.
You can also use online tools like Canva to create amazing video slideshows online for free. Try Wondershare Filmora X if you are looking for quality, simplicity, and pricing flexibility.
For more slideshow-making tutorials with other editors, see this article: How to Create Amazing Showreel or Slideshow?
Liza Brown
Liza Brown is a writer and a lover of all things video.
Follow @Liza Brown
Liza Brown
Mar 27, 2024• Proven solutions
A video slideshow is video footage produced by presenting a series of still images in a prearranged sequence. In the context of computer-based visualization, the term slideshow refers to turning existing images into upbeat, attention-grabbing videos.
Final Cut Pro is advanced video-editing software used by professional video editors and filmmakers to create impressive videos and animations. Its high-tech features allow users to add various kinds of effects to their videos to make them look worth watching. You can also create video slideshows with FCP and give your still images a new look.
Read this article section to learn how to make video slideshows with FCP and Wondershare Filmora.
- Part 1: How to Create a Video Slideshow in Final Cut Pro?
- Part 2: Where to Find FCP Video Slideshow Templates for Free?
- Part 3: How to Adopt Templates in Final Cut Pro?
- Part 4: How to Add Music and Text in a Video Slideshow with Final Cut Pro?
- Part 5: How to Make a Slideshow in an Easier yet Better Way?
- Part 6: How to make a simple Slideshow Free & Online?
Part 1: How to Create a Video Slideshow in Final Cut Pro?
Final Cut Pro is an amazing software that makes slideshow creation as simple as ABC. You need not use any template; instead, you can sequence images on the timeline and add a few transitions and audio effects to create a video slideshow. Here’s how you can do this:
- Open Final Cut Pro, go to File, and click on New Project;
- Now, it’s time to import the still images you want to use to Final Cut Pro. For this purpose, tap File > Import > Files and select all photos from your computer, and click Import. Keep selecting until all images have been imported.
- Go to the Browser pane and drag your photos to the Timeline of Final Cut Pro. Make sure you follow the order in which you want these images to appear in the slideshow. You can also drag each image individually and drop it to your desired place before or after other images. The video slideshow will display images in the order they are placed in the Timeline.
- To add various transitions between your images, take the cursor to the target location in the timeline, go to the Menu and click Effects and Video Transitions. Now select the type of transition you want to add such as Wipe or Fade. You can also open other transitions from the submenu. This way, your desired effect will appear at your selected location in the Timeline.
- You can also add audio effects to your video slideshow. For this purpose, click File > Import > Files. Now, select your favorite audio file from the FCP’s library or your computer and click Once the audio file has been imported to the Browser pan of FCP, drag that file to the Timeline.
- To add opening or closing credits, click Effects > Video Generators. Now, double-click Text and Text From the newly opened window, click Controls and type your desired text to be displayed in your video slideshow. Now, click Video and drag the video box into the Timeline to your desired location where it should appear.
- To export your video slideshow, click File > Export > QuickTime Movie. Based on your requirement, select your desired video quality and click OK.
Part 2: Where to Find Video Slideshow Templates for Free?
Templates make it easier for you to design unique slideshow videos with Final Cut Pro. Both premium and free templates are available online with different styles such as product showcases, wedding albums, social media promos, and corporate events, etc.
Given below are some websites where you can find some of the best slideshow templates and create amazing video slideshows without effort.
Motion Array
Motion array is famous for providing both free and paid templates and plugins for FCPX. Get all the things you need for your FCPX here.
As a resource library built for Filmora, FilmStock provides tons of media and effects for you to choose from. You can adopt different styles in one video, or make a video collection with a consistent tone by applying packages in FilmStock.
Design Shack
Download thousands of free and premium FCP slideshow templates for product showcases, corporate events, weddings, and much more.
For more slideshow templates please refer to this article: 10 Best Sites to Download Free Slideshow Templates .
Part 3: How to Adopt Templates in Final Cut Pro?
Adopting templates to create amazing video slideshows with Final Cut Pro is very easy. Follow these steps to download and use templates with FCP:
- Download your favorite template online. Once downloaded, go to the folder containing the folder, unzip it, and locate the installable file.
- Copy and paste the folder where FCP can find it. If you don’t have Apple Motion, right-click on the FCP icon and select Show Package Contents from the dropdown menu. Now, navigate to the Titles or Generators folder.
- Open FCP and go to Titles and Generators sidebar.
- Search for the Title or Generator you installed under each label.
- Or use the search bar to find your installed Title or Generator.
- Drag the template to the FCP timeline.
- Use the Published Parameters panel to edit the template. Check all parameters to see editing options available.
Part 4: How to Add Music and Text in a Video Slideshow with Final Cut Pro?
You can add your favorite music or audio effects and text to your video slideshow with FCP. A variety of jingles and sound effects are available in Final Cut Pro that can be used in your video slideshow for free. If the build-in sound effects do not seem interesting, record your own audio and create your audio effects. FCP also allows users to import music files from their computers and add them to video slideshows.
To add music, click File > Import > Files. Now, either select the music file to be added from the FCP library or your computer and click Import. Finally, drag the imported file to the Timeline. It will be added to your video slideshow.
To add text, go to the Browser window, select Effects, click Video Generators, and double-click Text and Text again. Now, click Controls and enter the text you want to add to your video slideshow. Finally, click Video and drag your video box with the text into the desired location in the Final Cut Pro Timeline.
Click here to learn more about how to make a slideshow with music.
Part 5: How to Make a Slideshow in an Easier yet Better Way?
Do you want to create an amazing video slideshow conveniently? Try Wondershare Filmora X, a user-friendly and high-performance video-editing software that allows you to create unique video slideshows without advanced skills. Simply choose your favorite music, adjust photos’ duration, and add transitions and effects.
Follow these steps to make a slideshow with Wondershare Filmora X:
- Open Wondershare Filmora, add multiple photos into the applications. Adding multiple folders would make it easy for you to sort the images.
- Adjust the duration for each photo to your desired length.
- Add background music and royalty-free sound. For enhanced user experience, use the media library.
- Drag and drop all images you want to add to the timeline and set their hue, aspect ratio, saturation, contrast, and brightness.
- Add transitions between images.
- Use filters and overlays to improve your slideshow’s appearance. Since this is a core step, make sure you spend ample time on it.
- Export your video slideshow to your desired format and quality.
Don’t worry if you are a beginner and don’t have the advanced skills to create a video slideshow. There are multiple websites like Canva where you build amazing slideshows for free and impress your family and friends. Given below are simple steps to create video slideshows online.
Part 6: How to make a simple Slideshow Free & Online?
- First of all, log in to your Canva account using Gmail or Facebook and open a new page. Search for your desired Slideshow design.
- Find your favorite template by using the search tool. Select a template you want to add to your video slideshow and move to the next step.
- Go to the Canva’s library where you can find a variety of charts, images, photos, icons, and illustrations. To add any of these graphics to your page, use the Drag and Drop tool. For clear images, use the photo effects tool.
- Now, select all the images and illustrations you want and customize your slideshow using background, sound effects, font style, animations, color scheme, and animated sticker GIFs.
- Once you have finished the customization, preview your slideshow and make sure everything looks perfect. If you are happy with the result, download the slideshow in MP4, PPT JPEG, PDF, PNG, or any other format as per your requirement. For live telecast, press the Present button or share the link on your Facebook or Instagram account.
Conclusion
If you want to impress your family and friends with your video-editing skills, there’s no better option than creating an impressive video slideshow. You can give a pleasant surprise to your siblings or astonish your loved ones by making a video slideshow of their memorable images.
Several video-editing tools are available where you can design, edit, and recreate innovative video slideshows. The two best software are Final Cut Pro and Wondershare Filmora X, both of which are user-friendly and offer amazing features. You just have to simply import all images, arrange them in proper order, choose your favorite theme or template, and add transitions and audio effects, and download the slideshow in your desired format.
You can also use online tools like Canva to create amazing video slideshows online for free. Try Wondershare Filmora X if you are looking for quality, simplicity, and pricing flexibility.
For more slideshow-making tutorials with other editors, see this article: How to Create Amazing Showreel or Slideshow?
Liza Brown
Liza Brown is a writer and a lover of all things video.
Follow @Liza Brown
Also read:
- Updated Zero Budget, Big Impact The Best Free Online Video Editors
- In 2024, WhatsApp Video Status Creators Top Recommendations
- Updated 2024 Approved Unbranded Video Editing 10 Top Free Android Apps
- Updated In 2024, Unleash Your Creativity Top 10 2D Animation Tools for Artists
- In 2024, Top Time-Lapse Photography Apps for Mobile Devices (2023 Update)
- Updated In 2024, The Ultimate List 10 Best Video Trimmers for PC Users
- 2024 Approved Shrink Your Videos 10 Best Free Online Compression Tools
- New 2024 Approved Loop Your Favorite Videos for Free on Windows and Mac
- Best Top-Rated 2D Animation Programs for Beginners and Pros for 2024
- Updated 2024 Approved Audio Fade Ins and Outs Made Easy 2 Final Cut Pro Techniques
- Updated 2024 Approved Mastering Video Editing on Mac A Yosemite Guide
- New In 2024, Free Video Editing Online Top Picks and Reviews
- Trim Videos for Free No Watermark, No Hassle for 2024
- Updated Kids Film Studio A Guide to Creating Movies for 2024
- New 2024 Approved Get Instagram Audio Top Methods for Saving Music
- New 2024 Approved Turn Talk Into Type Mastering Speech-to-Text Technology
- VLC Video Cutter for Mac Trim and Preserve Quality with Ease
- New In 2024, Stay Ahead of the Game The Latest Social Media Aspect Ratio Trends
- New In 2024, Discover the Hidden Gems Best Mac Speech to Text Apps with No Download Required
- New In 2024, Mac Movie Making 101 Choosing the Right Video Editing Software
- New In 2024, Create Cartoon Characters From Your Photos
- New Android Video Editing Made Easy Top 10 Free and Paid Apps
- Best Timecode Calculators Online, Mobile, and More
- New The Art of Color Correction in Final Cut Pro 2023
- New Video on the Go How to Speed Up Playback in QuickTime Player for 2024
- New Unleash Your Creativity Best Free Green Screen Apps for Mobile for 2024
- Updated In 2024, Prime Video Screen Dimensions
- Updated Avidemux No Sound Error Causes and Fixes
- New No Budget? No Problem! 10 Free Open-Source Video Editors for 2024
- Updated Windows 11 Video Editing Essentials Top Software Recommendations
- Updated Simplify AVI Editing A Step-by-Step Guide to Trimming and Splitting
- Transform Your Job Search with These 4 Top Video Resume Makers Free for 2024
- New In 2024, Best Free Video Cutter Tools Our Expert Recommendations
- New 13 Windows Movie Maker Alternatives You Need to Try for 2024
- New Windows Movie Maker Download Instructions For PC and Laptop Users for 2024
- New Video Editing for Mac Yosemite A Step-by-Step Tutorial
- 2024 Approved Home Video Editing Tips - How to Make a Great Home Movie
- Updated In 2024, No Budget? No Problem! Top Free 4K Video Editors
- New 2024 Approved WhatsApp Status Video Design Software
- Updated 2024 Approved Power Up Your Audio The Best Professional Editing Software
- New Stop Motion Simplified A Step-by-Step Guide to Software and Alternatives for 2024
- Updated The Ultimate Guide to Compressor Settings in FCPX
- Updated 2024 Approved The Ultimate Guide to Video Metadata Editing on Mac 8 Top Picks
- Updated 2024 Approved Speech to Text Conversion Made Easy Tips and Tricks
- New Slow Down Time How to Make a Slow Motion Video on Kapwing
- Updated Get Best Subtitle Edit for Mac Alternatives
- New From Basic to Brilliant Adding Effects in FCP X in 3 Easy Steps
- In 2024, How To Remove Phone Number From Your Apple ID on Your iPhone 14 Plus?
- 7 Solutions to Fix Chrome Crashes or Wont Open on Vivo Y100 5G | Dr.fone
- How to Unlock Apple iPhone SE (2020) with IMEI Code?
- Complete Tutorial to Use VPNa to Fake GPS Location On Vivo Y27s | Dr.fone
- In 2024, 3 Ways to Erase iPhone 6 Plus When Its Locked Within Seconds | Dr.fone
- Easy steps to recover deleted data from Realme C67 5G
- In 2024, How to Check Distance and Radius on Google Maps For your Motorola Moto G14 | Dr.fone
- In 2024, Top 9 HTC U23 Monitoring Apps for Parental Controls | Dr.fone
- How To Transfer Messages From Apple iPhone 6s to other iPhone All iOS Versions | Dr.fone
- In 2024, Universal Unlock Pattern for Poco F5 Pro 5G
- Restore Missing App Icon on Nokia C32 Step-by-Step Solutions | Dr.fone
- Android Call History Recovery - recover deleted call logs from Xiaomi Redmi Note 12 4G
- Will the iPogo Get You Banned and How to Solve It On Honor 90 GT | Dr.fone
- How to Send and Fake Live Location on Facebook Messenger Of your Motorola Edge+ (2023) | Dr.fone
- New 2024 Approved Best Emoji Removers to Remove Emojis From Pictures Online/PC/Mobile
- Updated Whats The Best Laptops For Video Editing
- Three Ways to Sim Unlock Vivo Y02T
- All Must-Knows to Use Fake GPS GO Location Spoofer On Asus ROG Phone 7 | Dr.fone
- In 2024, Ultimate Guide to Catch the Regional-Located Pokemon For Oppo Reno 9A | Dr.fone
- In 2024, How To Use Special Features - Virtual Location On Apple iPhone SE (2020)? | Dr.fone
- In 2024, How to Unlock SIM Card on Oppo F25 Pro 5G online without jailbreak
- Updated How to Put a Filter on a Video in iMovie for 2024
- How To Remove the Two Factor Authentication On Apple iPhone 11
- In 2024, Bypass iCloud Activation Lock with IMEI Code On your Apple iPhone 14
- How to Unlock Xiaomi Redmi Note 13 Pro+ 5G Phone without Google Account?
- How to Fix Android.Process.Media Has Stopped on Oppo Reno 11 5G | Dr.fone
- In 2024, How to Fake Snapchat Location on Honor X8b | Dr.fone
- 6 Solutions to Fix Error 505 in Google Play Store on Vivo Y28 5G | Dr.fone
- Best Pokemons for PVP Matches in Pokemon Go For Vivo V30 | Dr.fone
- In 2024, Unlocking Made Easy The Best 10 Apps for Unlocking Your Honor X9b Device
- Ultimate Guide from Oppo FRP Bypass
- Title: New 2024 Approved Best of the Best Top Webcam Recording Tools for Windows 10
- Author: Emma
- Created at : 2024-05-19 05:48:33
- Updated at : 2024-05-20 05:48:33
- Link: https://video-ai-editor.techidaily.com/new-2024-approved-best-of-the-best-top-webcam-recording-tools-for-windows-10/
- License: This work is licensed under CC BY-NC-SA 4.0.
