
:max_bytes(150000):strip_icc():format(webp)/mothersday_NataliaCampbell_Getty-5a4baef6c7822d00371e56cd.jpg)
New In 2024, Say Goodbye to Windows 10 Photos Top 8 Alternative Image Viewers
Say Goodbye to Windows 10 Photos: Top 8 Alternative Image Viewers
8 Best Alternatives to Windows 10 Photos

Shanoon Cox
Mar 27, 2024• Proven solutions
While using a Windows computer, we are comfortable viewing the images with Windows Photo Viewer . The ease of use and being the default program with our system, we tend to rely heavily on it. Now that the tool has been upgraded to Windows 10 Photos with added features, it has been equipped with enhanced functionalities as well.
But, there are people who find it difficult to work around as they find it complex to use. So, if you are one of them, then here we bring the most effective Windows 10 Photos alternatives.
Go through this article to discover more options to work without Windows 10 Photos.
Best alternative to Windows 10 photos
Here is a collection of the top 8 Windows 10 Photos alternatives for your convenience.
Recommended: Wondershare Filmora
Being a top notch video editor, Filmora offers you photo editing as well. You can create slide shows, memes, GIFs and what not. There are thousands of effects that you can add on to beautify your image. Moreover, you can alter the saturation, photo styles, tune colors and much more. PIP and background blurring is also supported by this amazing Windows 10 Photos alternative.
Features:
- It is available for both Mac and Windows computers.
- You get to use advanced filters and overlays, motion elements, 4K editing, GIF creation, text and titles etc.
- You can directly export photos from social media platforms.


1. XnView
This tool can act as a perfect Windows 10 Photos alternative for viewing images. XnView can work as an image viewer, converter and browser for Windows systems. This intuitive program is quick to learn and costs you nothing for personal use. There are no adware or spywares, as well as it supports 500 plus image formats.
Features:
- You can organize, browse, as well as view images using XnView as thumbnails, fullscreen, slideshow, images compare or filmstrip etc.
- You can modify color depth and palette, apply effects and filters, , as well as lossless crop and rotate etc.
- With 70 plus formats, it helps exporting images and creating web pages, slideshow, contact sheets, video thumbnails gallery and image strips.

2. 123 Photo Viewer
When we talk about Windows 10 Photos alternative, 123 Photo Viewer should not be left behind. It supports DDS, PSD, WEBP, TGA formats, GIF etc. Single click magnifying feature is one of the best ones about this software.
Features:
- Fast magnification time.
- It supports batch operations for fulfilling various purposes.
- Offers convenience for switching between previous and next images.

3. ImageGlass
Image Glass is one of the most effective programs for image editing and viewing. The interface is a neat and nice one. It supports HEIC, SVG, GIF and RAW images.
Features:
- This software is a lightweight one which enables you to switch faster between photos.
- Its versatility makes things easier for users.
- You can easily install new themes and language packages.

4. Honeyview
It supports a wide range of image formats including PNG, BMP, JPG, PSD, JXR, DDR, J2K etc. Animated GIFs, WebP, BPG, and PNG are also the supported animation file types. ZIP, TAR, RAR, CBZ, CBR, LZH are the popular archive formats that it supports for image viewing sans any extraction.
Features:
- You can edit, view, watch slideshow, copy and bookmark images using this Windows 10 Photos alternative.
- This freeware supports Windows XP/Vista/7/8/10.
- You can view EXIF in JPEG format including GPS information.

5. Imagine Picture Viewer
If you are looking for a lightweight Windows 10 Photos alternative, then Imagine Picture Viewer is the right place for you. You also have the facility to browse images without any bulky graphic suites. It allows you to edit your images into black and white ones or add a sepia tone or oil painting effect. Though, it is a bit slow and can undo only the last action you have performed.
Features:
- Direct sharing on social media platforms like Picasa, Flickr is possible.
- Basic editing tools like cropping, resizing, adjust contrast, brightness, and rotating or flipping is available.

6. FastStone Viewer
This software is a stable, quick and intuitive image converter, browser and editor. You can view, crop, manage, remove red-eye, compare, resize, email, color adjust and retouch images with this tool. Supporting a wide range of graphic formats and animated GIF, popular digital image formats as well as RAW formats this program has a world to offer.
Features:
- It has a high-quality magnifier along with a musical slideshow having 150 plus transitional effects.
- Full-screen viewer having an image zoom support with extraordinary fly-out menu panels are there.

7. Imagine
Imagine is one of the lightest Windows 10 Photos alternative, which you can use at its best. You can use it to view archive files such as RAR, ZIP, 7Z etc. and convert images in batches, capture screen, browse thumbnail, and see slideshow etc. You can add supported plugins to enhance the features.
Features:
- It features a great GIF animator for quick deletion of frames from any GIF animation.
- When you want to show a bug, process or sequence, it helps you crisply record the screens.
- Basic animation and graphics editing features are found here.

8. ACDSee
With this tool, you can do parametric photo manipulation with layers. You can review photos on your desktop, picture folder, OneDrive etc. You can even browse documents by date and view file types of business documents.
Features:
- 100 formats of video, image and audio is supported.
- You can zoom, magnify and use histogram.
- Filters and auto lens view helps preview the final result.

Shanoon Cox
Shanoon Cox is a writer and a lover of all things video.
Follow @Shanoon Cox
Shanoon Cox
Mar 27, 2024• Proven solutions
While using a Windows computer, we are comfortable viewing the images with Windows Photo Viewer . The ease of use and being the default program with our system, we tend to rely heavily on it. Now that the tool has been upgraded to Windows 10 Photos with added features, it has been equipped with enhanced functionalities as well.
But, there are people who find it difficult to work around as they find it complex to use. So, if you are one of them, then here we bring the most effective Windows 10 Photos alternatives.
Go through this article to discover more options to work without Windows 10 Photos.
Best alternative to Windows 10 photos
Here is a collection of the top 8 Windows 10 Photos alternatives for your convenience.
Recommended: Wondershare Filmora
Being a top notch video editor, Filmora offers you photo editing as well. You can create slide shows, memes, GIFs and what not. There are thousands of effects that you can add on to beautify your image. Moreover, you can alter the saturation, photo styles, tune colors and much more. PIP and background blurring is also supported by this amazing Windows 10 Photos alternative.
Features:
- It is available for both Mac and Windows computers.
- You get to use advanced filters and overlays, motion elements, 4K editing, GIF creation, text and titles etc.
- You can directly export photos from social media platforms.
1. XnView
This tool can act as a perfect Windows 10 Photos alternative for viewing images. XnView can work as an image viewer, converter and browser for Windows systems. This intuitive program is quick to learn and costs you nothing for personal use. There are no adware or spywares, as well as it supports 500 plus image formats.
Features:
- You can organize, browse, as well as view images using XnView as thumbnails, fullscreen, slideshow, images compare or filmstrip etc.
- You can modify color depth and palette, apply effects and filters, , as well as lossless crop and rotate etc.
- With 70 plus formats, it helps exporting images and creating web pages, slideshow, contact sheets, video thumbnails gallery and image strips.
2. 123 Photo Viewer
When we talk about Windows 10 Photos alternative, 123 Photo Viewer should not be left behind. It supports DDS, PSD, WEBP, TGA formats, GIF etc. Single click magnifying feature is one of the best ones about this software.
Features:
- Fast magnification time.
- It supports batch operations for fulfilling various purposes.
- Offers convenience for switching between previous and next images.
3. ImageGlass
Image Glass is one of the most effective programs for image editing and viewing. The interface is a neat and nice one. It supports HEIC, SVG, GIF and RAW images.
Features:
- This software is a lightweight one which enables you to switch faster between photos.
- Its versatility makes things easier for users.
- You can easily install new themes and language packages.
4. Honeyview
It supports a wide range of image formats including PNG, BMP, JPG, PSD, JXR, DDR, J2K etc. Animated GIFs, WebP, BPG, and PNG are also the supported animation file types. ZIP, TAR, RAR, CBZ, CBR, LZH are the popular archive formats that it supports for image viewing sans any extraction.
Features:
- You can edit, view, watch slideshow, copy and bookmark images using this Windows 10 Photos alternative.
- This freeware supports Windows XP/Vista/7/8/10.
- You can view EXIF in JPEG format including GPS information.
5. Imagine Picture Viewer
If you are looking for a lightweight Windows 10 Photos alternative, then Imagine Picture Viewer is the right place for you. You also have the facility to browse images without any bulky graphic suites. It allows you to edit your images into black and white ones or add a sepia tone or oil painting effect. Though, it is a bit slow and can undo only the last action you have performed.
Features:
- Direct sharing on social media platforms like Picasa, Flickr is possible.
- Basic editing tools like cropping, resizing, adjust contrast, brightness, and rotating or flipping is available.
6. FastStone Viewer
This software is a stable, quick and intuitive image converter, browser and editor. You can view, crop, manage, remove red-eye, compare, resize, email, color adjust and retouch images with this tool. Supporting a wide range of graphic formats and animated GIF, popular digital image formats as well as RAW formats this program has a world to offer.
Features:
- It has a high-quality magnifier along with a musical slideshow having 150 plus transitional effects.
- Full-screen viewer having an image zoom support with extraordinary fly-out menu panels are there.
7. Imagine
Imagine is one of the lightest Windows 10 Photos alternative, which you can use at its best. You can use it to view archive files such as RAR, ZIP, 7Z etc. and convert images in batches, capture screen, browse thumbnail, and see slideshow etc. You can add supported plugins to enhance the features.
Features:
- It features a great GIF animator for quick deletion of frames from any GIF animation.
- When you want to show a bug, process or sequence, it helps you crisply record the screens.
- Basic animation and graphics editing features are found here.
8. ACDSee
With this tool, you can do parametric photo manipulation with layers. You can review photos on your desktop, picture folder, OneDrive etc. You can even browse documents by date and view file types of business documents.
Features:
- 100 formats of video, image and audio is supported.
- You can zoom, magnify and use histogram.
- Filters and auto lens view helps preview the final result.
Shanoon Cox
Shanoon Cox is a writer and a lover of all things video.
Follow @Shanoon Cox
Mac’s Best-Kept Secrets: Top Speech to Text Apps with No Download Necessary
Do you struggle to meet deadlines for your text assignments? If you do, then you are in luck. Speech recognition technology is the best way to beat this challenge. Whether you are a student or a corporate professional, several speech-to-text apps can be used to guarantee that you meet your deadlines. For example, Mac owners can use dragon for Mac to complete typing assignments in half the time.
Below are the best speech-to-text apps on Mac you might have missed since the beginning of 2022. Some of the apps in the list are in-built into your device, while others may require you to download additional software. Regardless, all of those listed below are free to use on your Mac device. Keep reading to find out more.
Part1: Top 1 Built-in Mac Dictation Feature

Did you know your Mac device comes with a built-in speech-to-text feature? So whether you use a laptop or desktop, you can generate text from your voice through your device’s microphone. Officially known as Dictation, the app allows you to transcribe text anywhere you can type it. So, for example, you can use Apple Dictation for your messaging and word processing apps.
The feature has been available since macOS Sierra as a free built-in feature. Earlier versions of Apple Dictation relied on its voice recognition software. However, it now relies on Siri for users of macOS Catalina onwards.
Typically, the app allows you to transcribe thirty seconds and below of audio. However, you can enable Enhanced dictation for longer transcription times. According to most users, the app is suitable for getting the first draft of your assignment, which you can manually edit later.
Follow these steps to enable Apple Dictation on your Mac:
- Tap the Apple logo on the top-left toolbar of your screen and select System Preferences from the resulting menu.
- Click on the Keyboard option from the system preferences screen.
- Once there, click on the Dictation option located at the top of the menu.
- Select On to activate the app in its default mode. In addition, you can check the Use Enhanced Dictation box to enable additional functions such as offline use and text commands like bold and italics.
- Finally, select your language from the dropdown menu and choose a shortcut key.
Please note that you need to speak your punctuation loudly when using Apple Dictation. Otherwise, the app will consider them as regular words.
Part2: Top 2 Microsoft Word [Free & No Download]

Another option to consider is speech-to-text Microsoft Word Mac. The app is free to use and relies on Microsoft Azure Speech Services to transcribe text. Below are the requirements to use speech-to-text word mac.
- An external microphone for your Mac desktop, or you can use your built-in microphone for your MacBook. This is because speech-to-text on Microsoft word mac only allows input with a microphone rather than an audio file upload.
- An active Office 365 subscription. Please note you need to log in to your account for the app to function.
- Insider builds 16.32 (19120802) and above.
- An active internet connection.
Once you have everything set up, follow these steps to use speech-to-text on Word.
- Launch Microsoft Word from your desktop.
- Click on the Dictate button from the top menu of your Word document, and wait for the red dot to appear. The button features a microphone for easy identification.
- Once the dot appears, start speaking to transcribe your text. Ensure you are in a quiet environment for the best results. In addition, speak louder when transcribing punctuations.
- Click on the Dictate button to finish the transcription.
Part3: Top 3 Google docs

Google Docs is arguably the market’s most accurate free speech-to-text service. In addition, it allows you to transcribe your voice to text and format documents with your voice. However, you can only use the service through the Chrome browser.
Follow these steps to activate Google Docs voice typing on your Mac device:
- Launch the Chrome browser on your macOS and select Docs from the app menu. Please note you will need an active Google account to use the service.
- Open a new document and click on the Tools tab from the top menu.
- Select Voice Typing from the menu to access speech-to-text on Google Docs.
- Tap the microphone to start transcribing, and tap it again to finish.
Google Docs speech-to-text is available in 71 languages. In addition, it supports simple commands such as ‘create a bulleted list,’ which are unavailable on other speech-to-text apps. As such, it is one of the market’s most popular voice typing apps.
Part4: Top 4 Filmora

Free Download For Win 7 or later(64-bit)
Free Download For macOS 10.14 or later
Adding subtitles to your videos can be incredibly time-consuming if you do not have the right tools. However, with Filmora’s speech-to-text function, you can add subtitles to your video with a single click. In addition, it automatically recognizes audio in your videos and transcribes it to text with incredible accuracy. The plugin uses state-of-the-art algorithms to ensure the video industry’s most accurate speech technology.
Furthermore, you can import external files to your video’s timeline and edit them as you please. For example, you can import a video from your thumb drive and use the Filmora speech-to-text plugin to transcribe to text. Currently, the plugin can transcribe the text in 26 languages. As such, it is a favorite for vloggers, teachers, and film editors, who all have to deliver their content with great efficiency.
Please note that you must have Filmora installed on your Mac device to access the Speech to Text plugin. In addition, check if your Filmora version is compatible with the plugin before downloading. Once you confirm that you meet all the requirements, here is how to use the service:
- Launch the Filmora app on your Mac and open a new video workspace.
- Click on the microphone symbol at the bottom right corner of the page to start recording. Tap it once again to finish the recording.
- Tap the Tools tab on your main menu and select Speech to Text. Then, confirm your preferences and wait for the transcription.
Part5: Top 5 Dragon for Mac

Dragon Dictate is arguably the best dictation software currently on the market. According to most users, its accuracy and feature sets are next to none. For example, the Smart Format Rules learn how you represent dates, numbers, and abbreviations, resulting in less editing work for you. The Dragon Dictate app is free to download from the Apple Store.
Dragon for Mac users reports a dictation accuracy of nearly 99%, which is excellent in the speech-to-text software category. All of Nuance’s Dragon products use deep learning technology to capture your accent and cadence. As such, the app gets better at transcribing your text as you continue using it. In addition, dragon for Mac professional allows you to transcribe audio clips from uploaded files. For example, you can import audio from your iPhone to your Dragon Dictate workspace and transcribe it hassle-free.
Unfortunately, you cannot get a stand-alone dragon app for Mac. This is because Nuance discontinued its development in 2018. In addition, Microsoft’s acquisition of the company in 2021 proves that the decision is permanent. However, you can still use the Windows version of Dragon through Parallels, which allows you to run macOS and Windows simultaneously. In addition, this method also works for M1 Macs.
Part6: FAQs
Is there a difference between voice recognition and speech-to-text?
Voice recognition software allows your device to capture your accent and tone and then stores that data for different functions, such as user logins and speech-to-text functionality. For example, Siri will ask you to repeat a sentence several times as one of the setup steps.
Which is the best external device for the speech-to-text service?
Most users report better speech-to-text accuracy when using headsets compared to using an external microphone. This is because the microphone is much closer to your mouth, so your voice is less affected by external noise.
Can speech-to-text apps automatically translate a transcribed text?
Yes, they can. Apps such as Google’s Speech to Text include a translation feature in their functionality. However, you will need the Google Chrome browser to access Speech to text. This is because the service is only available to active google account holders.
How much faster is speech to text faster than typing?
A 2017 Stanford study states that speech to text is aboutthree times faster than typing . In addition, it found that speech-to-text apps can transcribe over 150 words per minute, while professional transcriptionists range between 50 to 80 words per minute.
Free Download For Win 7 or later(64-bit)
Free Download For macOS 10.14 or later
Free Download For macOS 10.14 or later
Adding subtitles to your videos can be incredibly time-consuming if you do not have the right tools. However, with Filmora’s speech-to-text function, you can add subtitles to your video with a single click. In addition, it automatically recognizes audio in your videos and transcribes it to text with incredible accuracy. The plugin uses state-of-the-art algorithms to ensure the video industry’s most accurate speech technology.
Furthermore, you can import external files to your video’s timeline and edit them as you please. For example, you can import a video from your thumb drive and use the Filmora speech-to-text plugin to transcribe to text. Currently, the plugin can transcribe the text in 26 languages. As such, it is a favorite for vloggers, teachers, and film editors, who all have to deliver their content with great efficiency.
Please note that you must have Filmora installed on your Mac device to access the Speech to Text plugin. In addition, check if your Filmora version is compatible with the plugin before downloading. Once you confirm that you meet all the requirements, here is how to use the service:
- Launch the Filmora app on your Mac and open a new video workspace.
- Click on the microphone symbol at the bottom right corner of the page to start recording. Tap it once again to finish the recording.
- Tap the Tools tab on your main menu and select Speech to Text. Then, confirm your preferences and wait for the transcription.
Part5: Top 5 Dragon for Mac
Dragon Dictate is arguably the best dictation software currently on the market. According to most users, its accuracy and feature sets are next to none. For example, the Smart Format Rules learn how you represent dates, numbers, and abbreviations, resulting in less editing work for you. The Dragon Dictate app is free to download from the Apple Store.
Dragon for Mac users reports a dictation accuracy of nearly 99%, which is excellent in the speech-to-text software category. All of Nuance’s Dragon products use deep learning technology to capture your accent and cadence. As such, the app gets better at transcribing your text as you continue using it. In addition, dragon for Mac professional allows you to transcribe audio clips from uploaded files. For example, you can import audio from your iPhone to your Dragon Dictate workspace and transcribe it hassle-free.
Unfortunately, you cannot get a stand-alone dragon app for Mac. This is because Nuance discontinued its development in 2018. In addition, Microsoft’s acquisition of the company in 2021 proves that the decision is permanent. However, you can still use the Windows version of Dragon through Parallels, which allows you to run macOS and Windows simultaneously. In addition, this method also works for M1 Macs.
Part6: FAQs
Is there a difference between voice recognition and speech-to-text?
Voice recognition software allows your device to capture your accent and tone and then stores that data for different functions, such as user logins and speech-to-text functionality. For example, Siri will ask you to repeat a sentence several times as one of the setup steps.
Which is the best external device for the speech-to-text service?
Most users report better speech-to-text accuracy when using headsets compared to using an external microphone. This is because the microphone is much closer to your mouth, so your voice is less affected by external noise.
Can speech-to-text apps automatically translate a transcribed text?
Yes, they can. Apps such as Google’s Speech to Text include a translation feature in their functionality. However, you will need the Google Chrome browser to access Speech to text. This is because the service is only available to active google account holders.
How much faster is speech to text faster than typing?
A 2017 Stanford study states that speech to text is aboutthree times faster than typing . In addition, it found that speech-to-text apps can transcribe over 150 words per minute, while professional transcriptionists range between 50 to 80 words per minute.
Free Download For Win 7 or later(64-bit)
Free Download For macOS 10.14 or later
Optimize Your LinkedIn Videos: The Best Aspect Ratios for Engagement
The Ideal LinkedIn Video Aspect Ratios for Effective Posting
An easy yet powerful editor
Numerous effects to choose from
Detailed tutorials provided by the official channel
The written content of LinkedIn has been taken over by the video content these days. Videos created with exceptional features and editing perks are booming amongst the audience.
In this article
01 [What is LinkedIn Video Format?](#Part 1)
02 [Everything You Need to Know About LinkedIn Ad Specs](#Part 2)
03 [5 Types of LinkedIn Ads](#Part 3)
04 [Best 5 LinkedIn Video Practices](#Part 4)
Part 1 What is LinkedIn Video Format?
01Can you post 1920x1080 on LinkedIn?
Yes, videos of 1920 by 1080px can be easily posted on LinkedIn. Moreover, this is the best resolution in which you should post your video. This will provide you the best quality.
02What aspect ratio is best for a LinkedIn video?
Although LinkedIn accepts and allows almost each aspect ratio but the most recommended aspect ratio is 16:This means it should remain between 1.778 and 0.565However, the aspect ratio can vary according to the mode of your video that is horizontal or vertical.

Part 2 Everything You Need to Know About LinkedIn Ad Specs
The specs can vary in the case of LinkedIn videos and LinkedIn ads. As the ads are totally different from the videos their specs also become different. Here are some of the specs that you should know when you are creating LinkedIn ads:
● Length: The maximum and minimum length of these ad videos are 3 seconds to 30 minutes respectively. However, the most successful video length is up to 15 seconds.
● File size and file format: The file size of the ad videos must be a minimum of 75 KB and the maximum it can be of 200 MB. The file format that is supported on the LinkedIn application is MP4.
● Audio Format and size: The audio format of these ad videos must be MPEG4 or ACC. If you talk about the audio size then it is recommended not to be more than 64 KHz.
● Resolution and aspect ratio: The resolution of these ads can be 360p, 480p, 720p or 1080p. When it comes to the aspect ratio then the best-recommended one is 16:9 for landscape mode and 9:16 for vertical mode.
● Video captions and headlines: If you are adding video captions in your ad video, then it must be in SRT format and the headlines should also be under 200 characters. It is recommended to keep the headlines up to maximum of 70 characters.
Part 3 5 types of LinkedIn Ads
LinkedIn provides you with several platforms and types of ad placements. Here mentioned are some of them:
Sponsored messages in LinkedIn: This type of LinkedIn ad was previously termed as sponsored InMail. Through this, you can directly advertise your product or brand in the user’s inbox. However, LinkedIn has set a maximum number of times that your customer can receive the messaging ad. This states that any member of your audience will not receive the ads more than two times in a short span of time. Also, it is estimated that consumers enjoy messaging ads but companies do not interact much with them via sponsored messaging ads.

Sponsored content: These ads show up in the feed of the LinkedIn user. No matter if they are using it on mobile on desktop. These sponsored contents also have a label of promotion on them. This makes them different from the regular contents. If you are choosing sponsored content then you also get the choice between carousel ads, video ads and images ads.

Dynamic ads: These ads are visible on the right rail as you open the LinkedIn. Also this is the best way to speak to your audience through personalization. The users get to see their own personal details as soon these ads pop up on the screen. This can even be changed through the settings so that the details get hidden if the user finds this to be very personal. Dynamic ads are also of two types. One is follower ads and other is sponsored ads.

Text ads: These ads are considered as the best way to build a strong lead amongst the audience. This is also suitable in the terms of professional demographic. These ads are shown on the top and right side of the feed of LinkedIn. Approximately 58% of the companies say that making the lead generation better is the top priority of digital marketing. This is also a good way to manage company’s budget.

Awareness ads: If you want to make your brand stay on the tips of your audience then it is a good idea to go for awareness ads. These ads build a communication amongst the audience related to your brands, products and services, etc. These awareness ads also boost the engagement, help to gain followers and increase the views.

Part 4 Best 5 LinkedIn Video Practices
**Optimized setup:**To create an excellent video its setup is most important thing. So before you create the video keep in mind that your setup is well organized. Your set up includes lighting, background, camera and its position. Until the lighting is not perfect your video will lack its charm. Often natural lights are the best but artificial lights are also can do the work of perk. Also the background must be free from clutters. The camera that you are using should also be perfect and the camera position should also be in place.
Correct video length: When the correct video length is concerned, LinkedIn recommends it to be less than 15 seconds. This is so because the shorter the video is the more effective it can be. You should also keep in mind that these video may be of maximum 10 minutes but the starting moments must be engaging. This will keep your audience stay to watch your video till the end.
**Grab the viewer’s attention:**Social media platforms are filled with ignorable contents and when it comes to LinkedIn it can be so true. So if you want to grab the attention of your targeted audience then you must make your videos extraordinary. This is only possible when you focus on each and every aspect of the videos. Adding subtitles to your videos can also be an amazing idea to make them more engaging. You can even optimize the length of your video according to the objective that you want to convey.
**Plan the content according to your objective:**It is a good idea to remain up to the objective that you want to convey to your audience. No matter if you want to facilitate consideration or want to spread awareness. If you want to generate some conversions then you can go for making small demos in your videos.
**Go for the best tools:**At last but one of the most important points is to pay attention on the tool that you are using. Although there are a number of tools that can be used but nowadays, Wondershare Filmora Video Editor is the most in the use. Here are some extraordinary features of both the tools:
Features of Filmora:
● This one is an easy to use tool that can be used by beginners and less professional people.
● Using this tool you can experience latest filters and colors making their perk at the best.
● Here you will also get amazing sound effect to make your video stand out.
● You can create the videos in just a single click. This is the reason its feature of key framing is immensely popular.
Wondershare Filmora
Get started easily with Filmora’s powerful performance, intuitive interface, and countless effects!
Try It Free Try It Free Try It Free Learn More >

Key Takeaways from This Episode
● LinkedIn is an application that has made its popularity amongst the users and advertisers in a very recent and less time. Ads and videos on this application is being loved and watched these days at a rapid rate. As per the increased demand increases a responsibility to meet those demands.
● To meet up the demands it is essential that all the technical requirements are fulfilled and also the protocols of the app are followed. This remains crucial and important in the terms of video aspect ratio, resolution, size and dimensions, and a lot more.
● If you are uploading your videos and ads on LinkedIn then it is must that they should be engaging and interesting. To make them exciting you may opt for the best practices which also include the use of popular tools. The latest tools like Filmora, Inshot, etc. are laced with all the additional features and make your video perfect for the apps.
The written content of LinkedIn has been taken over by the video content these days. Videos created with exceptional features and editing perks are booming amongst the audience.
In this article
01 [What is LinkedIn Video Format?](#Part 1)
02 [Everything You Need to Know About LinkedIn Ad Specs](#Part 2)
03 [5 Types of LinkedIn Ads](#Part 3)
04 [Best 5 LinkedIn Video Practices](#Part 4)
Part 1 What is LinkedIn Video Format?
01Can you post 1920x1080 on LinkedIn?
Yes, videos of 1920 by 1080px can be easily posted on LinkedIn. Moreover, this is the best resolution in which you should post your video. This will provide you the best quality.
02What aspect ratio is best for a LinkedIn video?
Although LinkedIn accepts and allows almost each aspect ratio but the most recommended aspect ratio is 16:This means it should remain between 1.778 and 0.565However, the aspect ratio can vary according to the mode of your video that is horizontal or vertical.
Part 2 Everything You Need to Know About LinkedIn Ad Specs
The specs can vary in the case of LinkedIn videos and LinkedIn ads. As the ads are totally different from the videos their specs also become different. Here are some of the specs that you should know when you are creating LinkedIn ads:
● Length: The maximum and minimum length of these ad videos are 3 seconds to 30 minutes respectively. However, the most successful video length is up to 15 seconds.
● File size and file format: The file size of the ad videos must be a minimum of 75 KB and the maximum it can be of 200 MB. The file format that is supported on the LinkedIn application is MP4.
● Audio Format and size: The audio format of these ad videos must be MPEG4 or ACC. If you talk about the audio size then it is recommended not to be more than 64 KHz.
● Resolution and aspect ratio: The resolution of these ads can be 360p, 480p, 720p or 1080p. When it comes to the aspect ratio then the best-recommended one is 16:9 for landscape mode and 9:16 for vertical mode.
● Video captions and headlines: If you are adding video captions in your ad video, then it must be in SRT format and the headlines should also be under 200 characters. It is recommended to keep the headlines up to maximum of 70 characters.
Part 3 5 types of LinkedIn Ads
LinkedIn provides you with several platforms and types of ad placements. Here mentioned are some of them:
Sponsored messages in LinkedIn: This type of LinkedIn ad was previously termed as sponsored InMail. Through this, you can directly advertise your product or brand in the user’s inbox. However, LinkedIn has set a maximum number of times that your customer can receive the messaging ad. This states that any member of your audience will not receive the ads more than two times in a short span of time. Also, it is estimated that consumers enjoy messaging ads but companies do not interact much with them via sponsored messaging ads.
Sponsored content: These ads show up in the feed of the LinkedIn user. No matter if they are using it on mobile on desktop. These sponsored contents also have a label of promotion on them. This makes them different from the regular contents. If you are choosing sponsored content then you also get the choice between carousel ads, video ads and images ads.
Dynamic ads: These ads are visible on the right rail as you open the LinkedIn. Also this is the best way to speak to your audience through personalization. The users get to see their own personal details as soon these ads pop up on the screen. This can even be changed through the settings so that the details get hidden if the user finds this to be very personal. Dynamic ads are also of two types. One is follower ads and other is sponsored ads.
Text ads: These ads are considered as the best way to build a strong lead amongst the audience. This is also suitable in the terms of professional demographic. These ads are shown on the top and right side of the feed of LinkedIn. Approximately 58% of the companies say that making the lead generation better is the top priority of digital marketing. This is also a good way to manage company’s budget.
Awareness ads: If you want to make your brand stay on the tips of your audience then it is a good idea to go for awareness ads. These ads build a communication amongst the audience related to your brands, products and services, etc. These awareness ads also boost the engagement, help to gain followers and increase the views.
Part 4 Best 5 LinkedIn Video Practices
**Optimized setup:**To create an excellent video its setup is most important thing. So before you create the video keep in mind that your setup is well organized. Your set up includes lighting, background, camera and its position. Until the lighting is not perfect your video will lack its charm. Often natural lights are the best but artificial lights are also can do the work of perk. Also the background must be free from clutters. The camera that you are using should also be perfect and the camera position should also be in place.
Correct video length: When the correct video length is concerned, LinkedIn recommends it to be less than 15 seconds. This is so because the shorter the video is the more effective it can be. You should also keep in mind that these video may be of maximum 10 minutes but the starting moments must be engaging. This will keep your audience stay to watch your video till the end.
**Grab the viewer’s attention:**Social media platforms are filled with ignorable contents and when it comes to LinkedIn it can be so true. So if you want to grab the attention of your targeted audience then you must make your videos extraordinary. This is only possible when you focus on each and every aspect of the videos. Adding subtitles to your videos can also be an amazing idea to make them more engaging. You can even optimize the length of your video according to the objective that you want to convey.
**Plan the content according to your objective:**It is a good idea to remain up to the objective that you want to convey to your audience. No matter if you want to facilitate consideration or want to spread awareness. If you want to generate some conversions then you can go for making small demos in your videos.
**Go for the best tools:**At last but one of the most important points is to pay attention on the tool that you are using. Although there are a number of tools that can be used but nowadays, Wondershare Filmora Video Editor is the most in the use. Here are some extraordinary features of both the tools:
Features of Filmora:
● This one is an easy to use tool that can be used by beginners and less professional people.
● Using this tool you can experience latest filters and colors making their perk at the best.
● Here you will also get amazing sound effect to make your video stand out.
● You can create the videos in just a single click. This is the reason its feature of key framing is immensely popular.
Wondershare Filmora
Get started easily with Filmora’s powerful performance, intuitive interface, and countless effects!
Try It Free Try It Free Try It Free Learn More >
Key Takeaways from This Episode
● LinkedIn is an application that has made its popularity amongst the users and advertisers in a very recent and less time. Ads and videos on this application is being loved and watched these days at a rapid rate. As per the increased demand increases a responsibility to meet those demands.
● To meet up the demands it is essential that all the technical requirements are fulfilled and also the protocols of the app are followed. This remains crucial and important in the terms of video aspect ratio, resolution, size and dimensions, and a lot more.
● If you are uploading your videos and ads on LinkedIn then it is must that they should be engaging and interesting. To make them exciting you may opt for the best practices which also include the use of popular tools. The latest tools like Filmora, Inshot, etc. are laced with all the additional features and make your video perfect for the apps.
Quality Matters: Top 10 Free Online Video Enhancers for Better Results
Top 9 Best Online Video Quality Enhancer for FREE

Ollie Mattison
Apr 24, 2024• Proven solutions
In 2024, the average person will watch 17 hours of video content every week. Improving the quality of your videos can make your content more noticeable.
Fortunately, there are many excellent video quality enhancer tools to choose from. These tools can enhance both the visual and audio clarity of your content. Ultimately, this will enhance your professionalism and reputation as a trustworthy creator.
Are you wondering where to start when selecting an effective, user-friendly video enhancer? Here are some of our top recommendations to help you begin.
- Part 2: 5 Free AI Video Enhancers [Software Options]
- Part 3: Top 2 4K Video Enhancer Online Free Options
- Part 4: How to Choose the Best Video Enhancer
- In this article
Why Do You Need an AI Video Enhancer?
AI video enhancers utilize generative AI to remove noise, stabilize shaky videos, upscale, or enhance their overall appearance. These tools employ machine learning and neural network techniques to analyze videos and apply different effects for enhancement. Trained on extensive datasets, most AI video enhancers can understand video content like faces, scenes, and objects, automatically adjusting imperfections.
Using an AI video enhancer is an excellent way to boost video quality quickly. Unlike traditional methods, AI speeds up the enhancement process significantly. There are additional benefits, such as:
- **Enhanced Media Quality:**AI video enhancers enhance videos automatically with advanced algorithms, maintaining quality, clarity, and detail.
- Noise Reduction: Many AI video enhancer tools effectively reduce visual noise in videos, resulting in cleaner and clearer footage.
- **Reviving Old Clip:**AI video enhancers are adept at restoring old video footage to make it appear more vibrant.
5 Free AI Video Enhancers [Software Options]
Are blurry videos on your large screen getting on your nerves? Thanks to advancements in artificial intelligence (AI), you can now enhance your low-resolution videos for a crystal-clear viewing experience.
Whether you’re a video editor, content creator, or streamer, incorporating an AI video upscaler into your toolkit is a wise choice. Here are the top 5 picks for the best free AI video enhancer software to improve your video editing.
1.Wondershare Filmora - AI Video Enhancer

Pricing:Filmora offers a free trial without exporting.
Wondershare Filmora stands out in video editing by combining comprehensive editing features with AI-powered enhancement tools. With 4K editing, Filmora ensures videos are improved and future-proofed.
In addition to enhancement, Filmora offers over 300 unique transitions and effects catering to creative minds. Audio enthusiasts will enjoy advanced audio tools like audio ducking and equalizers.
Filmora’s standout feature is its motion tracking capability, enabling dynamic video compositions. While beginners may find the abundance of features overwhelming, regular updates and an active online community provide ample support.
Features
- Filmora’s advanced AI video-enhancing algorithms let you convert black-and-white footage to colored ones.
- It boosts frame rates up to 240 FPS using AI-enhanced frame interpolation technology and 4x super-resolution algorithms.
- Filmora enhances videos’ clarity and quality through audio ducking, equalizers, and more.
- This AI Video Enhancer tracks and attaches objects in videos.
- The tool preserves details and enhances quality in slow-motion scenes.
- Offers over 300 unique transitions and effects.
Pros
- Versatile editing and enhancement options.
- This AI video enhancer is designed to assist both beginners and professionals.
- It supports batch processing, enhancing 10+ videos simultaneously.
Cons
- The free version adds a watermark.
2.AVCLabs Video Enhancer AI
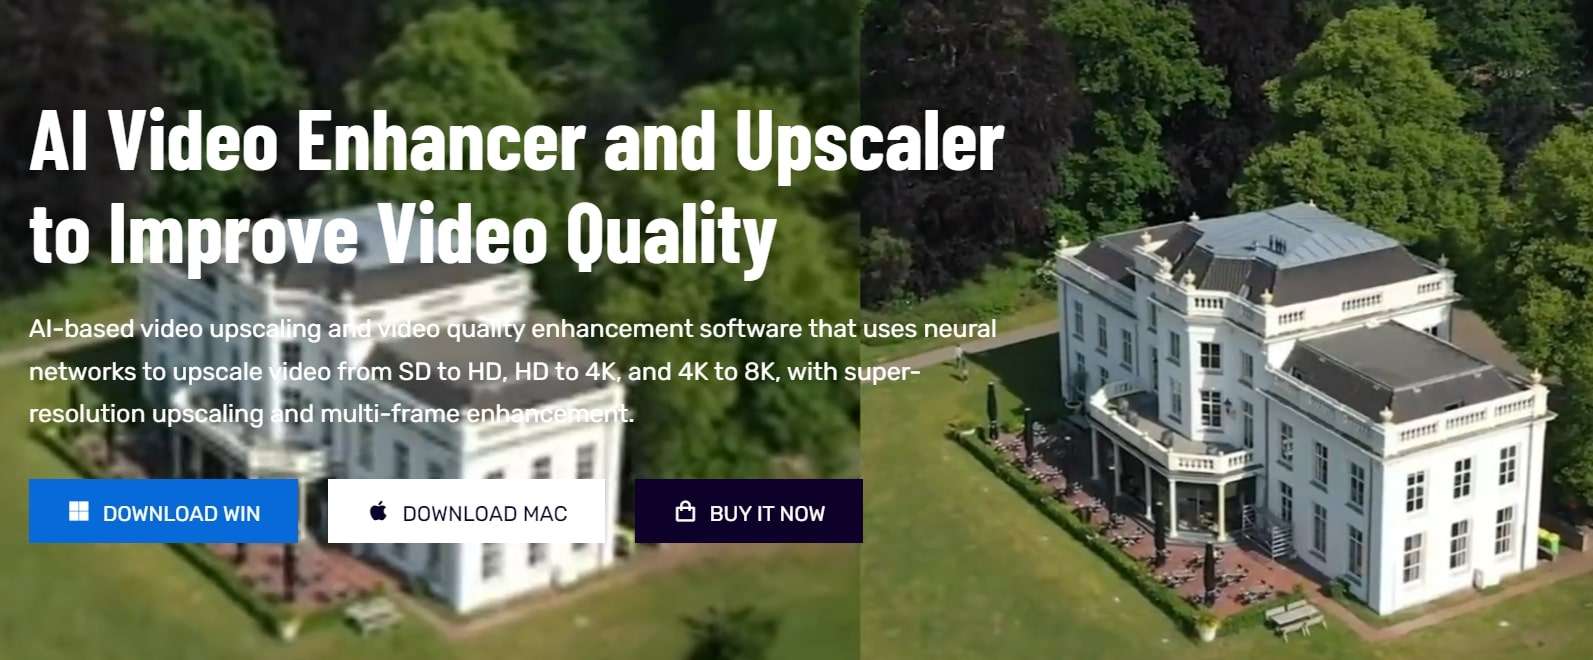
Pricing:AVCLabs offers new users a 7-day free trial.
AVCLabs Video Enhancer AI utilizes a neural network to improve video clip quality. With super-resolution AI video upscaling and multi-frame enhancement, it can easily upscale video from SD to HD (720p or 1080p) to 4K and up to 8K in just one click.
With support for various video and audio formats, users can work seamlessly without compatibility issues. A notable feature is its batch processing capability, enabling users to upscale and enhance multiple videos simultaneously, saving time. The real-time preview feature is invaluable for those who wish to see the software’s results before finalizing their project.
Features
- AVCLabs seamlessly enhances any video footage without quality loss. Whether single or multi-frame, you’ll experience smooth transitions and improved frames.
- With AVCLabs’ color correction feature, you can easily adjust each video frame’s brightness, saturation, and contrast. This tool employs AI video upscaling to create larger, more detailed images without sacrificing quality.
- This video enhancement tool offers automatic face refinement to enhance facial details, which is ideal for improving low-quality videos with excessive noise and blurriness.
- The Super Resolution feature recovers high-resolution videos from low-resolution materials by generating additional pixel data to fill gaps, resulting in enhanced output.
- AVCLabs Video Enhancer AI uses a multi-frame convolutional neural network to stabilize video shakes and remove motion artifacts, overlay noise, and grain, producing natural and enhanced results.
Pros
- AVCLabs features a color calibration algorithm that accurately portrays natural colors.
- It allows you to add color to old black-and-white videos.
- The video processing is fully automatic, requiring no manual fine-tuning.
Cons
- The app demands a significant amount of free space, up to 15 GB.
- It is only compatible with Windows and Mac operating systems.
- The free trial adds a watermark from AVC Labs to the videos.
3.UniFab Video Enhancer
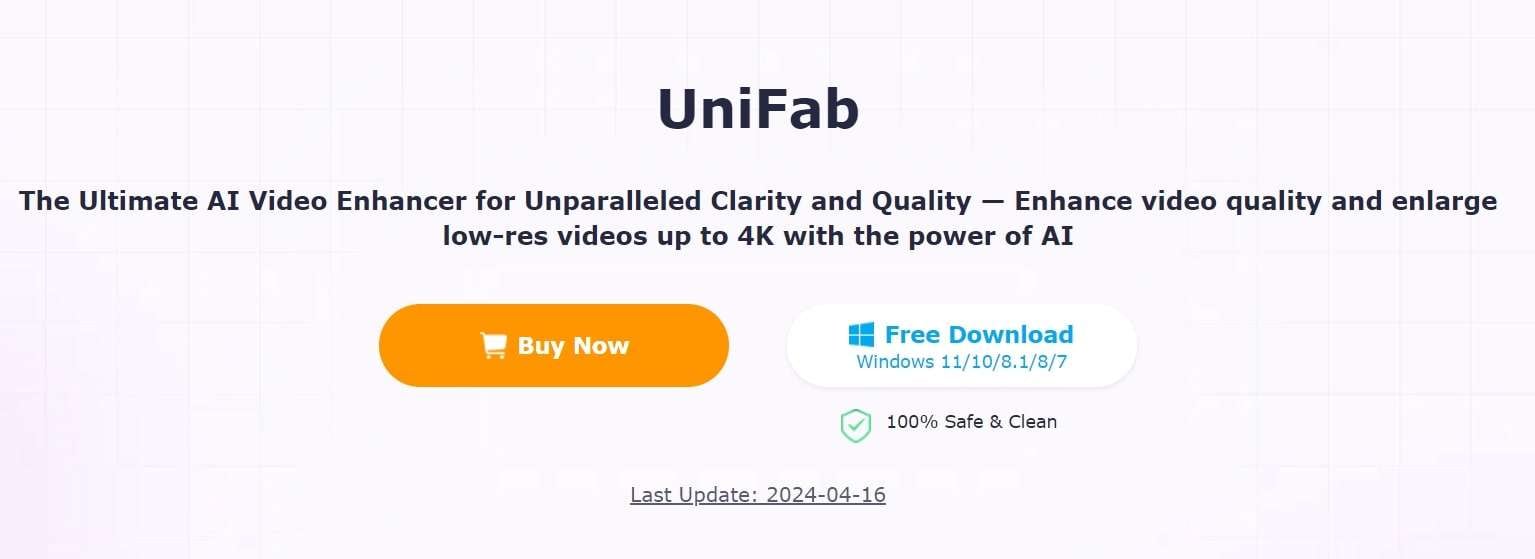
Pricing: UniFab provides a 30-day free trial for new AI users and a 30-day money-back guarantee for paid.
UniFab is a comprehensive AI-powered video enhancer to enhance video quality for all types of videos. Standout features like upscaling video to HDR10/Dolby Vision, denoising, and deinterlacing set this tool apart.
The models are regularly updated with the latest advancements in Deep Learning. Whether you’re a novice or an expert, UniFab offers both automatic and manual modes for video enhancement, making it easy to use without requiring complex settings.
Features
- Upgrade any video to 720p, 1080p, or even 4k resolution with remarkable clarity.
- Convert SDR videos to stunning HDR formats like HDR10+ and Dolby Vision. This feature revitalizes your videos, making them significantly more vibrant and immersive.
- Utilize AI technology to deinterlace your videos, ensuring smooth playback and a pristine viewing experience on modern displays.
- Specifically designed for videos captured in low-light conditions or with high ISO settings, this tool intuitively reduces grain and noise, restoring your footage’s true essence without sacrificing detail.
- Experience unprecedented fluidity as the software boosts your videos to an impressive 120FPS using AI. This transforms your content into a smooth motion stream, ideal for high-definition screens and attentive audiences.
Pros
- It allows audio up-mixing to EAC3 5.1/DTS 7.1 through AI.
- Utilizes GPU-accelerated technology.
- Supports video conversion, compression, and editing.
Cons
- The free trial is limited to 3 videos.
- Does not support Mac systems.
4.Topaz Video Enhance AI
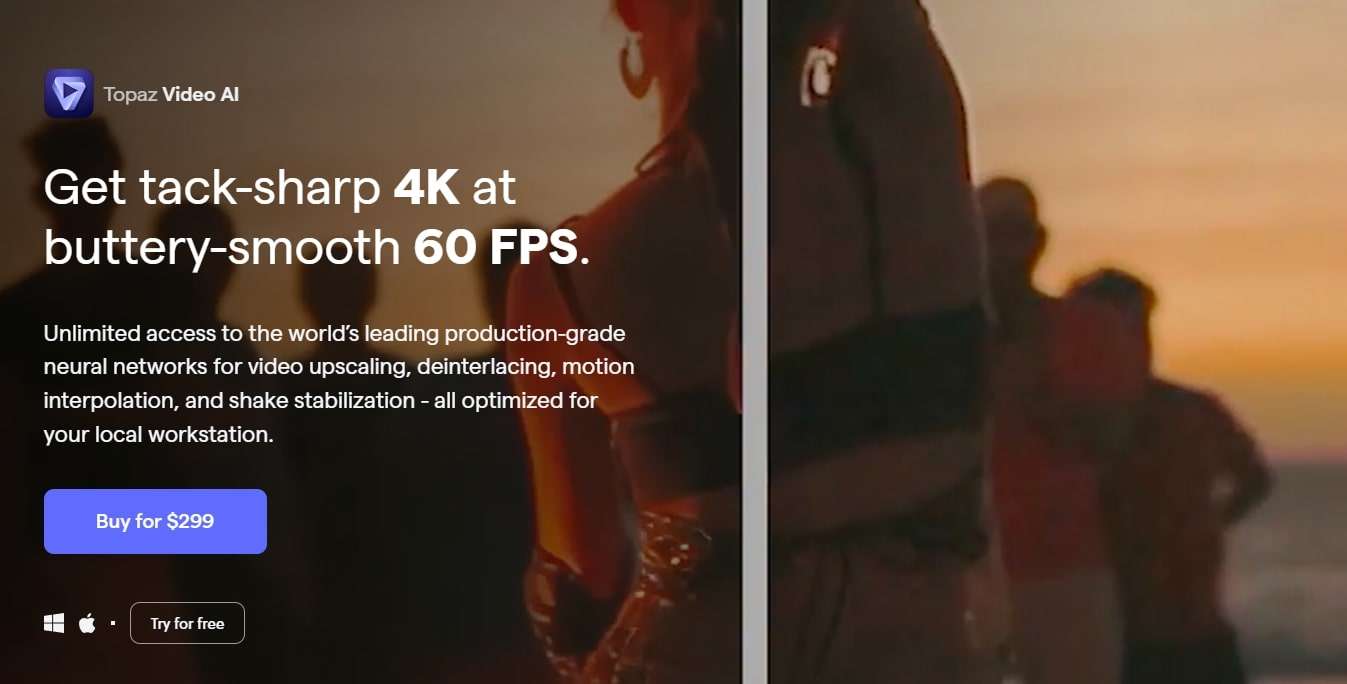
Pricing:Topaz video enhancement tool offers a 30-day no-questions-asked refund policy.
Topaz Video Enhance AI enhances video quality by increasing its resolution. It supports batch upscaling of videos and is compatible with DVD, DSLR, Game, and HD stock footage.
Many notable film studios consider Topaz Video Enhance AI one of the best video editing software tools. It is suitable for various uses, such as commercials, movie content, and YouTube videos.
Features
- This free video upscaling software swiftly analyzes video footage quality using AI tools and recreates it into high-resolution videos.
- Topaz offers Gaia CGI and Theia for enhancing CG and animated videos, along with Proteus and Artemis for noise removal and sharpening.
- Easily recover details from any video footage by injecting original details using adjacent frames’ additional information. It detects and corrects visual artifacts formed during compression.
- Topaz provides an automatic mode for quick video quality enhancement and manual fine-tuning options using available controls.
- With this free video enhancer software, preserve video audio tracks and select from different conversion options for optimal output in the final project.
Pros
- Reduces motion artifacts.
- Adds extra frames for smooth, slow-motion videos.
- Enhances video quality up to 8K.
Cons
- AI processing can be time-consuming, sometimes taking hours.
- Requires a high-quality graphics card.
5.HitPaw Video Enhancer

Pricing:HitPaw AI video enhancer offers a 30-day refund guarantee on paid plans.
HitPaw is a user-friendly video enhancer suitable for both beginners and professionals. It features an easy-to-navigate interface, ensuring even those with minimal experience can improve their videos. Despite its simplicity, HitPaw offers robust enhancement tools, including color correction and stabilization. Its extensive support for various video formats eliminates compatibility concerns.
The software prioritizes efficient video enhancement without compromising quality or speed. Comprehensive tutorials help users explore different editing tasks and unlock their content’s full potential.
Features
- Utilize advanced AI algorithms to upscale low-resolution videos for a more appealing look. The AI feature optimizes content for sharper and more vibrant visuals.
- The HitPaw video quality enhancer app uses AI tools to improve detailing on human faces. Apply filters and adjust settings to enhance facial output in videos.
- The app includes a video stabilization feature that eliminates shaky camera movements, producing smoother and clearer videos with a professional touch.
- HitPaw offers an AI video repair option to restore damaged, corrupted, and old videos. It can also use deep learning AI to colorize black-and-white videos.
- Remove noise from videos with the General Denoise feature, making them look sharper, clearer, and newer.
Pros
- Supports various video formats.
- Has a user-friendly and intuitive interface.
- Can repair and enhance animation videos.
Cons
- The free plan has limited editing features.
Top 2 4K Video Enhancer Online Free Options
The AI-enhanced video tools mentioned above excel in their field. However, there are times when you might run out of storage or need a quick fix through your browser. So, here are some online AI tools that can enhance your videos. Unlike offline video enhancer AIs, online tools are easily accessible. While they may offer fewer features than desktop solutions, they are still useful for some editors.
1.Cutout.Pro
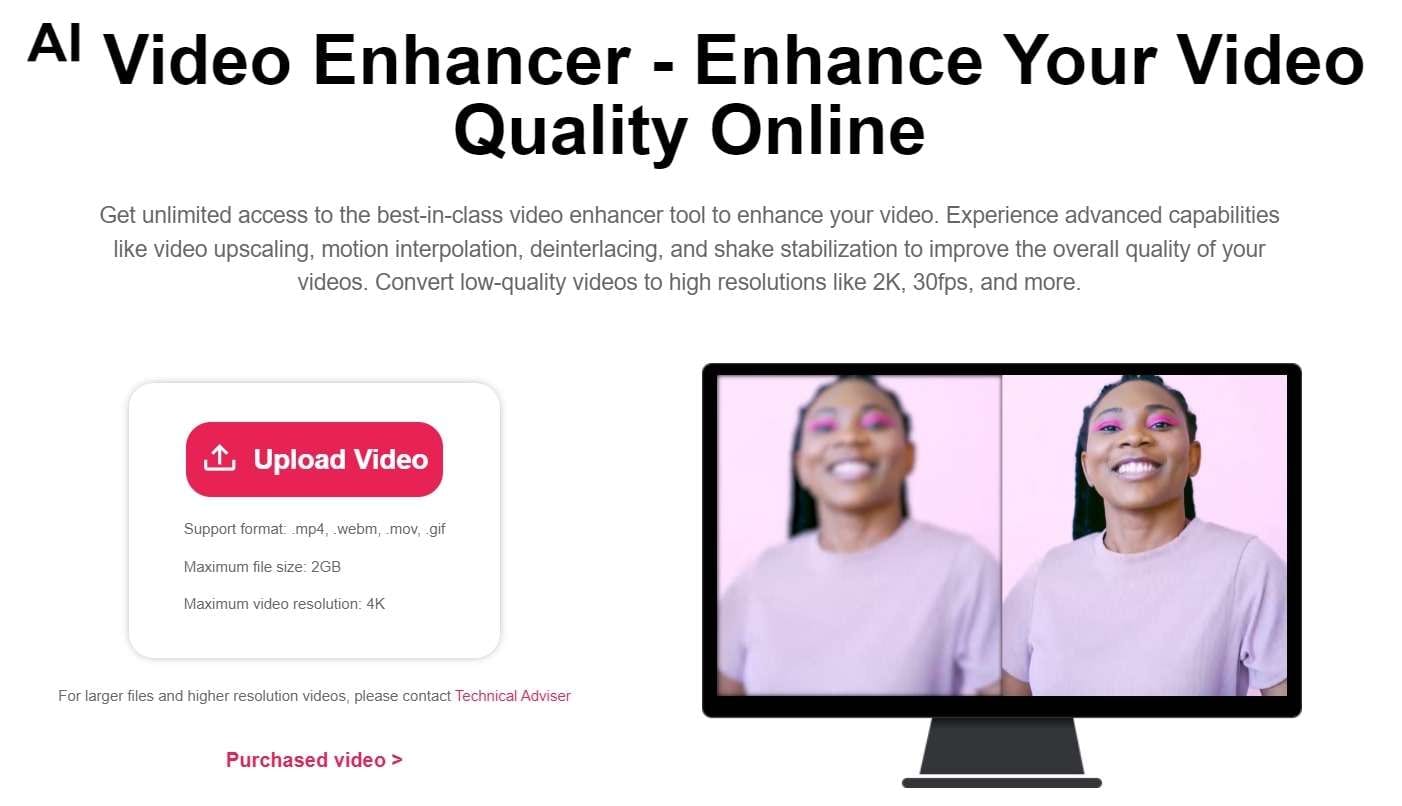
Many editing professionals rely on this free AI video enhancer for unlimited video improvements. Cutout.Pro utilizes advanced features such as video upscaling, motion interpolation, deinterlacing, and shake stabilization to enhance overall quality. This tool converts low-quality videos to higher resolutions like 2K, 30fps, and beyond. Moreover, this online tool swiftly reduces visual noise and other motion artifacts from clips using AI.
Features
- Reduce noise, motion artifacts, and improve video resolution significantly with this powerful online video quality enhancer and upscaler. Perfect for enhancing low-resolution videos like 240p, 360p, 480p, and more.
- Pro increases video frame rates without sacrificing quality. Smooth out shaky footage for better slow-motion effects.
- This tool enhances video resolution up to 2K at a maximum of 30fps effortlessly. It sharpens and defines your videos, bringing your story to life like a professional.
- This is perfect for filmmakers seeking to enhance footage quality and create professional-looking films. Improve video resolution and quality to unblur, upscale, and smooth videos for cinematic results.
- Enhance the quality of personal videos as this tool features shake stabilization for professional results.
- This video enhancer is ideal for professionals creating cinematic frames and restoring old footage. It’s also great for individuals looking to improve the quality of compressed videos downloaded from social media platforms like YouTube, Netflix, and TikTok.
Pros
- It boosts video frame rates and enables HD clip exports.
- Users can upload videos in MP4, MOV, WebM, and GIF formats for processing.
Cons
- It only offers a 5-second preview of the results after enhancement.
2.Clideo Video Enhancer
Clideo is an online video-enhancing tool that can completely transform any random video. It lets you add special AI effects and filters to adjust the video’s brightness, saturation, and contrast, making it stunning, vibrant, and attractive. You can enhance any video professionally for social media attention or business branding.
When it comes to video-enhancing tools, users seek maximum customization options. Clideo offers various features, functions, and facilities to transform average-looking videos into 4k video resolutions.
Features
- The interface is intuitive, so you don’t need any video editing experience to use it.
- You can enhance your video regardless of format because Clideo works with MP4, WMV, MOV, VOB, AVI, and other popular formats.
- You don’t need to download and install the video enhancer to your device. It’s not only faster but also more secure.
- Enhance multiple videos or images simultaneously.
- Add subtitles with customizable text fonts.
- Text Overlay feature with support for HD resolution.
- Access a media library with social sharing options.
Pros
- User-friendly tool is ideal for beginners.
- Supports multiple formats.
- As an online tool, it saves device storage space.
- Reasonable pricing.
- Provides uninterrupted video editing with customizable features.
Cons
- A premium subscription is required to remove watermarking.
- No offline app available; internet connection always necessary.
- No dedicated mobile app.
How to Choose the Best Video Enhancer
Consider the following to ensure you select the right video enhancer for your needs and creative vision.
1.Type of Content
Think about the type of content you’re working with. Are you creating short-form clips for social media or longer, more complex videos? Different enhancers may better suit different content types, so consider your file type and potential quality issues.
2.Consider The Features You Need
Consider the tools and features you need from your video quality enhancer software. Each system offers different capabilities, so planning can help you find the option that best fits your requirements.
3.Sharing Formats and Requirements
Determine the purpose of your video project and any specific sharing requirements. Understanding your goals will help you plan accordingly, whether for online sharing or commercial use.
4.Your Budget
Keep your budget in mind. Some enhancers offer free features, while others may require a purchase or subscription fee for full access. Budgeting effectively ensures you get the best value for your money while achieving great video results.
Conclusion
The video enhancement landscape has been transformed by artificial intelligence, providing numerous options to enhance your videos’ quality. Whether a professional filmmaker or a casual content creator, free AI video enhancers offer a chance to take your productions to the next level.
Each software has unique strengths, from Wondershare Filmora’s comprehensive editing features to AVCLabs’ neural network-powered upscaling and UniFab’s HDR conversion capabilities. User-friendly options like HitPaw cater to beginners while providing robust enhancement tools.
Moreover, for quick fixes or limited storage, online options like Cutout.Pro and Clideo offer accessible solutions with impressive results. With these advancements, achieving professional-quality videos is now achievable for everyone.
Ollie Mattison
Ollie Mattison is a writer and a lover of all things video.
Follow @Ollie Mattison
Ollie Mattison
Apr 24, 2024• Proven solutions
In 2024, the average person will watch 17 hours of video content every week. Improving the quality of your videos can make your content more noticeable.
Fortunately, there are many excellent video quality enhancer tools to choose from. These tools can enhance both the visual and audio clarity of your content. Ultimately, this will enhance your professionalism and reputation as a trustworthy creator.
Are you wondering where to start when selecting an effective, user-friendly video enhancer? Here are some of our top recommendations to help you begin.
- Part 2: 5 Free AI Video Enhancers [Software Options]
- Part 3: Top 2 4K Video Enhancer Online Free Options
- Part 4: How to Choose the Best Video Enhancer
- In this article
Why Do You Need an AI Video Enhancer?
AI video enhancers utilize generative AI to remove noise, stabilize shaky videos, upscale, or enhance their overall appearance. These tools employ machine learning and neural network techniques to analyze videos and apply different effects for enhancement. Trained on extensive datasets, most AI video enhancers can understand video content like faces, scenes, and objects, automatically adjusting imperfections.
Using an AI video enhancer is an excellent way to boost video quality quickly. Unlike traditional methods, AI speeds up the enhancement process significantly. There are additional benefits, such as:
- **Enhanced Media Quality:**AI video enhancers enhance videos automatically with advanced algorithms, maintaining quality, clarity, and detail.
- Noise Reduction: Many AI video enhancer tools effectively reduce visual noise in videos, resulting in cleaner and clearer footage.
- **Reviving Old Clip:**AI video enhancers are adept at restoring old video footage to make it appear more vibrant.
5 Free AI Video Enhancers [Software Options]
Are blurry videos on your large screen getting on your nerves? Thanks to advancements in artificial intelligence (AI), you can now enhance your low-resolution videos for a crystal-clear viewing experience.
Whether you’re a video editor, content creator, or streamer, incorporating an AI video upscaler into your toolkit is a wise choice. Here are the top 5 picks for the best free AI video enhancer software to improve your video editing.
1.Wondershare Filmora - AI Video Enhancer
Pricing:Filmora offers a free trial without exporting.
Wondershare Filmora stands out in video editing by combining comprehensive editing features with AI-powered enhancement tools. With 4K editing, Filmora ensures videos are improved and future-proofed.
In addition to enhancement, Filmora offers over 300 unique transitions and effects catering to creative minds. Audio enthusiasts will enjoy advanced audio tools like audio ducking and equalizers.
Filmora’s standout feature is its motion tracking capability, enabling dynamic video compositions. While beginners may find the abundance of features overwhelming, regular updates and an active online community provide ample support.
Features
- Filmora’s advanced AI video-enhancing algorithms let you convert black-and-white footage to colored ones.
- It boosts frame rates up to 240 FPS using AI-enhanced frame interpolation technology and 4x super-resolution algorithms.
- Filmora enhances videos’ clarity and quality through audio ducking, equalizers, and more.
- This AI Video Enhancer tracks and attaches objects in videos.
- The tool preserves details and enhances quality in slow-motion scenes.
- Offers over 300 unique transitions and effects.
Pros
- Versatile editing and enhancement options.
- This AI video enhancer is designed to assist both beginners and professionals.
- It supports batch processing, enhancing 10+ videos simultaneously.
Cons
- The free version adds a watermark.
2.AVCLabs Video Enhancer AI
Pricing:AVCLabs offers new users a 7-day free trial.
AVCLabs Video Enhancer AI utilizes a neural network to improve video clip quality. With super-resolution AI video upscaling and multi-frame enhancement, it can easily upscale video from SD to HD (720p or 1080p) to 4K and up to 8K in just one click.
With support for various video and audio formats, users can work seamlessly without compatibility issues. A notable feature is its batch processing capability, enabling users to upscale and enhance multiple videos simultaneously, saving time. The real-time preview feature is invaluable for those who wish to see the software’s results before finalizing their project.
Features
- AVCLabs seamlessly enhances any video footage without quality loss. Whether single or multi-frame, you’ll experience smooth transitions and improved frames.
- With AVCLabs’ color correction feature, you can easily adjust each video frame’s brightness, saturation, and contrast. This tool employs AI video upscaling to create larger, more detailed images without sacrificing quality.
- This video enhancement tool offers automatic face refinement to enhance facial details, which is ideal for improving low-quality videos with excessive noise and blurriness.
- The Super Resolution feature recovers high-resolution videos from low-resolution materials by generating additional pixel data to fill gaps, resulting in enhanced output.
- AVCLabs Video Enhancer AI uses a multi-frame convolutional neural network to stabilize video shakes and remove motion artifacts, overlay noise, and grain, producing natural and enhanced results.
Pros
- AVCLabs features a color calibration algorithm that accurately portrays natural colors.
- It allows you to add color to old black-and-white videos.
- The video processing is fully automatic, requiring no manual fine-tuning.
Cons
- The app demands a significant amount of free space, up to 15 GB.
- It is only compatible with Windows and Mac operating systems.
- The free trial adds a watermark from AVC Labs to the videos.
3.UniFab Video Enhancer
Pricing: UniFab provides a 30-day free trial for new AI users and a 30-day money-back guarantee for paid.
UniFab is a comprehensive AI-powered video enhancer to enhance video quality for all types of videos. Standout features like upscaling video to HDR10/Dolby Vision, denoising, and deinterlacing set this tool apart.
The models are regularly updated with the latest advancements in Deep Learning. Whether you’re a novice or an expert, UniFab offers both automatic and manual modes for video enhancement, making it easy to use without requiring complex settings.
Features
- Upgrade any video to 720p, 1080p, or even 4k resolution with remarkable clarity.
- Convert SDR videos to stunning HDR formats like HDR10+ and Dolby Vision. This feature revitalizes your videos, making them significantly more vibrant and immersive.
- Utilize AI technology to deinterlace your videos, ensuring smooth playback and a pristine viewing experience on modern displays.
- Specifically designed for videos captured in low-light conditions or with high ISO settings, this tool intuitively reduces grain and noise, restoring your footage’s true essence without sacrificing detail.
- Experience unprecedented fluidity as the software boosts your videos to an impressive 120FPS using AI. This transforms your content into a smooth motion stream, ideal for high-definition screens and attentive audiences.
Pros
- It allows audio up-mixing to EAC3 5.1/DTS 7.1 through AI.
- Utilizes GPU-accelerated technology.
- Supports video conversion, compression, and editing.
Cons
- The free trial is limited to 3 videos.
- Does not support Mac systems.
4.Topaz Video Enhance AI
Pricing:Topaz video enhancement tool offers a 30-day no-questions-asked refund policy.
Topaz Video Enhance AI enhances video quality by increasing its resolution. It supports batch upscaling of videos and is compatible with DVD, DSLR, Game, and HD stock footage.
Many notable film studios consider Topaz Video Enhance AI one of the best video editing software tools. It is suitable for various uses, such as commercials, movie content, and YouTube videos.
Features
- This free video upscaling software swiftly analyzes video footage quality using AI tools and recreates it into high-resolution videos.
- Topaz offers Gaia CGI and Theia for enhancing CG and animated videos, along with Proteus and Artemis for noise removal and sharpening.
- Easily recover details from any video footage by injecting original details using adjacent frames’ additional information. It detects and corrects visual artifacts formed during compression.
- Topaz provides an automatic mode for quick video quality enhancement and manual fine-tuning options using available controls.
- With this free video enhancer software, preserve video audio tracks and select from different conversion options for optimal output in the final project.
Pros
- Reduces motion artifacts.
- Adds extra frames for smooth, slow-motion videos.
- Enhances video quality up to 8K.
Cons
- AI processing can be time-consuming, sometimes taking hours.
- Requires a high-quality graphics card.
5.HitPaw Video Enhancer
Pricing:HitPaw AI video enhancer offers a 30-day refund guarantee on paid plans.
HitPaw is a user-friendly video enhancer suitable for both beginners and professionals. It features an easy-to-navigate interface, ensuring even those with minimal experience can improve their videos. Despite its simplicity, HitPaw offers robust enhancement tools, including color correction and stabilization. Its extensive support for various video formats eliminates compatibility concerns.
The software prioritizes efficient video enhancement without compromising quality or speed. Comprehensive tutorials help users explore different editing tasks and unlock their content’s full potential.
Features
- Utilize advanced AI algorithms to upscale low-resolution videos for a more appealing look. The AI feature optimizes content for sharper and more vibrant visuals.
- The HitPaw video quality enhancer app uses AI tools to improve detailing on human faces. Apply filters and adjust settings to enhance facial output in videos.
- The app includes a video stabilization feature that eliminates shaky camera movements, producing smoother and clearer videos with a professional touch.
- HitPaw offers an AI video repair option to restore damaged, corrupted, and old videos. It can also use deep learning AI to colorize black-and-white videos.
- Remove noise from videos with the General Denoise feature, making them look sharper, clearer, and newer.
Pros
- Supports various video formats.
- Has a user-friendly and intuitive interface.
- Can repair and enhance animation videos.
Cons
- The free plan has limited editing features.
Top 2 4K Video Enhancer Online Free Options
The AI-enhanced video tools mentioned above excel in their field. However, there are times when you might run out of storage or need a quick fix through your browser. So, here are some online AI tools that can enhance your videos. Unlike offline video enhancer AIs, online tools are easily accessible. While they may offer fewer features than desktop solutions, they are still useful for some editors.
1.Cutout.Pro
Many editing professionals rely on this free AI video enhancer for unlimited video improvements. Cutout.Pro utilizes advanced features such as video upscaling, motion interpolation, deinterlacing, and shake stabilization to enhance overall quality. This tool converts low-quality videos to higher resolutions like 2K, 30fps, and beyond. Moreover, this online tool swiftly reduces visual noise and other motion artifacts from clips using AI.
Features
- Reduce noise, motion artifacts, and improve video resolution significantly with this powerful online video quality enhancer and upscaler. Perfect for enhancing low-resolution videos like 240p, 360p, 480p, and more.
- Pro increases video frame rates without sacrificing quality. Smooth out shaky footage for better slow-motion effects.
- This tool enhances video resolution up to 2K at a maximum of 30fps effortlessly. It sharpens and defines your videos, bringing your story to life like a professional.
- This is perfect for filmmakers seeking to enhance footage quality and create professional-looking films. Improve video resolution and quality to unblur, upscale, and smooth videos for cinematic results.
- Enhance the quality of personal videos as this tool features shake stabilization for professional results.
- This video enhancer is ideal for professionals creating cinematic frames and restoring old footage. It’s also great for individuals looking to improve the quality of compressed videos downloaded from social media platforms like YouTube, Netflix, and TikTok.
Pros
- It boosts video frame rates and enables HD clip exports.
- Users can upload videos in MP4, MOV, WebM, and GIF formats for processing.
Cons
- It only offers a 5-second preview of the results after enhancement.
2.Clideo Video Enhancer
Clideo is an online video-enhancing tool that can completely transform any random video. It lets you add special AI effects and filters to adjust the video’s brightness, saturation, and contrast, making it stunning, vibrant, and attractive. You can enhance any video professionally for social media attention or business branding.
When it comes to video-enhancing tools, users seek maximum customization options. Clideo offers various features, functions, and facilities to transform average-looking videos into 4k video resolutions.
Features
- The interface is intuitive, so you don’t need any video editing experience to use it.
- You can enhance your video regardless of format because Clideo works with MP4, WMV, MOV, VOB, AVI, and other popular formats.
- You don’t need to download and install the video enhancer to your device. It’s not only faster but also more secure.
- Enhance multiple videos or images simultaneously.
- Add subtitles with customizable text fonts.
- Text Overlay feature with support for HD resolution.
- Access a media library with social sharing options.
Pros
- User-friendly tool is ideal for beginners.
- Supports multiple formats.
- As an online tool, it saves device storage space.
- Reasonable pricing.
- Provides uninterrupted video editing with customizable features.
Cons
- A premium subscription is required to remove watermarking.
- No offline app available; internet connection always necessary.
- No dedicated mobile app.
How to Choose the Best Video Enhancer
Consider the following to ensure you select the right video enhancer for your needs and creative vision.
1.Type of Content
Think about the type of content you’re working with. Are you creating short-form clips for social media or longer, more complex videos? Different enhancers may better suit different content types, so consider your file type and potential quality issues.
2.Consider The Features You Need
Consider the tools and features you need from your video quality enhancer software. Each system offers different capabilities, so planning can help you find the option that best fits your requirements.
3.Sharing Formats and Requirements
Determine the purpose of your video project and any specific sharing requirements. Understanding your goals will help you plan accordingly, whether for online sharing or commercial use.
4.Your Budget
Keep your budget in mind. Some enhancers offer free features, while others may require a purchase or subscription fee for full access. Budgeting effectively ensures you get the best value for your money while achieving great video results.
Conclusion
The video enhancement landscape has been transformed by artificial intelligence, providing numerous options to enhance your videos’ quality. Whether a professional filmmaker or a casual content creator, free AI video enhancers offer a chance to take your productions to the next level.
Each software has unique strengths, from Wondershare Filmora’s comprehensive editing features to AVCLabs’ neural network-powered upscaling and UniFab’s HDR conversion capabilities. User-friendly options like HitPaw cater to beginners while providing robust enhancement tools.
Moreover, for quick fixes or limited storage, online options like Cutout.Pro and Clideo offer accessible solutions with impressive results. With these advancements, achieving professional-quality videos is now achievable for everyone.
Ollie Mattison
Ollie Mattison is a writer and a lover of all things video.
Follow @Ollie Mattison
Also read:
- Updated 2024 Approved Dont Know Which Video Splitter to Choose? Just Check Out Our List of the 5 Best Video Software for Splitting Videos Below
- New In 2024, Top 5 Best Free MOV Video Cutters
- New Transform Your Clips 2 Simple Methods for Creating Time Lapse Masterpieces for 2024
- New 2024 Approved The FCPX Troubleshooters Bible Solving Problems
- Steady Shots The Top Free Android Apps for Video Stabilization
- Updated 2024 Approved Video Editing on a Budget Free Software for 32-Bit Windows
- New 2024 Approved Get Creative with Free Online Video Invitation Software
- Pro Tips How to Stabilize Your Videos Like a Pro in Adobe Premiere Pro
- In 2024, Jaycut 101 Unlocking the Power of Free Online Video Editing
- In 2024, Make Videos on Apple Mac Computer with the Best Video Maker for Mac
- Updated 2024 Approved Rip and Digitize A Step-by-Step Guide to Converting DVDs to Digital Files
- Updated The Art of Slow Motion How to Create Stunning Videos on Kapwing for 2024
- Updated In 2024, Bring Your Vision to Life 7 Best Movie Intro Design Software
- New 2024 Approved MP4 Video Information Changers Top Editor Options
- Updated 2024 Approved The Ultimate List 10 Best Video Combining Alternatives
- Updated The Best Free 4K Video Editors for Beginners and Pros Alike
- Updated 2024 Approved From Confusion to Clarity The Only Facebook Video Aspect Ratio Guide You Need
- Top 5 Reaction Video Makers
- 4 Feasible Ways to Fake Location on Facebook For your Samsung Galaxy Z Fold 5 | Dr.fone
- Disabled iPhone XR How to Unlock a Disabled iPhone XR?
- In 2024, How To Open Your iPhone XS Max Without a Home Button
- In 2024, FRP Hijacker by Hagard Download and Bypass your Infinix Hot 30 5G FRP Locks
- Top 10 Fingerprint Lock Apps to Lock Your Motorola G24 Power Phone
- In 2024, Detailed guide of ispoofer for pogo installation On Samsung Galaxy A15 4G | Dr.fone
- In 2024, How to use Pokemon Go Joystick on Motorola G54 5G? | Dr.fone
- Fixing Persistent Pandora Crashes on Honor Play 7T | Dr.fone
- Unlocking Made Easy The Best 10 Apps for Unlocking Your Realme 11 Pro Device
- Quick Fixes for Why Is My Samsung Galaxy F34 5G Black and White | Dr.fone
- How to Send and Fake Live Location on Facebook Messenger Of your Poco C65 | Dr.fone
- In 2024, Fake Android Location without Rooting For Your Tecno Spark 20 Pro | Dr.fone
- In 2024, How to Fix Pokemon Go Route Not Working On Samsung Galaxy A15 5G? | Dr.fone
- How to identify missing or malfunctioning your hardware drivers with Windows Device Manager on Windows 10
- In 2024, 5 Techniques to Transfer Data from Samsung Galaxy A05s to iPhone 15/14/13/12 | Dr.fone
- How to Fix iPhone 6s Plus Storage Not Loading/Showing | Stellar
- In 2024, Fake the Location to Get Around the MLB Blackouts on Samsung Galaxy S23 Tactical Edition | Dr.fone
- Unlock Your Vivo Y27 5G Phone with Ease The 3 Best Lock Screen Removal Tools
- Title: New In 2024, Say Goodbye to Windows 10 Photos Top 8 Alternative Image Viewers
- Author: Emma
- Created at : 2024-04-29 02:27:58
- Updated at : 2024-04-30 02:27:58
- Link: https://video-ai-editor.techidaily.com/new-in-2024-say-goodbye-to-windows-10-photos-top-8-alternative-image-viewers/
- License: This work is licensed under CC BY-NC-SA 4.0.
