
:max_bytes(150000):strip_icc():format(webp)/GettyImages-541365354-5c8ad42246e0fb00014a9687.jpg)
New Video Resume Builder Showdown Top 4 Picks Free Resources
Video Resume Builder Showdown: Top 4 Picks [Free Resources]
4 Best Video Resume Makers in 2024

Liza Brown
Mar 27, 2024• Proven solutions
Video resume, or Visumé, Video CV, is a new way for job applicants to demonstrate their capabilities. As video sharing is getting popular, more and more job seeks to try to use video resumes.
Creating a video resume can be just the thing that will distinguish your application from all others. However, whether or not you should add a video resume to your job application, depends on the company, the position you’re applying for and your video editing skills.
Video resumes can be quite effective if used in the right context, and that is the reason that we’re here. Below are some of the best video resume makers you can use to get the job you’ve always wanted.
- Part 1: Best Video Resume Makers
- Part 2: What should be included in a video resume?
- Part 3: How to make a video resume with Filmora?
- Part 4: Tips for creating a better video resume
- Part 5: Creative Video Resumes Examples
Part 1: 4 Best Video Resume Makers
From a technical standpoint, creating a video resume isn’t much different from making any other type of video , since you are going to need a webcam, a video camera , or a screen recording software to capture the footage and video editing software to piece the footage together.
You may also need the lighting equipment, a couple of different camera lenses , or a tripod if you want to make sure that your footage meets the highest professional standards. Let’s take a look at the best video resume makers that will enable you to combine your footage in virtually any way you want.
1. Biteable
Price: Free version available, $23 per month billed annually
Compatibility: Web-based

Biteable video resume template editing interface
This is a perfect option if you’ve already edited your video resume and you just want to add music, text overlays or opening titles. Biteable lets you choose from a large number of video templates you can customize easily, so once you create an account on this platform you can just select a template and upload a video to it.

Biteable video resume templates
All videos resumes you export with the free version of the Biteable platform are going to be watermarked, and you must purchase a premium plan if you don’t want your video resumes to have the Biteable’s watermark over them.
2. Animaker
Price: Free version available, pricing plans start from $12 per month billed annually
Compatibility: Cloud-based
Animaker video resume editing interface
Animaker is equipped with a selection of video resume templates for designers, marketers, and developers that enable you to create your own resume in just a couple of minutes. This cloud-based software lets you upload your own videos, photos, and music, but it also features a huge animation and music libraries you can use to make your resume more charming.
The maximum duration of a video you can produce with Animaker depends on the subscription plan, which is why you can’t make videos that are longer than two minutes if you are using the free version of Animaker. Keep in mind that the maximum number of videos you can export each month also depends on the subscription plan you have.
3. Camtasia
Price: Free trial available, pricing plans start from $177.17 per year
Compatibility: Windows, macOS
This video editing software for Mac and PC computers grants you complete creative freedom over the process of making a video resume. You can use Camtasia to record videos using a webcam while recording your computer’s screen at the same time. In addition, you can import video files in a wide range of file formats into your project and use them to make your resume more informative.
Camtasia lets you cut or trim all video clips you place on its timeline, which means that you can remove all parts of the video clips you don’t want your potential employers to see. Adding text overlays, visual effects or creating perfect soundtracks for your video resumes are just a few among countless options Camtasia offers.
4. Filmora
Price: Free trial available, $49.99 for one-year [at this time of reviewing]
Compatibility: macOS, Windows
Filmora is an all-in-one video recording and video editing software. Making a video resume with Filmora is easy. You can record your webcam and your voice at the same time, or you can import the footage you’d like to use in your video resume. You can remove all segments that don’t fit into the structure of your video resume easily.


Filmora has huge visual effects, music and sound effects libraries you can use on all projects you edit with this software. Besides the video effects pre-programmed in the video editor, you can also download and use some video effects, especially for businesses to make the video resume more professional. What’s more, you can export all your videos to your YouTube channel directly from Filmora and save time on uploading your video resume and all other videos you create with this software to the Internet.
Part 2: What should be included in a video resume?
In essence, there is no difference between a video resume and a paper resume, which are means of obtaining an interview. So, in the video resume, the following information should be included as well:
Education background: When recording video resumes, briefly introduce the educational experience and qualifications, the majors and graduates, and the specific skills and abilities if necessary.
Work experience: Focus on past jobs and positions and achievements.
Training experience: What kind of skills training did you participate in, and what benefits do you get from it?
Job intention: which position you’re applying for, and why do you want to this job. You can state it from your majors and your future career plans.
Concluding remarks: you can end your resume recording with sentences like Thank you for watching my resume and looking forward to the opportunity to get an interview.
Part 3: How to Make a video resume with Filmora?
Making videos in Filmora is easy, import your captured resume footage, do some basic editing, add some effects and titles, and save and share.
- Import video footage or record

If you’ve recorded your resume video with your phone or camera already, you can import them to Filmora directly. Click the Import menu and then select Import from a Camera or a phone.
You can also click Import Media Files Here to import the recorded media from your computer step by step.
You can also record the video with the webcam on your computer. To do this, click the Record menu and then select Record from Webcam.

All imported media files or recorded files will appear in the Project Media library.
Check our tips and tricks for shooting and recording videos .
- Add media to timeline and do some basic editing
Drag the media files you want to edit into the timeline panel. Click the Spacebar to preview the media on timeline in the Preview window.

In most cases, you may need to trim, split and cut out unwanted parts from the recorded video CV. All this can be done quickly in Filmora.
- Polishing video
If your recorded video footage is shaky, you can stabilize it in Filmora with the Video Stabilization feature.

If the lighting isn’t so beautiful in recording, you can adjust the contrast, hue and temperature to correct the color .
- Add titles & subtitles
You can also add some vital information as titles to emphasis.

Of course, you can also add subtitles , so even when people watch your Visume in mute, you can still know what you’re talking about.
- Save and share
When you’re satisfied with the video and want to save it, click the Export button to save it on your computer directly.

There’re several formats available, but MP4 is highly-recommended considering the capacity.
Part 4: Tips That Are Going to Help You Make a Better Video Resume
Creating your first video resume can be an intimidating task, so here are a few tips that will help you go through the process smoothly.
Relax, you can always do another take – Don’t panic if at first, you have a tough time remembering your lines. Just relax, because the shot is going to look much better if you act naturally.
Less is more – Respect the time of your potential employers by keeping your video resume short. Video resumes that last between one and two minutes often produce the best results.
Don’t improvise, make a script – Put your ideas on paper, that will make them much easier to remember once the camera starts rolling.
Focus on what you’re good at – You have a limited amount of time to explain why you are the right candidate for the job, don’t waste that time on talking about your weaknesses.
Don’t forget your audience – Try to understand what the people who are going to watch the video like and what they don’t like. If you manage to do this, your video resume is going to grab the attention of its viewers.
Part 5: Creative Video Resumes Examples
You can find more videos about Video Resume on YouTube, and I’ve selected some creative ones so you can have a quick look.
Mark Leruste introduced himself in a joyful way. In his video, we can see there’re lots of visual effects used.
Video production credits: Mickey Mahut
In Denny’s Video Resume, he added upbeat background music to demonstrate his experience in an upbeat atmosphere. He shared his filmmaking experience, editing techniques, achievement, and thoughts in this 2-minute video.
Video production credits: Denny Kremblas Creative
Conclusion
The job market is highly competitive, which is why you shouldn’t hesitate to use all means available to you to get the job you want. The video resume makers, we presented in this article, offer a wide array of tools, but it is up to you to find a way to use these tools creatively. What is your favorite method of creating a video resume? Leave a comment and let us know.
And you’re exploring the power of video and looking for a good video editing software, download and try Filmora video editor.
Liza Brown
Liza Brown is a writer and a lover of all things video.
Follow @Liza Brown
Liza Brown
Mar 27, 2024• Proven solutions
Video resume, or Visumé, Video CV, is a new way for job applicants to demonstrate their capabilities. As video sharing is getting popular, more and more job seeks to try to use video resumes.
Creating a video resume can be just the thing that will distinguish your application from all others. However, whether or not you should add a video resume to your job application, depends on the company, the position you’re applying for and your video editing skills.
Video resumes can be quite effective if used in the right context, and that is the reason that we’re here. Below are some of the best video resume makers you can use to get the job you’ve always wanted.
- Part 1: Best Video Resume Makers
- Part 2: What should be included in a video resume?
- Part 3: How to make a video resume with Filmora?
- Part 4: Tips for creating a better video resume
- Part 5: Creative Video Resumes Examples
Part 1: 4 Best Video Resume Makers
From a technical standpoint, creating a video resume isn’t much different from making any other type of video , since you are going to need a webcam, a video camera , or a screen recording software to capture the footage and video editing software to piece the footage together.
You may also need the lighting equipment, a couple of different camera lenses , or a tripod if you want to make sure that your footage meets the highest professional standards. Let’s take a look at the best video resume makers that will enable you to combine your footage in virtually any way you want.
1. Biteable
Price: Free version available, $23 per month billed annually
Compatibility: Web-based
Biteable video resume template editing interface
This is a perfect option if you’ve already edited your video resume and you just want to add music, text overlays or opening titles. Biteable lets you choose from a large number of video templates you can customize easily, so once you create an account on this platform you can just select a template and upload a video to it.
Biteable video resume templates
All videos resumes you export with the free version of the Biteable platform are going to be watermarked, and you must purchase a premium plan if you don’t want your video resumes to have the Biteable’s watermark over them.
2. Animaker
Price: Free version available, pricing plans start from $12 per month billed annually
Compatibility: Cloud-based
Animaker video resume editing interface
Animaker is equipped with a selection of video resume templates for designers, marketers, and developers that enable you to create your own resume in just a couple of minutes. This cloud-based software lets you upload your own videos, photos, and music, but it also features a huge animation and music libraries you can use to make your resume more charming.
The maximum duration of a video you can produce with Animaker depends on the subscription plan, which is why you can’t make videos that are longer than two minutes if you are using the free version of Animaker. Keep in mind that the maximum number of videos you can export each month also depends on the subscription plan you have.
3. Camtasia
Price: Free trial available, pricing plans start from $177.17 per year
Compatibility: Windows, macOS
This video editing software for Mac and PC computers grants you complete creative freedom over the process of making a video resume. You can use Camtasia to record videos using a webcam while recording your computer’s screen at the same time. In addition, you can import video files in a wide range of file formats into your project and use them to make your resume more informative.
Camtasia lets you cut or trim all video clips you place on its timeline, which means that you can remove all parts of the video clips you don’t want your potential employers to see. Adding text overlays, visual effects or creating perfect soundtracks for your video resumes are just a few among countless options Camtasia offers.
4. Filmora
Price: Free trial available, $49.99 for one-year [at this time of reviewing]
Compatibility: macOS, Windows
Filmora is an all-in-one video recording and video editing software. Making a video resume with Filmora is easy. You can record your webcam and your voice at the same time, or you can import the footage you’d like to use in your video resume. You can remove all segments that don’t fit into the structure of your video resume easily.
Filmora has huge visual effects, music and sound effects libraries you can use on all projects you edit with this software. Besides the video effects pre-programmed in the video editor, you can also download and use some video effects, especially for businesses to make the video resume more professional. What’s more, you can export all your videos to your YouTube channel directly from Filmora and save time on uploading your video resume and all other videos you create with this software to the Internet.
Part 2: What should be included in a video resume?
In essence, there is no difference between a video resume and a paper resume, which are means of obtaining an interview. So, in the video resume, the following information should be included as well:
Education background: When recording video resumes, briefly introduce the educational experience and qualifications, the majors and graduates, and the specific skills and abilities if necessary.
Work experience: Focus on past jobs and positions and achievements.
Training experience: What kind of skills training did you participate in, and what benefits do you get from it?
Job intention: which position you’re applying for, and why do you want to this job. You can state it from your majors and your future career plans.
Concluding remarks: you can end your resume recording with sentences like Thank you for watching my resume and looking forward to the opportunity to get an interview.
Part 3: How to Make a video resume with Filmora?
Making videos in Filmora is easy, import your captured resume footage, do some basic editing, add some effects and titles, and save and share.
- Import video footage or record
If you’ve recorded your resume video with your phone or camera already, you can import them to Filmora directly. Click the Import menu and then select Import from a Camera or a phone.
You can also click Import Media Files Here to import the recorded media from your computer step by step.
You can also record the video with the webcam on your computer. To do this, click the Record menu and then select Record from Webcam.
All imported media files or recorded files will appear in the Project Media library.
Check our tips and tricks for shooting and recording videos .
- Add media to timeline and do some basic editing
Drag the media files you want to edit into the timeline panel. Click the Spacebar to preview the media on timeline in the Preview window.
In most cases, you may need to trim, split and cut out unwanted parts from the recorded video CV. All this can be done quickly in Filmora.
- Polishing video
If your recorded video footage is shaky, you can stabilize it in Filmora with the Video Stabilization feature.
If the lighting isn’t so beautiful in recording, you can adjust the contrast, hue and temperature to correct the color .
- Add titles & subtitles
You can also add some vital information as titles to emphasis.
Of course, you can also add subtitles , so even when people watch your Visume in mute, you can still know what you’re talking about.
- Save and share
When you’re satisfied with the video and want to save it, click the Export button to save it on your computer directly.
There’re several formats available, but MP4 is highly-recommended considering the capacity.
Part 4: Tips That Are Going to Help You Make a Better Video Resume
Creating your first video resume can be an intimidating task, so here are a few tips that will help you go through the process smoothly.
Relax, you can always do another take – Don’t panic if at first, you have a tough time remembering your lines. Just relax, because the shot is going to look much better if you act naturally.
Less is more – Respect the time of your potential employers by keeping your video resume short. Video resumes that last between one and two minutes often produce the best results.
Don’t improvise, make a script – Put your ideas on paper, that will make them much easier to remember once the camera starts rolling.
Focus on what you’re good at – You have a limited amount of time to explain why you are the right candidate for the job, don’t waste that time on talking about your weaknesses.
Don’t forget your audience – Try to understand what the people who are going to watch the video like and what they don’t like. If you manage to do this, your video resume is going to grab the attention of its viewers.
Part 5: Creative Video Resumes Examples
You can find more videos about Video Resume on YouTube, and I’ve selected some creative ones so you can have a quick look.
Mark Leruste introduced himself in a joyful way. In his video, we can see there’re lots of visual effects used.
Video production credits: Mickey Mahut
In Denny’s Video Resume, he added upbeat background music to demonstrate his experience in an upbeat atmosphere. He shared his filmmaking experience, editing techniques, achievement, and thoughts in this 2-minute video.
Video production credits: Denny Kremblas Creative
Conclusion
The job market is highly competitive, which is why you shouldn’t hesitate to use all means available to you to get the job you want. The video resume makers, we presented in this article, offer a wide array of tools, but it is up to you to find a way to use these tools creatively. What is your favorite method of creating a video resume? Leave a comment and let us know.
And you’re exploring the power of video and looking for a good video editing software, download and try Filmora video editor.
Liza Brown
Liza Brown is a writer and a lover of all things video.
Follow @Liza Brown
Discover the Perfect Aspect Ratio: A Step-by-Step Guide
How Do You Find the Picture Ratio Calculator?
An easy yet powerful editor
Numerous effects to choose from
Detailed tutorials provided by the official channel
Aspect ratios are critical elements in photography, although you don’t have to go that deep! Still, you are here as you understand the significance of using aspect ratios in your projects and thus are looking to find the best picture ratio calculator.

In this guide, we’ll talk about everything you need to know about the photo ratio calculator.
In this article
01 [What is Picture Size Ratio?](#Part 1)
02 [What is 1920x1080 in Ratio?](#Part 2)
03 [How Do You Find the Ratio of an Image?](#Part 3)
04 [1920x1080 Aspect Ratio and 16:9 Aspect Ratio Differences](#Part 4)
05 [The Resolution Calculator (image Ration Calculator)](#Part 5)
06 [A Practical Explanation about Aspect Ratios in Filmora](#Part 6)
Part 1 What is Picture Size Ratio?
As already mentioned, a picture size ratio refers to calculating or determining the Ratio of an image. And, it’s accomplished by using apicture ratio calculator. So, for example, the picture size ratio could vary from 1:1, 4:3, 3:2, 16:9, etc.
You can visualize this aspect ratio by allocating an image’s width and height units. For example, a 6×4 inch image has a 3:2 aspect ratio, whereas a 1920×1080 pixel video includes a 16:9 aspect ratio.
Fact Check:
An aspect ratio does not contain attached units—instead, it shows how large the width compared to the height, meaning that an image measured in centimeters will have the same aspect ratio even if measured in inches.
The relationship between its height and width decides the shape and Ratio instead of the image’s actual size.
Different aspect ratios consist of varying effects on the image you use. For example, an image set in a 1:1 ratio vs. a 5:4 ratio changes the composition and perception of the photo.
Types of picture size ratios
1:1 Ratio

A 1:1 ratio includes an image’s width and height are square and thus equal. Some standard 1:1 ratios are an 8″x8″ photo, a 1080 x 1080 pixel image generally used for mobile screens, print photographs, and social media platforms.
3:2 Ratio

The 3:2 Ratio is generally 35mm film and photography and is still extensively used for prints. Images framed at 6″x4″ or 1080×720 pixels set within this aspect ratio.
5:4 Ratio

Last but not least, this Ratio is standard in photography and art prints and photography.
In the following sections, let’s uncover more about the photo aspect ratio and its related calculator!
Part 2 What is 1920x1080 in Ratio?

1920 x 1080 is itself a 16:9 aspect ratio. By default, DSLRs, smartphones, and most modern camcorders record video at 1920 x 1080.
Part 3 How Do You Find the Ratio of an Image?
Before finding the image ratio, understand that there’s a difference between image size and image ratio.
Unlike aspect ratios, image size shows the actual width and height in pixels. Image size refers to the image dimensions. You can measure its dimensions in any unit, but you’ll generally see pixels used for digital or web images and inches used for print images.
It’s essential to note that two different images containing the same aspect ratio may not have the exact dimensions of an image. For instance, the image has 1920×1080 pixels has 16:9 aspect ratios, and an image sized at 1280×720 pixels has a 16:9 aspect ratio.
You can use thistool to measure the aspect ratio of images. Here, match either ratio width and ratio and height or pixel width and pixel height to find the aspect ratio in thisimage size ratio calculator.
Part 4 1920x1080 Aspect Ratio and 16:9 Aspect Ratio Differences
These are almost the same. The only difference is that of the pixels. If you cancel the numbers 1920 and 1080, they will automatically come as 16 and 9. 1920 x 1080 is a 16:9 aspect ratio.
Part 5 The Resolution Calculator (Image Ratio Calculator)
To use a picture aspect ratio calculator, you need to understand the following.
Understand the following five variables:
● H1 Height of the initial image
● W1 Width of the initial image
● H2 Height of the final image
● W2 Width of the final image
● A percentage - the proportion of the initial image’s ratio to the final image’s ratio.
The aspect ratio formulas that sync the quantities mentioned above for the ratio converter are:
H1/W1 = H2/W2,
H1 * A% = H2, and
W1 * A% = W2
You are not required to understand the details by heart; if the initial resolution is generally used, use the list to select the ideal ratio:
Proportions
● 4:3,
● 3:2,
● 16:9,
● 16:10,
● 1:1, square, in some social networks,
● 85:1,
Pixels
● 2048:1536, iPad with Retina screen;
● 1920:1080, HD TV, iPhone 6 plus; and
● 800:600, traditional television & computer monitor standard.
Part 6 A Practical Explanation about Aspect Ratios in Filmora
Want to find thephoto aspect ratio calculatorquickly? Waste no more time calculating formulas and launch Wondershare Filmora Video Editor for the purpose. It is a robust video editing platform within which you can change the aspect ratios of images and videos and do the same with different methods. You can even do it under the editing panel as well. However, we won’t suggest going much deep when you’re looking to find the idealpicture ratio calculator.
Wondershare Filmora
Get started easily with Filmora’s powerful performance, intuitive interface, and countless effects!
Try It Free Try It Free Try It Free Learn More >

The most standard aspect ratios of videos are 4:3 and 16:9. Despite these two, 9:16 and 1:1 get famous over social media platforms these days.
As far as you may know, various media players help you to transform the aspect ratio in real-time when playback. Yet this modification is temporary. You are required to change the aspect ratio again next time you open them.
But, changing the aspect ratios is pretty different than other media players. You need to launch the program and create a new project simply. But, before you do a new project, you can easily change it at the beginning panel.
The Filmora assists you in changing the aspect ratio of the project after downloading. Hit the drop-down tab, and you will choose the options among 16:9, 4:3, 1:1, 9:16, and 21:9 aspect ratios.

Key Takeaways from This Episode
● 1 –An overview of the picture aspect ratio.
● 2 – Formula to measure the aspect ratio of an image.
● 3 –Practical understanding of aspect ratios with WondershareFilmora
● So here, we end our topic byusinga picture ratio calculator. We’ve described how to measure the image aspect ratio in detail. By now, you must have got how important the concept of aspect ratio is in photography or video editing.
Aspect ratios are critical elements in photography, although you don’t have to go that deep! Still, you are here as you understand the significance of using aspect ratios in your projects and thus are looking to find the best picture ratio calculator.
In this guide, we’ll talk about everything you need to know about the photo ratio calculator.
In this article
01 [What is Picture Size Ratio?](#Part 1)
02 [What is 1920x1080 in Ratio?](#Part 2)
03 [How Do You Find the Ratio of an Image?](#Part 3)
04 [1920x1080 Aspect Ratio and 16:9 Aspect Ratio Differences](#Part 4)
05 [The Resolution Calculator (image Ration Calculator)](#Part 5)
06 [A Practical Explanation about Aspect Ratios in Filmora](#Part 6)
Part 1 What is Picture Size Ratio?
As already mentioned, a picture size ratio refers to calculating or determining the Ratio of an image. And, it’s accomplished by using apicture ratio calculator. So, for example, the picture size ratio could vary from 1:1, 4:3, 3:2, 16:9, etc.
You can visualize this aspect ratio by allocating an image’s width and height units. For example, a 6×4 inch image has a 3:2 aspect ratio, whereas a 1920×1080 pixel video includes a 16:9 aspect ratio.
Fact Check:
An aspect ratio does not contain attached units—instead, it shows how large the width compared to the height, meaning that an image measured in centimeters will have the same aspect ratio even if measured in inches.
The relationship between its height and width decides the shape and Ratio instead of the image’s actual size.
Different aspect ratios consist of varying effects on the image you use. For example, an image set in a 1:1 ratio vs. a 5:4 ratio changes the composition and perception of the photo.
Types of picture size ratios
1:1 Ratio
A 1:1 ratio includes an image’s width and height are square and thus equal. Some standard 1:1 ratios are an 8″x8″ photo, a 1080 x 1080 pixel image generally used for mobile screens, print photographs, and social media platforms.
3:2 Ratio
The 3:2 Ratio is generally 35mm film and photography and is still extensively used for prints. Images framed at 6″x4″ or 1080×720 pixels set within this aspect ratio.
5:4 Ratio
Last but not least, this Ratio is standard in photography and art prints and photography.
In the following sections, let’s uncover more about the photo aspect ratio and its related calculator!
Part 2 What is 1920x1080 in Ratio?
1920 x 1080 is itself a 16:9 aspect ratio. By default, DSLRs, smartphones, and most modern camcorders record video at 1920 x 1080.
Part 3 How Do You Find the Ratio of an Image?
Before finding the image ratio, understand that there’s a difference between image size and image ratio.
Unlike aspect ratios, image size shows the actual width and height in pixels. Image size refers to the image dimensions. You can measure its dimensions in any unit, but you’ll generally see pixels used for digital or web images and inches used for print images.
It’s essential to note that two different images containing the same aspect ratio may not have the exact dimensions of an image. For instance, the image has 1920×1080 pixels has 16:9 aspect ratios, and an image sized at 1280×720 pixels has a 16:9 aspect ratio.
You can use thistool to measure the aspect ratio of images. Here, match either ratio width and ratio and height or pixel width and pixel height to find the aspect ratio in thisimage size ratio calculator.
Part 4 1920x1080 Aspect Ratio and 16:9 Aspect Ratio Differences
These are almost the same. The only difference is that of the pixels. If you cancel the numbers 1920 and 1080, they will automatically come as 16 and 9. 1920 x 1080 is a 16:9 aspect ratio.
Part 5 The Resolution Calculator (Image Ratio Calculator)
To use a picture aspect ratio calculator, you need to understand the following.
Understand the following five variables:
● H1 Height of the initial image
● W1 Width of the initial image
● H2 Height of the final image
● W2 Width of the final image
● A percentage - the proportion of the initial image’s ratio to the final image’s ratio.
The aspect ratio formulas that sync the quantities mentioned above for the ratio converter are:
H1/W1 = H2/W2,
H1 * A% = H2, and
W1 * A% = W2
You are not required to understand the details by heart; if the initial resolution is generally used, use the list to select the ideal ratio:
Proportions
● 4:3,
● 3:2,
● 16:9,
● 16:10,
● 1:1, square, in some social networks,
● 85:1,
Pixels
● 2048:1536, iPad with Retina screen;
● 1920:1080, HD TV, iPhone 6 plus; and
● 800:600, traditional television & computer monitor standard.
Part 6 A Practical Explanation about Aspect Ratios in Filmora
Want to find thephoto aspect ratio calculatorquickly? Waste no more time calculating formulas and launch Wondershare Filmora Video Editor for the purpose. It is a robust video editing platform within which you can change the aspect ratios of images and videos and do the same with different methods. You can even do it under the editing panel as well. However, we won’t suggest going much deep when you’re looking to find the idealpicture ratio calculator.
Wondershare Filmora
Get started easily with Filmora’s powerful performance, intuitive interface, and countless effects!
Try It Free Try It Free Try It Free Learn More >
The most standard aspect ratios of videos are 4:3 and 16:9. Despite these two, 9:16 and 1:1 get famous over social media platforms these days.
As far as you may know, various media players help you to transform the aspect ratio in real-time when playback. Yet this modification is temporary. You are required to change the aspect ratio again next time you open them.
But, changing the aspect ratios is pretty different than other media players. You need to launch the program and create a new project simply. But, before you do a new project, you can easily change it at the beginning panel.
The Filmora assists you in changing the aspect ratio of the project after downloading. Hit the drop-down tab, and you will choose the options among 16:9, 4:3, 1:1, 9:16, and 21:9 aspect ratios.
Key Takeaways from This Episode
● 1 –An overview of the picture aspect ratio.
● 2 – Formula to measure the aspect ratio of an image.
● 3 –Practical understanding of aspect ratios with WondershareFilmora
● So here, we end our topic byusinga picture ratio calculator. We’ve described how to measure the image aspect ratio in detail. By now, you must have got how important the concept of aspect ratio is in photography or video editing.
The Ultimate List: 10 Vegas Pro Alternatives for Mac Users (Free & Paid)
For creating high-grade dynamic videos, simply shooting or recording a clip is not enough. Finding the best Sony Ve gas alternatives for Mac is essential since the software mainly targets Windows users.
Thanks to developers, there are many free and paid options to start your video editing journey on a Mac. Let’s first have a look at alternative software you could consider.
- Lightworks
- Wondershare Filmora
- Adobe Premiere Pro
- HitFilm Express
- Kdenlive
- OpenShot
- Blender
- Jahshaka
- Final Cut Pro
- Cyberlink PowerDirector 365
- What are the limitations when using Sony Vegas (Vegas Pro) on Mac?
- Hot FAQs about Vegas Pro Alternatives
Part 1: Sony Vegas Pro Alternatives & Competitors Overview
Here is a list of the top 10 tools we found after research. For an easier understanding, the following are the essential points of difference between alternative video editing software types for Sony Vegas Pro in a tabular form.
| Software | Supported OS | Price | Editor’s Verdict |
|---|---|---|---|
| Lightworks | Windows, Mac, Linux | Create-$9.99/month, Pro-$23.99/month | Medium-Difficult |
| Wondershare Filmora | Windows, Mac | Annual-$49.99, Perpetual-$79.99 | Easy |
| Adobe Premiere Pro | Windows, Mac | $20.99/month | Easy-Medium |
| HitFilm Express | Windows, Mac | Free | Easy |
| Kdenlive | Windows, Mac, Linux | Free | Medium-Difficult |
| OpenShot | Windows, Mac, Linux, OsX | Free | Medium-Difficult |
| Blender | Windows, Mac, Linux | Free | Easy |
| Jahshaka | Windows, Linux, OsX | Free | Easy-Medium |
| Final Cut Pro | Mac | Lifetime-$299.99 | Easy-Medium |
| Cyberlink PowerDirector 365 | Windows, Mac | Lifetime-$52.50 | Easy-Medium |
Part 2: Top 10 Sony Vegas (Vegas Pro) Alternatives & Competitors
Now that you know the primary differences between the Sony Vegas Pro alternatives. Are you find anything you like? Let’s move on to more details for your further consideration.
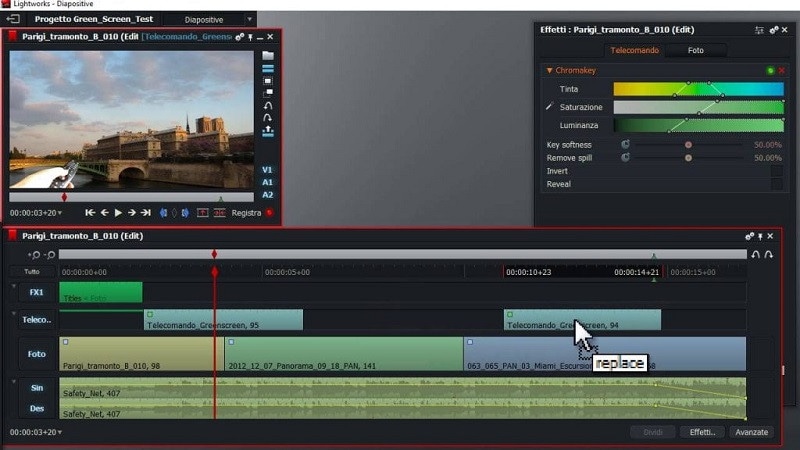
1. Lightworks
With Lightworks, using the independent timeline codec, format, and resolution alteration in videos is extremely simple. In addition, you can use the multi-cam editing feature for real-time, high-quality editing work. Moreover, drag and drop elements into videos for optimized video editing work, including pre-existing Storyboard points.
Main Features:
- Industry-grade features like QC, transcoding, and automated transfer are available.
- Edit files at different FPS limits and use three-point editing for recording/source files.
- Insert files and overwrite on a new project, replace, backfill, and fit to fill your video clips.
- Attach Storyboard tiles and match-frame clips/sub-clips easily.
Pros
- Flexible functionality and speedy transfers
- Edit files with professional movie-like quality
- Auto Sync feature for automatic timeline re-syncing is available
Cons
- Direct X is only available on the Windows version
- TotalFX plugin is not available for free- you have to upgrade to use them
OS Compatibility: Windows , Mac , Linux
Best For: Editing experts creating visually animated and professional-looking short videos can work with Lightworks.
What users say:
For professional-level video editing work, Lightworks brings a lot of resources and elements to users. According to reviews , people who have tried it have experienced better video editing functionality with these resources.
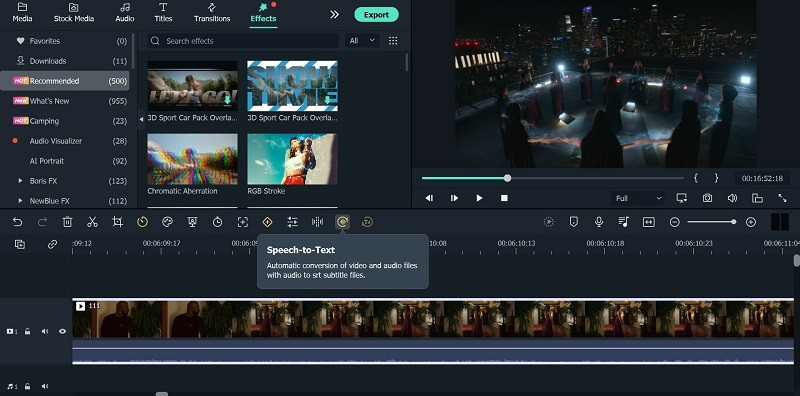
2. Wondershare Filmora
The top Vegas Pro alternative that both Windows and Mac users can opt for is Filmora. The software has advanced AI-incorporated editing functions for automated editing work, including preset effects from FX plugins. Besides that, you can easily add pre-set transitions, audio clips, text, images, and more.
Beginners find it simple to navigate through its interface and can opt for the Instant Mode function for automatic video edits .
Free Download For Win 7 or later(64-bit)
Free Download For macOS 10.14 or later

For a better idea of how this works, you should check out this tutorial video: https://filmora.wondershare.com/get-creative/make-a-video-quickly.html
Main Features:
- Instant Mode is available for automatic video/audio project editing out of 6 shorter clips.
- Support Advanced editing tools like Chroma Key and AI Portrait.
- Record voiceover, apply speech-to-text/text-to-speech functions, and more audio editing features.
- OpenFX plugins like BorisFX and NewBlue FX for a better list of pre-set effects.
Pros
- Simple to use and navigate on the editor timeline, especially with drag-and-drop support
- Output your editing files in different video/audio formats
- Quickly share the file on Vimeo or YouTube, besides downloading it on the local hard drive
Cons
- Free trial users cannot bring their Instant Mode-created videos into the editor timeline
- 4K support only with selected MKV, MOV, M4V (for Mac), and MP4 codecs
OS Compatibility: Windows , Mac
G2 Rating: 4.4 out of 5
Best For: All types of users like educators, students, homeowners, businesses, and video editors for comprehensive video editing tools and uses.
What users say:
Filmora is extremely simple to use, with advanced features available for top-level video editing work. Users mention in reviews how they have benefitted from the simple functionality and dynamic AI-based features available here for video editing.
3. Adobe Premiere Pro
If you are looking for high-quality programs like Sony Vegas, Adobe Premiere Pro is a reliable choice. This editing software allows you to easily create, delete, and move big video projects. Moreover, you can work on multiple files simultaneously and use shortcuts for faster editing work.
Preset filters and editing features are also available here, especially if they choose the Adobe Creative Cloud option.
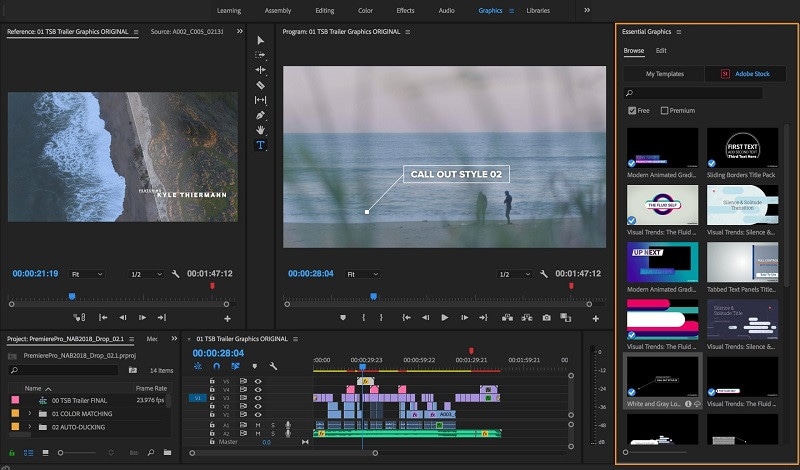
Main Features:
- Multiple pre-set transitions and effects are available for quick thematic changes.
- Add graphics, titles, and captions.
- Color grading and correction tools are available.
- It is possible to add keyframing and animation elements.
Pros
- Opting for group plans for video editing practice and learning using Adobe Premiere Pro is possible
- Aligns audio with videos instantly during editing
- Utilize Quick Export functionality for video files in some taps
Cons
- Windows High Contrast Mode is supported but to a limited extent, like with menus and title bars
- HDR workflows can only be handled on the Windows version with DisplayHDR 400 support
OS Compatibility: Windows , Mac
G2 Rating: 4.5 out of 5
Best For: Professional editors and trainers can use the various plans under Adobe Premiere Pro for video/audio editing.
What users say:
Advertisers and videographers enjoy high-grade video editing features and like the simple effects and interface quality. The motion graphics support in Adobe Premiere Pro is high-grade as well.
4. HitFilm Express
A capable Sony Vegas free alternative that you should check out is HitFilm Express. With this, you can expect many prepared designs for quick video edits. Additionally, you can manually customize the video files you are working on with high-grade personalization features available in the timeline.

Main Features:
- Pre-set customizable designs are available.
- Built-in sound effects and soundtracks are usable for free.
- Cache renders in timelines are optimized.
- The New Grade Clips feature allows users to apply varying effects to many video clips.
Pros
- Stable process of switching between timelines with an active orbit tool
- Easy to switch between 2D/3D timelines while using the text tool
- Simple to use for an unlimited period
Cons
- Does not work on older versions than Windows 10 and macOS 10.14
- Users cannot integrate this with Vegas Pro like before
OS Compatibility: Windows , Mac
TechRadar Rating: 4.5 out of 5
Best For: This software is a high-quality video editor for custom video editing work, fit for beginners and professionals alike.
What users say:
HitFilm Express is easy to use and efficient in the market for professional-level editing. The tutorial is available here for quick learning about the steps, and expandable features are well-admired by users.
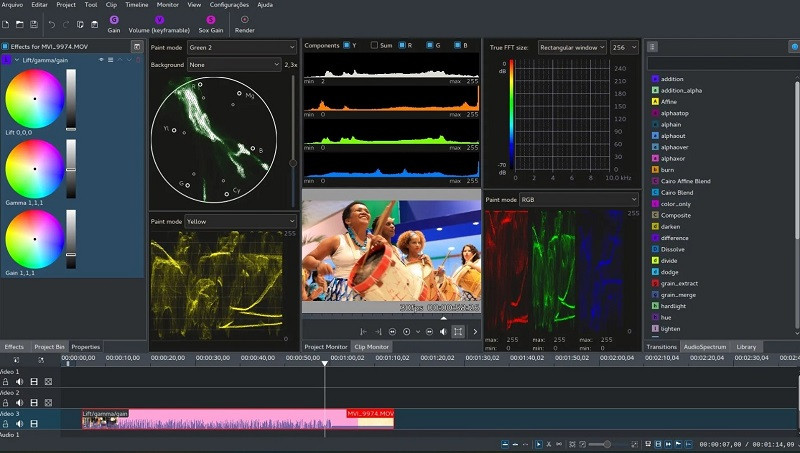
5. Kdenlive
A high-quality Sony Vegas open-source variety that you should seriously consider is Kdenlive. The video editor comes with MLT framework support and holds many tools for optimizing video editing.
To simplify, you can arrange and adjust various video/audio tracks and mute or lock specific ones as needed. Add everything from filters, texts, and transitions using this editor for high-grade video projects.
Main Features:
- Get an automatic backup of your video project while you are editing it.
- Use proxy editing to create low-resolution source clip copies and render them later on computers.
- Multiple video/audio scopes are available for monitoring projects like vectorscope, waveform, and RDB Parade.
- Many transition and effect choices to use.
Pros
- Flexibility with themes to add with multiple options
- Pre-render specific timeline parts for preview
- Effects are simple to use with keyframing quality
Cons
- Complex for completely non-technical users to adapt to
- Only supports 64-bit versions in regards to Windows-based compatibility
Trustpilot Rating: 3.7 out of 5
Best For: High-level editing experts who need strong video editing and monitoring features in an open-source platform.
What users say:
Kdenlive, as an open-source video editing software, assures quick and straightforward usability with projects. Per reviews , users like the ability to make simple video edits without bugs in this editor and quickly export finished projects.
6. OpenShot
OpenShot is a high-quality cross-platform video editor that you can use on different devices for quick but dynamic video project edits. Use keyframing ability here to adjust the animated elements you add to the file.
Moreover, cut the videos with simple steps and add many audio tracks/background videos/watermarks in layers. Also, get several video effects to optimize the video look easily.
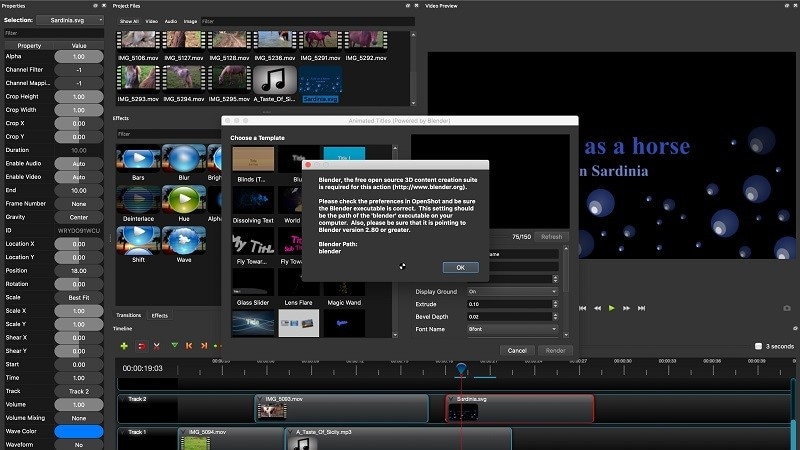
Main Features:
- Adjust video speed in reverse motion, fast forward, and slow motion.
- Render effects and 3D animated elements into the video project.
- Get title templates and edit them as needed.
- Visualize the background audio beats with waveform support.
Pros
- Very user-friendly interface with a simple navigation guarantee
- Supports more than 70 languages that you can translate as well using LaunchPad
- Drag-and-drop functionality is supported for adding images, audio, and videos into the OpenShot editor timeline
Cons
- Some bug issues can occur
- Slightly complex learning curve
OS Compatibility: Windows , Linux , OsX
G2 Rating: 4.4 out of 5
Best For: Professional-level video editing experts can opt for this cross-platform free software for high-quality video creations.
What users say:
The OpenShot software is suitable for high-quality video editing across different devices and operating systems. Users like the lack of automated watermarks on all videos, its simple dashboard, and its multi-track editing ability, all available for free.
7. Blender
Blender is free video editing software like Sony Vegas that users can use for video editing, but it is also effective for game development with animations. Indeed, you can create and render dynamic-looking scenes with features like Cycles.
Furthermore, the software has a rich modelling toolset with solutions like curves and sculpting tools.

Main Features:
- Completely customization-friendly UI, shortcuts, and window layout here.
- Customization and scripting are possible to do with this software due to the Python API support.
- Supports access and integration of many pipeline tools for projects.
- Comes with advanced simulation-based features available in MantaFlow and Bullet libraries.
Pros
- Basic and advanced tools for quick video edits
- Strong composition and masking ability with object-based motion tracking benefits
- Easily create short animations with Blender
Cons
- Data under the standalone games created here fall under GPL conditions
- Strict licensing rules are applicable here
OS Compatibility: Windows , Mac , Linux
G2 Rating: 4.5 out of 5
Best For: Game developers and videographers for companies can use this open-source platform for creation and editing.
What users say:
Blender is a capable software for animation-based editing, with high-quality game-based features and interactive elements that make editing simple. As per reviews , users like the simple animation-based tools and fast rendering it offers.
8. Jahshaka
Users of Jahshaka can experience an inclusive, collaborative environment for metaverse-level editing work. This free editing software, like Sony Vegas, focuses mainly on VR-based editing functions and comes with powerful tools for project management and content creation.
Take the help of other team members to collaborate on dynamic virtual world building, editing, and publishing.
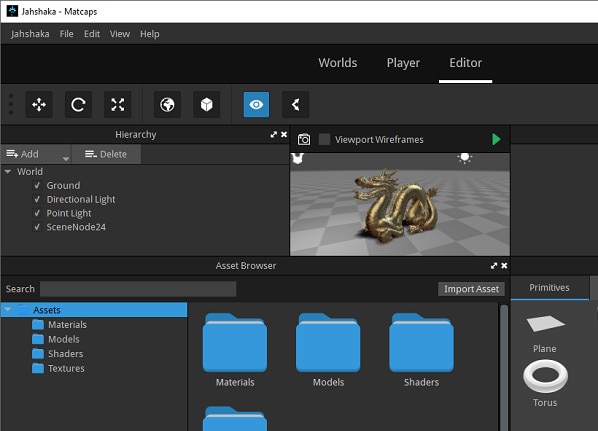
Main Features:
- Compatible player for different desktop and mobile devices.
- Create diversified worlds and scenes with one comprehensive platform.
- Immersive software 3D video development.
- Access to pre-built content and libraries of scenes and assets
Pros
- Easily share and distribute your virtual projects
- Deliver final projects offline and online
- An interactive multi-user engine is available
Cons
- Usable for a niche audience and does not include standard video editing tools
- Jahshaka V2 legacy support is no longer active
OS Compatibility: Windows , Linux , OsX
SourceForge Rating: 4.4 out of 5
Best For: Professional video editors who want a collaborative experience in VR-based development and publishing.
What users say:
Jahshaka is a suitable program for optimized VR-based editing with many preset features and themes to choose from. Most users enjoy the new features and worlds and can work with them efficiently.
9. Final Cut Pro
One of the top Sony Vegas alternatives Mac users can safely turn to is Final Cut Pro, which has powerful modern video editing features. With this software, you will access Cinematic Mode, which you can use to create stylish and thematic video scenes.
Similarly, the Object Tracker features utilize ML technology to automatically detect objects and faces in moving videos. It can align effects and titles accurately with the graphical elements in videos.

Main Features:
- Object Tracker feature for using color correction and adding texts into moving videos.
- Accelerated functional for motion tracking with Apple Neural Engine.
- Add high-quality effects and titles into videos with Cinematic Mode support.
- Preset audio tracks and royalty-free sound effects are available for editing.
Pros
- Handle color grading for optimized scene quality
- Adjust the field depth and focus depth in clips
- Share projects across iOS and macOS platforms
Cons
- Not valid for Windows users
- Relatively high cost to avail the paid version with all advanced features
OS Compatibility: Mac
TrustRadius Rating: 4.8 out of 5
Best For: Professional video editors, students, and filmmakers who want to create cinematic-quality video projects.
What users say:
Final Cut Pro is an efficient Mac-based video editing tool with easy sharing and editing capabilities, rich effects/transitions options, and fast rendering ability. Customers enjoy the intuitive non-linear editor, easy accessibility to social media platforms for file exporting, and live scrubbing, as noted in one review .
10. Cyberlink PowerDirector 365
Another Sony Vegas mac alternative for Windows you should give a try is PowerDirector 365 from Cyberlink. This software removes or compiles video clips and uses masking features like image/custom masks.
Preset special effects, blending modes, and sound effects are available here for quick editing. Additionally, the AI-powered Motion Tracking traces objects in clips and adds graphics, animations, and text quickly in line with it.

Main Features:
- You can create and remove videos with masking features.
- Drag and drop the pre-set effects and texts into videos.
- Adjust video clips with tools for border, gradation, and shadowing.
- Multiple animations, callouts, graphics, and stickers to add to videos.
Pros
- Use green screen functionality for quick background removal or editing
- Automatic audio mastering and mixing functionality are available
- Keyframing benefits for customized animations like scaling and positioning
Cons
- Dolby Digital-centric audio codec is not available for users
- Users can try features like Room Echo Removal and NVIDIA A/V Denoise only on Windows 11
OS Compatibility: Windows
TechRadar Rating: 4.5 out of 5
Best For: Professional videographers and regular users who want a Windows-based video editing software for standard video clip editing.
What users say:
Cyberlink PowerDirector is a powerful video editor with standard editing functions many users have tried and benefited from. According to customers , the program has high-quality video and audio editing benefits for presentations, with additional effects/splitting/cropping features.
Part 3: What are the limitations when using Sony Vegas (Vegas Pro) on Mac?
Yes, with the given Sony Vegas alternatives, Mac and Windows users can benefit heavily. But why is it important to try for a replacement when Sony Vegas Pro is relatively efficient software?
To know the answer, you should take the time to understand its limitations, which do exist.
It only works for Windows users
The Sony Vegas Pro software is not available for Mac or other operating systems besides Windows. In addition, it’ll be really complex and time-consuming, even if you opt for virtual machine software or handle dual booting techniques to configure the software on your Mac or Linux.
You need to invest in other hardware
Sony Vegas Pro does do not work within one comprehensive platform like other capable video editing software types, like Wondershare Filmora . You have to acquire a powerful PC and tools to operate it separately. The software works very slowly on older devices.
Not incredibly unique
The functions of Sony Vegas Pro match somewhat with other options in the market. So, users would not expect much value in purchasing this software’s plans that they want to upgrade from their previous system, but on the other hand, the available features are mostly standard-level in functionality as well.
Hot FAQs about Vegas Pro Alternatives
After knowing these details, many users still have specific common queries about opting for a Sony Vegas Pro alternatively. So these are some common FAQs about this- answered.
1. Can Sony Vegas be used on a Mac?
No, it is impossible to directly use Sony Vegas on macOS devices since it does not support it. Instead, you have to separately use a dual boot strategy or virtual machine software to activate the video editor on Mac devices, but the process for that is complex.
2. Is Wondershare Filmora or Vegas Pro better?
Wondershare Filmora and Vegas Pro are top-level options in video and audio editing projects with professional-level editing accuracy. However, Filmora has a cohesive ecosystem with rich AI and standard functions and comes with Mac/Windows support. So, in that sense, Filmora is comparatively a better choice.
Final Words
In place of Sony Vegas Pro, any of these options would also give you a great user experience. Out of them, Filmora is one that we will recommend due to its multi-faceted benefits and features for Mac and Windows users. Ultimately, make your decision based on your particular needs.
Free Download For Win 7 or later(64-bit)
Free Download For macOS 10.14 or later
Part 1: Sony Vegas Pro Alternatives & Competitors Overview
Here is a list of the top 10 tools we found after research. For an easier understanding, the following are the essential points of difference between alternative video editing software types for Sony Vegas Pro in a tabular form.
| Software | Supported OS | Price | Editor’s Verdict |
|---|---|---|---|
| Lightworks | Windows, Mac, Linux | Create-$9.99/month, Pro-$23.99/month | Medium-Difficult |
| Wondershare Filmora | Windows, Mac | Annual-$49.99, Perpetual-$79.99 | Easy |
| Adobe Premiere Pro | Windows, Mac | $20.99/month | Easy-Medium |
| HitFilm Express | Windows, Mac | Free | Easy |
| Kdenlive | Windows, Mac, Linux | Free | Medium-Difficult |
| OpenShot | Windows, Mac, Linux, OsX | Free | Medium-Difficult |
| Blender | Windows, Mac, Linux | Free | Easy |
| Jahshaka | Windows, Linux, OsX | Free | Easy-Medium |
| Final Cut Pro | Mac | Lifetime-$299.99 | Easy-Medium |
| Cyberlink PowerDirector 365 | Windows, Mac | Lifetime-$52.50 | Easy-Medium |
Part 2: Top 10 Sony Vegas (Vegas Pro) Alternatives & Competitors
Now that you know the primary differences between the Sony Vegas Pro alternatives. Are you find anything you like? Let’s move on to more details for your further consideration.
1. Lightworks
With Lightworks, using the independent timeline codec, format, and resolution alteration in videos is extremely simple. In addition, you can use the multi-cam editing feature for real-time, high-quality editing work. Moreover, drag and drop elements into videos for optimized video editing work, including pre-existing Storyboard points.
Main Features:
- Industry-grade features like QC, transcoding, and automated transfer are available.
- Edit files at different FPS limits and use three-point editing for recording/source files.
- Insert files and overwrite on a new project, replace, backfill, and fit to fill your video clips.
- Attach Storyboard tiles and match-frame clips/sub-clips easily.
Pros
- Flexible functionality and speedy transfers
- Edit files with professional movie-like quality
- Auto Sync feature for automatic timeline re-syncing is available
Cons
- Direct X is only available on the Windows version
- TotalFX plugin is not available for free- you have to upgrade to use them
OS Compatibility: Windows , Mac , Linux
Best For: Editing experts creating visually animated and professional-looking short videos can work with Lightworks.
What users say:
For professional-level video editing work, Lightworks brings a lot of resources and elements to users. According to reviews , people who have tried it have experienced better video editing functionality with these resources.
2. Wondershare Filmora
The top Vegas Pro alternative that both Windows and Mac users can opt for is Filmora. The software has advanced AI-incorporated editing functions for automated editing work, including preset effects from FX plugins. Besides that, you can easily add pre-set transitions, audio clips, text, images, and more.
Beginners find it simple to navigate through its interface and can opt for the Instant Mode function for automatic video edits .
Free Download For Win 7 or later(64-bit)
Free Download For macOS 10.14 or later
For a better idea of how this works, you should check out this tutorial video: https://filmora.wondershare.com/get-creative/make-a-video-quickly.html
Main Features:
- Instant Mode is available for automatic video/audio project editing out of 6 shorter clips.
- Support Advanced editing tools like Chroma Key and AI Portrait.
- Record voiceover, apply speech-to-text/text-to-speech functions, and more audio editing features.
- OpenFX plugins like BorisFX and NewBlue FX for a better list of pre-set effects.
Pros
- Simple to use and navigate on the editor timeline, especially with drag-and-drop support
- Output your editing files in different video/audio formats
- Quickly share the file on Vimeo or YouTube, besides downloading it on the local hard drive
Cons
- Free trial users cannot bring their Instant Mode-created videos into the editor timeline
- 4K support only with selected MKV, MOV, M4V (for Mac), and MP4 codecs
OS Compatibility: Windows , Mac
G2 Rating: 4.4 out of 5
Best For: All types of users like educators, students, homeowners, businesses, and video editors for comprehensive video editing tools and uses.
What users say:
Filmora is extremely simple to use, with advanced features available for top-level video editing work. Users mention in reviews how they have benefitted from the simple functionality and dynamic AI-based features available here for video editing.
3. Adobe Premiere Pro
If you are looking for high-quality programs like Sony Vegas, Adobe Premiere Pro is a reliable choice. This editing software allows you to easily create, delete, and move big video projects. Moreover, you can work on multiple files simultaneously and use shortcuts for faster editing work.
Preset filters and editing features are also available here, especially if they choose the Adobe Creative Cloud option.
Main Features:
- Multiple pre-set transitions and effects are available for quick thematic changes.
- Add graphics, titles, and captions.
- Color grading and correction tools are available.
- It is possible to add keyframing and animation elements.
Pros
- Opting for group plans for video editing practice and learning using Adobe Premiere Pro is possible
- Aligns audio with videos instantly during editing
- Utilize Quick Export functionality for video files in some taps
Cons
- Windows High Contrast Mode is supported but to a limited extent, like with menus and title bars
- HDR workflows can only be handled on the Windows version with DisplayHDR 400 support
OS Compatibility: Windows , Mac
G2 Rating: 4.5 out of 5
Best For: Professional editors and trainers can use the various plans under Adobe Premiere Pro for video/audio editing.
What users say:
Advertisers and videographers enjoy high-grade video editing features and like the simple effects and interface quality. The motion graphics support in Adobe Premiere Pro is high-grade as well.
4. HitFilm Express
A capable Sony Vegas free alternative that you should check out is HitFilm Express. With this, you can expect many prepared designs for quick video edits. Additionally, you can manually customize the video files you are working on with high-grade personalization features available in the timeline.
Main Features:
- Pre-set customizable designs are available.
- Built-in sound effects and soundtracks are usable for free.
- Cache renders in timelines are optimized.
- The New Grade Clips feature allows users to apply varying effects to many video clips.
Pros
- Stable process of switching between timelines with an active orbit tool
- Easy to switch between 2D/3D timelines while using the text tool
- Simple to use for an unlimited period
Cons
- Does not work on older versions than Windows 10 and macOS 10.14
- Users cannot integrate this with Vegas Pro like before
OS Compatibility: Windows , Mac
TechRadar Rating: 4.5 out of 5
Best For: This software is a high-quality video editor for custom video editing work, fit for beginners and professionals alike.
What users say:
HitFilm Express is easy to use and efficient in the market for professional-level editing. The tutorial is available here for quick learning about the steps, and expandable features are well-admired by users.
5. Kdenlive
A high-quality Sony Vegas open-source variety that you should seriously consider is Kdenlive. The video editor comes with MLT framework support and holds many tools for optimizing video editing.
To simplify, you can arrange and adjust various video/audio tracks and mute or lock specific ones as needed. Add everything from filters, texts, and transitions using this editor for high-grade video projects.
Main Features:
- Get an automatic backup of your video project while you are editing it.
- Use proxy editing to create low-resolution source clip copies and render them later on computers.
- Multiple video/audio scopes are available for monitoring projects like vectorscope, waveform, and RDB Parade.
- Many transition and effect choices to use.
Pros
- Flexibility with themes to add with multiple options
- Pre-render specific timeline parts for preview
- Effects are simple to use with keyframing quality
Cons
- Complex for completely non-technical users to adapt to
- Only supports 64-bit versions in regards to Windows-based compatibility
Trustpilot Rating: 3.7 out of 5
Best For: High-level editing experts who need strong video editing and monitoring features in an open-source platform.
What users say:
Kdenlive, as an open-source video editing software, assures quick and straightforward usability with projects. Per reviews , users like the ability to make simple video edits without bugs in this editor and quickly export finished projects.
6. OpenShot
OpenShot is a high-quality cross-platform video editor that you can use on different devices for quick but dynamic video project edits. Use keyframing ability here to adjust the animated elements you add to the file.
Moreover, cut the videos with simple steps and add many audio tracks/background videos/watermarks in layers. Also, get several video effects to optimize the video look easily.
Main Features:
- Adjust video speed in reverse motion, fast forward, and slow motion.
- Render effects and 3D animated elements into the video project.
- Get title templates and edit them as needed.
- Visualize the background audio beats with waveform support.
Pros
- Very user-friendly interface with a simple navigation guarantee
- Supports more than 70 languages that you can translate as well using LaunchPad
- Drag-and-drop functionality is supported for adding images, audio, and videos into the OpenShot editor timeline
Cons
- Some bug issues can occur
- Slightly complex learning curve
OS Compatibility: Windows , Linux , OsX
G2 Rating: 4.4 out of 5
Best For: Professional-level video editing experts can opt for this cross-platform free software for high-quality video creations.
What users say:
The OpenShot software is suitable for high-quality video editing across different devices and operating systems. Users like the lack of automated watermarks on all videos, its simple dashboard, and its multi-track editing ability, all available for free.
7. Blender
Blender is free video editing software like Sony Vegas that users can use for video editing, but it is also effective for game development with animations. Indeed, you can create and render dynamic-looking scenes with features like Cycles.
Furthermore, the software has a rich modelling toolset with solutions like curves and sculpting tools.
Main Features:
- Completely customization-friendly UI, shortcuts, and window layout here.
- Customization and scripting are possible to do with this software due to the Python API support.
- Supports access and integration of many pipeline tools for projects.
- Comes with advanced simulation-based features available in MantaFlow and Bullet libraries.
Pros
- Basic and advanced tools for quick video edits
- Strong composition and masking ability with object-based motion tracking benefits
- Easily create short animations with Blender
Cons
- Data under the standalone games created here fall under GPL conditions
- Strict licensing rules are applicable here
OS Compatibility: Windows , Mac , Linux
G2 Rating: 4.5 out of 5
Best For: Game developers and videographers for companies can use this open-source platform for creation and editing.
What users say:
Blender is a capable software for animation-based editing, with high-quality game-based features and interactive elements that make editing simple. As per reviews , users like the simple animation-based tools and fast rendering it offers.
8. Jahshaka
Users of Jahshaka can experience an inclusive, collaborative environment for metaverse-level editing work. This free editing software, like Sony Vegas, focuses mainly on VR-based editing functions and comes with powerful tools for project management and content creation.
Take the help of other team members to collaborate on dynamic virtual world building, editing, and publishing.
Main Features:
- Compatible player for different desktop and mobile devices.
- Create diversified worlds and scenes with one comprehensive platform.
- Immersive software 3D video development.
- Access to pre-built content and libraries of scenes and assets
Pros
- Easily share and distribute your virtual projects
- Deliver final projects offline and online
- An interactive multi-user engine is available
Cons
- Usable for a niche audience and does not include standard video editing tools
- Jahshaka V2 legacy support is no longer active
OS Compatibility: Windows , Linux , OsX
SourceForge Rating: 4.4 out of 5
Best For: Professional video editors who want a collaborative experience in VR-based development and publishing.
What users say:
Jahshaka is a suitable program for optimized VR-based editing with many preset features and themes to choose from. Most users enjoy the new features and worlds and can work with them efficiently.
9. Final Cut Pro
One of the top Sony Vegas alternatives Mac users can safely turn to is Final Cut Pro, which has powerful modern video editing features. With this software, you will access Cinematic Mode, which you can use to create stylish and thematic video scenes.
Similarly, the Object Tracker features utilize ML technology to automatically detect objects and faces in moving videos. It can align effects and titles accurately with the graphical elements in videos.
Main Features:
- Object Tracker feature for using color correction and adding texts into moving videos.
- Accelerated functional for motion tracking with Apple Neural Engine.
- Add high-quality effects and titles into videos with Cinematic Mode support.
- Preset audio tracks and royalty-free sound effects are available for editing.
Pros
- Handle color grading for optimized scene quality
- Adjust the field depth and focus depth in clips
- Share projects across iOS and macOS platforms
Cons
- Not valid for Windows users
- Relatively high cost to avail the paid version with all advanced features
OS Compatibility: Mac
TrustRadius Rating: 4.8 out of 5
Best For: Professional video editors, students, and filmmakers who want to create cinematic-quality video projects.
What users say:
Final Cut Pro is an efficient Mac-based video editing tool with easy sharing and editing capabilities, rich effects/transitions options, and fast rendering ability. Customers enjoy the intuitive non-linear editor, easy accessibility to social media platforms for file exporting, and live scrubbing, as noted in one review .
10. Cyberlink PowerDirector 365
Another Sony Vegas mac alternative for Windows you should give a try is PowerDirector 365 from Cyberlink. This software removes or compiles video clips and uses masking features like image/custom masks.
Preset special effects, blending modes, and sound effects are available here for quick editing. Additionally, the AI-powered Motion Tracking traces objects in clips and adds graphics, animations, and text quickly in line with it.
Main Features:
- You can create and remove videos with masking features.
- Drag and drop the pre-set effects and texts into videos.
- Adjust video clips with tools for border, gradation, and shadowing.
- Multiple animations, callouts, graphics, and stickers to add to videos.
Pros
- Use green screen functionality for quick background removal or editing
- Automatic audio mastering and mixing functionality are available
- Keyframing benefits for customized animations like scaling and positioning
Cons
- Dolby Digital-centric audio codec is not available for users
- Users can try features like Room Echo Removal and NVIDIA A/V Denoise only on Windows 11
OS Compatibility: Windows
TechRadar Rating: 4.5 out of 5
Best For: Professional videographers and regular users who want a Windows-based video editing software for standard video clip editing.
What users say:
Cyberlink PowerDirector is a powerful video editor with standard editing functions many users have tried and benefited from. According to customers , the program has high-quality video and audio editing benefits for presentations, with additional effects/splitting/cropping features.
Part 3: What are the limitations when using Sony Vegas (Vegas Pro) on Mac?
Yes, with the given Sony Vegas alternatives, Mac and Windows users can benefit heavily. But why is it important to try for a replacement when Sony Vegas Pro is relatively efficient software?
To know the answer, you should take the time to understand its limitations, which do exist.
It only works for Windows users
The Sony Vegas Pro software is not available for Mac or other operating systems besides Windows. In addition, it’ll be really complex and time-consuming, even if you opt for virtual machine software or handle dual booting techniques to configure the software on your Mac or Linux.
You need to invest in other hardware
Sony Vegas Pro does do not work within one comprehensive platform like other capable video editing software types, like Wondershare Filmora . You have to acquire a powerful PC and tools to operate it separately. The software works very slowly on older devices.
Not incredibly unique
The functions of Sony Vegas Pro match somewhat with other options in the market. So, users would not expect much value in purchasing this software’s plans that they want to upgrade from their previous system, but on the other hand, the available features are mostly standard-level in functionality as well.
Hot FAQs about Vegas Pro Alternatives
After knowing these details, many users still have specific common queries about opting for a Sony Vegas Pro alternatively. So these are some common FAQs about this- answered.
1. Can Sony Vegas be used on a Mac?
No, it is impossible to directly use Sony Vegas on macOS devices since it does not support it. Instead, you have to separately use a dual boot strategy or virtual machine software to activate the video editor on Mac devices, but the process for that is complex.
2. Is Wondershare Filmora or Vegas Pro better?
Wondershare Filmora and Vegas Pro are top-level options in video and audio editing projects with professional-level editing accuracy. However, Filmora has a cohesive ecosystem with rich AI and standard functions and comes with Mac/Windows support. So, in that sense, Filmora is comparatively a better choice.
Final Words
In place of Sony Vegas Pro, any of these options would also give you a great user experience. Out of them, Filmora is one that we will recommend due to its multi-faceted benefits and features for Mac and Windows users. Ultimately, make your decision based on your particular needs.
Free Download For Win 7 or later(64-bit)
Free Download For macOS 10.14 or later
10 Blockbuster Movies That Rely on Final Cut Pro for Post-Production
Top 10 Famous Movies Made By Final Cut Pro

Benjamin Arango
Mar 27, 2024• Proven solutions
Developed as video editing software that has been developed by Apple, Final Cut Pro began life as software designed to made simple video editing accessible for video hobbyists and independent filmmakers. However, in recent years the capabilities of Final Cut Pro have evolved significantly and we are now seeing major Hollywood movies also being edited with this software.
Do you want to turn your own video into a Hollywood film-like video? Check this guide on How to make big-budget cinematic look video with Final Cut Pro.
You may also like: 8 Best Movie Trailer Template for After Effects
Top 10 Movies Made by Final Cut Pro
Let’s take a look at ten major movies that have been edited using Final Cut Pro.

1. The Social Network (2010)
Based on the rise of the phenomenon that we now know as Facebook, The Social Network starred Jesse Eisenberg, Andrew Garfield and Justin Timberlake. The movie performed well at the box office and was also positively received by movie critics.
The film won an Academy Award for Best Editing, collected by Kirk Baxter and Angus Wall. They used Final Cut Pro to edit the film, and one of the things they really like about the software is the ability to do multiple timelines. Final Cut Pro was also used in this movie to enable face replacement in a number of scenes. Two of the key characters in the movie are twins, and so the scenes were filmed with actors (who weren’t twins) and then the editing software was used to create the illusion that they were twins. Digital matte paintings was another feature of this movie that relied on the functionality of Final Cut Pro.

2. The Girl with the Dragon Tattoo (2011)
This was the US adaptation of the earlier Swedish film of the same name - based on the novel by Stieg Larsson. Starring Daniel Craig and Rooney Mara, the story is a crime thriller trying to uncover the secrets surrounding the disappearance of a young girl from a wealthy family.
One of the challenges with this movie was that there were a lot of invisible effects throughout the film. Final Cut Pro was used to achieve the shot stabilization and the visual enhancements - everything from matte painting to creating seasonal elements such as snow.

3. John Carter (2011)
A science fiction adventure, this film performed so badly at the box office that it caused major financial problems for its studio Disney.
The editing of the John Carter movie was a particular challenge as a lot of the action was shot twice during the troubled production. The editor Eric Zumbrunnen used Final Cut Pro to piece the various elements together. With a huge range of CGI and creature effects to deal with, the editing process on this movie was extremely complex. Final Cut Pro was used to create a lot of the background detail need to bring the green screen scenes to life.

4. 500 Days of Summer (2009)
This was a cute, quirky romantic comedy starring Joseph Gordon-Levitt and Zooey Deschanel.
Editing on the movie was by Alan Edward Bell in DVCPro HD format on Final Cut Pro. Because the storyline of the movie unfolds in a non-linear timeline, the workflow feature of Final Cut Pro made it easier to manage the sequencing of the different scenes. There were also 250 invisible effects which were created using Final Cut Pro’s editing features.

5. X-Men Origins: Wolverine (2009)
Continuing the X-Men franchise, this installment traces Wolverine’s childhood and the relationship with his brother. It didn’t really appeal to X-Men fans or movie critics.
Editing on the movie was by Nicolas De Toth and Megan Gill. There were a number of continuity glitches identified during the production of this movie but De Toth and Gill used Final Pro Cut to keep a consistent flow to the narrative. What is interesting about the editing on this movie is that all the cutting of the scenes required was done on Final Cut Pro 5, taking advantage of the software’s HD abilities and also the multi-clip features.

6. Burn After Reading (2008)
A black comedy from the talented brothers Joel and Ethan Coen, they wrote, produced, edited, and directed the movie.
The Coen brothers used Final Cut Pro on this movie because it was simple and easy to use - they were blocking together the rough cuts as the scenes were being shot, and Final Cut Pro gave them the flexibility that they needed to edit quickly. On this movie most of the action was shot using Sony cameras but there were several scenes on which a RED camera was added when an additional camera was needed. Even though there is a significantly different workflow between the two types of camera, the RED material was able to be integrated smoothly with the Sony footage.

7. No Country for Old Men (2007)
A neo-Western thriller from Coen brothers. They directed, wrote, and edited this production.
The movie was also nominated for an Academy Award for Best Editing for editor Roderick Jaynes (a pseudonym for Joel and Ethan Coen).
Directing and editing a movie brings the two processes a lot closer together for the Coen brothers. An easy to use product such as Final Cut Pro ensures that they can construct the movie’s narrative using the timeline features of the product. This movie marked a chance in approach for the Coen brothers, who took advantage of the better resolution DVCPRO HD for their cutting process compared to earlier films that were cut at DV resolution.

8. 300 (2007)
Based on a graphic novel by Frank Miller, this is the fictionalized retelling of the Battle Termopylae - part of the Persian Wars. Directed by Zack Snyder, the movie was filmed with a super-imposition chroma key technique to help replicate the imagery of the original comic book. Editing on the movie was by William Hoy.
To capture the graphic novel look and feel of the film’s images, editor Hoy used a number of the key Final Cut Pro features such as the adjustment layer and blending modes to create depth and mood. With the look and feel of this movie so dependent on the effects created, editor Hoy spent a lot of time debating what was being added visually to each shot and how this would impact the length and continuity of each scene.

9. Sky Captain and the World of Tomorrow (2004)
With big name stars (Gwyneth Paltrow and Jude Law), this was an unusual film that used digital artists to build multi-layered 2D and 3D backgrounds for live action footage, with hand-drawn storyboards recreated as computer-generated 3D animatics. Critically it was well received but didn’t set the box office alight.
Editing on the movie was by Sabrina Plisco.
Final Cut Pro was particularly critical to create a scene between two characters that was shot in a physical set (unlike the digital soundstage that was used for the rest of the movie). Final Cut Pro allowed the filmmakers to line up the animatics with the live onstage footage. One of the challenges with this movie is that the editors had to manually assign time-codes to each take - the clips were then rendered out and sorted so that they could be used on a Final Cut Pro SD workstation. This approach was also used to create the master off-line cut. Batch lists of the cuts were then imported into Final Cut Pro.

10. Cold Mountain (2003)
This is an epic Civil War drama based on the novel by Charles Frazier. Starring Jude Law, Nicole Kidman, and Renee Zellweger this was critically acclaimed and performed reasonably well at the box office.
The movie was also nominated for an Academy Award for Best Editing let by editor Walter Murch.
This was really seen as the breakthrough movie for the use of Final Cut Pro in Hollywood Movies. An entire book has been produced analysing how editor Murch used Final Cut Pro to edit the movie and analysis its impact on future cinema productions. Editor Murch believes that the use of Final Cut Pro on this movie indirected affected the ultimate creative outcome. In particular, the use of the DVD authoring capabilities on Final Cut Pro meant that the editing team was able to look at the material more often, sharing it with more people, and changing the way that they looked at certain scenes.
While Hollywood movies require editing tools of the highest order, the range of effects that you can achieve using Final Cut Pro is impressive - as well as the standard ripple, roll, slip, slide, scrub, razor blade and time remapping edit functions, Final Cut Pro also comes with a range of video transitions and a range of video and audio filters that will take your film project to the next level.
It is clear that Final Cut Pro is definitely now a star in the editing of Hollywood movies, it is time to make it a star in editing your movies as well.
Benjamin Arango
Benjamin Arango is a writer and a lover of all things video.
Follow @Benjamin Arango
Benjamin Arango
Mar 27, 2024• Proven solutions
Developed as video editing software that has been developed by Apple, Final Cut Pro began life as software designed to made simple video editing accessible for video hobbyists and independent filmmakers. However, in recent years the capabilities of Final Cut Pro have evolved significantly and we are now seeing major Hollywood movies also being edited with this software.
Do you want to turn your own video into a Hollywood film-like video? Check this guide on How to make big-budget cinematic look video with Final Cut Pro.
You may also like: 8 Best Movie Trailer Template for After Effects
Top 10 Movies Made by Final Cut Pro
Let’s take a look at ten major movies that have been edited using Final Cut Pro.
1. The Social Network (2010)
Based on the rise of the phenomenon that we now know as Facebook, The Social Network starred Jesse Eisenberg, Andrew Garfield and Justin Timberlake. The movie performed well at the box office and was also positively received by movie critics.
The film won an Academy Award for Best Editing, collected by Kirk Baxter and Angus Wall. They used Final Cut Pro to edit the film, and one of the things they really like about the software is the ability to do multiple timelines. Final Cut Pro was also used in this movie to enable face replacement in a number of scenes. Two of the key characters in the movie are twins, and so the scenes were filmed with actors (who weren’t twins) and then the editing software was used to create the illusion that they were twins. Digital matte paintings was another feature of this movie that relied on the functionality of Final Cut Pro.
2. The Girl with the Dragon Tattoo (2011)
This was the US adaptation of the earlier Swedish film of the same name - based on the novel by Stieg Larsson. Starring Daniel Craig and Rooney Mara, the story is a crime thriller trying to uncover the secrets surrounding the disappearance of a young girl from a wealthy family.
One of the challenges with this movie was that there were a lot of invisible effects throughout the film. Final Cut Pro was used to achieve the shot stabilization and the visual enhancements - everything from matte painting to creating seasonal elements such as snow.
3. John Carter (2011)
A science fiction adventure, this film performed so badly at the box office that it caused major financial problems for its studio Disney.
The editing of the John Carter movie was a particular challenge as a lot of the action was shot twice during the troubled production. The editor Eric Zumbrunnen used Final Cut Pro to piece the various elements together. With a huge range of CGI and creature effects to deal with, the editing process on this movie was extremely complex. Final Cut Pro was used to create a lot of the background detail need to bring the green screen scenes to life.
4. 500 Days of Summer (2009)
This was a cute, quirky romantic comedy starring Joseph Gordon-Levitt and Zooey Deschanel.
Editing on the movie was by Alan Edward Bell in DVCPro HD format on Final Cut Pro. Because the storyline of the movie unfolds in a non-linear timeline, the workflow feature of Final Cut Pro made it easier to manage the sequencing of the different scenes. There were also 250 invisible effects which were created using Final Cut Pro’s editing features.
5. X-Men Origins: Wolverine (2009)
Continuing the X-Men franchise, this installment traces Wolverine’s childhood and the relationship with his brother. It didn’t really appeal to X-Men fans or movie critics.
Editing on the movie was by Nicolas De Toth and Megan Gill. There were a number of continuity glitches identified during the production of this movie but De Toth and Gill used Final Pro Cut to keep a consistent flow to the narrative. What is interesting about the editing on this movie is that all the cutting of the scenes required was done on Final Cut Pro 5, taking advantage of the software’s HD abilities and also the multi-clip features.
6. Burn After Reading (2008)
A black comedy from the talented brothers Joel and Ethan Coen, they wrote, produced, edited, and directed the movie.
The Coen brothers used Final Cut Pro on this movie because it was simple and easy to use - they were blocking together the rough cuts as the scenes were being shot, and Final Cut Pro gave them the flexibility that they needed to edit quickly. On this movie most of the action was shot using Sony cameras but there were several scenes on which a RED camera was added when an additional camera was needed. Even though there is a significantly different workflow between the two types of camera, the RED material was able to be integrated smoothly with the Sony footage.
7. No Country for Old Men (2007)
A neo-Western thriller from Coen brothers. They directed, wrote, and edited this production.
The movie was also nominated for an Academy Award for Best Editing for editor Roderick Jaynes (a pseudonym for Joel and Ethan Coen).
Directing and editing a movie brings the two processes a lot closer together for the Coen brothers. An easy to use product such as Final Cut Pro ensures that they can construct the movie’s narrative using the timeline features of the product. This movie marked a chance in approach for the Coen brothers, who took advantage of the better resolution DVCPRO HD for their cutting process compared to earlier films that were cut at DV resolution.
8. 300 (2007)
Based on a graphic novel by Frank Miller, this is the fictionalized retelling of the Battle Termopylae - part of the Persian Wars. Directed by Zack Snyder, the movie was filmed with a super-imposition chroma key technique to help replicate the imagery of the original comic book. Editing on the movie was by William Hoy.
To capture the graphic novel look and feel of the film’s images, editor Hoy used a number of the key Final Cut Pro features such as the adjustment layer and blending modes to create depth and mood. With the look and feel of this movie so dependent on the effects created, editor Hoy spent a lot of time debating what was being added visually to each shot and how this would impact the length and continuity of each scene.
9. Sky Captain and the World of Tomorrow (2004)
With big name stars (Gwyneth Paltrow and Jude Law), this was an unusual film that used digital artists to build multi-layered 2D and 3D backgrounds for live action footage, with hand-drawn storyboards recreated as computer-generated 3D animatics. Critically it was well received but didn’t set the box office alight.
Editing on the movie was by Sabrina Plisco.
Final Cut Pro was particularly critical to create a scene between two characters that was shot in a physical set (unlike the digital soundstage that was used for the rest of the movie). Final Cut Pro allowed the filmmakers to line up the animatics with the live onstage footage. One of the challenges with this movie is that the editors had to manually assign time-codes to each take - the clips were then rendered out and sorted so that they could be used on a Final Cut Pro SD workstation. This approach was also used to create the master off-line cut. Batch lists of the cuts were then imported into Final Cut Pro.
10. Cold Mountain (2003)
This is an epic Civil War drama based on the novel by Charles Frazier. Starring Jude Law, Nicole Kidman, and Renee Zellweger this was critically acclaimed and performed reasonably well at the box office.
The movie was also nominated for an Academy Award for Best Editing let by editor Walter Murch.
This was really seen as the breakthrough movie for the use of Final Cut Pro in Hollywood Movies. An entire book has been produced analysing how editor Murch used Final Cut Pro to edit the movie and analysis its impact on future cinema productions. Editor Murch believes that the use of Final Cut Pro on this movie indirected affected the ultimate creative outcome. In particular, the use of the DVD authoring capabilities on Final Cut Pro meant that the editing team was able to look at the material more often, sharing it with more people, and changing the way that they looked at certain scenes.
While Hollywood movies require editing tools of the highest order, the range of effects that you can achieve using Final Cut Pro is impressive - as well as the standard ripple, roll, slip, slide, scrub, razor blade and time remapping edit functions, Final Cut Pro also comes with a range of video transitions and a range of video and audio filters that will take your film project to the next level.
It is clear that Final Cut Pro is definitely now a star in the editing of Hollywood movies, it is time to make it a star in editing your movies as well.
Benjamin Arango
Benjamin Arango is a writer and a lover of all things video.
Follow @Benjamin Arango
Also read:
- Updated 2024 Approved Unleash Your Childs Creativity 10 Top Video Editing Apps, Free and Paid
- New 2024 Approved From Photos to Film How to Create an Unforgettable Video
- Updated Free Divx Video Cutter Reviews Top 6 Options for 2024
- New Top-Rated Web Video Editors for Music-Enhanced Videos for 2024
- New 2024 Approved Cut, Color, and Create Top Free 4K Video Editing Programs
- Updated 2024 Approved S Most Popular Public Domain Image Websites
- New In 2024, The Ultimate Guide to Video Editing on Windows 10
- Updated The Best Free Video Trimmers for Watermark-Free Edits for 2024
- New Unlock Chromebooks Full Potential Install Linux
- Make Your Own Movie Masterpiece A Fun and Easy Guide for Kids for 2024
- In 2024, From Boring to Brilliant How to Customize LinkedIn Video Thumbnails
- Updated GIF It Up! 28 Video to GIF Converter Reviews
- New Free Video Stabilization Software for Android Devices for 2024
- New In 2024, Smooth Operator Mastering Video Stabilization in FCPX
- Updated From Basic to Brilliant Mastering Video Editing Effects for Beginners for 2024
- In 2024, Steady Shots Best Free Video Stabilizers for Better Videos
- Updated 2024 Approved Streamline Your Recording 3 Easy Options for Gamers
- Updated 2024 Approved Lights, Camera, Action! Easy Movie Making for All
- New Create a Sense of Speed Motion Blur in Final Cut Pro for 2024
- Updated 2024 Approved This Article Points Out the Key Differences Between After Effects and Premiere to Get a Clearer Understanding of What Is Best
- Updated Video Speed Controllers Best Options for PC and Mac for 2024
- Updated In 2024, Had You Ever Thought About Modifying the Aspect Ratio of Your Memorable Videos? Do You Have Any Idea About It? Quickly Step Into This Article to Discover Insights on This Topic in Detail
- Updated In 2024, Master FCPX Top Tutorials and Resources
- How to Reset a Infinix Note 30i Phone That Is Locked | Dr.fone
- How to Unlock iPhone SE (2020) Passcode Screen? | Dr.fone
- In 2024, How to Intercept Text Messages on HTC U23 | Dr.fone
- Reasons for Xiaomi Redmi K70 Pro Stuck on Boot Screen and Ways To Fix Them | Dr.fone
- How To Transfer Data From Apple iPhone 14 Pro Max To Other iPhone 14 Pro devices? | Dr.fone
- How to Bypass Android Lock Screen Using Emergency Call On Samsung Galaxy A24?
- In 2024, Apple iPhone 8 Backup Password Never Set But Still Asking? Heres the Fix | Dr.fone
- How To Do Nokia G310 Screen Sharing | Dr.fone
- Android Screen Stuck General Vivo S17t Partly Screen Unresponsive | Dr.fone
- What Is AI Text to Video, In 2024
- In 2024, A Step-by-Step Guide to Finding Your Apple ID From Your iPhone 12 mini
- In 2024, Complete Review & Guide to Techeligible FRP Bypass and More For Itel P40+
- 2024 Approved Free Video Editing Essentials Cutting and Joining Tools for Starters
- In 2024, Fixing Foneazy MockGo Not Working On Motorola Razr 40 | Dr.fone
- 7 Top Ways To Resolve Apple ID Not Active Issue For Apple iPhone 6 | Dr.fone
- In 2024, Top 7 Phone Number Locators To Track Asus ROG Phone 7 Ultimate Location | Dr.fone
- Troubleshooting Error Connecting to the Apple ID Server From iPhone 15 Pro
- In 2024, 7 Top Ways To Resolve Apple ID Not Active Issue For Apple iPhone SE
- Fixes for Apps Keep Crashing on Google Pixel 7a | Dr.fone
- How to Change/Fake Your Motorola Razr 40 Ultra Location on Viber | Dr.fone
- Title: New Video Resume Builder Showdown Top 4 Picks Free Resources
- Author: Emma
- Created at : 2024-05-19 05:48:17
- Updated at : 2024-05-20 05:48:17
- Link: https://video-ai-editor.techidaily.com/new-video-resume-builder-showdown-top-4-picks-free-resources/
- License: This work is licensed under CC BY-NC-SA 4.0.
