
Updated 2024 Approved Rip and Digitize A Step-by-Step Guide to Converting DVDs to Digital Files
Rip and Digitize: A Step-by-Step Guide to Converting DVDs to Digital Files
Best DVD to Digital Format Converters

Liza Brown
Mar 27, 2024• Proven solutions
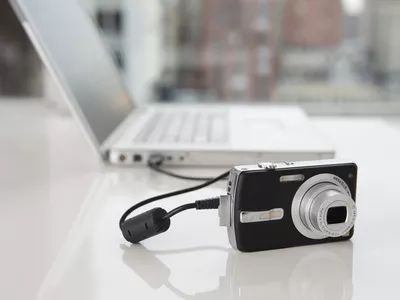
DVDs are not as nearly as popular as they were in the 2000s, simply because USB flash drives are much more durable than DVD discs. One of the easiest ways to back up the data stored on DVDs is to convert it to digital video file formats, like MOV or MP4 .
You cannot just copy and paste the data from a DVD or Blu-ray to a computer since you need file conversion software in order to change the format of a video file . Read on if you are looking for a way to convert a DVD to a digital video file format because in this article we are going to take you through some of the best DVD to digital format converters.
How to convert DVDs to Digital Video File Formats?
The process of converting a video file is simple, and anyone can perform it in just a few minutes even if they have never done it before. However, converting DVDs to digital file formats without permission is punishable by the law, so you must make sure that you have the right to use the file you created freely. Let’s take a look at some of the best DVD to digital format converters.
1. Vudu
Price: $2 - $5 per conversion
Compatibility: Android, iOS
Having a source of entertainment in your pocket wherever you go can make dull long journeys much more fun. Vudu allows you to manage your film collection directly from your Smartphone and have access to all your DVD and Blu-ray discs at any moment.

In order to start the conversion process, you just have to scan a disc’s barcode and the app will automatically convert it to a digital video file format. You can choose to convert a Blu-ray to HDX, DVD to SD or DVD to HDX, however, you will have to pay between $2 and $5 plus the tax for each file you convert with Vudu. Furthermore, the app features an impressive movie collection with more than 100,000 titles you can watch anytime and anywhere.
2. HandBrake
Price: Free
Compatibility: Windows
This open-source file converter can help you convert any DVD to a file format you choose effortlessly. PC users that have Windows 7 or later can install HandBrake for free, although the application only works on 64-bit versions of the OS.
You can choose from a variety of device presets that automatically adjust the conversion settings to a device on which the converted DVD video is going to be played. In addition, HandBrake lets you choose the output file format, set the preferred framerate or apply video filters such as Denoise , Grayscale or Deinterlacing. Nonetheless, HandBrake can only convert DVDs to MP4 or MKV file formats, which can considerably limit your conversion options.
3. Wondershare Uniconverter
Price: Freemium, $55.99 for the perpetual plan
Compatibility: Windows, macOS
If you are looking for a software product that enables you to burn DVDs, edit or transfer videos and convert them to more than a thousand video file formats, then Wondershare Unicoverter is undoubtedly one of the best choices you have at your disposal.

This cross-platform app converts files 30 times faster than any of its competitors because it supports GPU acceleration. In addition to excellent DVD file conversion capabilities, Uniconverter also offers VR conversion features and it allows you to combine and merge multiple video clips . Optionally, you can use this cross-platform app to add srt and other subtitle files to the videos you convert with it. You should keep in mind that the free version of Wondershare Uniconverter only lets you convert 1/3 of the output file and prevents recording videos that are longer than one minute.
4. DVDVideoSoft Free Video Converter
Price: Free
Compatibility: Windows
This is a simple tool that makes the process of converting a DVD to a digital video or audio file effortless. You just have to specify the source of the input video, then select the file format of the output video and optimize it for playback on a particular device by choosing one of the available Device presets.
You can easily convert DVDs to AVI, MP4, MKV, iPod, iPhone, Apple TV, Xbox or PS3 files with this video file converter. Extracting audio from DVD is yet another option DVDVideo Soft Free Video Converter provides, which enables you to extract dialogue or narration from video files. Even so, the software can only convert unprotected files, so you must make sure that the DVD you are trying to convert doesn’t have regional protection or any other form of encryption.
5. DVDFab DVD Ripper
Price: Free version available, pricing options start at $69
Compatibility: Windows, macOS
The range of the file conversion options this tool provides depends on the subscription model you’ve selected. In case you choose to convert your DVDs with the free version of the software, the number of discs you can open will not be limited but you won’t have access to all conversion profiles. Furthermore, you won’t have access to 4K and profiles and you will only get a free DVD Ripper account.
Both Full Trial and Paid versions of this DVD converter let you export multichannel audio files, but the free version limits the number of audio channels to just two. The resolution of the output videos cannot be higher than 480p regardless of the subscription model you choose, but you can purchase the Enlarger AI app separately and use it to upscale the videos up to 1080p.
6. WinX DVD Ripper Platinum
Price: $59.95
Compatibility: macOS, Windows
Backing up old DVDs, fixing playback errors on DVDs, or ripping a DVD to MP4 are some of the most common reasons why PC and Mac users choose to convert their DVDs with WinX DVD Ripper Platinum.

You can also convert encrypted or regional DVDs or choose to clone DVD to ISO without any quality losses. This DVD converter also offers simple video editing tools that allow you to trim videos, remove black bars, add subtitles or change the resolution of a video file. WinX DVD Ripper Platinum supports Level-3 Hardware Acceleration for Intel CPU, Nvidia or AMD GPU, so that you can convert an entire DVD into MP4 in just a few minutes.
Conclusion
Even though DVDs are no longer as popular as they once were, movie or music collectors can benefit from converting them to digital formats. Damaging a DVD is relatively easy, and backing up the data from your DVDs is probably the easiest way of ensuring that all your files are safe. Which DVD to digital format converter are you going to choose to convert your DVDs to digital video file format? Leave a comment and let us know.
Liza Brown
Liza Brown is a writer and a lover of all things video.
Follow @Liza Brown
Liza Brown
Mar 27, 2024• Proven solutions
DVDs are not as nearly as popular as they were in the 2000s, simply because USB flash drives are much more durable than DVD discs. One of the easiest ways to back up the data stored on DVDs is to convert it to digital video file formats, like MOV or MP4 .
You cannot just copy and paste the data from a DVD or Blu-ray to a computer since you need file conversion software in order to change the format of a video file . Read on if you are looking for a way to convert a DVD to a digital video file format because in this article we are going to take you through some of the best DVD to digital format converters.
How to convert DVDs to Digital Video File Formats?
The process of converting a video file is simple, and anyone can perform it in just a few minutes even if they have never done it before. However, converting DVDs to digital file formats without permission is punishable by the law, so you must make sure that you have the right to use the file you created freely. Let’s take a look at some of the best DVD to digital format converters.
1. Vudu
Price: $2 - $5 per conversion
Compatibility: Android, iOS
Having a source of entertainment in your pocket wherever you go can make dull long journeys much more fun. Vudu allows you to manage your film collection directly from your Smartphone and have access to all your DVD and Blu-ray discs at any moment.
In order to start the conversion process, you just have to scan a disc’s barcode and the app will automatically convert it to a digital video file format. You can choose to convert a Blu-ray to HDX, DVD to SD or DVD to HDX, however, you will have to pay between $2 and $5 plus the tax for each file you convert with Vudu. Furthermore, the app features an impressive movie collection with more than 100,000 titles you can watch anytime and anywhere.
2. HandBrake
Price: Free
Compatibility: Windows
This open-source file converter can help you convert any DVD to a file format you choose effortlessly. PC users that have Windows 7 or later can install HandBrake for free, although the application only works on 64-bit versions of the OS.
You can choose from a variety of device presets that automatically adjust the conversion settings to a device on which the converted DVD video is going to be played. In addition, HandBrake lets you choose the output file format, set the preferred framerate or apply video filters such as Denoise , Grayscale or Deinterlacing. Nonetheless, HandBrake can only convert DVDs to MP4 or MKV file formats, which can considerably limit your conversion options.
3. Wondershare Uniconverter
Price: Freemium, $55.99 for the perpetual plan
Compatibility: Windows, macOS
If you are looking for a software product that enables you to burn DVDs, edit or transfer videos and convert them to more than a thousand video file formats, then Wondershare Unicoverter is undoubtedly one of the best choices you have at your disposal.
This cross-platform app converts files 30 times faster than any of its competitors because it supports GPU acceleration. In addition to excellent DVD file conversion capabilities, Uniconverter also offers VR conversion features and it allows you to combine and merge multiple video clips . Optionally, you can use this cross-platform app to add srt and other subtitle files to the videos you convert with it. You should keep in mind that the free version of Wondershare Uniconverter only lets you convert 1/3 of the output file and prevents recording videos that are longer than one minute.
4. DVDVideoSoft Free Video Converter
Price: Free
Compatibility: Windows
This is a simple tool that makes the process of converting a DVD to a digital video or audio file effortless. You just have to specify the source of the input video, then select the file format of the output video and optimize it for playback on a particular device by choosing one of the available Device presets.
You can easily convert DVDs to AVI, MP4, MKV, iPod, iPhone, Apple TV, Xbox or PS3 files with this video file converter. Extracting audio from DVD is yet another option DVDVideo Soft Free Video Converter provides, which enables you to extract dialogue or narration from video files. Even so, the software can only convert unprotected files, so you must make sure that the DVD you are trying to convert doesn’t have regional protection or any other form of encryption.
5. DVDFab DVD Ripper
Price: Free version available, pricing options start at $69
Compatibility: Windows, macOS
The range of the file conversion options this tool provides depends on the subscription model you’ve selected. In case you choose to convert your DVDs with the free version of the software, the number of discs you can open will not be limited but you won’t have access to all conversion profiles. Furthermore, you won’t have access to 4K and profiles and you will only get a free DVD Ripper account.
Both Full Trial and Paid versions of this DVD converter let you export multichannel audio files, but the free version limits the number of audio channels to just two. The resolution of the output videos cannot be higher than 480p regardless of the subscription model you choose, but you can purchase the Enlarger AI app separately and use it to upscale the videos up to 1080p.
6. WinX DVD Ripper Platinum
Price: $59.95
Compatibility: macOS, Windows
Backing up old DVDs, fixing playback errors on DVDs, or ripping a DVD to MP4 are some of the most common reasons why PC and Mac users choose to convert their DVDs with WinX DVD Ripper Platinum.
You can also convert encrypted or regional DVDs or choose to clone DVD to ISO without any quality losses. This DVD converter also offers simple video editing tools that allow you to trim videos, remove black bars, add subtitles or change the resolution of a video file. WinX DVD Ripper Platinum supports Level-3 Hardware Acceleration for Intel CPU, Nvidia or AMD GPU, so that you can convert an entire DVD into MP4 in just a few minutes.
Conclusion
Even though DVDs are no longer as popular as they once were, movie or music collectors can benefit from converting them to digital formats. Damaging a DVD is relatively easy, and backing up the data from your DVDs is probably the easiest way of ensuring that all your files are safe. Which DVD to digital format converter are you going to choose to convert your DVDs to digital video file format? Leave a comment and let us know.
Liza Brown
Liza Brown is a writer and a lover of all things video.
Follow @Liza Brown
Thumbnail Mastery: Boost Your YouTube Video’s Visibility with These Pro Tips
YouTube Thumbnail Size Template & Practical Tactics for You
An easy yet powerful editor
Numerous effects to choose from
Detailed tutorials provided by the official channel
A YouTube thumbnail is like a cover page of your video that creates the first impression. Though a default thumbnail is created for each video by YouTube, you can always customize it and make it more appealing and attractive.

More in detail about Youtube thumbnail size template, tips, and others can be learned from the following content.
In this article
01 [Youtube Thumbnail Specifications](#Part 1)
02 [Youtube Thumbnail Templates](#Part 2)
03 [Top 5 Tips for Creating Effective Thumbnails](#Part 3)
04 [How to Add a Customized Thumbnail to a Youtube Video](#Part 4)
Part 1 YouTube Thumbnail Specifications
To stand out from the crowd and create an impact over the viewers, a well-customized thumbnail works great. A customized thumbnail proves effective in ways more than one like encouraging attention, increasing engagement, giving a professional look, portraying your personality, and much more. The right size of the thumbnail is an important consideration and the following are the suggested YouTube video thumbnail dimensions.
● An ideal width and height of YouTube thumbnail size is 1280 X 720 pixels
● The size of the thumbnail should be kept under 2MB.
● Use the thumbnail in JPEG, PNG, BMP, or GIF format.
● The ideal thumbnail ratio for YouTube has to be kept at 16:9.
● The width of the thumbnail should not be less than 640 pixels.

Part 2 YouTube Thumbnail Templates
If you are struggling to find the right thumbnail for your video, templates are a great rescue. There are several sites and programs where you can find multiple templates that can be customized and edited to suit your requirements. We have shortlisted a few sites where you can check different types of interesting templates for the YouTube thumbnails.
● Canva: This online site has a huge collection of free as well as paid video thumbnails in different categories, and types. You can filter the collection of templates based on style and theme. The templates can be further customized as needed after which they can be downloaded to be used on YouTube.

● VistaCreate: Interesting template designs are available at this site to be used as a YouTube video thumbnail. You can even create your own design or customize the ones available. The site also has an option to choose the desired thumbnail design using the search bar.

● Postermywall: YouTube templates in an array of designs, themes, and genres are available at this site. There are also Youtube Thumbnail Size Template and from these you can choose the one that matches the personality of your video and customize it as per the requirements. The search bar to look for your choice of template is also available.

● Visme: Templates for all types of video thumbnails are available at this site to choose from. You simply need to choose the template as per your choice and you are all set to have an impressive thumbnail for your video. You can even look for your choice of design using the search bar.

● Snappa: There is a wide selection of templates in different categories at this site that can be used for creating a customized thumbnail for your YouTube videos. The templates are free and you need to create a free account on the site to use them.

Part 3 Top 5 Tips For Creating Effective Thumbnails
To make your thumbnails interesting and effective we have shortlisted a few useful tips as below.
● Keep it clutter-free: It’s always good to keep your thumbnail simple and clean without any clutter. If you use too many elements in a thumbnail, they will look messy when watched on a mobile device.
● Using a still image from the video: Though you can set a customized thumbnail for your videos, an automatic image is also selected by YouTube. It might be a possibility that the image automatically selected is good enough and effective and thus creating a customized thumbnail is not required.
● Using editing software like Wondershare Filmora Video Editor for creating customized graphics: A good editing software can be used for creating an effective and impressive image. Wondershare Filmora is one such professional tool that can be considered. This Windows and Mac-based program can let you edit your images using multiple features. Simple and fast to use, the software also supports batch processing so that multiple files as thumbnails for multiple videos can be created at a time. Additional features supported by the software include motion tracking, adding text and tiles, adding overlays and filters, adding transitions and elements, color tuning, and more.
Wondershare Filmora
Get started easily with Filmora’s powerful performance, intuitive interface, and countless effects Try It Free Try It Free Learn More >

● Use eye-catchy titles: Using catchy titles in your thumbnails is an effective way to grab the attention of the viewers. A title will give a glimpse to the viewers of the content of the video.
● Try different designs: If you are not sure about a thumbnail design, create multiple ones and then add them to the video one by one. Select the design that goes best and looks attractive.

Part 4 How to Add A Customized Thumbnail To A Youtube Video
Once a customized thumbnail image is created, the next step is to add it to the video on your YouTube. The process is simple and quick and involves the following steps.
Step 1. Open your YouTube account and add the new video using the camera-plus icon. Alternatively, to add a thumbnail to the already uploaded video, go to the Studio dashboard and tap on the video for editing the settings.
Step 2. At the bottom of the video settings window, you can see the 3 thumbnails generated automatically. To upload the customized image, click on the Custom thumbnail box at the bottom right-hand side.
Step 3. Browse and import the created thumbnail image and click on the Upload button.
The selected image will not be used as the thumbnail for the video.

Key Takeaways from This Episode
● A YouTube thumbnail works as the cover for your video and is the first thing that will get the attention and the interest of the viewer.
● YouTube video thumbnail dimensions as recommended must be used.
● Several pre-designed templates are available for creating interesting thumbnails.
● To create an effective thumbnail, several tips and tricks can be used like using editing software like Wondershare Filmora.
A YouTube thumbnail is like a cover page of your video that creates the first impression. Though a default thumbnail is created for each video by YouTube, you can always customize it and make it more appealing and attractive.
More in detail about Youtube thumbnail size template, tips, and others can be learned from the following content.
In this article
01 [Youtube Thumbnail Specifications](#Part 1)
02 [Youtube Thumbnail Templates](#Part 2)
03 [Top 5 Tips for Creating Effective Thumbnails](#Part 3)
04 [How to Add a Customized Thumbnail to a Youtube Video](#Part 4)
Part 1 YouTube Thumbnail Specifications
To stand out from the crowd and create an impact over the viewers, a well-customized thumbnail works great. A customized thumbnail proves effective in ways more than one like encouraging attention, increasing engagement, giving a professional look, portraying your personality, and much more. The right size of the thumbnail is an important consideration and the following are the suggested YouTube video thumbnail dimensions.
● An ideal width and height of YouTube thumbnail size is 1280 X 720 pixels
● The size of the thumbnail should be kept under 2MB.
● Use the thumbnail in JPEG, PNG, BMP, or GIF format.
● The ideal thumbnail ratio for YouTube has to be kept at 16:9.
● The width of the thumbnail should not be less than 640 pixels.
Part 2 YouTube Thumbnail Templates
If you are struggling to find the right thumbnail for your video, templates are a great rescue. There are several sites and programs where you can find multiple templates that can be customized and edited to suit your requirements. We have shortlisted a few sites where you can check different types of interesting templates for the YouTube thumbnails.
● Canva: This online site has a huge collection of free as well as paid video thumbnails in different categories, and types. You can filter the collection of templates based on style and theme. The templates can be further customized as needed after which they can be downloaded to be used on YouTube.
● VistaCreate: Interesting template designs are available at this site to be used as a YouTube video thumbnail. You can even create your own design or customize the ones available. The site also has an option to choose the desired thumbnail design using the search bar.
● Postermywall: YouTube templates in an array of designs, themes, and genres are available at this site. There are also Youtube Thumbnail Size Template and from these you can choose the one that matches the personality of your video and customize it as per the requirements. The search bar to look for your choice of template is also available.
● Visme: Templates for all types of video thumbnails are available at this site to choose from. You simply need to choose the template as per your choice and you are all set to have an impressive thumbnail for your video. You can even look for your choice of design using the search bar.
● Snappa: There is a wide selection of templates in different categories at this site that can be used for creating a customized thumbnail for your YouTube videos. The templates are free and you need to create a free account on the site to use them.
Part 3 Top 5 Tips For Creating Effective Thumbnails
To make your thumbnails interesting and effective we have shortlisted a few useful tips as below.
● Keep it clutter-free: It’s always good to keep your thumbnail simple and clean without any clutter. If you use too many elements in a thumbnail, they will look messy when watched on a mobile device.
● Using a still image from the video: Though you can set a customized thumbnail for your videos, an automatic image is also selected by YouTube. It might be a possibility that the image automatically selected is good enough and effective and thus creating a customized thumbnail is not required.
● Using editing software like Wondershare Filmora Video Editor for creating customized graphics: A good editing software can be used for creating an effective and impressive image. Wondershare Filmora is one such professional tool that can be considered. This Windows and Mac-based program can let you edit your images using multiple features. Simple and fast to use, the software also supports batch processing so that multiple files as thumbnails for multiple videos can be created at a time. Additional features supported by the software include motion tracking, adding text and tiles, adding overlays and filters, adding transitions and elements, color tuning, and more.
Wondershare Filmora
Get started easily with Filmora’s powerful performance, intuitive interface, and countless effects Try It Free Try It Free Learn More >
● Use eye-catchy titles: Using catchy titles in your thumbnails is an effective way to grab the attention of the viewers. A title will give a glimpse to the viewers of the content of the video.
● Try different designs: If you are not sure about a thumbnail design, create multiple ones and then add them to the video one by one. Select the design that goes best and looks attractive.
Part 4 How to Add A Customized Thumbnail To A Youtube Video
Once a customized thumbnail image is created, the next step is to add it to the video on your YouTube. The process is simple and quick and involves the following steps.
Step 1. Open your YouTube account and add the new video using the camera-plus icon. Alternatively, to add a thumbnail to the already uploaded video, go to the Studio dashboard and tap on the video for editing the settings.
Step 2. At the bottom of the video settings window, you can see the 3 thumbnails generated automatically. To upload the customized image, click on the Custom thumbnail box at the bottom right-hand side.
Step 3. Browse and import the created thumbnail image and click on the Upload button.
The selected image will not be used as the thumbnail for the video.
Key Takeaways from This Episode
● A YouTube thumbnail works as the cover for your video and is the first thing that will get the attention and the interest of the viewer.
● YouTube video thumbnail dimensions as recommended must be used.
● Several pre-designed templates are available for creating interesting thumbnails.
● To create an effective thumbnail, several tips and tricks can be used like using editing software like Wondershare Filmora.
The Best Timecode Calculators : A Comprehensive Review
8 Best Timecode Calculator to Use (online/iPhone/Android)

Shanoon Cox
Mar 27, 2024• Proven solutions
For professionals using video editing tools and film makers, timecode calculator is not a new thing. But, novice users trying to start with such a tool needs to know what exactly it stands for and what will it offer to them. Real-time timecode calculator can be bought, but the market also has some brilliant free of cost tools for your rescue.
This software performs depending on the operations over video timings. Adding, subtracting, dividing or multiplying fragments of videos tapes in various formats can be done using the timecode calculating tool. You can even convert calculated values without submitting the values again between formats.
Recommended Timecode Calculator on PC - Filmora
If you want to have a powerful yet intuitive timecode calculator, we recommend using Filmora to calculate timecode. It is a build in effects, so just drag and drop to use. The timecode is precise without loss. The steps are also easy to start. Don’t need to worry about complex operations. Just download it now to have a try!
- Drag video clip to timeline
- Drag timecode effect to video clip. Now, timecode calculator is generated
- You can show millisecond, frames and scale of timecode. You can also change text color and opacity.
 Download Mac Version ](https://tools.techidaily.com/wondershare/filmora/download/ )
Part 1: Best online timecode calculator
Here comes the list of reliable timecode calculators –
1. Michael Cinquin
This online timecode calculator has an integrated keykode (keycode) calculator as well. The timecode calculator allows you to decide the frames per second, whereas keykode calculator helps in finalizing what type of film you are choosing.
Features
- You can convert a timecode to images with this tool.
- Images can be added or subtracted from a keycode.
- Timecode can be added or subtracted to a timecode.
- Computing number of images between 2 keycodes is possible.

2. Zapstudio
Using this free online timecode calculator, you can calculate time out of frames and frames out of time easily. The timecode used here follows SMTPE format denoting HOURS:MINUTES:SECONDS:FRAMES.
Features
- You can set the frame rate for converting frames to time and time to frames.
- You can calculate the time between the ‘IN’ and ‘OUT’ point here.
- You can also set how slow you can make the clip by altering the clip framerate and project framerate.

3. Omni
This timecode calculator has an attractive interface but with plenty of Ads to confuse the user. The plus side is it comes with instructions and examples in the page to use the timecode calculator.
Features
- The site allows you to enter frames and frames per second, and the result is published just below the input values.
- You can share the result by email or on social media sites by tapping the ‘Send this result’ button.
- The values can be reset by pressing the ‘Refresh’ icon.

4. Kodak
This timecode calculator from the film making expert Kodak is awesome. You need to enter your location though, while starting to calculate timecode.
Features
- It allows you to calculate feet, speed, time, and frames.
- The speed here denotes frames per second.
- You can alter the feet, which is otherwise constant while calculating the timecode. It affects the overall values.

Part 2: Best timecode calculator apps
When it comes to calculate timecode using an online timecode calculator app on your Smartphone, you have a list of them too.
5. Daan van de Westelaken
This is an iOS app available directly to be installed on your iPhone from the official website. It is also known as Simple Timecode Calculator.
Features
- It supports iOS 8 and above compatible iPhones.
- It helps you to multiply, add, subtract or divide video files utilizing major frame rates.
- This iOS app comes with an inbuilt ticker tape function that is activated the moment you rotate the iPhone to landscape orientation.
- You can assign the onscreen input value to any of the 2 memory buttons by holding down that button.

6. TcCalc
This Android app is meant for video and film timecode calculations. It is compatible with all frame rates.
Features
- TcCalc’s supported frame rates are 23.98, 24, 25, 29.97, 30, 50, 59.94, and 60.
- It even supports the drop and not drop time codes.
- You can calculate timecodes and switch the values, while the current frame value stays intact.
- Standard timecode strings and frame values are the output formats for timecodes.

7. TimeCode Calculator
This Android app is a paid one available on Google Play Store that you can buy for approximately $2.58. It is essential for timecode calculations that supports IN and OUT timecode for converting to and from frames.
Features
- You can gauge the differences between fps rate supporting drop and non drop –NTSC (SMTPE-12M-1-2008), and PAL.
- It can help you edit films and videos and cut them as well with fps ranging from 10 and beyond.
- Timecode calculation is supported for addition, subtraction, division and multiplication as well as RCL STO.

8. Timecode
It supports iOS versions higher than iOS 8 on iPhone, iPad, and iPod Touch. It enables you to calculate and convert one timecode to the other or any other unit with a single click.
Features
- It has 10 unique preset formats.
- There are 10 preset frame rates and units with this iOS app.
- Timecode calculation and footage is cakewalk with intuitive app.

Conclusion
From the above article, we have a huge list of timecode calculator for 25fps and other fps that you can utilize to make interesting films. While picking the timecode calculator ensure that the software or app meets your purpose to avoid any issues.
Download Mac Version ](https://tools.techidaily.com/wondershare/filmora/download/ )
Shanoon Cox
Shanoon Cox is a writer and a lover of all things video.
Follow @Shanoon Cox
Shanoon Cox
Mar 27, 2024• Proven solutions
For professionals using video editing tools and film makers, timecode calculator is not a new thing. But, novice users trying to start with such a tool needs to know what exactly it stands for and what will it offer to them. Real-time timecode calculator can be bought, but the market also has some brilliant free of cost tools for your rescue.
This software performs depending on the operations over video timings. Adding, subtracting, dividing or multiplying fragments of videos tapes in various formats can be done using the timecode calculating tool. You can even convert calculated values without submitting the values again between formats.
Recommended Timecode Calculator on PC - Filmora
If you want to have a powerful yet intuitive timecode calculator, we recommend using Filmora to calculate timecode. It is a build in effects, so just drag and drop to use. The timecode is precise without loss. The steps are also easy to start. Don’t need to worry about complex operations. Just download it now to have a try!
- Drag video clip to timeline
- Drag timecode effect to video clip. Now, timecode calculator is generated
- You can show millisecond, frames and scale of timecode. You can also change text color and opacity.
Download Mac Version ](https://tools.techidaily.com/wondershare/filmora/download/ )
Part 1: Best online timecode calculator
Here comes the list of reliable timecode calculators –
1. Michael Cinquin
This online timecode calculator has an integrated keykode (keycode) calculator as well. The timecode calculator allows you to decide the frames per second, whereas keykode calculator helps in finalizing what type of film you are choosing.
Features
- You can convert a timecode to images with this tool.
- Images can be added or subtracted from a keycode.
- Timecode can be added or subtracted to a timecode.
- Computing number of images between 2 keycodes is possible.
2. Zapstudio
Using this free online timecode calculator, you can calculate time out of frames and frames out of time easily. The timecode used here follows SMTPE format denoting HOURS:MINUTES:SECONDS:FRAMES.
Features
- You can set the frame rate for converting frames to time and time to frames.
- You can calculate the time between the ‘IN’ and ‘OUT’ point here.
- You can also set how slow you can make the clip by altering the clip framerate and project framerate.
3. Omni
This timecode calculator has an attractive interface but with plenty of Ads to confuse the user. The plus side is it comes with instructions and examples in the page to use the timecode calculator.
Features
- The site allows you to enter frames and frames per second, and the result is published just below the input values.
- You can share the result by email or on social media sites by tapping the ‘Send this result’ button.
- The values can be reset by pressing the ‘Refresh’ icon.
4. Kodak
This timecode calculator from the film making expert Kodak is awesome. You need to enter your location though, while starting to calculate timecode.
Features
- It allows you to calculate feet, speed, time, and frames.
- The speed here denotes frames per second.
- You can alter the feet, which is otherwise constant while calculating the timecode. It affects the overall values.
Part 2: Best timecode calculator apps
When it comes to calculate timecode using an online timecode calculator app on your Smartphone, you have a list of them too.
5. Daan van de Westelaken
This is an iOS app available directly to be installed on your iPhone from the official website. It is also known as Simple Timecode Calculator.
Features
- It supports iOS 8 and above compatible iPhones.
- It helps you to multiply, add, subtract or divide video files utilizing major frame rates.
- This iOS app comes with an inbuilt ticker tape function that is activated the moment you rotate the iPhone to landscape orientation.
- You can assign the onscreen input value to any of the 2 memory buttons by holding down that button.
6. TcCalc
This Android app is meant for video and film timecode calculations. It is compatible with all frame rates.
Features
- TcCalc’s supported frame rates are 23.98, 24, 25, 29.97, 30, 50, 59.94, and 60.
- It even supports the drop and not drop time codes.
- You can calculate timecodes and switch the values, while the current frame value stays intact.
- Standard timecode strings and frame values are the output formats for timecodes.
7. TimeCode Calculator
This Android app is a paid one available on Google Play Store that you can buy for approximately $2.58. It is essential for timecode calculations that supports IN and OUT timecode for converting to and from frames.
Features
- You can gauge the differences between fps rate supporting drop and non drop –NTSC (SMTPE-12M-1-2008), and PAL.
- It can help you edit films and videos and cut them as well with fps ranging from 10 and beyond.
- Timecode calculation is supported for addition, subtraction, division and multiplication as well as RCL STO.
8. Timecode
It supports iOS versions higher than iOS 8 on iPhone, iPad, and iPod Touch. It enables you to calculate and convert one timecode to the other or any other unit with a single click.
Features
- It has 10 unique preset formats.
- There are 10 preset frame rates and units with this iOS app.
- Timecode calculation and footage is cakewalk with intuitive app.
Conclusion
From the above article, we have a huge list of timecode calculator for 25fps and other fps that you can utilize to make interesting films. While picking the timecode calculator ensure that the software or app meets your purpose to avoid any issues.
Download Mac Version ](https://tools.techidaily.com/wondershare/filmora/download/ )
Shanoon Cox
Shanoon Cox is a writer and a lover of all things video.
Follow @Shanoon Cox
We’re Going to Take a Look at some of the Alternatives to Adobe Rush Out There, Which May Be More Capable of Getting the Job Done
Top 4 Alternatives to Adobe Premiere Rush
Liza Brown
Mar 27, 2024• Proven solutions
Adobe have recently released their new multi-platform video editing tool named Adobe Rush . It promises to be the first of its type in the world, allowing hassle video editing and publishing to a multitude of platforms.

Dubbed the video editing tool for the YouTube generation, having been designed from the ground up for online video creators. Editing is simple via its suite of audio and visual tools, including title screens, transition effects and color adjustment tools. Export is optimized for all social platforms available, including Vimeo, Facebook, Twitter and Snapchat.
Despite the promise of the perfect video editing tool, it’s not been entirely warmly received. Some complain that the editing tools are just too basic, others that the price is uncompetitive. Other issues have been raised with slow rendering capabilities and general instability of the platform, causing crashes that can set projects back by hours.
We’re going to take a look at some of the alternatives to Adobe Rush out there, which may be more capable of getting the job done.
Shortages of Adobe Rush
System requirements
| Devices | Requirements |
|---|---|
| PC | Windows 10 (v1709 or later) |
| 8 GB of RAM | |
| 8 GB of available hard-disk space | |
| Multicore processor with 64-bit support | |
| Mac | macOS 10.13 or later |
| 8 GB of RAM | |
| 8 GB of available hard-disk space | |
| Multicore Intel processor with 64-bit support | |
| iPhone/iPad | iOS 11 or later |
| iPhone 7 and newer (devices with A9 ARM chip or higher) | |
| Android | Not available now |
Windows users will need to be upgraded to the latest version of the operating system, at least version 1709 as a minimum. You’ll also need at least 8GB of RAM if you want to avoid the system crashing every time you use it.
Despite having computers that meet the required spec, numerous users have complained that Adobe Rush is buggy and repeatedly crashes. Some say that the laggy performance makes it almost impossible to use.
An alternative is to use Rush on your iPhone, but for this you’ll need to own at least an iPhone 7, preferably something newer. In testing, we found it to be very slow, even on an iPhone X. If you’re an Android user, you’ll need to wait to experience the ‘Rush’, because this software is not available for your handset yet. Adobe have said they are working on it and how to have it ready at some point in 2019.
Performance
As a video editing tool, it’s fairly competent, but for anything more than the basics, it’s somewhat lacking. Many of the most basic video editing tools are missing, and the platform supports only three transitions, so if you’re into making longer or more complex videos, its just not going to work.
In terms of rendering, we found it incredibly slow in comparison to some of the alternatives to Adobe Rush. The background music choices are pretty limited too, and most of it is not what you want accompanying your cutting-edge videos.
What really broke the deal for us was the inability to specify the output of your video files. This means that although social sharing could be OK, you’re going to be stuck if you want to share it in other locations. It’s great to see a video editing app on iPhone, but overall, it’s really nothing special.
Price
If you already subscribe to the Adobe Create Cloud (CC) suite, then Rush will be included in your subscription. However, if you want to subscribe to it as a standalone app, the price is $9.99 a month for individuals. This is not particularly competitive with the alternatives to Premier Rush, and could be prohibitively expensive for the hobbyist, which is, after all, the market Adobe are aiming at.
Alternatives to Adobe Rush for All Platforms
While Adobe are marketing Rush as a ‘cross platform’ video editor, there are alternatives to Premier Rush which do the job just as well, if not better, and often for a lot less.
1. For Windows - Wondershare Filmora
We love Wondershare Filmora as an alternative to Adobe Rush for Windows. Unlike Rush, you can pick and choose your video output format, as Filmora is compatible with all major video file types including mp4, FLV, MKV, AVI, MOV and more. Instead of being limited to a handful of basic effects, Filmora supports more than 300 high performance effects and filters to perfect your visual appeal.
 Download Mac Version ](https://tools.techidaily.com/wondershare/filmora/download/ )
As well as being a video editor, Filmora is a working audio editor too, featuring a full mixer and equalizer to bring your music and speech to life. There’re no transitional limitations, and you can even use green-screen technology, tilt-shift and jump cut features to make your videos pop.

Each video can use up to 99 timelines to make it easier to edit and customize your work. Finally, and a big plus for many of us, you don’t need to have the latest and best PC in order to use this software. Wondershare Filmora works on Windows 7, 8 and 10, and requires only 3GB of RAM. If you want to work in HD or 4K quality, however, you will need 8GB RAM.
2. For Mac - iMovie
iMovie is a powerful editing tool designed for iOS and perfect to use on a Mac. Using your own photos and videos, you can create polished movies complete with titles and even a credits roll. It’s great for turning memories into beautiful keepsakes, which can then be shared with family and friends via social media or direct from your Apple device.
Check this article to see thecomparison between Adobe Rush and Apple iMovie

The user-friendly interface makes it possible for even the most novice of users to harness the power of digital video editing. Complete with templates and easy to use tools, even beginners can make high quality trailers, logos and cinema like productions.
iMovie lets users access a number of special effects and enhancements, as well as ten filters to improve the images. Music can be chosen from their own library, and narrative voice overs are possible too. We think iMovie is one of the best alternatives to Adobe Rush available for Mac.
3. For Android - Filmora
As Rush is not yet available for the Android platform, users must look for alternatives to Premier Rush if they want to go ahead and start making movies. Filmora is a great solution, as powerful as most of the desktop editors you’ll come across and with all the features you need to get started.
Clips can be selected from your own device, or from Facebook or Google, and then added into your project folder to be created into a movie. They can then be arranged into a handy timeline, using simple drag and drop functionality which is easy for even beginners to master. There are even in-built themes which you can try out to turn your home movies into something special.
For switching between stills or video clips, there are a raft of fun transitions available to make it a more cohesive production. You can adjust colors, brightness, speed and more, as well as adding in subtitles and editing in music. One of the best features of this software is the picture-in-picture function, where you can add another video or still over the main one. It’s free and amazing fun, and we think one of the best alternatives to Adobe Rush for Android.
4. For iOS - LumaFusion
LumaFusion is a powerful multi track video editor which has been built for the mobile marketplace. It’s widely used by professional filmmakers and journalists, which is why we’ve picked it as one of the best alternatives to Premier Rush for iOS users.

It’s not the easiest app to get started with, but the creators have made a ton of tutorial videos to help you get to grips with it. Capability wise, it’s amazing, with up to three tracks for photos, videos, graphic and titles as well as an additional three audio tracks for narration, music and sound effects.
Video editing includes a wealth of special effects, from color correction tools to transitions, as well as an audio track mixer which can be adjusted on the fly. Title pages can be created, as well as adapting the speed and ratio of playback. Sharing the finished project can be done via social media, cloud storage, disk storage and more.
Conclusion
It’s great to see more software like Adobe Rush coming onto the market; however, it’s important to realize that, despite the hype, there may still be drawbacks to some of these systems. For us, Adobe Rush was exactly that something for editing videos in a rush. If you’re serious about making awesome clips though, investigating some of these alternatives to Adobe Rush.
Before you shell out the high subscription price for Adobe products, it’s worth considering what you really want from your software. Having some goals in mind will allow you to compare the different alternatives to Premier Rush to see where the best value for money lies.
Liza Brown
Liza Brown is a writer and a lover of all things video.
Follow @Liza Brown
Liza Brown
Mar 27, 2024• Proven solutions
Adobe have recently released their new multi-platform video editing tool named Adobe Rush . It promises to be the first of its type in the world, allowing hassle video editing and publishing to a multitude of platforms.
Dubbed the video editing tool for the YouTube generation, having been designed from the ground up for online video creators. Editing is simple via its suite of audio and visual tools, including title screens, transition effects and color adjustment tools. Export is optimized for all social platforms available, including Vimeo, Facebook, Twitter and Snapchat.
Despite the promise of the perfect video editing tool, it’s not been entirely warmly received. Some complain that the editing tools are just too basic, others that the price is uncompetitive. Other issues have been raised with slow rendering capabilities and general instability of the platform, causing crashes that can set projects back by hours.
We’re going to take a look at some of the alternatives to Adobe Rush out there, which may be more capable of getting the job done.
Shortages of Adobe Rush
System requirements
| Devices | Requirements |
|---|---|
| PC | Windows 10 (v1709 or later) |
| 8 GB of RAM | |
| 8 GB of available hard-disk space | |
| Multicore processor with 64-bit support | |
| Mac | macOS 10.13 or later |
| 8 GB of RAM | |
| 8 GB of available hard-disk space | |
| Multicore Intel processor with 64-bit support | |
| iPhone/iPad | iOS 11 or later |
| iPhone 7 and newer (devices with A9 ARM chip or higher) | |
| Android | Not available now |
Windows users will need to be upgraded to the latest version of the operating system, at least version 1709 as a minimum. You’ll also need at least 8GB of RAM if you want to avoid the system crashing every time you use it.
Despite having computers that meet the required spec, numerous users have complained that Adobe Rush is buggy and repeatedly crashes. Some say that the laggy performance makes it almost impossible to use.
An alternative is to use Rush on your iPhone, but for this you’ll need to own at least an iPhone 7, preferably something newer. In testing, we found it to be very slow, even on an iPhone X. If you’re an Android user, you’ll need to wait to experience the ‘Rush’, because this software is not available for your handset yet. Adobe have said they are working on it and how to have it ready at some point in 2019.
Performance
As a video editing tool, it’s fairly competent, but for anything more than the basics, it’s somewhat lacking. Many of the most basic video editing tools are missing, and the platform supports only three transitions, so if you’re into making longer or more complex videos, its just not going to work.
In terms of rendering, we found it incredibly slow in comparison to some of the alternatives to Adobe Rush. The background music choices are pretty limited too, and most of it is not what you want accompanying your cutting-edge videos.
What really broke the deal for us was the inability to specify the output of your video files. This means that although social sharing could be OK, you’re going to be stuck if you want to share it in other locations. It’s great to see a video editing app on iPhone, but overall, it’s really nothing special.
Price
If you already subscribe to the Adobe Create Cloud (CC) suite, then Rush will be included in your subscription. However, if you want to subscribe to it as a standalone app, the price is $9.99 a month for individuals. This is not particularly competitive with the alternatives to Premier Rush, and could be prohibitively expensive for the hobbyist, which is, after all, the market Adobe are aiming at.
Alternatives to Adobe Rush for All Platforms
While Adobe are marketing Rush as a ‘cross platform’ video editor, there are alternatives to Premier Rush which do the job just as well, if not better, and often for a lot less.
1. For Windows - Wondershare Filmora
We love Wondershare Filmora as an alternative to Adobe Rush for Windows. Unlike Rush, you can pick and choose your video output format, as Filmora is compatible with all major video file types including mp4, FLV, MKV, AVI, MOV and more. Instead of being limited to a handful of basic effects, Filmora supports more than 300 high performance effects and filters to perfect your visual appeal.
Download Mac Version ](https://tools.techidaily.com/wondershare/filmora/download/ )
As well as being a video editor, Filmora is a working audio editor too, featuring a full mixer and equalizer to bring your music and speech to life. There’re no transitional limitations, and you can even use green-screen technology, tilt-shift and jump cut features to make your videos pop.
Each video can use up to 99 timelines to make it easier to edit and customize your work. Finally, and a big plus for many of us, you don’t need to have the latest and best PC in order to use this software. Wondershare Filmora works on Windows 7, 8 and 10, and requires only 3GB of RAM. If you want to work in HD or 4K quality, however, you will need 8GB RAM.
2. For Mac - iMovie
iMovie is a powerful editing tool designed for iOS and perfect to use on a Mac. Using your own photos and videos, you can create polished movies complete with titles and even a credits roll. It’s great for turning memories into beautiful keepsakes, which can then be shared with family and friends via social media or direct from your Apple device.
Check this article to see thecomparison between Adobe Rush and Apple iMovie
The user-friendly interface makes it possible for even the most novice of users to harness the power of digital video editing. Complete with templates and easy to use tools, even beginners can make high quality trailers, logos and cinema like productions.
iMovie lets users access a number of special effects and enhancements, as well as ten filters to improve the images. Music can be chosen from their own library, and narrative voice overs are possible too. We think iMovie is one of the best alternatives to Adobe Rush available for Mac.
3. For Android - Filmora
As Rush is not yet available for the Android platform, users must look for alternatives to Premier Rush if they want to go ahead and start making movies. Filmora is a great solution, as powerful as most of the desktop editors you’ll come across and with all the features you need to get started.
Clips can be selected from your own device, or from Facebook or Google, and then added into your project folder to be created into a movie. They can then be arranged into a handy timeline, using simple drag and drop functionality which is easy for even beginners to master. There are even in-built themes which you can try out to turn your home movies into something special.
For switching between stills or video clips, there are a raft of fun transitions available to make it a more cohesive production. You can adjust colors, brightness, speed and more, as well as adding in subtitles and editing in music. One of the best features of this software is the picture-in-picture function, where you can add another video or still over the main one. It’s free and amazing fun, and we think one of the best alternatives to Adobe Rush for Android.
4. For iOS - LumaFusion
LumaFusion is a powerful multi track video editor which has been built for the mobile marketplace. It’s widely used by professional filmmakers and journalists, which is why we’ve picked it as one of the best alternatives to Premier Rush for iOS users.
It’s not the easiest app to get started with, but the creators have made a ton of tutorial videos to help you get to grips with it. Capability wise, it’s amazing, with up to three tracks for photos, videos, graphic and titles as well as an additional three audio tracks for narration, music and sound effects.
Video editing includes a wealth of special effects, from color correction tools to transitions, as well as an audio track mixer which can be adjusted on the fly. Title pages can be created, as well as adapting the speed and ratio of playback. Sharing the finished project can be done via social media, cloud storage, disk storage and more.
Conclusion
It’s great to see more software like Adobe Rush coming onto the market; however, it’s important to realize that, despite the hype, there may still be drawbacks to some of these systems. For us, Adobe Rush was exactly that something for editing videos in a rush. If you’re serious about making awesome clips though, investigating some of these alternatives to Adobe Rush.
Before you shell out the high subscription price for Adobe products, it’s worth considering what you really want from your software. Having some goals in mind will allow you to compare the different alternatives to Premier Rush to see where the best value for money lies.
Liza Brown
Liza Brown is a writer and a lover of all things video.
Follow @Liza Brown
Also read:
- Updated 2024 Approved Animate Like a Pro The Top 7 Drawing Software for Aspiring Animators
- Updated 2024 Approved Brighten Up Best Video Editing Tools for Luminance Control
- New Make a Blockbuster Trailer Best Software for Mac and Windows
- In 2024, Free Sound Effects for FCP A Beginners Guide to Elevating Your Video Editing Game
- New Convert Soundcloud Music to MP3 with Ease Proven Methods
- Updated Getting Started with VN Video Editor on PC A Review for 2024
- Updated Create Stunning Lyric Videos with These Top Online Tools for 2024
- New In 2024, Unlock Efficient Writing Top Mac Speech-to-Text Tools That Are Free, Easy, and Instantly Accessible
- New 2024 Approved S Hottest 4K/8K Video Editing Tools A Comprehensive Guide
- Updated In 2024, Ways to Find a Suitable YouTube to MP3 Converter
- New Rewind to the Past Top Apps for Adding Retro VHS Effects to Your Videos for 2024
- In 2024, Free to Create Top 14 Watermark-Free Video Editing Software and Beyond
- In 2024, Unlock Pro-Quality Edits Top 1080P Video Editing Tools
- New In 2024, Transform Your Content with the Best 3D Video Generators
- New In 2024, Speed Up Your Video Editing Workflow Essential Tips for Cutting Large Videos on Mac
- Updated Capture and Share The Ultimate Guide to PS4 Screenshot Sharing for 2024
- New Make a Statement with These WhatsApp Status Builder Apps
- 2024 Approved Top-Rated Gaming Intro Makers for PC and Mac Paid and Free Solutions
- New Best Tips for Effortless Unity 3D Animation for 2024
- How to Successfully Bypass iCloud Activation Lock from iPhone 8
- Why Your WhatsApp Location is Not Updating and How to Fix On Oppo Reno 11F 5G | Dr.fone
- Authentication Error Occurred on Realme V30? Here Are 10 Proven Fixes | Dr.fone
- In 2024, How to Bypass FRP on Itel?
- How To Track IMEI Number Of Poco M6 Pro 4G Through Google Earth?
- In 2024, Pokemon Go No GPS Signal? Heres Every Possible Solution On OnePlus Ace 2V | Dr.fone
- In 2024, Ultimate Guide to Catch the Regional-Located Pokemon For Tecno Pop 7 Pro | Dr.fone
- In 2024, Best 10 Chinese Video to English Translators
- How to Restore Deleted Huawei Nova Y91 Contacts An Easy Method Explained.
- How to Easily Hard reset my Infinix Note 30 VIP Racing Edition | Dr.fone
- Title: Updated 2024 Approved Rip and Digitize A Step-by-Step Guide to Converting DVDs to Digital Files
- Author: Emma
- Created at : 2024-06-24 02:32:40
- Updated at : 2024-06-25 02:32:40
- Link: https://video-ai-editor.techidaily.com/updated-2024-approved-rip-and-digitize-a-step-by-step-guide-to-converting-dvds-to-digital-files/
- License: This work is licensed under CC BY-NC-SA 4.0.
