
:max_bytes(150000):strip_icc():format(webp)/safari-photo--canon-and-nikon-digital-cameras-and-lenses--masai-mara-game-reserve--kenya--769713645-5bde071546e0fb0026a2c012.jpg)
Updated Expert-Recommended AVI Cutters Top 16 for Precise Video Editing Multi-Device
Expert-Recommended AVI Cutters: Top 16 for Precise Video Editing [Multi-Device]
With the growing fame of video-sharing and social media applications like Twitter, Instagram, and TikTok, the demand for simple and fast video cutting and trimming tools has dramatically increased. Nowadays, you don’t have to play with complex video editing tools to produce high-quality videos.
Thanks to several user-friendly editing software to make things easy for everybody. However, finding the right programs to trim/cut videos is still challenging, especially in AVI format.
But, guess what? These top 16 AVI video cutters for Windows, MAC, Android, iPhone, and online will make video cutting and trimming fun, especially when you learn to do it using Filmora.
In this Article
Part 1: Best AVI Video Cutter to Trim/Cut AVI Video on Windows and MAC – Filmora Video Cutter [with steps}
Part 2: Top 3 Free AVI Video Cutter on Windows
Part 3: Top 3 Free AVI Video Cutter on MAC
Part 4: Top 3 Free AVI Video Cutter on Android
Part 5: Top 3 Free AVI Video Cutter on iPhone
Part 6: Top 3 Free AVI Video Cutter Online
Part 7: Bottom Line
Part 8: FAQs
Part 1: Best AVI Video Cutter to Trim/Cut AVI Video on Windows and MAC – Filmora Video Cutter [with steps]
Filmora by Wondershare is a star video editor with outstanding outcomes. Whether you have a MAC or Windows PC, you can download Filmora regardless of your operating system. The program best serves those who intend to make high-quality videos. The software provides editing support for all video formats, including AVI.
Although Filmora is an affordable editor with tons of audio and video editing options, you can still download the software for free and create projects if watermarks don’t bother you. Moreover, you can count this tool’s capabilities in cropping, resizing, and Chroma screen support. But that’s not the only sweet fruit.
In fact, Filmora is equipped with many jaw-dropping features, including preset templates, auto beat sync, split-screen, speed ramping, motion tracking, keyframing, creative transitions, titles, filters, and much more. And the best part is, you can learn and understand Filmora in no time. That’s why the program is loved and supported by all types of users.
So does Filmora helps cut and trim AVI videos? Yes! It does if you follow these steps correctly.
Step 1: Download Filmora Video Editor
First, download Filmora Video Editor by choosing your operating system, as seen in the screenshot below.
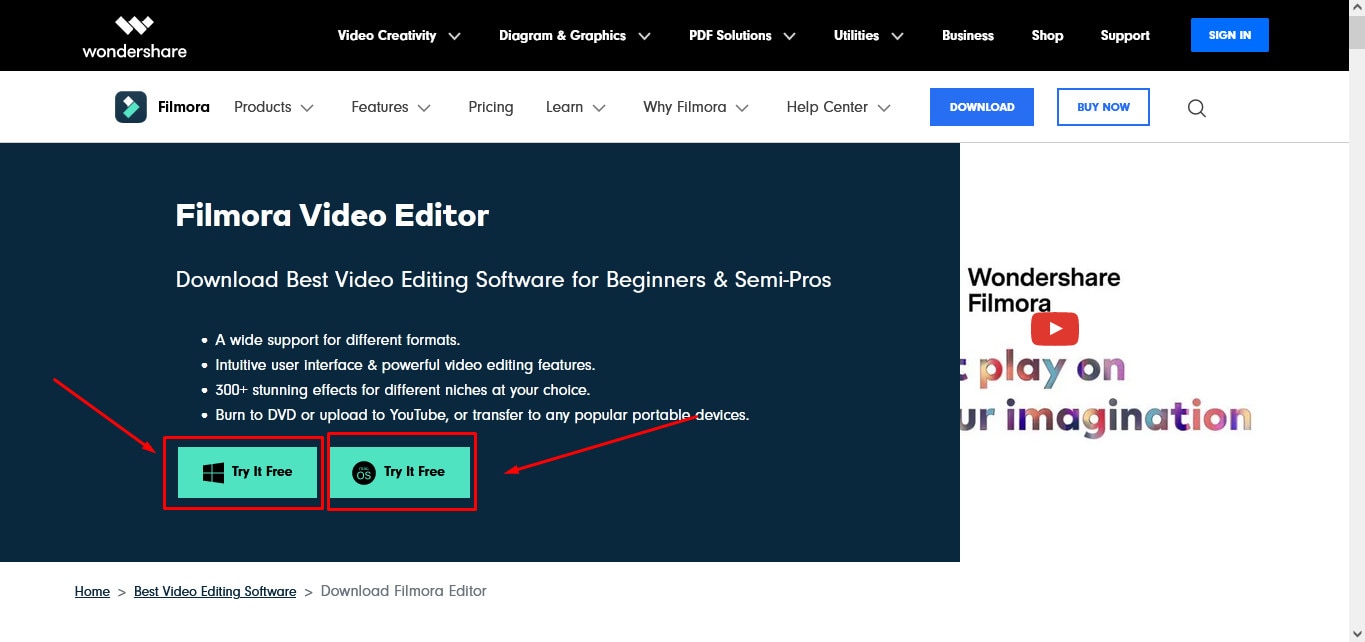
Run the setup and let it finish without any pause or break.
Step 2: Import Your Video to Filmora Video Editor
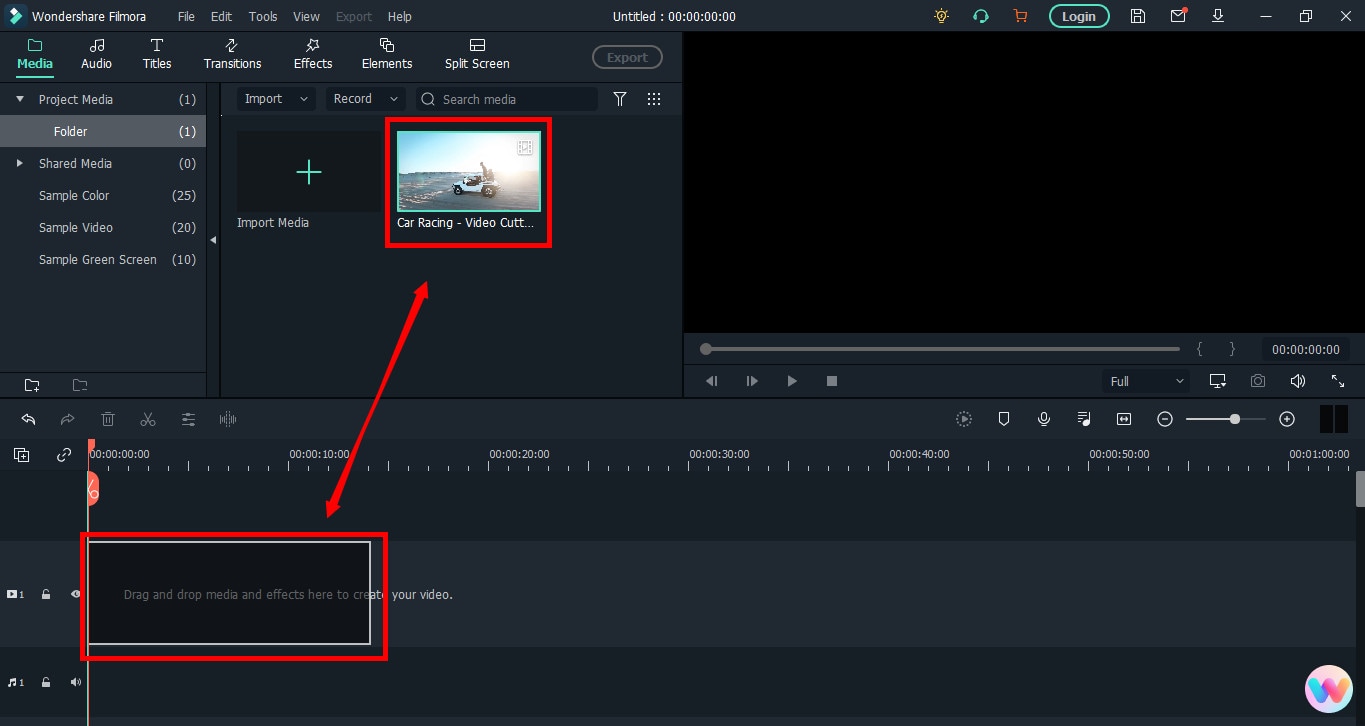
Importing your AVI video is a very simple process. Just click on the “Film Clip” icon.
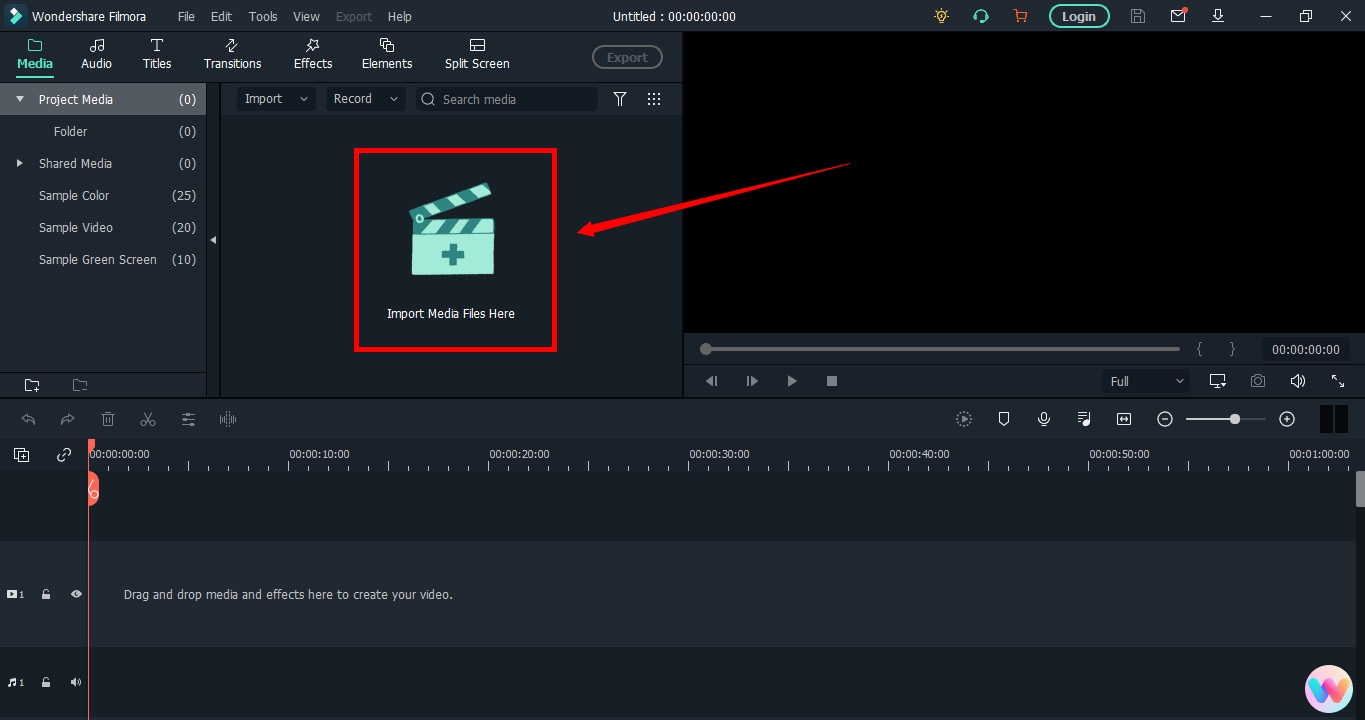
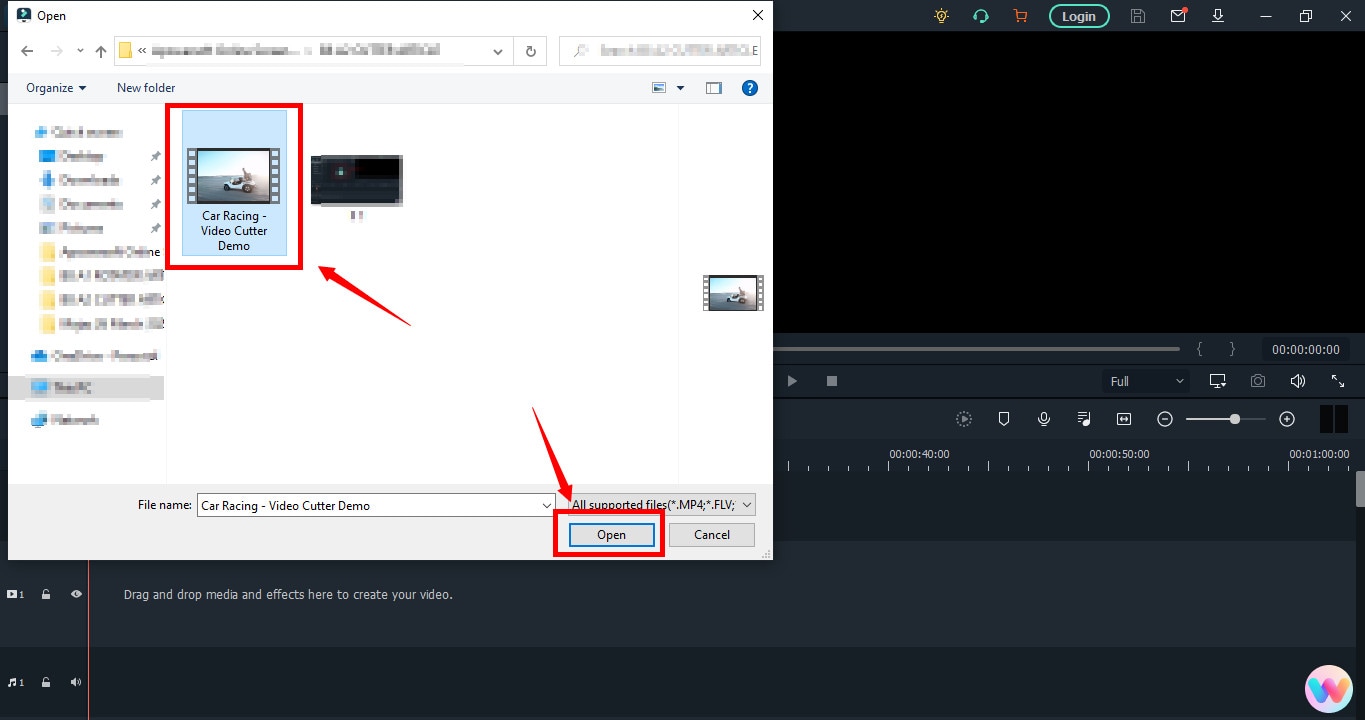
It will open a new window screen on your computer to select the video from the directory. Find the clip you want to import and cut. Use your mouse to select it and click the “Open” button.
The video will be loaded in the “Media” folder of Filmora. The clip’s thumbnail should be visible to assure you have done everything correctly.
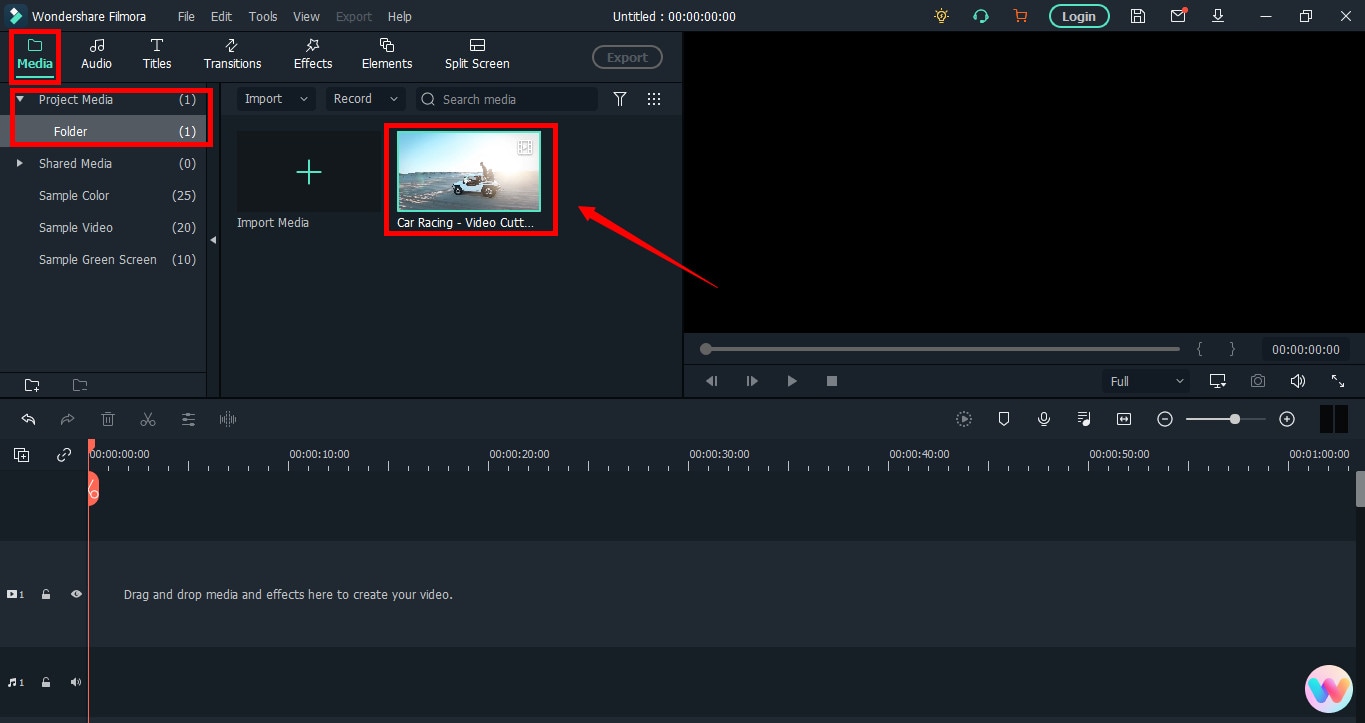
If you can see that, let’s go to the next step.
Step 3: Drag and Drop Video to Filmora’s Timeline
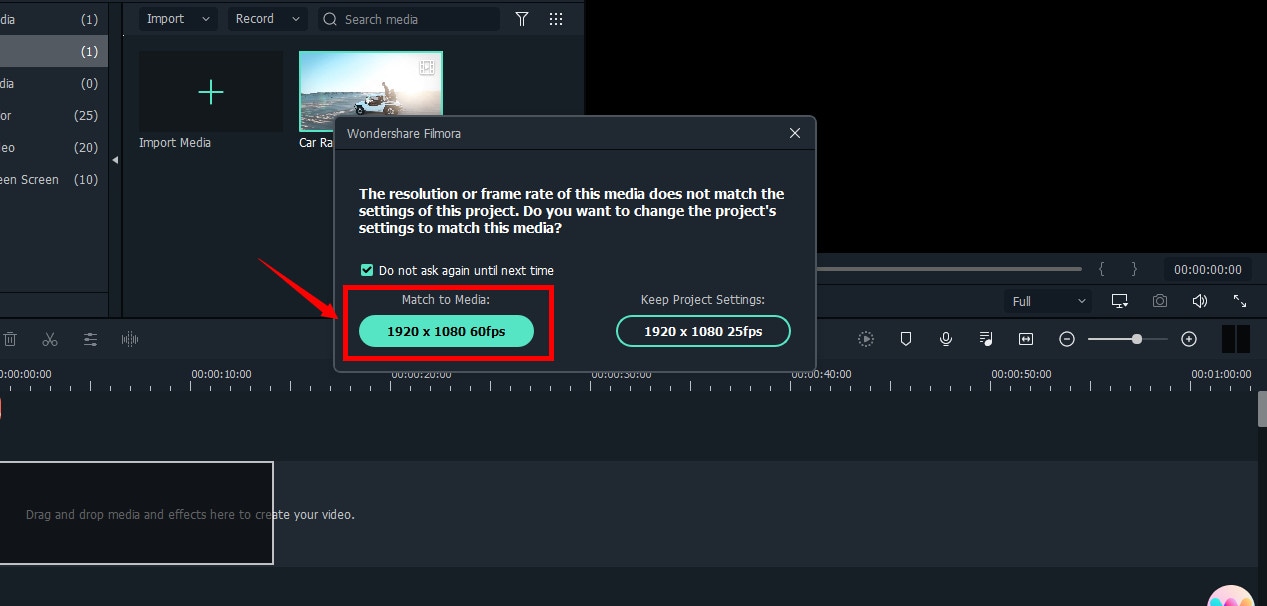
Select the video in the media folder by clicking over it once. Now, without leaving the hold of the left button of your mouse, slide the video down to the track in the timeline.
After that, a message will pop up, asking about your preference for the project settings. It is recommended to choose the “Match to Media” option unless you’re an experienced video editor who knows how to play with the resolution and frame rates.
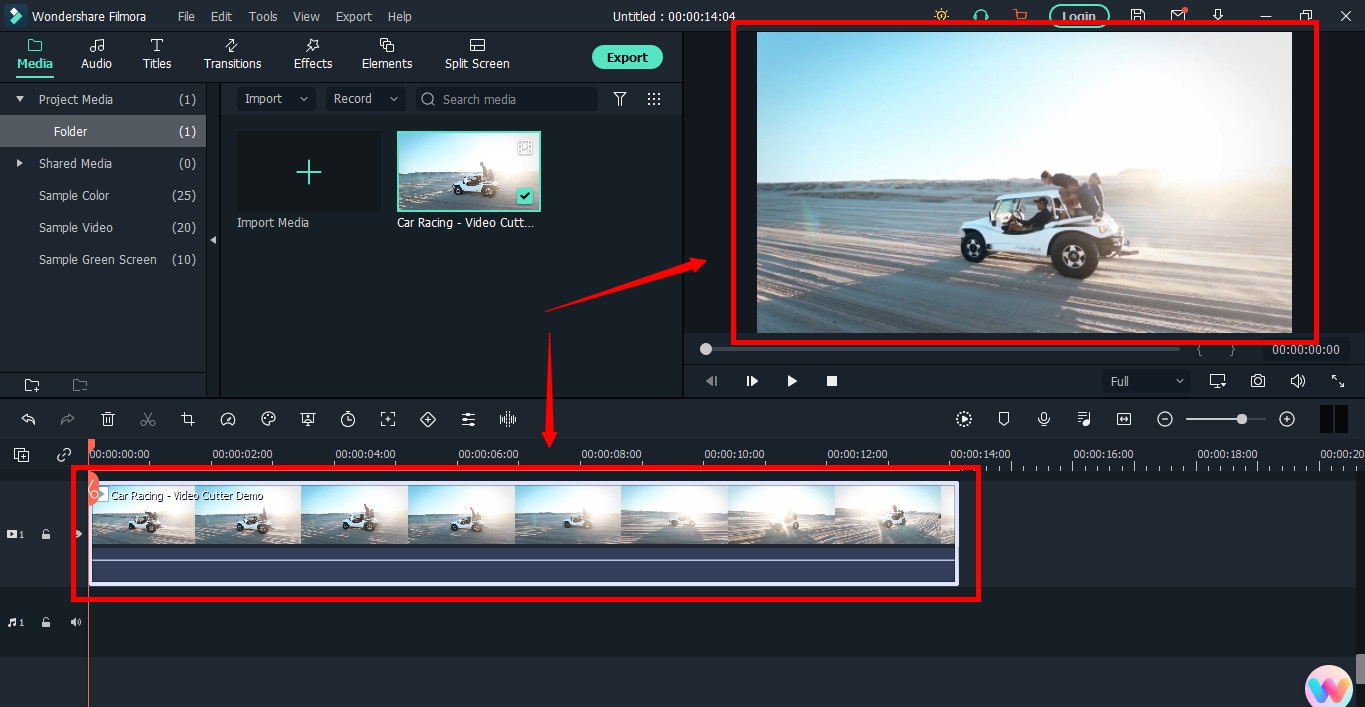
You will see the video on the timeline with its preview on the “Preview Screen” on the right side of the interface.
Step 4: Cutting Your Video in Filmora
Here comes the core step you have been waiting for. But before you go any further, you need to know about the “Playhead.”
Playhead is an orange-reddish marker you can find on the timeline.
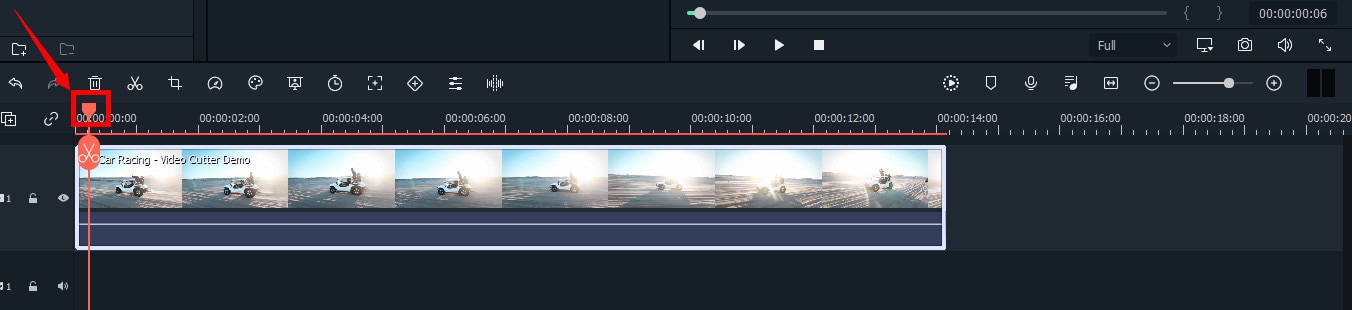
It has an important role in cutting your videos.
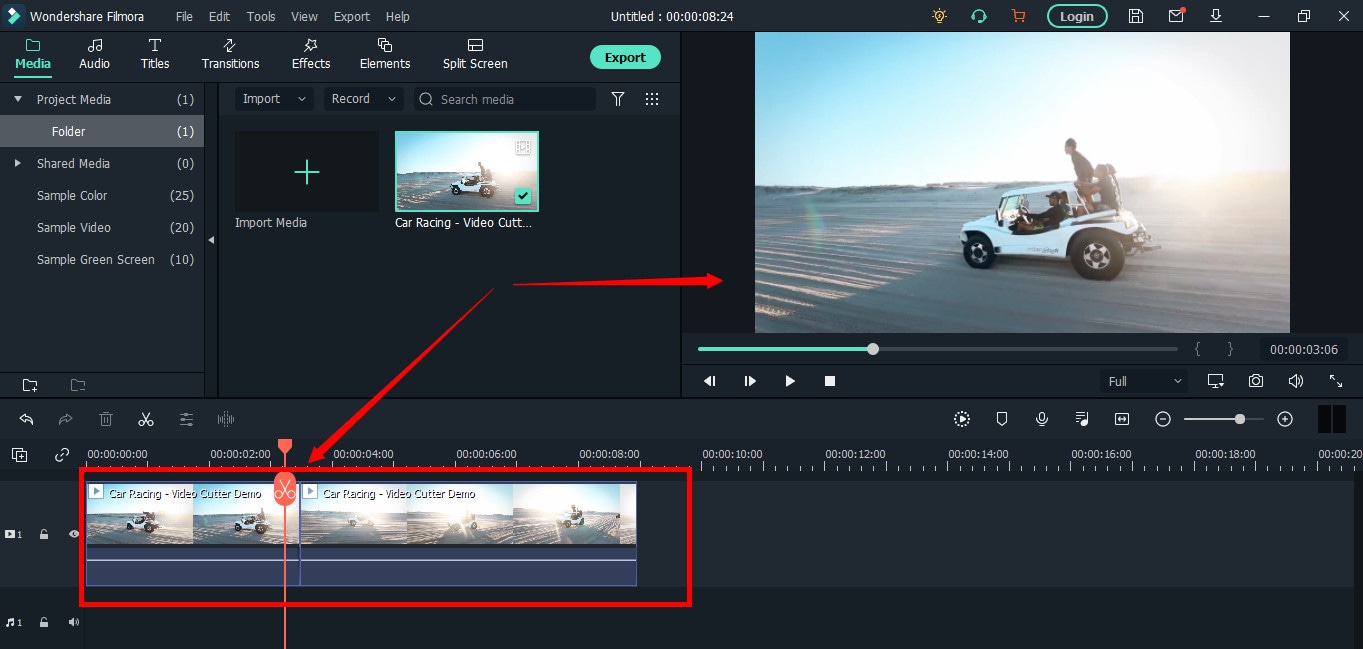
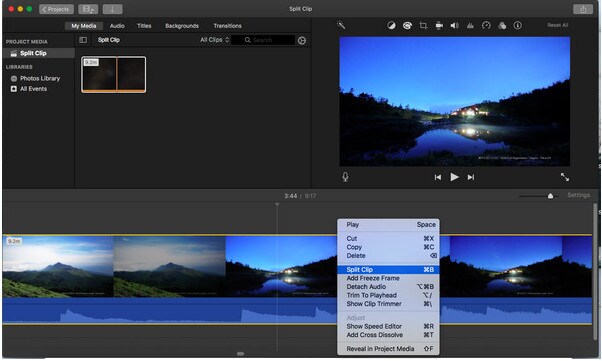
So, move the playhead to your desired frame and click on the “scissor” icon to make the “starting” cut.
As soon as you do it, you will see that the single clip is now divided into two parts similar to this image.
The “Red” marked area in the above screenshot ensures a gap between the clips on the timeline. The “Yellow” arrows confirm two separate clips of the same video.
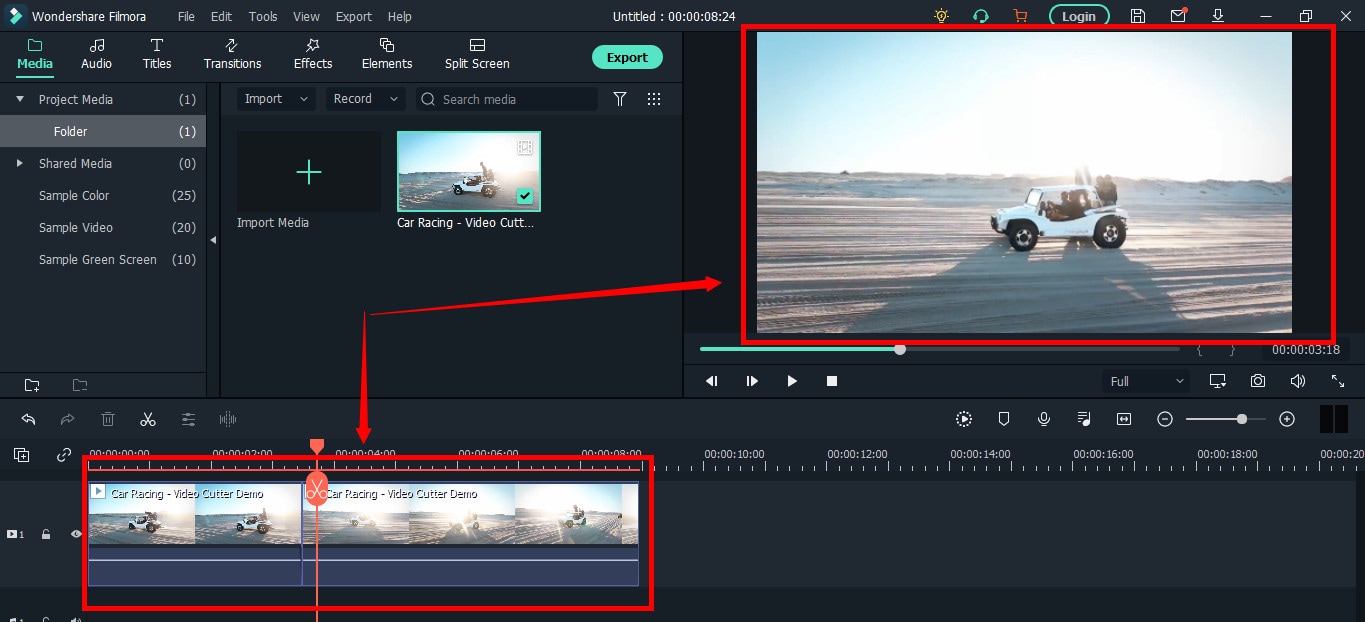
Place the two clips together as seen in this “Green” area.
And place the playhead anywhere on the clip. And click on the “scissor” icon once again to make the “ending” cut (second cut).
If done correctly, there should be three clips now of the same video, as you can observe in this screenshot.
Again, the “Red” area in the above photo indicates the gap, and the “Yellow” area ensures a third segment of the video.
Note: The gaps you can see in the divided clips are made intentionally for understanding. Practically, Filmora doesn’t move the clip or make gaps in between after you have made the cuts.
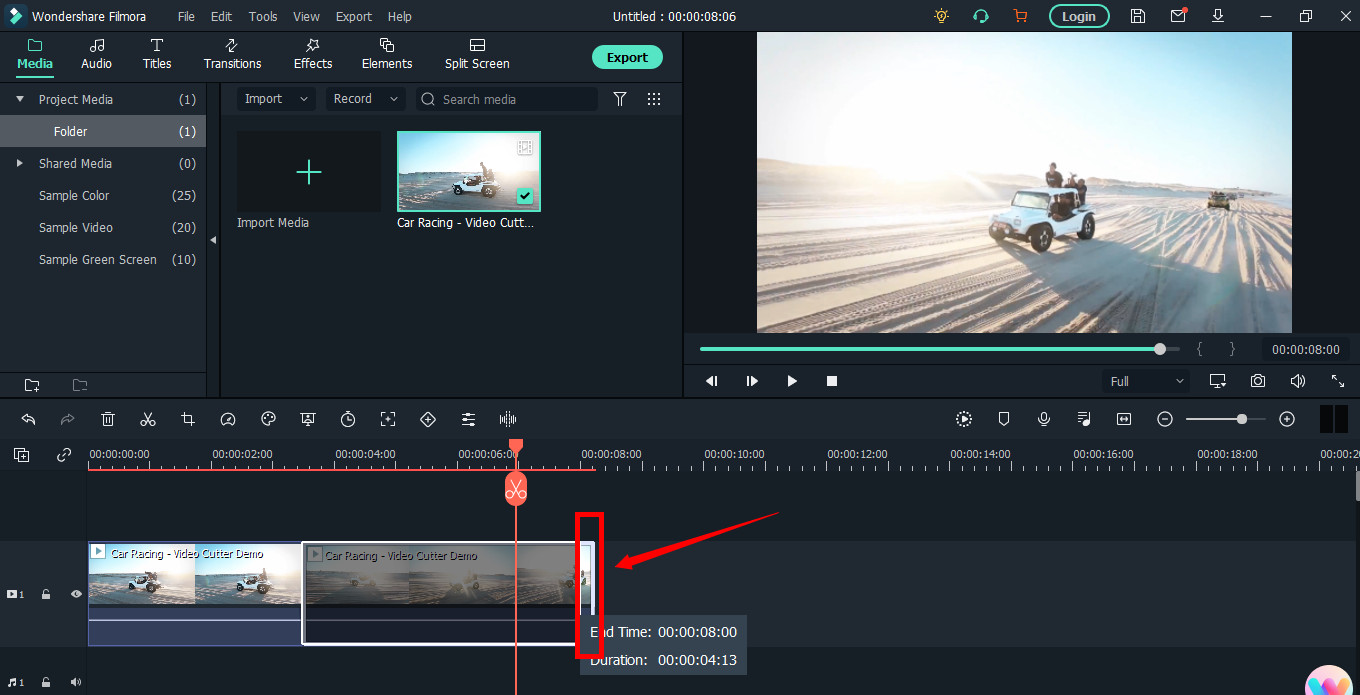
Keep in mind that there are three clips on the timeline. Now, if you want to remove the second clip from the video, you need to select that portion first by clicking on it.
Then, right-click on the mouse and choose “Cut” from the menu.
Within a semi-second, the selected portion will be removed from the timeline. And you will be able to see the remaining parts of the video. Now, pull the second clip using your mouse and place it at the end of the first clip without leaving a gap in between.
Then, click the “Play” button under the preview screen to see the results.
You can see in the above two screenshots that there’s a jump between the scenes due to cuts, confirming that video has been cut significantly.
Step 5: Trimming Your Video in Filmora
Remember that cutting and trimming in Filmora are two different things. Trimming allows you to remove a particular video part from visibility without deleting the portion.
So feel free to skip this step if you’re happy learning the cutting technique. But if you’re interested in trimming, here’s how you do it.
Take your mouse cursor at the beginning or end of the clip you want to trim. Keep holding the clip’s corner and slide the mouse back or front to trim the part
Note: Since the trim tool doesn’t delete the video, the final project based on trimming will be of a larger size. Therefore, it is advised to cut videos rather than trimming for fast rendering, better results, and small video size.
Step 6: Save Project and Export Your Cut/Trimmed AVI Video
Choose “Save Project” from the “File” menu.
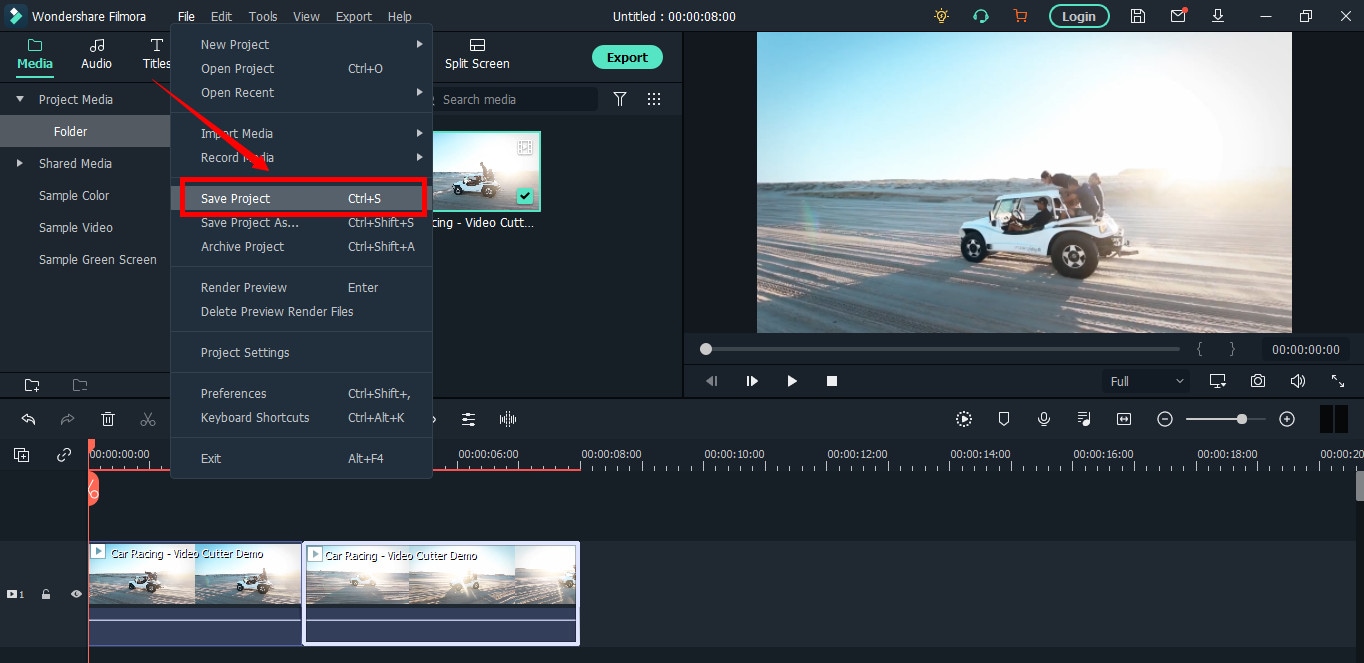
Select the directory to save the project, rename the new video, and click the “Save” button.

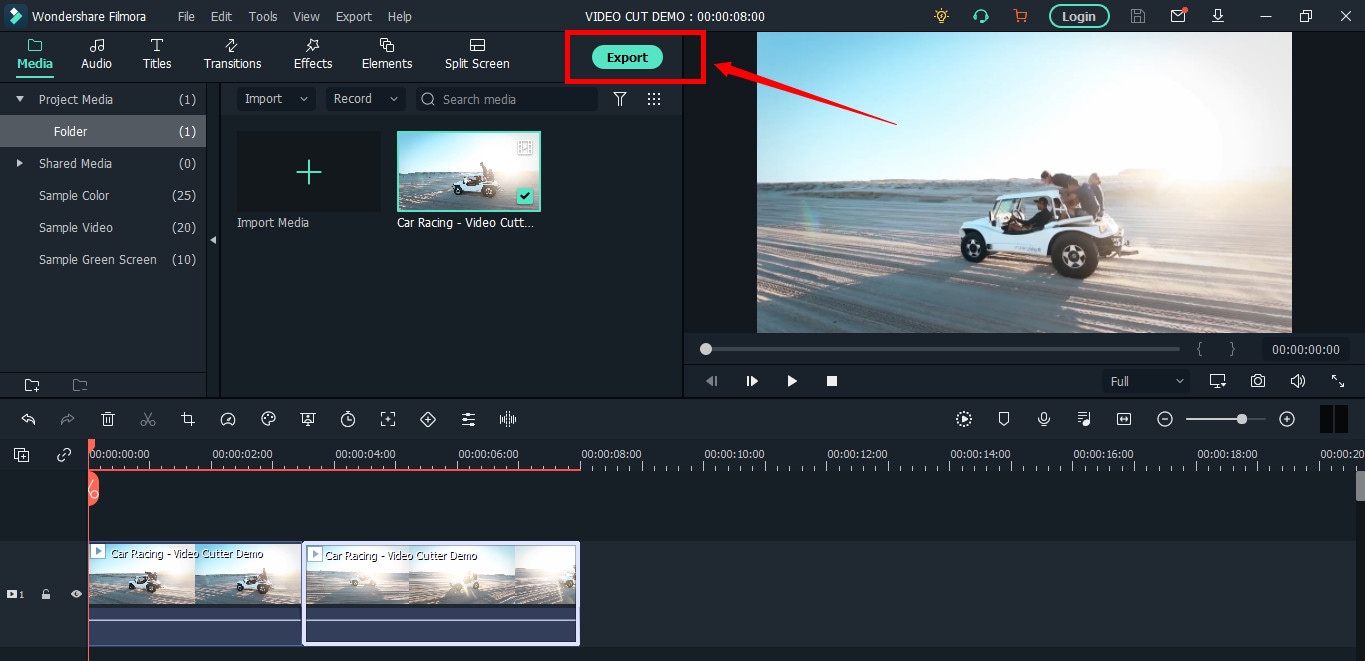
Click on the “Export” button to save the video in AVI or any other video format of your choice on your computer.
Part 2: Top 3 Free AVI Video Cutter on Windows
As a Windows user, finding an excellent video cutter is relatively easy. However, not all software permits importing AVI videos. In the same way, some video trimmers come at a price. So if you really don’t want to pay and enjoy cutting your AVI files, try using these three video cutting tools.
Microsoft Photos (Windows 10)
Microsoft Photos or Photo App is a free photo viewer and editor with your Windows 10. It offers incredible photo editing and enhancement along with different tools for organizing and editing videos in a very friendly way. Likewise, you can create drawings over the videos and add 3D effects and background music to your clips.
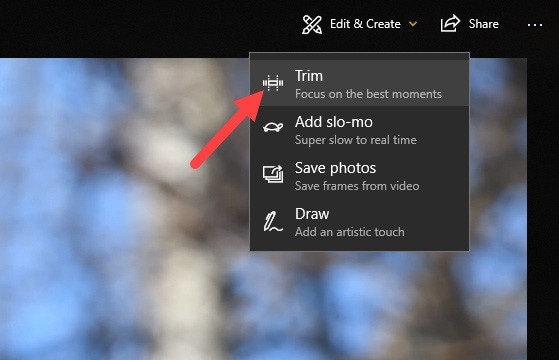
You can also trim AVI videos with Microsoft Photos quickly. All you need to do is open your clip with the Photo App, choose the “Trim” option, select a portion of the video you want to trim, and go ahead.
That’s it!
Features
- Quick video trimming
- Cool text effects
- 3D library and effects
- It has a clear interface
- You can find and tag people’s faces
- The program has 15+ filters for editing
- Motion tracking option for drawing on videos
- Allows you to view and organize your files easily
Pros
- Microsoft Photos is free for Windows users
- It automatically creates albums
- The program has a touch-friendly interface
- You can integrate your OneDrive with the software
Cons
- Lacks before and after view
- Not included in older Windows versions
- It doesn’t support selective focus or panorama stitching
Handbrake
Handbrake is best-known for its video transcoding traits. Unlike typical video editors, this open-source tool includes limited options to rip Blu-rays and DVDs. Moreover, you can mix the 5.1 soundtracks and convert them to stereo to make the audio compatible with your TV speakers.
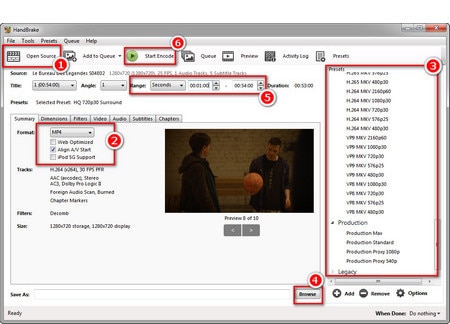
But the exciting thing about Handbrake is that you can use this software on your macOS 10.13 or later versions to cut AVI videos for free. However, it’s a bit technical process, as there’s no timeline to help you trim or make cuts on the clips directly with the help of your mouse.
You are required to mention a time range (seconds, minutes, or hours) to keep a specific part of the video while the software removes the non-ranged parts of the clip. For instance, you have a video of 10 seconds. You start the range from 5 seconds and end it at 10 seconds. So, the first four seconds of the video will be cut from the entire clip.
Features
- Video cutting, cropping, and resizing
- Low-quality and old video restoration
- Video conversion from any format to MKV or MP4
Pros
- Handbrake is free
- You can convert batch videos with ease
- It supports MAC, Windows, and Linux OS
- Allows you to import video files in all major formats
- The software comes with various video conversion presets
Cons
- Handbrake is not a user-friendly tool
- The video file output is limited to two formats (MKV and MP4) only
Gihosoft Video Cutter
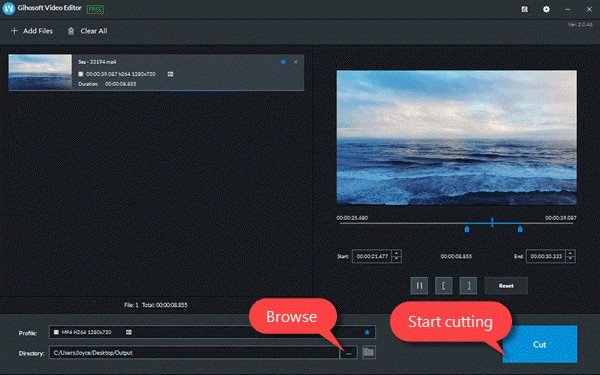
Gihosoft is a clean, free, lossless video cutter on your Windows PC. It’s a simple tool that helps you cut video files into various output formats. So be it AVI, MPEG, or any other file, with Gihosoft, everything becomes handy.
Another fascinating fact about this software is that it allows you to cut videos in three simple steps without losing the quality. So right after installing the program, you simply need to import your file, choose the start and end time, and click the “Cut” button to remove the part of the video.
Features
- Fast video and audio cutting
- Easy drag and drop audio/video files
- It supports most audio and video formats
Pros
- Free for both Windows and MAC operating systems
- The cutter saves video in original quality
Cons
- It does not include basic video editing features
Part 3: Top 3 Free AVI Video Cutter on MAC
Are you looking for a great AVI video cutter for your MAC? Sadly, you have limited product choices as compared to Windows users. But to ensure you don’t waste time looking for a suitable tool, here’s a list of three AVI video cutting programs you can use on your Macintosh.
iMovie
The first and foremost recommended software for free video cutting on MAC is Apple’s own tool, iMovie . It is a built-in program that comes with your system, so there is no need to spend extra on a video editor. iMovie allows you to browse and import most video files, including AVI, right from your computer. Also, this tool is equipped with multiple functions, such as audio editing, video quality enhancement, and much more.
This MAC’s video editor is ideal for beginners. Many home users and small business owners find this tool extremely simple, as they don’t like to be confused with complex features. So, if you want to make cuts to your video clips, start working on iMovie. And within a few clicks, you can trim or cut your videos for free.
Features
- Video cutting and trimming
- Cropping and rotation
- Effects and transitions
- Built-in themes
- HD and 4K video support
- Movie sharing
- Audio adjustments
- Chroma screen controls
- Character tracking
Pros
- Free to use for MAC users
- Clean timeline
- One-click video cutting and trimming
- Easy-to-remember keyboard shortcuts
- Direct share projects to your social media, like YouTube
Cons
- It takes a lot of time to export videos
- iMovie needs high HDD storage space
VideoPad by NCH

VideoPad by NCH is a beginner-level video editor with all the basic features. The software is specifically designed for home movie makers. That is why VideoPad is easy to understand and use.
VideoPad is entirely free of cost for non-commercial purposes, but it has limited features. On the other hand, if you want to enjoy full traits, you can purchase the tool.
VideoPad supports video files, including AVI, WMV, MPEG, MOV, MP4, ASF, and XviD. Likewise, you can also burn movies to Blu-ray, DVD, HD-DVD, or CD. And most importantly, you can easily cut or trim AVI videos on your MAC, as the software is available on both MAC and Windows systems.
Features
- Audio tools
- Video rotation
- Video sharing
- Visual effects
- Video transitions
- 3D Video editing
- Color correction
- Overlays and texts
- Video optimization
- Great plugin support
- Direct video uploading
- Multiple video resolutions
- Video cutting and trimming
- Files exportation to various devices
- Stereoscopic conversion from 2D to 3D
Pros
- You can use the basic tools for free
- Allows 360-degree video production
- It supports a wide range of video formats
- Compatible with MAC and Windows computers
Cons
- The auto speech feature performs poorly
- The free version has annoying notifications
Xilisoft Video Cutter
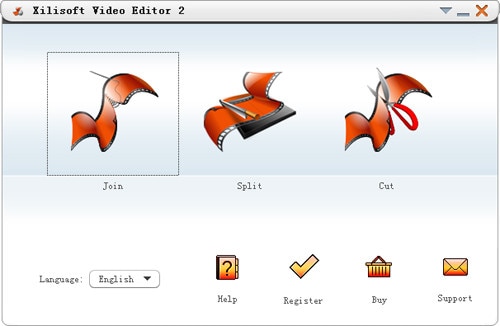
Xilisoft Video Cutter is the simplest tool to cut videos on MAC. This software has a straightforward option to cut the clip after importing it to the timeline. The program is fast and has a user-friendly interface.
Moreover, you can polish your videos by merging multiple clips or increasing the video quality once you’re done with the cutting process. At the same time, this video cutter allows you to import all video formats, including XviD, DivX, MOV, FLV, MP4, MPEG-4/, MKV, MPEG, WMV, and AVI.
Features
- Video joining
- Support multiple output video formats, including HD
Pros
- Easy video cutting and merging
- It doesn’t require a large storage space
- Extremely uncomplicated interface
- Real-time preview to make better cuts
- Available on both MAC and Windows systems
Cons
- The trial version is free to use but limits you from enjoying extra features
Part 4: Top 3 Free AVI Video Cutter on Android
After capturing nice videos with your Android mobile phone, you may need to cut unnecessary scenes to make your clips look professional. While there are numerous Android cutters, not all support the AVI format. So below, you will find the 3 best AVI video cutters for Android, which are free to use.
Quick – Video Editor & Maker
Quick – Video Editor & Maker is a free video editor with PRO results. Many photographers and vloggers love using this app to cut clips immediately. Furthermore, the application offers a wide range of options to assure you don’t have to look to any other tool to rotate or compress video. Quick – Video Editor & Maker lets you import videos in all major formats, including AVI, MPEG, WMA, and more.
Features
- Video cutting, fading, and rotation
- Speed control tools
- Conversion from video to GIF
Pros
- Free app
- Simple interface
Cons
- Lack of updates
- Some users complain about app crash
Funimate Video Editor & Maker
If you want to make some professional-grade video edits quickly, you are welcome to download and use Funimate Video Editor & Maker on your Android device. It’s a free tool to cut videos. It has an easy procedure, and you can cut AVI videos in a few seconds.
Plus, you can use the app to add custom animations, effects, and many other exciting elements. You can share your makes on social media like TikTok, Instagram, and other platforms. Contrarily, the app itself is a community with millions of Funimate-users who share their creations daily. You can also join or watch videos from other creators to learn more about new techniques and trends in video editing.
Features
- Video trimming and splitting
- Animation and cropping
- Filters and AI effects
- Speed adjustment
- Keyframing and video merging
Pros
- Free Android application with several editing tools
- Easy trimming, splitting, and cropping
- Aspect ratio, border, and color customization
- Direct social media sharing
Cons
- Free users cannot use templates
- The free version stamps watermarks on each project
Part 5: Top 3 Free AVI Video Cutter on iPhone
No wonder iPhone’s camera captures high-quality videos. But the problem begins when there’s no free app to cut AVI videos. So if you’re recording great spots, but deep inside, you really want to remove some parts, then these 3 free AVI video cutters will work smoothly on your iPhone.
Cut, Trim, Split Video Editor
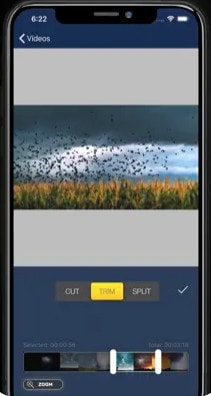
Download Cut, Trim, Split Video Editor on your iPhone to delete/cut unwanted portions of your video clips. The tool is also best for trimming iPhone-recorded clips without messing with the frames. Or, if you just want to split the video into multiple parts for your next WhatsApp status, this iPhone app can do that job for you.
The app supports multiple video file types, including MOV, MP4, AVI, MPEG, MPEG-2, and 3GPP
Features
- Easy trimming and cutting video clips
- Splitting big-sized videos into two smaller clips
- Import video from file-sharing platforms, like iCloud, using Wi-Fi
Pros
- Free app for fast video cutting and sharing
- Simple UI interface
Cons
- The free version shows advertisements
Splice - Video Editor & Maker
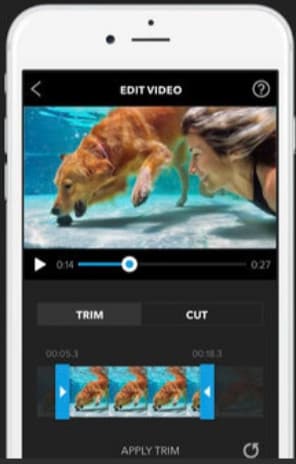
Splice is an extraordinary video editor that makes it easy to make fully customized and professional videos from your iPhone. The app is also best for video cutting. Besides, it has many interesting features, which you can use from your device.
Features
- Cutting, trimming, and cropping your videos
- Exposure, saturation, and exposure adjustment
- Slow and fast motion with speed ramping option
- Video masking and overlay
- Color correction and text overlays
Pros
- Free basic features, such as video cutting
- iTunes integration
- Supports AVI video input
- User-friendly application
- Access to the music library
- Quick and simple social sharing
Cons
- Output videos require high mobile storage space
Part 6: Top 3 Free AVI Video Cutter Online
Don’t want to install video cutters on your MAC, Windows, smartphone, or any other device? No problem! You can use online video cutters and trimmers to split, cut, or trim your clips for free.
However, the problem still exists in online tools, as not all web-based editors allow importing AVI files. So to save your time and energy, you can directly go to the following online AVI cutters to complete your tasks.
Kapwing
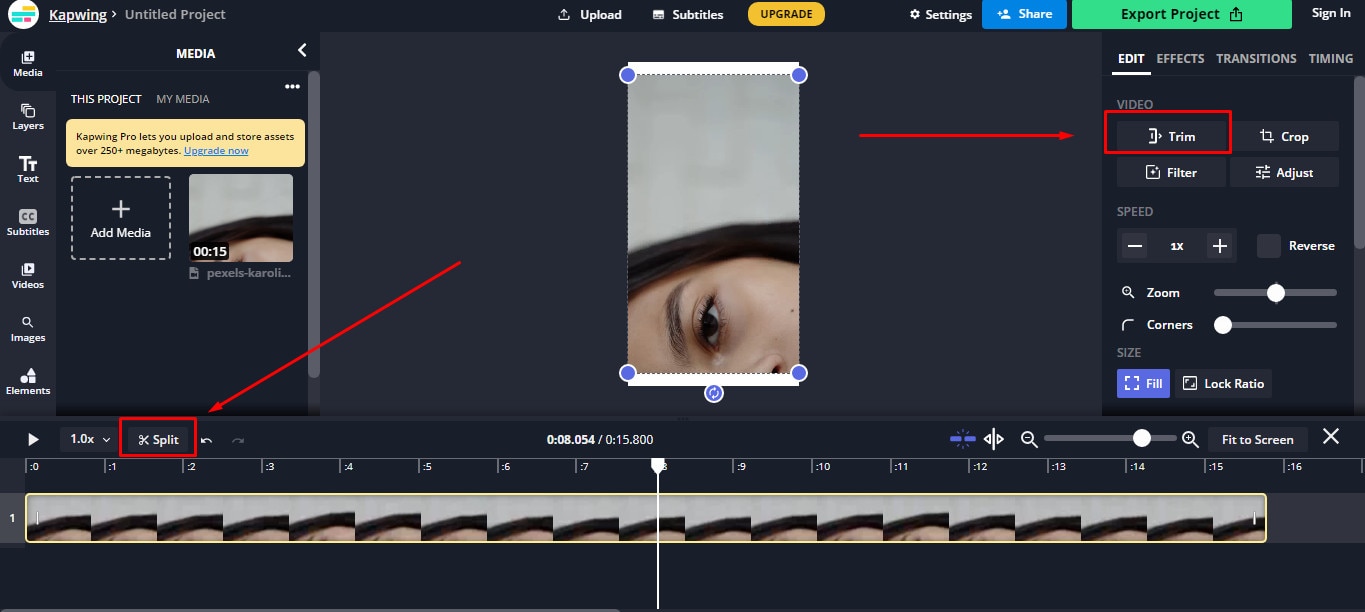
Kapwing is an online video editor best for casual creatives, such as Vloggers and YouTubers. You can use this web-based platform to cut your videos. Gladly, Kapwing supports all AVI incomings. You can upload your AVI video files to this platform and use its trim or split feature. To do that, you need to upload your AVI video and choose the “Trim” or “Split” tool to see the magic. Once done with the trimming process, you can explore Kapwing’s other incredible traits and apply them to your project.
Features
- Video splitting, trimming, and merging
- Audio capturing
- Speed adjustment
- Image and video library
- Text editing and overlay
- Auto-generated subtitles
- Several collaboration tools
- Video creation from scratch
- Templates, shapes, and emojis
- Simple drag-and-drop interface
- Video transitions, plugins, and elements
Pros
- Free online video trimmer
- User-friendly interface
- You can export 30-minutes long projects
- Allows you to export unlimited videos with a watermark
- One watermark-free video export is available each month
Cons
- Cannot export long videos with a free account
- Only 10 minutes transcription limit is available for free users
- You need to purchase a monthly or annual subscription to remove the watermark from multiple videos
Clideo
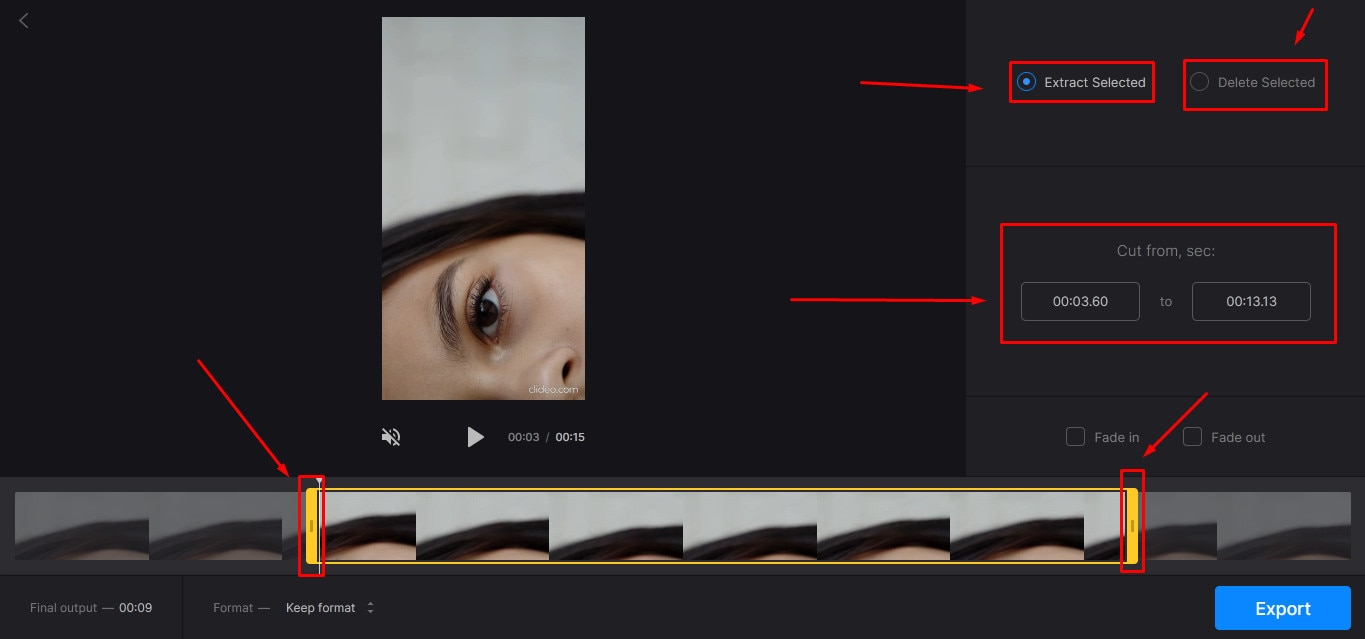
Clideo is not just a video cutter but an online solution to all your video editing problems. The tool is super popular, with 4 million+ users a month. And why not? This is one of those web-based platforms that allow AVI video files to be imported and exported without converting them into any other formats.
Nevertheless, if you’re only looking for video cutting options, this tool makes your life easy. Simply upload your video, and select the portion of it by setting start and end times. Choose whether you want to delete or extract the selected part from the clip, and hit the “Export” button.
And within a few moments, you can enjoy a trimmed video clip. And if you plan to be more creative, you can look for other Clideo features to make videos more fascinating.
Features
- Video combining and cutting
- Resize and crop clips
- Compress your videos
- Add text and subtitles
- Add music to your video files
- Filters and color correction tools
- Audio mute, cutting, and muting
- Video rotation, flipping, and speed adjustment
Pros
- Basic tools can be used for free
- Best for beginners and intermediate users
- Ideal for AVI videos and also supports other video formats
Cons
- You cannot use the free version regularly
Aspose
Aspose is a free web-based application to cut clips. You can use this tool on any operating system. It supports all major video file formats, including AVI, MKV, MOV, MP4, FLV, WMV, WEBM, and GIF. Additionally, you can use Aspose for various other reasons, such as audio extraction, video resizing, and more.
Features
- Video cutting and compressing
- Looping, rotation, and video merging
- Adding watermarks on videos
- Sound muting
- Speed change and audio addition
Pros
- Aspose is a free online tool
- It offers straightforward options to cut and edit videos
Cons
- No color correction option
- Slow video cutting process
- Lacks timeline and other valuable features
Part 7: Bottom Line
Tired of finding AVI cutters? Relax and try these top 16 AVI video cutters for Windows, MAC, iPhone, Android, and online. Almost all these tools are free to use and are extremely handy. On the other hand, if you want to cut and trim videos professionally, download Filmora and follow the step-by-step guide in this article for making clean cuts.
Part 8: FAQs
Q1. How do I trim an AVI video?
To trim an AVI video file, ensure that the software or tool you use supports AVI input. Generally, you need to upload or import a clip on the program, select the portion of the video, and apply the cut/trim feature to make it happen.
Q2. Which is the best online video cutter?
Kapwing and Clideo are the two best online video cutters you can use for free. Both web-based tools also allow you to cut your AVI videos.
Q3. Which is the best video cutter and joiner software?
Filmora, iMovie, and Kapwing are some of the best video cutters and joiner tools. These video editors are also free to use and come with different features.
Q4. How do I trim an AVI file in Windows 10?
Trimming an AVI video file in Windows 10 is very simple. Launch the Microsoft Photos (Photo App) application on your computer, add clip, and select the “Trim” tool to trim a specific video part.
Q5. How can I cut a video on my computer for free?
MAC and Windows users can download Filmora to cut videos for free. Filmora also offers a wide range of other features to make your clips exciting. Contrarily, Windows users can use the built-in Photo App in Windows 10 or download Gihosoft or Handbrake software to cut clips. Likewise, MAC users can download VideoPad, Xilisoft Video Cutter, or iMovie for free.
With the growing fame of video-sharing and social media applications like Twitter, Instagram, and TikTok, the demand for simple and fast video cutting and trimming tools has dramatically increased. Nowadays, you don’t have to play with complex video editing tools to produce high-quality videos.
Thanks to several user-friendly editing software to make things easy for everybody. However, finding the right programs to trim/cut videos is still challenging, especially in AVI format.
But, guess what? These top 16 AVI video cutters for Windows, MAC, Android, iPhone, and online will make video cutting and trimming fun, especially when you learn to do it using Filmora.
In this Article
Part 1: Best AVI Video Cutter to Trim/Cut AVI Video on Windows and MAC – Filmora Video Cutter [with steps}
Part 2: Top 3 Free AVI Video Cutter on Windows
Part 3: Top 3 Free AVI Video Cutter on MAC
Part 4: Top 3 Free AVI Video Cutter on Android
Part 5: Top 3 Free AVI Video Cutter on iPhone
Part 6: Top 3 Free AVI Video Cutter Online
Part 7: Bottom Line
Part 8: FAQs
Part 1: Best AVI Video Cutter to Trim/Cut AVI Video on Windows and MAC – Filmora Video Cutter [with steps]
Filmora by Wondershare is a star video editor with outstanding outcomes. Whether you have a MAC or Windows PC, you can download Filmora regardless of your operating system. The program best serves those who intend to make high-quality videos. The software provides editing support for all video formats, including AVI.
Although Filmora is an affordable editor with tons of audio and video editing options, you can still download the software for free and create projects if watermarks don’t bother you. Moreover, you can count this tool’s capabilities in cropping, resizing, and Chroma screen support. But that’s not the only sweet fruit.
In fact, Filmora is equipped with many jaw-dropping features, including preset templates, auto beat sync, split-screen, speed ramping, motion tracking, keyframing, creative transitions, titles, filters, and much more. And the best part is, you can learn and understand Filmora in no time. That’s why the program is loved and supported by all types of users.
So does Filmora helps cut and trim AVI videos? Yes! It does if you follow these steps correctly.
Step 1: Download Filmora Video Editor
First, download Filmora Video Editor by choosing your operating system, as seen in the screenshot below.
Run the setup and let it finish without any pause or break.
Step 2: Import Your Video to Filmora Video Editor
Importing your AVI video is a very simple process. Just click on the “Film Clip” icon.
It will open a new window screen on your computer to select the video from the directory. Find the clip you want to import and cut. Use your mouse to select it and click the “Open” button.
The video will be loaded in the “Media” folder of Filmora. The clip’s thumbnail should be visible to assure you have done everything correctly.
If you can see that, let’s go to the next step.
Step 3: Drag and Drop Video to Filmora’s Timeline
Select the video in the media folder by clicking over it once. Now, without leaving the hold of the left button of your mouse, slide the video down to the track in the timeline.
After that, a message will pop up, asking about your preference for the project settings. It is recommended to choose the “Match to Media” option unless you’re an experienced video editor who knows how to play with the resolution and frame rates.
You will see the video on the timeline with its preview on the “Preview Screen” on the right side of the interface.
Step 4: Cutting Your Video in Filmora
Here comes the core step you have been waiting for. But before you go any further, you need to know about the “Playhead.”
Playhead is an orange-reddish marker you can find on the timeline.
It has an important role in cutting your videos.
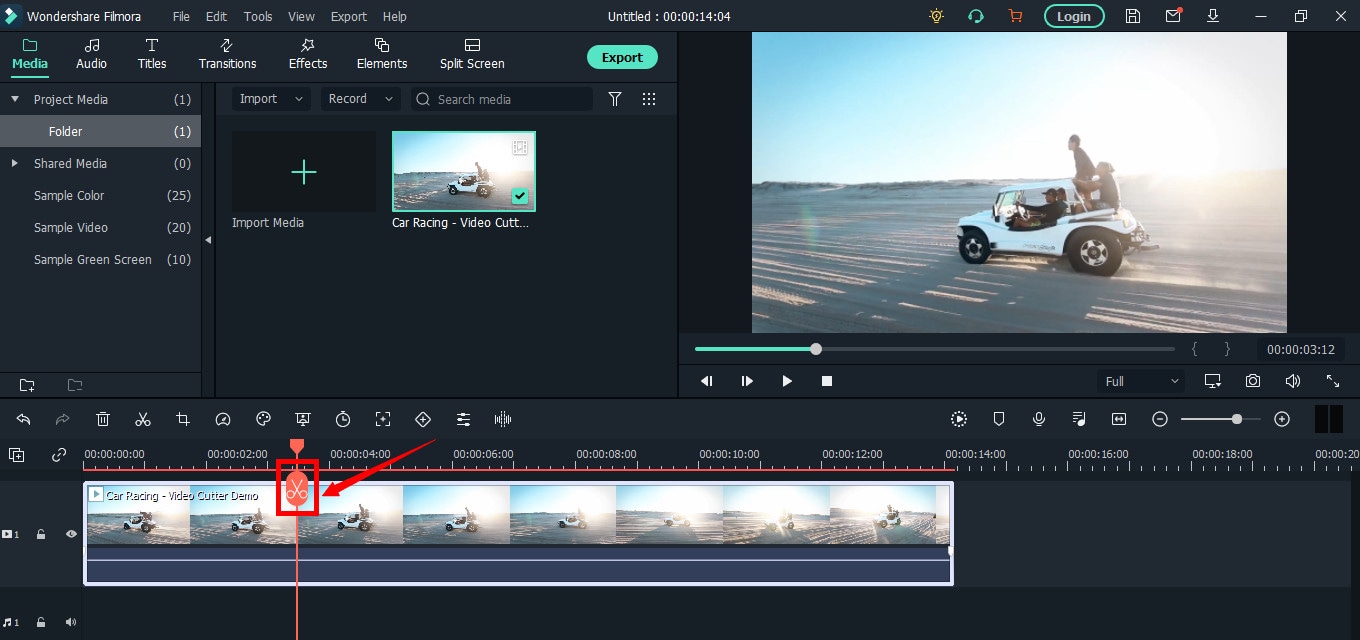
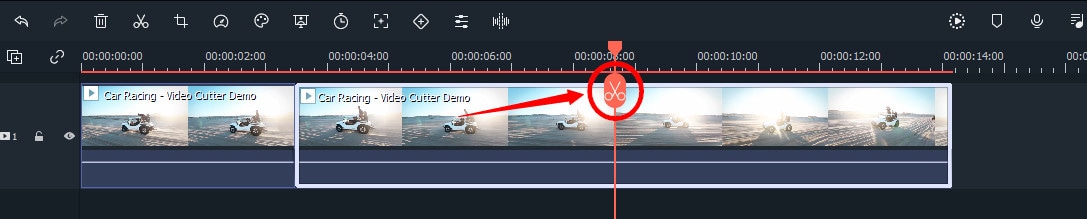
So, move the playhead to your desired frame and click on the “scissor” icon to make the “starting” cut.
As soon as you do it, you will see that the single clip is now divided into two parts similar to this image.
The “Red” marked area in the above screenshot ensures a gap between the clips on the timeline. The “Yellow” arrows confirm two separate clips of the same video.
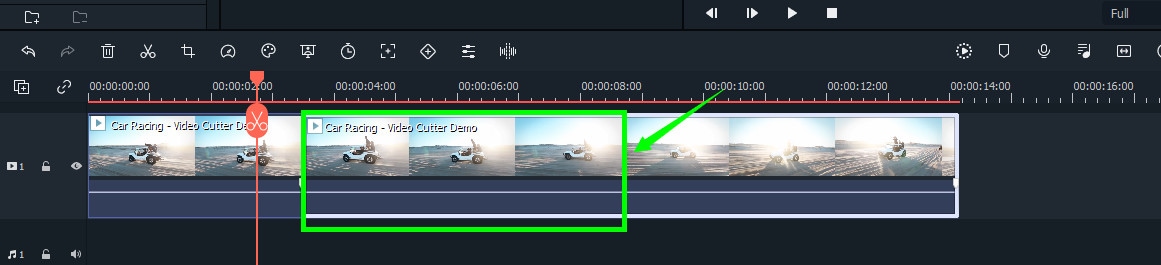
Place the two clips together as seen in this “Green” area.
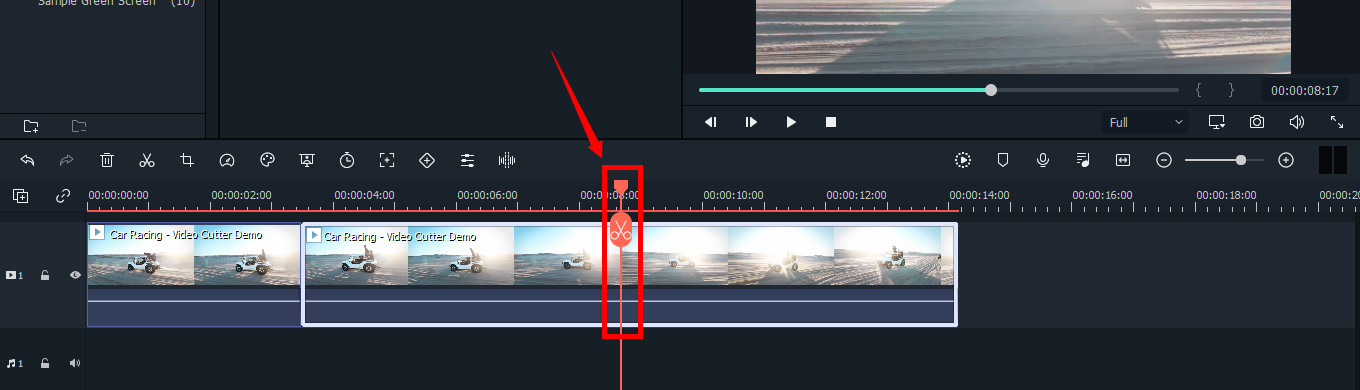
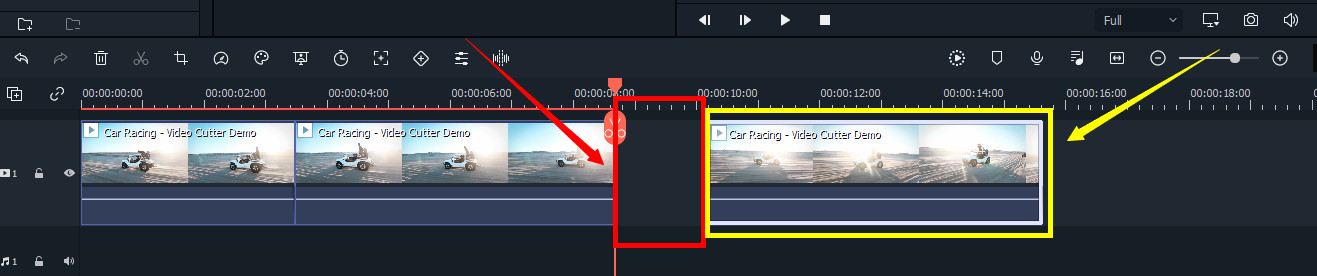
And place the playhead anywhere on the clip. And click on the “scissor” icon once again to make the “ending” cut (second cut).
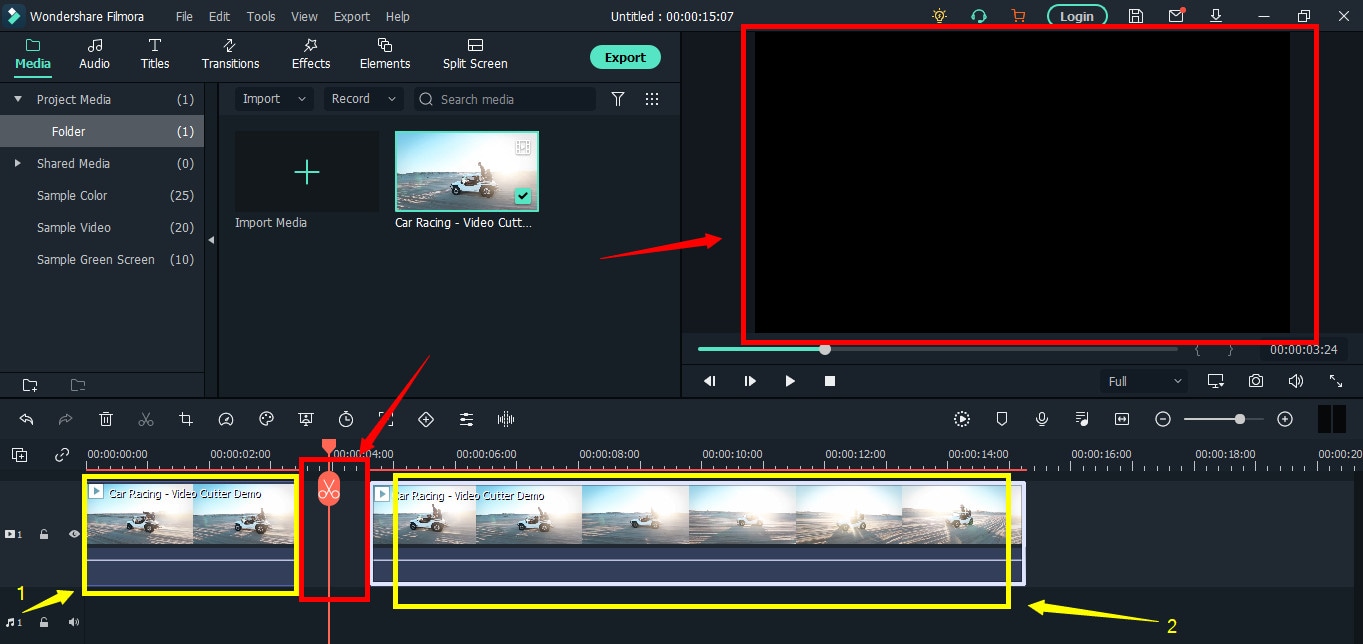
If done correctly, there should be three clips now of the same video, as you can observe in this screenshot.
Again, the “Red” area in the above photo indicates the gap, and the “Yellow” area ensures a third segment of the video.
Note: The gaps you can see in the divided clips are made intentionally for understanding. Practically, Filmora doesn’t move the clip or make gaps in between after you have made the cuts.
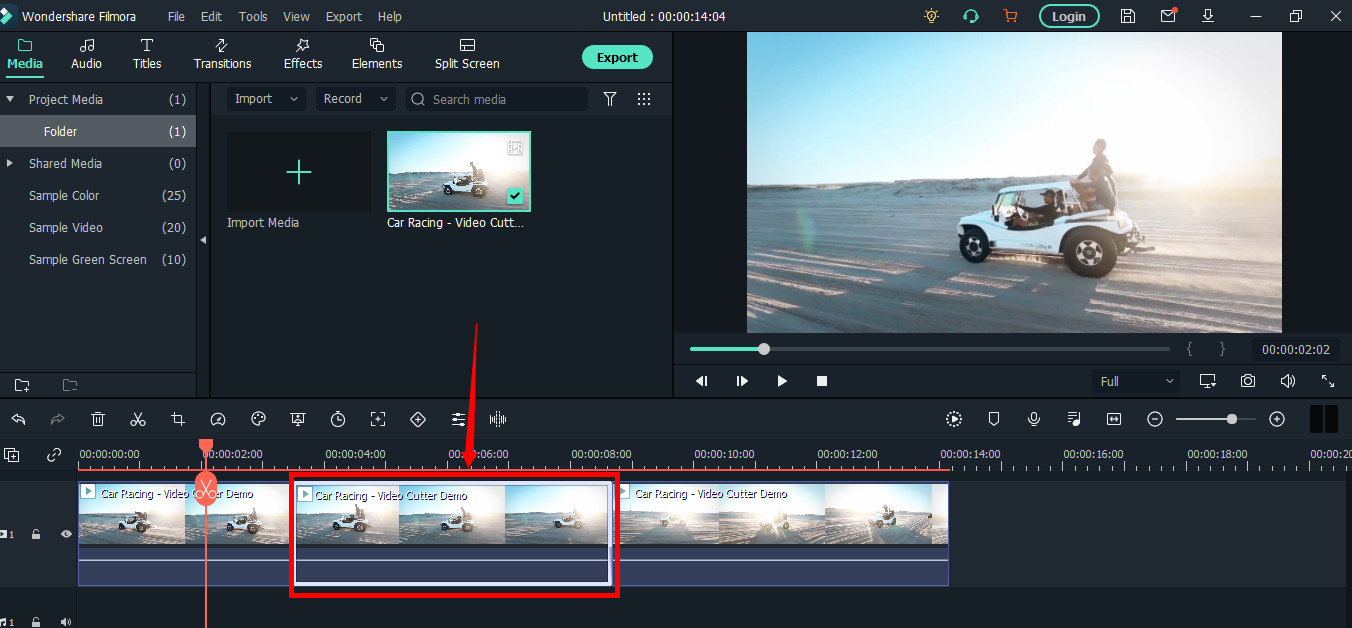
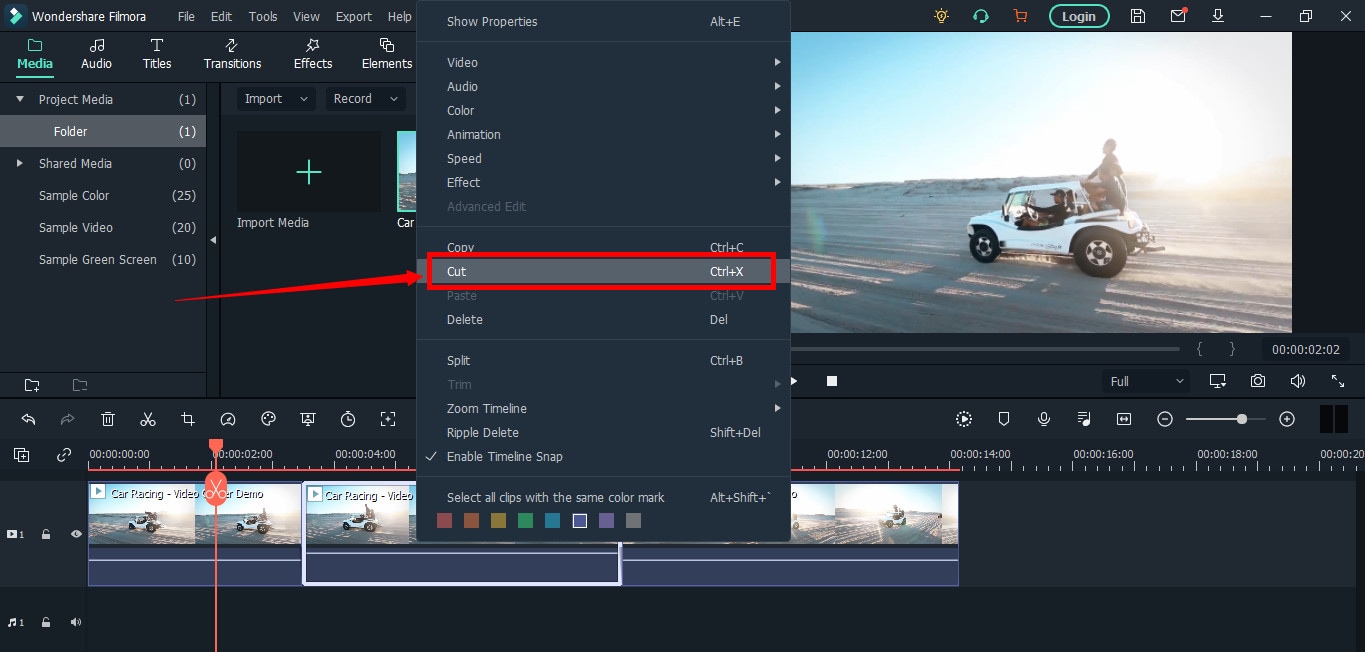
Keep in mind that there are three clips on the timeline. Now, if you want to remove the second clip from the video, you need to select that portion first by clicking on it.
Then, right-click on the mouse and choose “Cut” from the menu.
Within a semi-second, the selected portion will be removed from the timeline. And you will be able to see the remaining parts of the video. Now, pull the second clip using your mouse and place it at the end of the first clip without leaving a gap in between.
Then, click the “Play” button under the preview screen to see the results.
You can see in the above two screenshots that there’s a jump between the scenes due to cuts, confirming that video has been cut significantly.
Step 5: Trimming Your Video in Filmora
Remember that cutting and trimming in Filmora are two different things. Trimming allows you to remove a particular video part from visibility without deleting the portion.
So feel free to skip this step if you’re happy learning the cutting technique. But if you’re interested in trimming, here’s how you do it.
Take your mouse cursor at the beginning or end of the clip you want to trim. Keep holding the clip’s corner and slide the mouse back or front to trim the part
Note: Since the trim tool doesn’t delete the video, the final project based on trimming will be of a larger size. Therefore, it is advised to cut videos rather than trimming for fast rendering, better results, and small video size.
Step 6: Save Project and Export Your Cut/Trimmed AVI Video
Choose “Save Project” from the “File” menu.
Select the directory to save the project, rename the new video, and click the “Save” button.
Click on the “Export” button to save the video in AVI or any other video format of your choice on your computer.
Part 2: Top 3 Free AVI Video Cutter on Windows
As a Windows user, finding an excellent video cutter is relatively easy. However, not all software permits importing AVI videos. In the same way, some video trimmers come at a price. So if you really don’t want to pay and enjoy cutting your AVI files, try using these three video cutting tools.
Microsoft Photos (Windows 10)
Microsoft Photos or Photo App is a free photo viewer and editor with your Windows 10. It offers incredible photo editing and enhancement along with different tools for organizing and editing videos in a very friendly way. Likewise, you can create drawings over the videos and add 3D effects and background music to your clips.
You can also trim AVI videos with Microsoft Photos quickly. All you need to do is open your clip with the Photo App, choose the “Trim” option, select a portion of the video you want to trim, and go ahead.
That’s it!
Features
- Quick video trimming
- Cool text effects
- 3D library and effects
- It has a clear interface
- You can find and tag people’s faces
- The program has 15+ filters for editing
- Motion tracking option for drawing on videos
- Allows you to view and organize your files easily
Pros
- Microsoft Photos is free for Windows users
- It automatically creates albums
- The program has a touch-friendly interface
- You can integrate your OneDrive with the software
Cons
- Lacks before and after view
- Not included in older Windows versions
- It doesn’t support selective focus or panorama stitching
Handbrake
Handbrake is best-known for its video transcoding traits. Unlike typical video editors, this open-source tool includes limited options to rip Blu-rays and DVDs. Moreover, you can mix the 5.1 soundtracks and convert them to stereo to make the audio compatible with your TV speakers.
But the exciting thing about Handbrake is that you can use this software on your macOS 10.13 or later versions to cut AVI videos for free. However, it’s a bit technical process, as there’s no timeline to help you trim or make cuts on the clips directly with the help of your mouse.
You are required to mention a time range (seconds, minutes, or hours) to keep a specific part of the video while the software removes the non-ranged parts of the clip. For instance, you have a video of 10 seconds. You start the range from 5 seconds and end it at 10 seconds. So, the first four seconds of the video will be cut from the entire clip.
Features
- Video cutting, cropping, and resizing
- Low-quality and old video restoration
- Video conversion from any format to MKV or MP4
Pros
- Handbrake is free
- You can convert batch videos with ease
- It supports MAC, Windows, and Linux OS
- Allows you to import video files in all major formats
- The software comes with various video conversion presets
Cons
- Handbrake is not a user-friendly tool
- The video file output is limited to two formats (MKV and MP4) only
Gihosoft Video Cutter
Gihosoft is a clean, free, lossless video cutter on your Windows PC. It’s a simple tool that helps you cut video files into various output formats. So be it AVI, MPEG, or any other file, with Gihosoft, everything becomes handy.
Another fascinating fact about this software is that it allows you to cut videos in three simple steps without losing the quality. So right after installing the program, you simply need to import your file, choose the start and end time, and click the “Cut” button to remove the part of the video.
Features
- Fast video and audio cutting
- Easy drag and drop audio/video files
- It supports most audio and video formats
Pros
- Free for both Windows and MAC operating systems
- The cutter saves video in original quality
Cons
- It does not include basic video editing features
Part 3: Top 3 Free AVI Video Cutter on MAC
Are you looking for a great AVI video cutter for your MAC? Sadly, you have limited product choices as compared to Windows users. But to ensure you don’t waste time looking for a suitable tool, here’s a list of three AVI video cutting programs you can use on your Macintosh.
iMovie
The first and foremost recommended software for free video cutting on MAC is Apple’s own tool, iMovie . It is a built-in program that comes with your system, so there is no need to spend extra on a video editor. iMovie allows you to browse and import most video files, including AVI, right from your computer. Also, this tool is equipped with multiple functions, such as audio editing, video quality enhancement, and much more.
This MAC’s video editor is ideal for beginners. Many home users and small business owners find this tool extremely simple, as they don’t like to be confused with complex features. So, if you want to make cuts to your video clips, start working on iMovie. And within a few clicks, you can trim or cut your videos for free.
Features
- Video cutting and trimming
- Cropping and rotation
- Effects and transitions
- Built-in themes
- HD and 4K video support
- Movie sharing
- Audio adjustments
- Chroma screen controls
- Character tracking
Pros
- Free to use for MAC users
- Clean timeline
- One-click video cutting and trimming
- Easy-to-remember keyboard shortcuts
- Direct share projects to your social media, like YouTube
Cons
- It takes a lot of time to export videos
- iMovie needs high HDD storage space
VideoPad by NCH
VideoPad by NCH is a beginner-level video editor with all the basic features. The software is specifically designed for home movie makers. That is why VideoPad is easy to understand and use.
VideoPad is entirely free of cost for non-commercial purposes, but it has limited features. On the other hand, if you want to enjoy full traits, you can purchase the tool.
VideoPad supports video files, including AVI, WMV, MPEG, MOV, MP4, ASF, and XviD. Likewise, you can also burn movies to Blu-ray, DVD, HD-DVD, or CD. And most importantly, you can easily cut or trim AVI videos on your MAC, as the software is available on both MAC and Windows systems.
Features
- Audio tools
- Video rotation
- Video sharing
- Visual effects
- Video transitions
- 3D Video editing
- Color correction
- Overlays and texts
- Video optimization
- Great plugin support
- Direct video uploading
- Multiple video resolutions
- Video cutting and trimming
- Files exportation to various devices
- Stereoscopic conversion from 2D to 3D
Pros
- You can use the basic tools for free
- Allows 360-degree video production
- It supports a wide range of video formats
- Compatible with MAC and Windows computers
Cons
- The auto speech feature performs poorly
- The free version has annoying notifications
Xilisoft Video Cutter
Xilisoft Video Cutter is the simplest tool to cut videos on MAC. This software has a straightforward option to cut the clip after importing it to the timeline. The program is fast and has a user-friendly interface.
Moreover, you can polish your videos by merging multiple clips or increasing the video quality once you’re done with the cutting process. At the same time, this video cutter allows you to import all video formats, including XviD, DivX, MOV, FLV, MP4, MPEG-4/, MKV, MPEG, WMV, and AVI.
Features
- Video joining
- Support multiple output video formats, including HD
Pros
- Easy video cutting and merging
- It doesn’t require a large storage space
- Extremely uncomplicated interface
- Real-time preview to make better cuts
- Available on both MAC and Windows systems
Cons
- The trial version is free to use but limits you from enjoying extra features
Part 4: Top 3 Free AVI Video Cutter on Android
After capturing nice videos with your Android mobile phone, you may need to cut unnecessary scenes to make your clips look professional. While there are numerous Android cutters, not all support the AVI format. So below, you will find the 3 best AVI video cutters for Android, which are free to use.
Quick – Video Editor & Maker
Quick – Video Editor & Maker is a free video editor with PRO results. Many photographers and vloggers love using this app to cut clips immediately. Furthermore, the application offers a wide range of options to assure you don’t have to look to any other tool to rotate or compress video. Quick – Video Editor & Maker lets you import videos in all major formats, including AVI, MPEG, WMA, and more.
Features
- Video cutting, fading, and rotation
- Speed control tools
- Conversion from video to GIF
Pros
- Free app
- Simple interface
Cons
- Lack of updates
- Some users complain about app crash
Funimate Video Editor & Maker
If you want to make some professional-grade video edits quickly, you are welcome to download and use Funimate Video Editor & Maker on your Android device. It’s a free tool to cut videos. It has an easy procedure, and you can cut AVI videos in a few seconds.
Plus, you can use the app to add custom animations, effects, and many other exciting elements. You can share your makes on social media like TikTok, Instagram, and other platforms. Contrarily, the app itself is a community with millions of Funimate-users who share their creations daily. You can also join or watch videos from other creators to learn more about new techniques and trends in video editing.
Features
- Video trimming and splitting
- Animation and cropping
- Filters and AI effects
- Speed adjustment
- Keyframing and video merging
Pros
- Free Android application with several editing tools
- Easy trimming, splitting, and cropping
- Aspect ratio, border, and color customization
- Direct social media sharing
Cons
- Free users cannot use templates
- The free version stamps watermarks on each project
Part 5: Top 3 Free AVI Video Cutter on iPhone
No wonder iPhone’s camera captures high-quality videos. But the problem begins when there’s no free app to cut AVI videos. So if you’re recording great spots, but deep inside, you really want to remove some parts, then these 3 free AVI video cutters will work smoothly on your iPhone.
Cut, Trim, Split Video Editor
Download Cut, Trim, Split Video Editor on your iPhone to delete/cut unwanted portions of your video clips. The tool is also best for trimming iPhone-recorded clips without messing with the frames. Or, if you just want to split the video into multiple parts for your next WhatsApp status, this iPhone app can do that job for you.
The app supports multiple video file types, including MOV, MP4, AVI, MPEG, MPEG-2, and 3GPP
Features
- Easy trimming and cutting video clips
- Splitting big-sized videos into two smaller clips
- Import video from file-sharing platforms, like iCloud, using Wi-Fi
Pros
- Free app for fast video cutting and sharing
- Simple UI interface
Cons
- The free version shows advertisements
Splice - Video Editor & Maker
Splice is an extraordinary video editor that makes it easy to make fully customized and professional videos from your iPhone. The app is also best for video cutting. Besides, it has many interesting features, which you can use from your device.
Features
- Cutting, trimming, and cropping your videos
- Exposure, saturation, and exposure adjustment
- Slow and fast motion with speed ramping option
- Video masking and overlay
- Color correction and text overlays
Pros
- Free basic features, such as video cutting
- iTunes integration
- Supports AVI video input
- User-friendly application
- Access to the music library
- Quick and simple social sharing
Cons
- Output videos require high mobile storage space
Part 6: Top 3 Free AVI Video Cutter Online
Don’t want to install video cutters on your MAC, Windows, smartphone, or any other device? No problem! You can use online video cutters and trimmers to split, cut, or trim your clips for free.
However, the problem still exists in online tools, as not all web-based editors allow importing AVI files. So to save your time and energy, you can directly go to the following online AVI cutters to complete your tasks.
Kapwing
Kapwing is an online video editor best for casual creatives, such as Vloggers and YouTubers. You can use this web-based platform to cut your videos. Gladly, Kapwing supports all AVI incomings. You can upload your AVI video files to this platform and use its trim or split feature. To do that, you need to upload your AVI video and choose the “Trim” or “Split” tool to see the magic. Once done with the trimming process, you can explore Kapwing’s other incredible traits and apply them to your project.
Features
- Video splitting, trimming, and merging
- Audio capturing
- Speed adjustment
- Image and video library
- Text editing and overlay
- Auto-generated subtitles
- Several collaboration tools
- Video creation from scratch
- Templates, shapes, and emojis
- Simple drag-and-drop interface
- Video transitions, plugins, and elements
Pros
- Free online video trimmer
- User-friendly interface
- You can export 30-minutes long projects
- Allows you to export unlimited videos with a watermark
- One watermark-free video export is available each month
Cons
- Cannot export long videos with a free account
- Only 10 minutes transcription limit is available for free users
- You need to purchase a monthly or annual subscription to remove the watermark from multiple videos
Clideo
Clideo is not just a video cutter but an online solution to all your video editing problems. The tool is super popular, with 4 million+ users a month. And why not? This is one of those web-based platforms that allow AVI video files to be imported and exported without converting them into any other formats.
Nevertheless, if you’re only looking for video cutting options, this tool makes your life easy. Simply upload your video, and select the portion of it by setting start and end times. Choose whether you want to delete or extract the selected part from the clip, and hit the “Export” button.
And within a few moments, you can enjoy a trimmed video clip. And if you plan to be more creative, you can look for other Clideo features to make videos more fascinating.
Features
- Video combining and cutting
- Resize and crop clips
- Compress your videos
- Add text and subtitles
- Add music to your video files
- Filters and color correction tools
- Audio mute, cutting, and muting
- Video rotation, flipping, and speed adjustment
Pros
- Basic tools can be used for free
- Best for beginners and intermediate users
- Ideal for AVI videos and also supports other video formats
Cons
- You cannot use the free version regularly
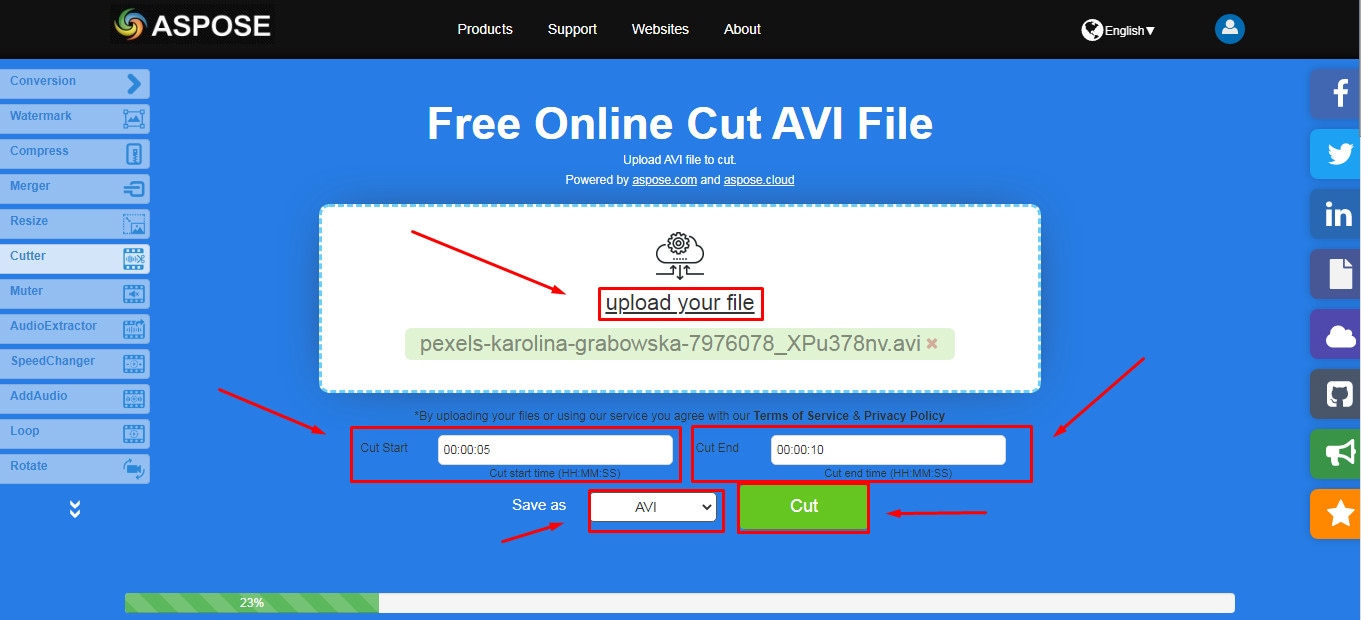
Aspose
Aspose is a free web-based application to cut clips. You can use this tool on any operating system. It supports all major video file formats, including AVI, MKV, MOV, MP4, FLV, WMV, WEBM, and GIF. Additionally, you can use Aspose for various other reasons, such as audio extraction, video resizing, and more.
Features
- Video cutting and compressing
- Looping, rotation, and video merging
- Adding watermarks on videos
- Sound muting
- Speed change and audio addition
Pros
- Aspose is a free online tool
- It offers straightforward options to cut and edit videos
Cons
- No color correction option
- Slow video cutting process
- Lacks timeline and other valuable features
Part 7: Bottom Line
Tired of finding AVI cutters? Relax and try these top 16 AVI video cutters for Windows, MAC, iPhone, Android, and online. Almost all these tools are free to use and are extremely handy. On the other hand, if you want to cut and trim videos professionally, download Filmora and follow the step-by-step guide in this article for making clean cuts.
Part 8: FAQs
Q1. How do I trim an AVI video?
To trim an AVI video file, ensure that the software or tool you use supports AVI input. Generally, you need to upload or import a clip on the program, select the portion of the video, and apply the cut/trim feature to make it happen.
Q2. Which is the best online video cutter?
Kapwing and Clideo are the two best online video cutters you can use for free. Both web-based tools also allow you to cut your AVI videos.
Q3. Which is the best video cutter and joiner software?
Filmora, iMovie, and Kapwing are some of the best video cutters and joiner tools. These video editors are also free to use and come with different features.
Q4. How do I trim an AVI file in Windows 10?
Trimming an AVI video file in Windows 10 is very simple. Launch the Microsoft Photos (Photo App) application on your computer, add clip, and select the “Trim” tool to trim a specific video part.
Q5. How can I cut a video on my computer for free?
MAC and Windows users can download Filmora to cut videos for free. Filmora also offers a wide range of other features to make your clips exciting. Contrarily, Windows users can use the built-in Photo App in Windows 10 or download Gihosoft or Handbrake software to cut clips. Likewise, MAC users can download VideoPad, Xilisoft Video Cutter, or iMovie for free.
With the growing fame of video-sharing and social media applications like Twitter, Instagram, and TikTok, the demand for simple and fast video cutting and trimming tools has dramatically increased. Nowadays, you don’t have to play with complex video editing tools to produce high-quality videos.
Thanks to several user-friendly editing software to make things easy for everybody. However, finding the right programs to trim/cut videos is still challenging, especially in AVI format.
But, guess what? These top 16 AVI video cutters for Windows, MAC, Android, iPhone, and online will make video cutting and trimming fun, especially when you learn to do it using Filmora.
In this Article
Part 1: Best AVI Video Cutter to Trim/Cut AVI Video on Windows and MAC – Filmora Video Cutter [with steps}
Part 2: Top 3 Free AVI Video Cutter on Windows
Part 3: Top 3 Free AVI Video Cutter on MAC
Part 4: Top 3 Free AVI Video Cutter on Android
Part 5: Top 3 Free AVI Video Cutter on iPhone
Part 6: Top 3 Free AVI Video Cutter Online
Part 7: Bottom Line
Part 8: FAQs
Part 1: Best AVI Video Cutter to Trim/Cut AVI Video on Windows and MAC – Filmora Video Cutter [with steps]
Filmora by Wondershare is a star video editor with outstanding outcomes. Whether you have a MAC or Windows PC, you can download Filmora regardless of your operating system. The program best serves those who intend to make high-quality videos. The software provides editing support for all video formats, including AVI.
Although Filmora is an affordable editor with tons of audio and video editing options, you can still download the software for free and create projects if watermarks don’t bother you. Moreover, you can count this tool’s capabilities in cropping, resizing, and Chroma screen support. But that’s not the only sweet fruit.
In fact, Filmora is equipped with many jaw-dropping features, including preset templates, auto beat sync, split-screen, speed ramping, motion tracking, keyframing, creative transitions, titles, filters, and much more. And the best part is, you can learn and understand Filmora in no time. That’s why the program is loved and supported by all types of users.
So does Filmora helps cut and trim AVI videos? Yes! It does if you follow these steps correctly.
Step 1: Download Filmora Video Editor
First, download Filmora Video Editor by choosing your operating system, as seen in the screenshot below.
Run the setup and let it finish without any pause or break.
Step 2: Import Your Video to Filmora Video Editor
Importing your AVI video is a very simple process. Just click on the “Film Clip” icon.
It will open a new window screen on your computer to select the video from the directory. Find the clip you want to import and cut. Use your mouse to select it and click the “Open” button.
The video will be loaded in the “Media” folder of Filmora. The clip’s thumbnail should be visible to assure you have done everything correctly.
If you can see that, let’s go to the next step.
Step 3: Drag and Drop Video to Filmora’s Timeline
Select the video in the media folder by clicking over it once. Now, without leaving the hold of the left button of your mouse, slide the video down to the track in the timeline.
After that, a message will pop up, asking about your preference for the project settings. It is recommended to choose the “Match to Media” option unless you’re an experienced video editor who knows how to play with the resolution and frame rates.
You will see the video on the timeline with its preview on the “Preview Screen” on the right side of the interface.
Step 4: Cutting Your Video in Filmora
Here comes the core step you have been waiting for. But before you go any further, you need to know about the “Playhead.”
Playhead is an orange-reddish marker you can find on the timeline.
It has an important role in cutting your videos.
So, move the playhead to your desired frame and click on the “scissor” icon to make the “starting” cut.
As soon as you do it, you will see that the single clip is now divided into two parts similar to this image.
The “Red” marked area in the above screenshot ensures a gap between the clips on the timeline. The “Yellow” arrows confirm two separate clips of the same video.
Place the two clips together as seen in this “Green” area.
And place the playhead anywhere on the clip. And click on the “scissor” icon once again to make the “ending” cut (second cut).
If done correctly, there should be three clips now of the same video, as you can observe in this screenshot.
Again, the “Red” area in the above photo indicates the gap, and the “Yellow” area ensures a third segment of the video.
Note: The gaps you can see in the divided clips are made intentionally for understanding. Practically, Filmora doesn’t move the clip or make gaps in between after you have made the cuts.
Keep in mind that there are three clips on the timeline. Now, if you want to remove the second clip from the video, you need to select that portion first by clicking on it.
Then, right-click on the mouse and choose “Cut” from the menu.
Within a semi-second, the selected portion will be removed from the timeline. And you will be able to see the remaining parts of the video. Now, pull the second clip using your mouse and place it at the end of the first clip without leaving a gap in between.
Then, click the “Play” button under the preview screen to see the results.
You can see in the above two screenshots that there’s a jump between the scenes due to cuts, confirming that video has been cut significantly.
Step 5: Trimming Your Video in Filmora
Remember that cutting and trimming in Filmora are two different things. Trimming allows you to remove a particular video part from visibility without deleting the portion.
So feel free to skip this step if you’re happy learning the cutting technique. But if you’re interested in trimming, here’s how you do it.
Take your mouse cursor at the beginning or end of the clip you want to trim. Keep holding the clip’s corner and slide the mouse back or front to trim the part
Note: Since the trim tool doesn’t delete the video, the final project based on trimming will be of a larger size. Therefore, it is advised to cut videos rather than trimming for fast rendering, better results, and small video size.
Step 6: Save Project and Export Your Cut/Trimmed AVI Video
Choose “Save Project” from the “File” menu.
Select the directory to save the project, rename the new video, and click the “Save” button.
Click on the “Export” button to save the video in AVI or any other video format of your choice on your computer.
Part 2: Top 3 Free AVI Video Cutter on Windows
As a Windows user, finding an excellent video cutter is relatively easy. However, not all software permits importing AVI videos. In the same way, some video trimmers come at a price. So if you really don’t want to pay and enjoy cutting your AVI files, try using these three video cutting tools.
Microsoft Photos (Windows 10)
Microsoft Photos or Photo App is a free photo viewer and editor with your Windows 10. It offers incredible photo editing and enhancement along with different tools for organizing and editing videos in a very friendly way. Likewise, you can create drawings over the videos and add 3D effects and background music to your clips.
You can also trim AVI videos with Microsoft Photos quickly. All you need to do is open your clip with the Photo App, choose the “Trim” option, select a portion of the video you want to trim, and go ahead.
That’s it!
Features
- Quick video trimming
- Cool text effects
- 3D library and effects
- It has a clear interface
- You can find and tag people’s faces
- The program has 15+ filters for editing
- Motion tracking option for drawing on videos
- Allows you to view and organize your files easily
Pros
- Microsoft Photos is free for Windows users
- It automatically creates albums
- The program has a touch-friendly interface
- You can integrate your OneDrive with the software
Cons
- Lacks before and after view
- Not included in older Windows versions
- It doesn’t support selective focus or panorama stitching
Handbrake
Handbrake is best-known for its video transcoding traits. Unlike typical video editors, this open-source tool includes limited options to rip Blu-rays and DVDs. Moreover, you can mix the 5.1 soundtracks and convert them to stereo to make the audio compatible with your TV speakers.
But the exciting thing about Handbrake is that you can use this software on your macOS 10.13 or later versions to cut AVI videos for free. However, it’s a bit technical process, as there’s no timeline to help you trim or make cuts on the clips directly with the help of your mouse.
You are required to mention a time range (seconds, minutes, or hours) to keep a specific part of the video while the software removes the non-ranged parts of the clip. For instance, you have a video of 10 seconds. You start the range from 5 seconds and end it at 10 seconds. So, the first four seconds of the video will be cut from the entire clip.
Features
- Video cutting, cropping, and resizing
- Low-quality and old video restoration
- Video conversion from any format to MKV or MP4
Pros
- Handbrake is free
- You can convert batch videos with ease
- It supports MAC, Windows, and Linux OS
- Allows you to import video files in all major formats
- The software comes with various video conversion presets
Cons
- Handbrake is not a user-friendly tool
- The video file output is limited to two formats (MKV and MP4) only
Gihosoft Video Cutter
Gihosoft is a clean, free, lossless video cutter on your Windows PC. It’s a simple tool that helps you cut video files into various output formats. So be it AVI, MPEG, or any other file, with Gihosoft, everything becomes handy.
Another fascinating fact about this software is that it allows you to cut videos in three simple steps without losing the quality. So right after installing the program, you simply need to import your file, choose the start and end time, and click the “Cut” button to remove the part of the video.
Features
- Fast video and audio cutting
- Easy drag and drop audio/video files
- It supports most audio and video formats
Pros
- Free for both Windows and MAC operating systems
- The cutter saves video in original quality
Cons
- It does not include basic video editing features
Part 3: Top 3 Free AVI Video Cutter on MAC
Are you looking for a great AVI video cutter for your MAC? Sadly, you have limited product choices as compared to Windows users. But to ensure you don’t waste time looking for a suitable tool, here’s a list of three AVI video cutting programs you can use on your Macintosh.
iMovie
The first and foremost recommended software for free video cutting on MAC is Apple’s own tool, iMovie . It is a built-in program that comes with your system, so there is no need to spend extra on a video editor. iMovie allows you to browse and import most video files, including AVI, right from your computer. Also, this tool is equipped with multiple functions, such as audio editing, video quality enhancement, and much more.
This MAC’s video editor is ideal for beginners. Many home users and small business owners find this tool extremely simple, as they don’t like to be confused with complex features. So, if you want to make cuts to your video clips, start working on iMovie. And within a few clicks, you can trim or cut your videos for free.
Features
- Video cutting and trimming
- Cropping and rotation
- Effects and transitions
- Built-in themes
- HD and 4K video support
- Movie sharing
- Audio adjustments
- Chroma screen controls
- Character tracking
Pros
- Free to use for MAC users
- Clean timeline
- One-click video cutting and trimming
- Easy-to-remember keyboard shortcuts
- Direct share projects to your social media, like YouTube
Cons
- It takes a lot of time to export videos
- iMovie needs high HDD storage space
VideoPad by NCH
VideoPad by NCH is a beginner-level video editor with all the basic features. The software is specifically designed for home movie makers. That is why VideoPad is easy to understand and use.
VideoPad is entirely free of cost for non-commercial purposes, but it has limited features. On the other hand, if you want to enjoy full traits, you can purchase the tool.
VideoPad supports video files, including AVI, WMV, MPEG, MOV, MP4, ASF, and XviD. Likewise, you can also burn movies to Blu-ray, DVD, HD-DVD, or CD. And most importantly, you can easily cut or trim AVI videos on your MAC, as the software is available on both MAC and Windows systems.
Features
- Audio tools
- Video rotation
- Video sharing
- Visual effects
- Video transitions
- 3D Video editing
- Color correction
- Overlays and texts
- Video optimization
- Great plugin support
- Direct video uploading
- Multiple video resolutions
- Video cutting and trimming
- Files exportation to various devices
- Stereoscopic conversion from 2D to 3D
Pros
- You can use the basic tools for free
- Allows 360-degree video production
- It supports a wide range of video formats
- Compatible with MAC and Windows computers
Cons
- The auto speech feature performs poorly
- The free version has annoying notifications
Xilisoft Video Cutter
Xilisoft Video Cutter is the simplest tool to cut videos on MAC. This software has a straightforward option to cut the clip after importing it to the timeline. The program is fast and has a user-friendly interface.
Moreover, you can polish your videos by merging multiple clips or increasing the video quality once you’re done with the cutting process. At the same time, this video cutter allows you to import all video formats, including XviD, DivX, MOV, FLV, MP4, MPEG-4/, MKV, MPEG, WMV, and AVI.
Features
- Video joining
- Support multiple output video formats, including HD
Pros
- Easy video cutting and merging
- It doesn’t require a large storage space
- Extremely uncomplicated interface
- Real-time preview to make better cuts
- Available on both MAC and Windows systems
Cons
- The trial version is free to use but limits you from enjoying extra features
Part 4: Top 3 Free AVI Video Cutter on Android
After capturing nice videos with your Android mobile phone, you may need to cut unnecessary scenes to make your clips look professional. While there are numerous Android cutters, not all support the AVI format. So below, you will find the 3 best AVI video cutters for Android, which are free to use.
Quick – Video Editor & Maker
Quick – Video Editor & Maker is a free video editor with PRO results. Many photographers and vloggers love using this app to cut clips immediately. Furthermore, the application offers a wide range of options to assure you don’t have to look to any other tool to rotate or compress video. Quick – Video Editor & Maker lets you import videos in all major formats, including AVI, MPEG, WMA, and more.
Features
- Video cutting, fading, and rotation
- Speed control tools
- Conversion from video to GIF
Pros
- Free app
- Simple interface
Cons
- Lack of updates
- Some users complain about app crash
Funimate Video Editor & Maker
If you want to make some professional-grade video edits quickly, you are welcome to download and use Funimate Video Editor & Maker on your Android device. It’s a free tool to cut videos. It has an easy procedure, and you can cut AVI videos in a few seconds.
Plus, you can use the app to add custom animations, effects, and many other exciting elements. You can share your makes on social media like TikTok, Instagram, and other platforms. Contrarily, the app itself is a community with millions of Funimate-users who share their creations daily. You can also join or watch videos from other creators to learn more about new techniques and trends in video editing.
Features
- Video trimming and splitting
- Animation and cropping
- Filters and AI effects
- Speed adjustment
- Keyframing and video merging
Pros
- Free Android application with several editing tools
- Easy trimming, splitting, and cropping
- Aspect ratio, border, and color customization
- Direct social media sharing
Cons
- Free users cannot use templates
- The free version stamps watermarks on each project
Part 5: Top 3 Free AVI Video Cutter on iPhone
No wonder iPhone’s camera captures high-quality videos. But the problem begins when there’s no free app to cut AVI videos. So if you’re recording great spots, but deep inside, you really want to remove some parts, then these 3 free AVI video cutters will work smoothly on your iPhone.
Cut, Trim, Split Video Editor
Download Cut, Trim, Split Video Editor on your iPhone to delete/cut unwanted portions of your video clips. The tool is also best for trimming iPhone-recorded clips without messing with the frames. Or, if you just want to split the video into multiple parts for your next WhatsApp status, this iPhone app can do that job for you.
The app supports multiple video file types, including MOV, MP4, AVI, MPEG, MPEG-2, and 3GPP
Features
- Easy trimming and cutting video clips
- Splitting big-sized videos into two smaller clips
- Import video from file-sharing platforms, like iCloud, using Wi-Fi
Pros
- Free app for fast video cutting and sharing
- Simple UI interface
Cons
- The free version shows advertisements
Splice - Video Editor & Maker
Splice is an extraordinary video editor that makes it easy to make fully customized and professional videos from your iPhone. The app is also best for video cutting. Besides, it has many interesting features, which you can use from your device.
Features
- Cutting, trimming, and cropping your videos
- Exposure, saturation, and exposure adjustment
- Slow and fast motion with speed ramping option
- Video masking and overlay
- Color correction and text overlays
Pros
- Free basic features, such as video cutting
- iTunes integration
- Supports AVI video input
- User-friendly application
- Access to the music library
- Quick and simple social sharing
Cons
- Output videos require high mobile storage space
Part 6: Top 3 Free AVI Video Cutter Online
Don’t want to install video cutters on your MAC, Windows, smartphone, or any other device? No problem! You can use online video cutters and trimmers to split, cut, or trim your clips for free.
However, the problem still exists in online tools, as not all web-based editors allow importing AVI files. So to save your time and energy, you can directly go to the following online AVI cutters to complete your tasks.
Kapwing
Kapwing is an online video editor best for casual creatives, such as Vloggers and YouTubers. You can use this web-based platform to cut your videos. Gladly, Kapwing supports all AVI incomings. You can upload your AVI video files to this platform and use its trim or split feature. To do that, you need to upload your AVI video and choose the “Trim” or “Split” tool to see the magic. Once done with the trimming process, you can explore Kapwing’s other incredible traits and apply them to your project.
Features
- Video splitting, trimming, and merging
- Audio capturing
- Speed adjustment
- Image and video library
- Text editing and overlay
- Auto-generated subtitles
- Several collaboration tools
- Video creation from scratch
- Templates, shapes, and emojis
- Simple drag-and-drop interface
- Video transitions, plugins, and elements
Pros
- Free online video trimmer
- User-friendly interface
- You can export 30-minutes long projects
- Allows you to export unlimited videos with a watermark
- One watermark-free video export is available each month
Cons
- Cannot export long videos with a free account
- Only 10 minutes transcription limit is available for free users
- You need to purchase a monthly or annual subscription to remove the watermark from multiple videos
Clideo
Clideo is not just a video cutter but an online solution to all your video editing problems. The tool is super popular, with 4 million+ users a month. And why not? This is one of those web-based platforms that allow AVI video files to be imported and exported without converting them into any other formats.
Nevertheless, if you’re only looking for video cutting options, this tool makes your life easy. Simply upload your video, and select the portion of it by setting start and end times. Choose whether you want to delete or extract the selected part from the clip, and hit the “Export” button.
And within a few moments, you can enjoy a trimmed video clip. And if you plan to be more creative, you can look for other Clideo features to make videos more fascinating.
Features
- Video combining and cutting
- Resize and crop clips
- Compress your videos
- Add text and subtitles
- Add music to your video files
- Filters and color correction tools
- Audio mute, cutting, and muting
- Video rotation, flipping, and speed adjustment
Pros
- Basic tools can be used for free
- Best for beginners and intermediate users
- Ideal for AVI videos and also supports other video formats
Cons
- You cannot use the free version regularly
Aspose
Aspose is a free web-based application to cut clips. You can use this tool on any operating system. It supports all major video file formats, including AVI, MKV, MOV, MP4, FLV, WMV, WEBM, and GIF. Additionally, you can use Aspose for various other reasons, such as audio extraction, video resizing, and more.
Features
- Video cutting and compressing
- Looping, rotation, and video merging
- Adding watermarks on videos
- Sound muting
- Speed change and audio addition
Pros
- Aspose is a free online tool
- It offers straightforward options to cut and edit videos
Cons
- No color correction option
- Slow video cutting process
- Lacks timeline and other valuable features
Part 7: Bottom Line
Tired of finding AVI cutters? Relax and try these top 16 AVI video cutters for Windows, MAC, iPhone, Android, and online. Almost all these tools are free to use and are extremely handy. On the other hand, if you want to cut and trim videos professionally, download Filmora and follow the step-by-step guide in this article for making clean cuts.
Part 8: FAQs
Q1. How do I trim an AVI video?
To trim an AVI video file, ensure that the software or tool you use supports AVI input. Generally, you need to upload or import a clip on the program, select the portion of the video, and apply the cut/trim feature to make it happen.
Q2. Which is the best online video cutter?
Kapwing and Clideo are the two best online video cutters you can use for free. Both web-based tools also allow you to cut your AVI videos.
Q3. Which is the best video cutter and joiner software?
Filmora, iMovie, and Kapwing are some of the best video cutters and joiner tools. These video editors are also free to use and come with different features.
Q4. How do I trim an AVI file in Windows 10?
Trimming an AVI video file in Windows 10 is very simple. Launch the Microsoft Photos (Photo App) application on your computer, add clip, and select the “Trim” tool to trim a specific video part.
Q5. How can I cut a video on my computer for free?
MAC and Windows users can download Filmora to cut videos for free. Filmora also offers a wide range of other features to make your clips exciting. Contrarily, Windows users can use the built-in Photo App in Windows 10 or download Gihosoft or Handbrake software to cut clips. Likewise, MAC users can download VideoPad, Xilisoft Video Cutter, or iMovie for free.
Most Downloaded and Loved Android Apps
Best and Most Popular Android Apps of 2024 on Google Play

Richard Bennett
Mar 27, 2024• Proven solutions
It is hard to believe that in 2024 Google Play had just fifty apps since it currently offers 2.8 million applications that can be used for anything from photo and video editing to learning a new language.
This year Google Play had a difficult task of selecting the best app of 2024, as there are so many apps across different categories that are worthy of this award. On December 3rd Google Play announced its choice and also presented the best Android apps of 2024 that were selected by users. So without further ado let’s take a look at the best and most popular Android apps of 2024
The Best App of 2024 Selected by Google Play: Ablo
Language barriers can prevent us from exploring the world and experiencing different cultures. So, it is no wonder that an app that enables its users to talk to people from around the globe in their mother tongue was chosen as the best app of 2024 by Google Play.

Ablo translates all chat messages in real-time which enables you to talk with all likeminded people you meet even if you don’t speak the same language.
The app also translates video calls live and allows you to have meaningful conversations with friends that come from different parts of the world. If you are traveling often and looking for an easy way to encounter the local culture or you just want to communicate with people whose language you don’t understand, then you should install Ablo and start making friends around the world.
The Most Popular Apps of 2024 on Google Play
Smartphones bring entertainment to the palms of our hands and grant us instant access to information that makes our lives easier. Over the course of 2024 apps from a broad range of categories have sparked the interest of thousands of Android users. Here are some of the most popular apps of 2024 that can help you improve your productivity or make better fashion choices.
1. Peloton
**Price:**Free, but offers in-app purchases
**Supported OS:**Requires Android 5.1 or up
**Category:**Health & Fitness

Leading a healthy lifestyle is much easier if you have the assistance of the world’s leading instructors. If you already own a Peloton bike or tread, then you can enjoy all the benefits of the Peloton app for free. Yoga, cardio or indoor cycling are just a few among numerous types of classes you can attend through this Android app. In addition, you can also broadcast your workouts through the Peloton’s Chromecast support and share your daily workout routines with thousands of followers. Even so, the app’s interface is somewhat outdated and the app crashes easily during workouts, which makes using Peloton frequently a bit difficult.
2. 21 Buttons
**Price:**Free
**Supported OS:**Requires Android 5.0 or up
**Category:**Social

If you would like to keep track of the latest fashion trends and discover places where you can buy clothes and accessories worn by your favorite influencers, then you should install the 21 Buttons app on your phone. This social network for fashion enthusiasts can help you choose new outfits and save them in your public or private closets. What’s more, you can share the fashion choices with your followers and link to the stores where particular items can be purchased. This app also enables you to search for up and coming brands, since it is hard to find a fashion brand that isn’t featured on 21 Buttons.
3. Post-it®
**Price:**Free
**Supported OS:**Android 7.0 and up
**Category:**Productivity

Managing and organizing vast amounts of handwritten notes is a futile effort as sorting out hundreds of tiny pieces of paper is often impossible. Installing the Post-it app that captures handwritten notes and allows you to organize them in any way you want can help you perform your daily tasks more efficiently. Once you’ve created and organized your board you can share it with your colleagues or export it to Excel, PowerPoint or Trello. Post-it can capture more than 200 notes at the same time using your phone’s camera and use the Handwriting Recognition AI to transcribe them. Each not you create with this app can be easily edited or deleted.
4. Scripts by Drops – Learn to Write
**Price:**Free, but offers in-app purchases
**Supported OS:**Requires Android 4.4 and up
**Category:**Education

Learning a new language should be a fun process that is not going to take too much of your time. Scripts by Drops limits the total amount of time you can spend practicing a new language to just five minutes a day. Even though this may seem far from enough to master Chinese Hanzi or to learn Russian Cyrillic, this app will deliver the results you’re looking for as long as you keep using it every single day. Scripts by Drops employs visual learning techniques that help the app’s users connect letters and characters to their pronunciations. If you opt for one of the available subscription models you will have an unlimited amount of learning time at your disposal.
5. Boosted – Productivity and Time Tracker
**Price:**Free
**Supported OS:**Requires Android 4.4 and up
**Category:**Productivity
![]()
Finding ways to use your time more effectively can have far-reaching positive consequences on your personal and professional life. Boosted lets you create as many new projects as you want and it allows you to break down each project into smaller tasks. It only takes a single tap to start tracking the time you spend on an activity and allows you to see how productive your days actually are. The app sends you notifications that inform you about the total amount of time you spend working on a project and grants you the weekly or monthly overview of the time you allocated to a particular project.
6. Enlight Pixaloop – Photo Animator & Photo Editor
**Price:**Free, but offers in-app purchases
**Supported OS:**Requires Android 7.1 and up
**Category:**Photography

Enlight Pixaloop makes animating still images look easy by offering simple animation tools that allow you to set anchor points or freeze entire sections of photos. Moreover, you can choose the direction of the movement by tapping on one of the arrows that are displayed on the screen.
Enlight Pixaloop grants you access to a huge selection of overlays that enable you to animate a photo with a single tap. The app’s photo editor features a versatile set of photo editing tools that give you complete creative control over the pictures you’re editing. You should keep in mind that you have to make in-app purchases if you want to use all of the animation and photo editing tools Enlight Pixaloop has to offer.
7. Morphin CGI GIF Maker and Editor
**Price:**Free
**Supported OS:**Requires Android 4.4 and up
**Category:**Video players and editors

This is a simple app that lets you create entertaining GIFs you can use to surprise your friends on social media. You can take a selfie and become your favorite celebrity in just a few minutes. Morphin utilizes CGI technology to customize faces and adjust them to the selected source image.
The app doesn’t add watermarks to the GIFs you create and allows you to share them on Instagram, WhatsApp, Messenger and countless other messaging and social media apps. However, there isn’t much more you can do with Morphin other than create GIFs, and you should consider installing another app if you want to edit videos.
8. Firework
**Price:**Free, but offers in-app purchases
**Supported OS:**Requires Android 5.0 and up
**Category:**Entertainment

Fans of short-form videos are going to love using Firework because it will help them discover new thought-provoking videos that are created by film enthusiasts from all over the world. The duration of all content you can find on Firework is limited to just thirty seconds, which means that you can watch several short masterpieces in less than five minutes. The app shows you curated videos based on your interests and allows you to follow your favorite creators. In addition, you can save all the videos you like to your private collection and view them whenever you want.
Conclusion
The best Android apps of 2024 bring innovation and push our expectations from the apps we are using further. Each of the most popular apps on Google Play is equipped with powerful features that can help you increase your level of productivity or create visual content your social media followers are going to adore.
Below is the summary of these best and popular apps on Google Play, hope that will give you some insight as well.
| Most Popular Apps of 2024 | Publisher | Category | Price | Ratings | User Rating | Requires Android |
|---|---|---|---|---|---|---|
| Ablo | MassiveMedia | Lifestyle | Free, In-App Purchases | 104,746 | 4.3 | 4.4 and up |
| Video Editor - Glitch Video Effects | Inc. | Video Players & Editors | Free, In-App Purchases | 67,703 | 4.6 | 5.0 and up |
| Peloton | Peloton Interactive, Inc | Health & Fitness | Free, In-App Purchases | 1,852 | 3.8 | 5.1 and up |
| 21 Buttons | 21 Buttons | Social | Free | 23,263 | 4 | 5.0 and up |
| Post-it® | 3M Company | Productivity | Free | 605 | 4 | 7.0 and up |
| Scripts by Drops | Language Drops | Education | Free, In-App Purchases | 7,355 | 4.6 | 4.4 and up |
| Boosted | Boosted Productivity | Productivity | Free | 5,446 | 4.7 | 4.4 and up |
| Enlight Pixaloop | Lightricks Ltd. | Photography | Free, In-App Purchases | 73,708 | 4.3 | 7.1 and up |
| Morphin | Morphin | Video Players & Editors | Free | 2,569 | 4.2 | 4.4 and up |
| Firework | Loop Now Technologies, Inc. | Entertainment | Free, In-App Purchases | 13,149 | 4.5 | 5.0 and up |
How many of the most popular apps on Google Play in 2024 have you used so far? Leave a comment and let us know.
Richard Bennett
Richard Bennett is a writer and a lover of all things video.
Follow @Richard Bennett
Richard Bennett
Mar 27, 2024• Proven solutions
It is hard to believe that in 2024 Google Play had just fifty apps since it currently offers 2.8 million applications that can be used for anything from photo and video editing to learning a new language.
This year Google Play had a difficult task of selecting the best app of 2024, as there are so many apps across different categories that are worthy of this award. On December 3rd Google Play announced its choice and also presented the best Android apps of 2024 that were selected by users. So without further ado let’s take a look at the best and most popular Android apps of 2024
The Best App of 2024 Selected by Google Play: Ablo
Language barriers can prevent us from exploring the world and experiencing different cultures. So, it is no wonder that an app that enables its users to talk to people from around the globe in their mother tongue was chosen as the best app of 2024 by Google Play.
Ablo translates all chat messages in real-time which enables you to talk with all likeminded people you meet even if you don’t speak the same language.
The app also translates video calls live and allows you to have meaningful conversations with friends that come from different parts of the world. If you are traveling often and looking for an easy way to encounter the local culture or you just want to communicate with people whose language you don’t understand, then you should install Ablo and start making friends around the world.
The Most Popular Apps of 2024 on Google Play
Smartphones bring entertainment to the palms of our hands and grant us instant access to information that makes our lives easier. Over the course of 2024 apps from a broad range of categories have sparked the interest of thousands of Android users. Here are some of the most popular apps of 2024 that can help you improve your productivity or make better fashion choices.
1. Peloton
**Price:**Free, but offers in-app purchases
**Supported OS:**Requires Android 5.1 or up
**Category:**Health & Fitness
Leading a healthy lifestyle is much easier if you have the assistance of the world’s leading instructors. If you already own a Peloton bike or tread, then you can enjoy all the benefits of the Peloton app for free. Yoga, cardio or indoor cycling are just a few among numerous types of classes you can attend through this Android app. In addition, you can also broadcast your workouts through the Peloton’s Chromecast support and share your daily workout routines with thousands of followers. Even so, the app’s interface is somewhat outdated and the app crashes easily during workouts, which makes using Peloton frequently a bit difficult.
2. 21 Buttons
**Price:**Free
**Supported OS:**Requires Android 5.0 or up
**Category:**Social
If you would like to keep track of the latest fashion trends and discover places where you can buy clothes and accessories worn by your favorite influencers, then you should install the 21 Buttons app on your phone. This social network for fashion enthusiasts can help you choose new outfits and save them in your public or private closets. What’s more, you can share the fashion choices with your followers and link to the stores where particular items can be purchased. This app also enables you to search for up and coming brands, since it is hard to find a fashion brand that isn’t featured on 21 Buttons.
3. Post-it®
**Price:**Free
**Supported OS:**Android 7.0 and up
**Category:**Productivity
Managing and organizing vast amounts of handwritten notes is a futile effort as sorting out hundreds of tiny pieces of paper is often impossible. Installing the Post-it app that captures handwritten notes and allows you to organize them in any way you want can help you perform your daily tasks more efficiently. Once you’ve created and organized your board you can share it with your colleagues or export it to Excel, PowerPoint or Trello. Post-it can capture more than 200 notes at the same time using your phone’s camera and use the Handwriting Recognition AI to transcribe them. Each not you create with this app can be easily edited or deleted.
4. Scripts by Drops – Learn to Write
**Price:**Free, but offers in-app purchases
**Supported OS:**Requires Android 4.4 and up
**Category:**Education
Learning a new language should be a fun process that is not going to take too much of your time. Scripts by Drops limits the total amount of time you can spend practicing a new language to just five minutes a day. Even though this may seem far from enough to master Chinese Hanzi or to learn Russian Cyrillic, this app will deliver the results you’re looking for as long as you keep using it every single day. Scripts by Drops employs visual learning techniques that help the app’s users connect letters and characters to their pronunciations. If you opt for one of the available subscription models you will have an unlimited amount of learning time at your disposal.
5. Boosted – Productivity and Time Tracker
**Price:**Free
**Supported OS:**Requires Android 4.4 and up
**Category:**Productivity
![]()
Finding ways to use your time more effectively can have far-reaching positive consequences on your personal and professional life. Boosted lets you create as many new projects as you want and it allows you to break down each project into smaller tasks. It only takes a single tap to start tracking the time you spend on an activity and allows you to see how productive your days actually are. The app sends you notifications that inform you about the total amount of time you spend working on a project and grants you the weekly or monthly overview of the time you allocated to a particular project.
6. Enlight Pixaloop – Photo Animator & Photo Editor
**Price:**Free, but offers in-app purchases
**Supported OS:**Requires Android 7.1 and up
**Category:**Photography
Enlight Pixaloop makes animating still images look easy by offering simple animation tools that allow you to set anchor points or freeze entire sections of photos. Moreover, you can choose the direction of the movement by tapping on one of the arrows that are displayed on the screen.
Enlight Pixaloop grants you access to a huge selection of overlays that enable you to animate a photo with a single tap. The app’s photo editor features a versatile set of photo editing tools that give you complete creative control over the pictures you’re editing. You should keep in mind that you have to make in-app purchases if you want to use all of the animation and photo editing tools Enlight Pixaloop has to offer.
7. Morphin CGI GIF Maker and Editor
**Price:**Free
**Supported OS:**Requires Android 4.4 and up
**Category:**Video players and editors
This is a simple app that lets you create entertaining GIFs you can use to surprise your friends on social media. You can take a selfie and become your favorite celebrity in just a few minutes. Morphin utilizes CGI technology to customize faces and adjust them to the selected source image.
The app doesn’t add watermarks to the GIFs you create and allows you to share them on Instagram, WhatsApp, Messenger and countless other messaging and social media apps. However, there isn’t much more you can do with Morphin other than create GIFs, and you should consider installing another app if you want to edit videos.
8. Firework
**Price:**Free, but offers in-app purchases
**Supported OS:**Requires Android 5.0 and up
**Category:**Entertainment
Fans of short-form videos are going to love using Firework because it will help them discover new thought-provoking videos that are created by film enthusiasts from all over the world. The duration of all content you can find on Firework is limited to just thirty seconds, which means that you can watch several short masterpieces in less than five minutes. The app shows you curated videos based on your interests and allows you to follow your favorite creators. In addition, you can save all the videos you like to your private collection and view them whenever you want.
Conclusion
The best Android apps of 2024 bring innovation and push our expectations from the apps we are using further. Each of the most popular apps on Google Play is equipped with powerful features that can help you increase your level of productivity or create visual content your social media followers are going to adore.
Below is the summary of these best and popular apps on Google Play, hope that will give you some insight as well.
| Most Popular Apps of 2024 | Publisher | Category | Price | Ratings | User Rating | Requires Android |
|---|---|---|---|---|---|---|
| Ablo | MassiveMedia | Lifestyle | Free, In-App Purchases | 104,746 | 4.3 | 4.4 and up |
| Video Editor - Glitch Video Effects | Inc. | Video Players & Editors | Free, In-App Purchases | 67,703 | 4.6 | 5.0 and up |
| Peloton | Peloton Interactive, Inc | Health & Fitness | Free, In-App Purchases | 1,852 | 3.8 | 5.1 and up |
| 21 Buttons | 21 Buttons | Social | Free | 23,263 | 4 | 5.0 and up |
| Post-it® | 3M Company | Productivity | Free | 605 | 4 | 7.0 and up |
| Scripts by Drops | Language Drops | Education | Free, In-App Purchases | 7,355 | 4.6 | 4.4 and up |
| Boosted | Boosted Productivity | Productivity | Free | 5,446 | 4.7 | 4.4 and up |
| Enlight Pixaloop | Lightricks Ltd. | Photography | Free, In-App Purchases | 73,708 | 4.3 | 7.1 and up |
| Morphin | Morphin | Video Players & Editors | Free | 2,569 | 4.2 | 4.4 and up |
| Firework | Loop Now Technologies, Inc. | Entertainment | Free, In-App Purchases | 13,149 | 4.5 | 5.0 and up |
How many of the most popular apps on Google Play in 2024 have you used so far? Leave a comment and let us know.
Richard Bennett
Richard Bennett is a writer and a lover of all things video.
Follow @Richard Bennett
Slow Down Your Videos: A Step-by-Step Guide to VLC’s Slow Motion Feature
While the files of the most common formats like MP4, WAV, etc. may look identical, they might be compiled using varied codecs which may or may not support any random player that you install on your PC. The reason why VLC media player is used by the majority of users worldwide is the versatility in the codecs that it supports natively.
Furthermore, the app is available for almost every platform, i.e., Windows, Mac, Linux, iOS, and Android, and is absolutely free to download and use.
With that said, the following sections explain how to manage the playback speed of a video while using VLC media player to add a slow motion effect to video. Here you will learn how to play slow motion on VLC on Windows, Mac, and iOS/Android, and also how to set the default speed for the app so that every time a video is played, the speed remains according to your preference.
In this article
01 How to Play Video in Slow Motion Effects on Windows with VLC?
02 How to Play Slow Motion Effects on Mac with VLC?
03 How to Control Playback Speed in VLC Media Player on Android and iOS?
04 How to Set up the Default Playback Speed on VLC?
Part 1: How to Play Video in Slow Motion Effects on Windows with VLC?
VLC is one of the best media players to play videos in slow motion . You can follow the instructions that are given below to learn how to play a video in slow motion in VLC on a Windows PC:
Step 1: Start Video Playback
Launch VLC on your Windows computer (a Windows 11 PC is used here for illustrations), click Media from the menu bar at the top, click Open File from the menu, and locate and open a video that you want to watch in slow motion. If VLC is your default media player, simply double-clicking the clip automatically opens the file in the app.

Step 2: Reduce the Playback Speed (In Decrements of 0.10x)
Once the playback begins, press the Spacebar on the keyboard to pause the video. Next, go to the Playback menu from the top, go to Speed, and click Slower (fine) once. This will reduce the speed to 0.90x. Clicking Slower (fine) again will further slow down the video to 0.80x speed. You can repeat this process until you reduce the speed to your desired level. Press Spacebar again to resume the playback in slow motion.
Note: The lowest speed that you can go to using this process is 0.03x.

Step 3: Reduce the Playback Speed (In Decrements in Percentage)
Pause the playback and go to Playback > Speed as explained in the previous step. From the list that comes up, click Slower (the last option). This will reduce the speed to 0.67x. Click Slower again and the speed will further go down to 0.50x. You can repeat this process until you reach your desired playback speed. Press Spacebar to resume the playback in slow motion. With this method, you can reduce the speed to as low as 0.02x.
Note: You can click Normal from the Speed submenu to play the video at normal speed.

Step 4: Using the Shortcut Keys (Optional)
You can press the left square bracket ‘[‘ on your keyboard to reduce the speed in decrements of 0.10x. To get back to the normal speed, press the equals to ‘=’ key. Likewise, pressing the right square bracket ‘]’ increases the speed by 0.10x.
Note: As it is with the Slower (fine) and Slower options, you can use Faster (fine) to add 0.10x increments to the speed, and Faster to increase percentage-wise. Also, if Faster (fine) is clicked repeatedly or its shortcut key is used multiple times, the speed can be increased up to 31.25x. On the other hand, by using the Faster option repeatedly, the speed can be increased to more than 100x.
Part 2: How to Play Slow Motion Effects on Mac with VLC?
The process of slowing down the video playback in VLC on a Mac computer is almost identical to that in Windows. You can learn how to get this done by following the steps that are given below:
Step 1: Open and Pause the Video
Locate and right-click the video that you want to play in slow motion, go to Open With from the context menu, and click VLC from the submenu. Once the clip opens, click the Pause button from the bottom as explained in the previous section.
Step 2: Reduce the Playback Speed
Click Playback from the menu bar at the top, and drag the Playback Speed slider to the left to reduce the speed of the video.

Step 3: Resume the Playback
Click anywhere on the screen to close the Playback menu, and then click the Play button from the bottom to resume the video playback in slow motion.
Part 3: How to Control Playback Speed in VLC Media Player on Android and iOS?
Although the playback speed of a video on both Android and iOS devices can be controlled with a slider, the location where the controller is placed on the two platforms varies, and so does the process of reaching there. Both the methods are explained below for your convenience:
Play Video in Slow Motion on Android with VLC
Step 1: Pause the Playback
Launch VLC on your Android phone (Samsung Galaxy Note 10+ is used here for illustrations), locate and open the video in VLC, tap anywhere on the screen, and tap the Pause button from the bottom to pause the playback.
Step 2: Set a Slower Playback Speed
Tap the More icon from the bottom-right corner, tap Playback speed from the menu that appears, and drag the slider that is present at the bottom to the left to reduce the speed. Alternatively, you can also repeatedly tap the down arrow that is present at the right of the slider to slow down the speed in the decrements of 0.05x.

Step 3: Resume the Playback
Tap anywhere on the screen, and when the Playback speed slider disappears, tap the screen one more time. Now, tap the Play icon from the bottom to resume the video playback.
Play Video in Slow Motion on iPhone with VLC
Step 1: Pause the Playback
Assuming that you have already added the video to the VLC library by connecting it to iTunes, launch the app on your iOS device (iPhone 13 Pro Max is used here for illustrations). Tap the video that you want to play in slow motion, and then tap the Pause icon from the bottom.
Step 2: Reduce the Playback Speed
Tap anywhere on the screen, and tap the Clock icon from the lower-left corner. Next, drag the Playback speed slider to the left to reduce the playback speed.

Step 3: Resume the Playback
Right after decreasing the speed, tap the Play icon from the bottom to resume the playback. If the controllers disappear, you can tap anywhere on the screen again, and then tap the Play icon.
Part 4: How to Set up the Default Playback Speed on VLC?
The processes of setting up default playback speed on different platforms and devices vary. For your convenience, all of them are explained below:
Set up Default Playback Speed in VLC on Windows
- Go to Tools > Preferences in VLC media player, and then click the All button from the Show settings section at the bottom.
- Select Input / Codecs from the left pane of the Advanced Preferences box, and then specify your preferred speed in the Playback speed field that is present under the Playback control section on the right window
- Click Save to save the changes

Set up Default Playback Speed in VLC on Mac
- Launch VLC, and go to VLC media player from the menu bar, and then click Preferences; and then click Show All from the bottom of the Preferences box to display all preferences setting options;

- Click the Input / Codecs from the left pane, and then define your preferred speed in the Playback speed field under the Playback control section in the right window, and then click Save to save the changes.

How to Change VLC Media Player Default Speed on Android
Note: At the time of this writing, the Android version of VLC doesn’t allow you to set a global default playback speed. However, you can set it on a per video basis. This means that every time that video is played, the playback speed will remain what you set for it. You must do this for each video in your VLC library individually.
- Launch VLC, and then tap More from the bottom-right corner; next, tap SETTINGS from the upper-left area;
- Tap Video from the Extra settings section, and then check the Save Playback Speed box

How to Change VLC Media Player Default Speed on iOS and iPhone
- Tap Settings from the Home screen, and then scroll down and tap VLC
- Tap Default playback speed from the GENERIC section, and then tap to select a playback speed from the available list to set it as the default.

Conclusion
It is pretty convenient to reduce the playback speed in VLC media player regardless of the platform or device you are using. While the processes of getting the job might be different, the principle behind it remains the same. When on Windows, the playback speed can be decreased to 0.02x and can be increased to more than 100x. This facility is not available on Mac, iOS, or Android platforms. Also, if you want, you can set the default playback speed for the videos so that every time a clip is played, the pace remains what you specified as default.
02 How to Play Slow Motion Effects on Mac with VLC?
03 How to Control Playback Speed in VLC Media Player on Android and iOS?
04 How to Set up the Default Playback Speed on VLC?
Part 1: How to Play Video in Slow Motion Effects on Windows with VLC?
VLC is one of the best media players to play videos in slow motion . You can follow the instructions that are given below to learn how to play a video in slow motion in VLC on a Windows PC:
Step 1: Start Video Playback
Launch VLC on your Windows computer (a Windows 11 PC is used here for illustrations), click Media from the menu bar at the top, click Open File from the menu, and locate and open a video that you want to watch in slow motion. If VLC is your default media player, simply double-clicking the clip automatically opens the file in the app.
Step 2: Reduce the Playback Speed (In Decrements of 0.10x)
Once the playback begins, press the Spacebar on the keyboard to pause the video. Next, go to the Playback menu from the top, go to Speed, and click Slower (fine) once. This will reduce the speed to 0.90x. Clicking Slower (fine) again will further slow down the video to 0.80x speed. You can repeat this process until you reduce the speed to your desired level. Press Spacebar again to resume the playback in slow motion.
Note: The lowest speed that you can go to using this process is 0.03x.
Step 3: Reduce the Playback Speed (In Decrements in Percentage)
Pause the playback and go to Playback > Speed as explained in the previous step. From the list that comes up, click Slower (the last option). This will reduce the speed to 0.67x. Click Slower again and the speed will further go down to 0.50x. You can repeat this process until you reach your desired playback speed. Press Spacebar to resume the playback in slow motion. With this method, you can reduce the speed to as low as 0.02x.
Note: You can click Normal from the Speed submenu to play the video at normal speed.
Step 4: Using the Shortcut Keys (Optional)
You can press the left square bracket ‘[‘ on your keyboard to reduce the speed in decrements of 0.10x. To get back to the normal speed, press the equals to ‘=’ key. Likewise, pressing the right square bracket ‘]’ increases the speed by 0.10x.
Note: As it is with the Slower (fine) and Slower options, you can use Faster (fine) to add 0.10x increments to the speed, and Faster to increase percentage-wise. Also, if Faster (fine) is clicked repeatedly or its shortcut key is used multiple times, the speed can be increased up to 31.25x. On the other hand, by using the Faster option repeatedly, the speed can be increased to more than 100x.
Part 2: How to Play Slow Motion Effects on Mac with VLC?
The process of slowing down the video playback in VLC on a Mac computer is almost identical to that in Windows. You can learn how to get this done by following the steps that are given below:
Step 1: Open and Pause the Video
Locate and right-click the video that you want to play in slow motion, go to Open With from the context menu, and click VLC from the submenu. Once the clip opens, click the Pause button from the bottom as explained in the previous section.
Step 2: Reduce the Playback Speed
Click Playback from the menu bar at the top, and drag the Playback Speed slider to the left to reduce the speed of the video.
Step 3: Resume the Playback
Click anywhere on the screen to close the Playback menu, and then click the Play button from the bottom to resume the video playback in slow motion.
Part 3: How to Control Playback Speed in VLC Media Player on Android and iOS?
Although the playback speed of a video on both Android and iOS devices can be controlled with a slider, the location where the controller is placed on the two platforms varies, and so does the process of reaching there. Both the methods are explained below for your convenience:
Play Video in Slow Motion on Android with VLC
Step 1: Pause the Playback
Launch VLC on your Android phone (Samsung Galaxy Note 10+ is used here for illustrations), locate and open the video in VLC, tap anywhere on the screen, and tap the Pause button from the bottom to pause the playback.
Step 2: Set a Slower Playback Speed
Tap the More icon from the bottom-right corner, tap Playback speed from the menu that appears, and drag the slider that is present at the bottom to the left to reduce the speed. Alternatively, you can also repeatedly tap the down arrow that is present at the right of the slider to slow down the speed in the decrements of 0.05x.
Step 3: Resume the Playback
Tap anywhere on the screen, and when the Playback speed slider disappears, tap the screen one more time. Now, tap the Play icon from the bottom to resume the video playback.
Play Video in Slow Motion on iPhone with VLC
Step 1: Pause the Playback
Assuming that you have already added the video to the VLC library by connecting it to iTunes, launch the app on your iOS device (iPhone 13 Pro Max is used here for illustrations). Tap the video that you want to play in slow motion, and then tap the Pause icon from the bottom.
Step 2: Reduce the Playback Speed
Tap anywhere on the screen, and tap the Clock icon from the lower-left corner. Next, drag the Playback speed slider to the left to reduce the playback speed.
Step 3: Resume the Playback
Right after decreasing the speed, tap the Play icon from the bottom to resume the playback. If the controllers disappear, you can tap anywhere on the screen again, and then tap the Play icon.
Part 4: How to Set up the Default Playback Speed on VLC?
The processes of setting up default playback speed on different platforms and devices vary. For your convenience, all of them are explained below:
Set up Default Playback Speed in VLC on Windows
- Go to Tools > Preferences in VLC media player, and then click the All button from the Show settings section at the bottom.
- Select Input / Codecs from the left pane of the Advanced Preferences box, and then specify your preferred speed in the Playback speed field that is present under the Playback control section on the right window
- Click Save to save the changes
Set up Default Playback Speed in VLC on Mac
- Launch VLC, and go to VLC media player from the menu bar, and then click Preferences; and then click Show All from the bottom of the Preferences box to display all preferences setting options;
- Click the Input / Codecs from the left pane, and then define your preferred speed in the Playback speed field under the Playback control section in the right window, and then click Save to save the changes.
How to Change VLC Media Player Default Speed on Android
Note: At the time of this writing, the Android version of VLC doesn’t allow you to set a global default playback speed. However, you can set it on a per video basis. This means that every time that video is played, the playback speed will remain what you set for it. You must do this for each video in your VLC library individually.
- Launch VLC, and then tap More from the bottom-right corner; next, tap SETTINGS from the upper-left area;
- Tap Video from the Extra settings section, and then check the Save Playback Speed box
How to Change VLC Media Player Default Speed on iOS and iPhone
- Tap Settings from the Home screen, and then scroll down and tap VLC
- Tap Default playback speed from the GENERIC section, and then tap to select a playback speed from the available list to set it as the default.
Conclusion
It is pretty convenient to reduce the playback speed in VLC media player regardless of the platform or device you are using. While the processes of getting the job might be different, the principle behind it remains the same. When on Windows, the playback speed can be decreased to 0.02x and can be increased to more than 100x. This facility is not available on Mac, iOS, or Android platforms. Also, if you want, you can set the default playback speed for the videos so that every time a clip is played, the pace remains what you specified as default.
Speed Up Your Videos: Top Time-Lapse Apps for Mobile Devices
Best Time-Lapse Apps for iPhone and Android Devices

Shanoon Cox
Mar 27, 2024• Proven solutions
Watching the time pass by in front of our eyes is mesmerizing. The fast forwarded scenes of beautiful sunsets, busy streets and all other types of vistas can be found anywhere from Holywood movies to YouTube videos. You don’t need professional camera equipment if you want to create time-lapse videos you can share on your social media accounts because there are plenty of apps that let you create these types of videos directly from your Smartphones. So, in this article, we are going to introduce you to some of the best time-lapse apps for iPhone and Android devices in 2020.
Best Time-Lapse Apps for Android and iPhone Devices in 2021
The quality of your time-lapse video doesn’t depend only on the number of tools an app offers, which is why you must do everything in your power to record the footage that doesn’t contain camera shakes or any other common mistakes. With that being said, let’s take a look at the five best time-lapse apps you can find on GooglePlay or on the AppStore.
1. Microsoft Hyperlapse Mobile
Price: Free
Compatibility: Android 4.4 or later
Rating: 4.2
This Android-based application makes the creation of time-lapse videos look easy. You just have to select the speed at which you want to record a video, choose between 720p and 1080p resolutions and hit the record button. The app lets you increase the video’s speed up to 32 times, enabling you to create seamless time-lapses, although the video stabilization feature is only available if you’re recording a video at a normal speed. That is why you must ensure that your phone is perfectly stable while the recording is in progress if you want to create a smooth time-lapse. Microsoft Hyperlapse Mobile lets you share your creations on Instagram, Facebook, and other popular social media networks or save the time-lapse you’ve created to your phone’s SD card.
2. Slo Mo time lapse vid edit.or
Price: Free, but offers in-app purchases
Compatibility: iOS 9.0 or later
Rating: 4.1
This is a video editing app that doesn’t offer video recording options. However, if you already have the footage you’d like to turn into a time-lapse video, Slo Mo time lapse vid edit.or may be one of the best options you have. Besides creating slow motion and time-lapse videos, you can also use this app to enhance the colors in the footage you’re editing, crop or trim video clips and add customized text overlays to the videos. The app also features a wide spectrum of filters and allows you to add sound effects or music to the video you’re working on. Keep in mind that you have to make an in-app purchase if you want to remove the watermark from your videos or if you want to export your time-lapse and slow-motion videos in Full HD resolution.
3. Lapse It Pro
Price: $2.99
Compatibility: Android 2.2 or later , iOS 11 or later
Rating: 4.1 on AppStore, 4.3 on Google Play
The seemingly endless list of options the Lapse It Pro offers makes it a perfect choice for all iPhone and Android users who want to speed up the footage they are recording up to 240 times. The app can be used in both Auto and Manual modes, which means that you can control ISO, Exposure or White Balance values while a recording session is still in progress. In case you don’t want to take photos or record videos with Lapse It Pro, you can import already existing footage into the app and turn it into a stunning time-lapse. The app’s render engine exports UHD 4K videos in remarkably short periods of time, so you can quickly share high-quality videos to any of the popular social media networks.
4. Hyperlapse from Instagram
Price: Free
Compatibility: iOS 9.0 or later
Rating: 4.4
Making time-lapse videos with this app is so easy that you just have to launch the app, hit the record button and point your iPhone towards the scene you’d like to capture. The best part is that you don’t even need an Instagram account to start using the Hyperlapse from Instagram app. You can increase the video’s speed up to 12 times, and you don’t have to worry about the camera shakes since the app features an automatic stabilization feature that is so powerful that you can shoot all your videos handheld. The time-lapse videos you create with this iOS-based app can be easily saved to your phone’s camera roll or shared to Instagram in only a few taps. The only downside is that Hyperlapse for Instagram doesn’t offer any video editing tools.
5. Framelapse
Price: Free
Compatibility: Android 4.0 or later
Rating: 3.8
Adjusting the frame interval, enhancing the colors in a time-lapse video or selecting the orientation of the video are just a few among countless video recording options the Framelapse app provides. Furthermore, you can control the exposure and white balance values manually or even use the built-in calculator to find out how long the video recording session is going to last. The app allows you to stop recording automatically by setting the duration of the recording, while you can also choose the preferred bitrate or the resolution of the time-lapse video. The free version of Framelapse contains ads, but you can purchase the Pro version of the app that offers even more powerful time-lapse recording options for just $2.99.
Conclusion
You no longer need professional cameras, tripods, and video editors to create seamless time-lapse videos that depict the passage of time at a certain location. Instead, you can just download an iOS or Android-based app that enables you to have complete creative control over the process of capturing time-lapse videos and share them with your friends on social media. Which app are you going to be using to record time-lapse videos in 2019? Leave a comment and let us know.
Shanoon Cox
Shanoon Cox is a writer and a lover of all things video.
Follow @Shanoon Cox
Shanoon Cox
Mar 27, 2024• Proven solutions
Watching the time pass by in front of our eyes is mesmerizing. The fast forwarded scenes of beautiful sunsets, busy streets and all other types of vistas can be found anywhere from Holywood movies to YouTube videos. You don’t need professional camera equipment if you want to create time-lapse videos you can share on your social media accounts because there are plenty of apps that let you create these types of videos directly from your Smartphones. So, in this article, we are going to introduce you to some of the best time-lapse apps for iPhone and Android devices in 2020.
Best Time-Lapse Apps for Android and iPhone Devices in 2021
The quality of your time-lapse video doesn’t depend only on the number of tools an app offers, which is why you must do everything in your power to record the footage that doesn’t contain camera shakes or any other common mistakes. With that being said, let’s take a look at the five best time-lapse apps you can find on GooglePlay or on the AppStore.
1. Microsoft Hyperlapse Mobile
Price: Free
Compatibility: Android 4.4 or later
Rating: 4.2
This Android-based application makes the creation of time-lapse videos look easy. You just have to select the speed at which you want to record a video, choose between 720p and 1080p resolutions and hit the record button. The app lets you increase the video’s speed up to 32 times, enabling you to create seamless time-lapses, although the video stabilization feature is only available if you’re recording a video at a normal speed. That is why you must ensure that your phone is perfectly stable while the recording is in progress if you want to create a smooth time-lapse. Microsoft Hyperlapse Mobile lets you share your creations on Instagram, Facebook, and other popular social media networks or save the time-lapse you’ve created to your phone’s SD card.
2. Slo Mo time lapse vid edit.or
Price: Free, but offers in-app purchases
Compatibility: iOS 9.0 or later
Rating: 4.1
This is a video editing app that doesn’t offer video recording options. However, if you already have the footage you’d like to turn into a time-lapse video, Slo Mo time lapse vid edit.or may be one of the best options you have. Besides creating slow motion and time-lapse videos, you can also use this app to enhance the colors in the footage you’re editing, crop or trim video clips and add customized text overlays to the videos. The app also features a wide spectrum of filters and allows you to add sound effects or music to the video you’re working on. Keep in mind that you have to make an in-app purchase if you want to remove the watermark from your videos or if you want to export your time-lapse and slow-motion videos in Full HD resolution.
3. Lapse It Pro
Price: $2.99
Compatibility: Android 2.2 or later , iOS 11 or later
Rating: 4.1 on AppStore, 4.3 on Google Play
The seemingly endless list of options the Lapse It Pro offers makes it a perfect choice for all iPhone and Android users who want to speed up the footage they are recording up to 240 times. The app can be used in both Auto and Manual modes, which means that you can control ISO, Exposure or White Balance values while a recording session is still in progress. In case you don’t want to take photos or record videos with Lapse It Pro, you can import already existing footage into the app and turn it into a stunning time-lapse. The app’s render engine exports UHD 4K videos in remarkably short periods of time, so you can quickly share high-quality videos to any of the popular social media networks.
4. Hyperlapse from Instagram
Price: Free
Compatibility: iOS 9.0 or later
Rating: 4.4
Making time-lapse videos with this app is so easy that you just have to launch the app, hit the record button and point your iPhone towards the scene you’d like to capture. The best part is that you don’t even need an Instagram account to start using the Hyperlapse from Instagram app. You can increase the video’s speed up to 12 times, and you don’t have to worry about the camera shakes since the app features an automatic stabilization feature that is so powerful that you can shoot all your videos handheld. The time-lapse videos you create with this iOS-based app can be easily saved to your phone’s camera roll or shared to Instagram in only a few taps. The only downside is that Hyperlapse for Instagram doesn’t offer any video editing tools.
5. Framelapse
Price: Free
Compatibility: Android 4.0 or later
Rating: 3.8
Adjusting the frame interval, enhancing the colors in a time-lapse video or selecting the orientation of the video are just a few among countless video recording options the Framelapse app provides. Furthermore, you can control the exposure and white balance values manually or even use the built-in calculator to find out how long the video recording session is going to last. The app allows you to stop recording automatically by setting the duration of the recording, while you can also choose the preferred bitrate or the resolution of the time-lapse video. The free version of Framelapse contains ads, but you can purchase the Pro version of the app that offers even more powerful time-lapse recording options for just $2.99.
Conclusion
You no longer need professional cameras, tripods, and video editors to create seamless time-lapse videos that depict the passage of time at a certain location. Instead, you can just download an iOS or Android-based app that enables you to have complete creative control over the process of capturing time-lapse videos and share them with your friends on social media. Which app are you going to be using to record time-lapse videos in 2019? Leave a comment and let us know.
Shanoon Cox
Shanoon Cox is a writer and a lover of all things video.
Follow @Shanoon Cox
Also read:
- Updated Free Video Hosting for Everyone 10 Top Picks for Private and Business Videos for 2024
- New In 2024, The Ultimate Guide to Vlog Video Editing Best Software for Creators
- Updated In 2024, The Ultimate 3GP Trimmer Cut, Edit, and Save
- Updated From Pixels to Perfection A Guide to Calculating Image Ratios for 2024
- Updated In 2024, The Ultimate MP4 Video Editing Tutorial for Mac and Windows Users
- New Simplify 4K Video Post-Production The Top Proxy Video Editing Apps
- Updated Convert Images to Cartoons with Ease for 2024
- New IMovie for Android? Not Exactly, But These 10 Alternatives Come Close for 2024
- New In 2024, Effortless Video Conversion Top 10 WebM to MP4 Tools
- Updated Top Tools for Crafting Engaging WhatsApp Stories for 2024
- New In 2024, Top WhatsApp Video Status Creators
- New In 2024, OS X Mavericks MP4 Editing Software Convert, Trim, and More
- Updated 2024 Approved Easily Blur Photo Backgrounds with These Free Online Tools
- Updated Join AVI Files for Free Top 10 Reliable AVI Joiner Software
- New Legitimate Ways to Get Filmora at No Cost No Cracks or Hacks
- In 2024, Thumbnail Secrets Revealed Boost Views with Perfectly Sized Images
- New The Ultimate List 10 Video Editing Apps for Kids of All Ages
- In 2024, Try the Easy Movie Maker Software Using the Following Guide
- New 2024 Approved Free and Fantastic Top 10 WebM Video Editors
- From Widescreen to Square The Effect of Aspect Ratio on YouTube Viewership for 2024
- Updated FREE Top 10 Best Online Video Editors without Watermark for 2024
- New In 2024, From Basic to Brilliant Adding FCP X Effects in 3 Easy Steps
- Updated 2024 Approved How to Remove Filmora Watermark
- 2024 Approved WebM to MP4 Conversion Made Simple Top 10 Software
- Updated In 2024, Learn FCPX Like a Pro Essential Guides and Channels
- New 2024 Approved Aspect Ratio Conversion in Final Cut Pro A Quick and Simple Process
- New In 2024, Uncomplicate Your Workflow 5 Free Online Tone Tools
- New In 2024, The Best Free Security Camera Programs 2023 Reviews and Ratings
- New In 2024, QuickTime Video Acceleration Tips and Tricks
- Updated Animation in Education Top Picks for Teachers and Educators
- Androids Best Kept Secrets Top iMovie Alternative Apps for 2024
- 2024 Approved Take Your Editing to the Next Level Top 40 FCPX Keyboard Shortcuts and Tricks
- Updated Make a Face for Free Best Online Generators and Makers
- Updated From Slow-Mo to Hyper-Speed The Best Free Video Speed Changer Apps for 2024
- New In 2024, Make an Impact Top 10 Intro Creator Websites for Your Videos
- Which Video Editor Should You Choose? Sony Vegas vs Adobe Premiere Pro for 2024
- New Top Green Screen Software for Mac Features, Pricing, and More
- In 2024, Free Video Trimming and Combining Software for Beginners A 2023 Review
- New In 2024, Mastering Soundcloud Downloads Tips and Tricks for MP3 Conversion
- Video to Audio Conversion Made Easy My Selection Criteria
- In 2024, Windows Movie Maker Replacement 10 Free Video Editors to Try
- In 2024, FCPX Image Cropping Tutorial Tips and Tricks for Professionals
- In 2024, Free to Edit Top 10 Online Video Editors with No Watermark Limitations
- New In 2024, Some Leading AI Tools to Replace Sky Backgrounds
- How to Reset your Samsung Galaxy F34 5G Lock Screen Password
- How to Remove Apple ID from iPhone 13 Pro Max without Password?
- In 2024, Full Guide to Bypass Oppo Reno 10 Pro+ 5G FRP
- How to Exit Android Factory Mode On Lava Yuva 3? | Dr.fone
- In 2024, How to Fix Pokemon Go Route Not Working On Motorola Moto E13? | Dr.fone
- In 2024, Easily Unlock Your Huawei Nova Y71 Device SIM
- 2024 Approved Boost Your Spirit Creating Motivational Status Videos
- Updated How to Cut Videos on Mac without Using FFmpeg?
- Top 8 iPhone SMS/Message/Text Recovery Software | Stellar
- Xiaomi Redmi Note 12T Pro Bootloop Problem, How to Fix it Without Data Loss | Dr.fone
- Top 10 Best Spy Watches For your Vivo Y02T | Dr.fone
- Identify some outdated hardware drivers with Windows Device Manager on Windows 7
- In 2024, Why Your WhatsApp Location is Not Updating and How to Fix On Oppo Reno 10 Pro 5G | Dr.fone
- In 2024, Best 3 Software to Transfer Files to/from Your Motorola Edge 40 via a USB Cable | Dr.fone
- In 2024, 6 Methods to Protect Yourself from Location Tracking on Apple iPhone SE | Dr.fone
- How to Bypass Activation Lock from iPhone 15 Pro Max or iPad?
- How to identify missing or malfunctioning drivers with Windows Device Manager in Windows 11
- How to Intercept Text Messages on Apple iPhone 6s Plus | Dr.fone
- Forgot your Xiaomi Redmi Note 12 Pro 4G lock screen pattern, PIN or password? Here’s what to do
- Split and Trim 3GP Files in Minutes 2023 Guide for 2024
- How to Share Location in Messenger On Oppo A59 5G? | Dr.fone
- In 2024, 6 Ways To Transfer Contacts From Itel A60s to iPhone | Dr.fone
- 6 Solutions to Fix Error 505 in Google Play Store on Vivo S17e | Dr.fone
- Tutorial to Change Samsung Galaxy A14 5G IMEI without Root A Comprehensive Guide
- In 2024, How to Remove an AirTag from Your Apple ID Account From Apple iPhone 15?
- Flip Video Clips in Final Cut Pro A 4-Step Guide for Beginners for 2024
- How to Bypass Google FRP Lock on Lava Storm 5G Devices
- How to Reset Infinix Smart 7 HD without Losing Data | Dr.fone
- How to Fix Life360 Shows Wrong Location On Oppo Find X7? | Dr.fone
- How to Perform Hard Reset on Meizu 21 Pro? | Dr.fone
- New Top 10 Banned Anime Around the World and Why
- Two Ways to Track My Boyfriends Realme C33 2023 without Him Knowing | Dr.fone
- The Ultimate Guide to Infinix Hot 30 5G Pattern Lock Screen Everything You Need to Know
- In 2024, How To Fix OEM Unlock Missing on Realme C67 4G?
- How To Deal With the Tecno Pop 8 Screen Black But Still Works? | Dr.fone
- Hard Resetting an Motorola Moto G34 5G Device Made Easy | Dr.fone
- Google Play Services Wont Update? 12 Fixes are Here on Itel A05s | Dr.fone
- How to Unlock iPhone 13 Pro Passcode without Computer?
- In 2024, 4 Feasible Ways to Fake Location on Facebook For your Samsung Galaxy XCover 6 Pro Tactical Edition | Dr.fone
- In 2024, How Poco X5 Pro Mirror Screen to PC? | Dr.fone
- In 2024, What Pokémon Evolve with A Dawn Stone For Motorola G54 5G? | Dr.fone
- 6 Proven Ways to Unlock Oppo Reno 8T Phone When You Forget the Password
- Title: Updated Expert-Recommended AVI Cutters Top 16 for Precise Video Editing Multi-Device
- Author: Emma
- Created at : 2024-05-19 05:47:41
- Updated at : 2024-05-20 05:47:41
- Link: https://video-ai-editor.techidaily.com/updated-expert-recommended-avi-cutters-top-16-for-precise-video-editing-multi-device/
- License: This work is licensed under CC BY-NC-SA 4.0.
