
:max_bytes(150000):strip_icc():format(webp)/001_best-lgbt-movies-on-netflix-right-now-5069913-92c9bcd3792548908be32c420bc4fa27.jpg)
Updated From Camera to Computer Editing Nikon Videos with Confidence for 2024
From Camera to Computer: Editing Nikon Videos with Confidence
Nikon Video Editing Software: How to Edit Nikon Video Files

Ollie Mattison
Mar 27, 2024• Proven solutions
You probably have a lot of cherished video clips about family events, social gatherings or wedding parties stored on your Nikon cameras. Want to transfer them to computer for further editing or use them to make your own creation? Here, a powerful yet easy-to-use Nikon video editor- Wondershare Filmora is introduced. With it, you can not only finish basic video editing like trimming, cutting, splitting in a few clicks, but also add creative flourishes like titles, intro/credits, clip arts, and fair-sounding soundtracks. What’s more, after editing, you can share your masterpiece directly on YouTube, burn it to DVD, or save to any formats on your computer. Now download this program and try it out.
 Download Mac Version ](https://tools.techidaily.com/wondershare/filmora/download/ )
How to Edit Nikon Video Files
1. Import your Nikon Video Files
First, transfer the Nikon video files to your computer. Then drag and drop them to the primary window after launching this program. All the imported files will appear as thumbnails in the left pane. You can double click a clip to preview it in the right previewing window. When everything is ready, drag and drop the videos to the Timeline to polish them as you like.

The latest version 9 of Filmora Video Editor also allows you to import video footage from your Nikon camera directly. You can click the Import menu first and then select Import from a Camera or Phone option which will enter the Import from Device window. You can import only videos or only images or all media files to Filmora. All the imported media will be saved under C:\Users\admin\Documents\Wondershare Filmora\User Media\Device Import by default. But you can always change the default path.

2. Edit and personalize your Nikon video files instantly
This Nikon video editing software turns rather complicated video editing into a pretty easy and efficient job. Since it features Timeline based editing, you can just move the slide bar or the duration adjustment bar to the right location you want, and then do video trimming, cutting, splitting with ease. To edit video/audio, just double click the target file and adjust the playing speed, brightness, contrast, pitch, voice, etc. according to your needs.

If the video shot by the Nikon camera has some noisy background wind sound, you can remove the noise with Filmora with ease. You can even separate audio from the video for more creative use by right clicking the video and choose “Audio Detach”.
Besides the basic video editing function, this Nikon video editing software also offers 300+ transitions, titles and effects that make your videos even more polished and artful. It’s easy to add them on the timeline. All you have to do is drag and drop them from the “Effect”, “Titles”, “Transitions” and “Elements” tab.

To help make your video more professional-looking, this Nikon video editor even includes some Power Tools for you to build a small miniature (tilt-shift), replace face in your video (face-off), blur part of a picture (Mosaic), and more.

You can find all these features and more by switching to Effects tab and go to Utility option under Filters menu.
3. Export your creation
When you finish editing, hit the “Export” button to save your creation to computer or upload it to YouTube, or Vimeo for online sharing.

It’s also easy to burn your finished video to DC for playing on home player. You can also save the video with specially designed settings for devices for watching offline on iPhone, iPad, Apple TV etc.
Editing videos shot with Nikon camera in Filmora is easy since it supports a large wide range of video formats, easy-to-use both basic and advanced video editing tools, and plenty of video effects and more. Download Filmora today and edit the video footage on Windows or Mac computer.
Download Mac Version ](https://tools.techidaily.com/wondershare/filmora/download/ )
Ollie Mattison
Ollie Mattison is a writer and a lover of all things video.
Follow @Ollie Mattison
Ollie Mattison
Mar 27, 2024• Proven solutions
You probably have a lot of cherished video clips about family events, social gatherings or wedding parties stored on your Nikon cameras. Want to transfer them to computer for further editing or use them to make your own creation? Here, a powerful yet easy-to-use Nikon video editor- Wondershare Filmora is introduced. With it, you can not only finish basic video editing like trimming, cutting, splitting in a few clicks, but also add creative flourishes like titles, intro/credits, clip arts, and fair-sounding soundtracks. What’s more, after editing, you can share your masterpiece directly on YouTube, burn it to DVD, or save to any formats on your computer. Now download this program and try it out.
Download Mac Version ](https://tools.techidaily.com/wondershare/filmora/download/ )
How to Edit Nikon Video Files
1. Import your Nikon Video Files
First, transfer the Nikon video files to your computer. Then drag and drop them to the primary window after launching this program. All the imported files will appear as thumbnails in the left pane. You can double click a clip to preview it in the right previewing window. When everything is ready, drag and drop the videos to the Timeline to polish them as you like.
The latest version 9 of Filmora Video Editor also allows you to import video footage from your Nikon camera directly. You can click the Import menu first and then select Import from a Camera or Phone option which will enter the Import from Device window. You can import only videos or only images or all media files to Filmora. All the imported media will be saved under C:\Users\admin\Documents\Wondershare Filmora\User Media\Device Import by default. But you can always change the default path.
2. Edit and personalize your Nikon video files instantly
This Nikon video editing software turns rather complicated video editing into a pretty easy and efficient job. Since it features Timeline based editing, you can just move the slide bar or the duration adjustment bar to the right location you want, and then do video trimming, cutting, splitting with ease. To edit video/audio, just double click the target file and adjust the playing speed, brightness, contrast, pitch, voice, etc. according to your needs.
If the video shot by the Nikon camera has some noisy background wind sound, you can remove the noise with Filmora with ease. You can even separate audio from the video for more creative use by right clicking the video and choose “Audio Detach”.
Besides the basic video editing function, this Nikon video editing software also offers 300+ transitions, titles and effects that make your videos even more polished and artful. It’s easy to add them on the timeline. All you have to do is drag and drop them from the “Effect”, “Titles”, “Transitions” and “Elements” tab.
To help make your video more professional-looking, this Nikon video editor even includes some Power Tools for you to build a small miniature (tilt-shift), replace face in your video (face-off), blur part of a picture (Mosaic), and more.
You can find all these features and more by switching to Effects tab and go to Utility option under Filters menu.
3. Export your creation
When you finish editing, hit the “Export” button to save your creation to computer or upload it to YouTube, or Vimeo for online sharing.
It’s also easy to burn your finished video to DC for playing on home player. You can also save the video with specially designed settings for devices for watching offline on iPhone, iPad, Apple TV etc.
Editing videos shot with Nikon camera in Filmora is easy since it supports a large wide range of video formats, easy-to-use both basic and advanced video editing tools, and plenty of video effects and more. Download Filmora today and edit the video footage on Windows or Mac computer.
Download Mac Version ](https://tools.techidaily.com/wondershare/filmora/download/ )
Ollie Mattison
Ollie Mattison is a writer and a lover of all things video.
Follow @Ollie Mattison
From Beginner to Pro: 5 Final Cut Pro Editing Tips to Up Your Game
Top 5 Final Cut Pro Editing Tips You Should Know

Benjamin Arango
Mar 27, 2024• Proven solutions
Most of the professionals throughout the world recommend Final Cut Pro as the best video editing software tool due to its incredible features. Final Cut Pro or simply called FCP is a wonderful video editing application that is available for Mac users; before Apple it was originally developed by Macromedia Inc. Some major modification capabilities of this software tool include its ability to handle about 99 audio tracks at a time, 3-way color correction feature, cutout tools, audio filters , ripple editing functions and many more.
You may also like: How to add effects in Final Cut Pro >>
Top 5 Final Cut Pro editing tips
The major criteria that differentiate simple editing tools and Final Cut Pro is the speed as in FCP users are able to stream knowledge into tricks within a few minutes. Things that make FCP one of the best tools for video editing needs are discussed as below:
1.Favourites and Keyword first
With FCP, it is possible to add keywords to your videos in much easier manner. Users simply need to press Command K for bringing up required keywords on timeline. The predefined keywords of your media file are also organized with control shortcuts. You can go to favourites option from drop down menu directly and the clips can be shorted as well as organized with easy-to-use collections on the left side.
2.Custom Keyboard shortcuts for hidden features
Keyboard shortcuts can provide faster support to some common actions and this feature is well equipped in FCP. For example, it is possible to use H and G as shortcut commands to initiate the action of Trim End and Trim Start. You will be glad to know that FCP allows customization for shortcuts that means you can add something more than the default keys as per need. Simple go to Final Cut Pro and then visit Commands; here you need to click on Customize and soon you will be able to assign different keys for required tasks.
3.Live Trimming
When we start editing any media clip then one of our major needs is to make that clip shorter but not all available software tools assists in easy trimming. Users of FCP are blessed in this context as they can trim videos on real time basis by using Trim Start, Trim End and Trim Playhead facility.
4.Adjustment Layers
It is possible to create your own motion effects with the help of FCP and they can be also taken from online sources. But the special feature is the adjustment layer that helps to maintain shooting space of camera and apply automatic correction filters on footage so that every clip can be corrected individually with perfect colour blending.
5.Export Faster
Although this software tool is downplayed with the help of unique language but the encoding capabilities of FCP are observed to be very high. It offers rich quality as compared to all other competitive tool and when person is using it on any modern Mac systems then it becomes much faster.
You may also like:
Best Alternative to Final Cut Pro
If you are searching for an alternative to the Final Cut Pro video editing tool then Wondershare Filmora for Mac can be the best choice for you. It comes with a fully stacked type feature set and serves with potential functionality so that professionals can manage all their media editing needs with ease. Wondershare Filmora possesses a drag and drop type interface so that users can create stories in a very artistic manner without sending more time of tool search.
Some of the key features of Wondershare Filmora Includes:
- Titles and Text - Wondershare Filmora extends its support towards animated text.
- Music Library – It is possible to edit or customize music tracks as per need.
- Filters and Overlays – In order to provide professional touch to all edited media files, Wondershare Filmora platform is loaded with advanced overlays and filters.
- Elements – Supports classic graphic needs and various visual effects.
Download Mac Version ](https://tools.techidaily.com/wondershare/filmora/download/ )
Benjamin Arango
Benjamin Arango is a writer and a lover of all things video.
Follow @Benjamin Arango
Benjamin Arango
Mar 27, 2024• Proven solutions
Most of the professionals throughout the world recommend Final Cut Pro as the best video editing software tool due to its incredible features. Final Cut Pro or simply called FCP is a wonderful video editing application that is available for Mac users; before Apple it was originally developed by Macromedia Inc. Some major modification capabilities of this software tool include its ability to handle about 99 audio tracks at a time, 3-way color correction feature, cutout tools, audio filters , ripple editing functions and many more.
You may also like: How to add effects in Final Cut Pro >>
Top 5 Final Cut Pro editing tips
The major criteria that differentiate simple editing tools and Final Cut Pro is the speed as in FCP users are able to stream knowledge into tricks within a few minutes. Things that make FCP one of the best tools for video editing needs are discussed as below:
1.Favourites and Keyword first
With FCP, it is possible to add keywords to your videos in much easier manner. Users simply need to press Command K for bringing up required keywords on timeline. The predefined keywords of your media file are also organized with control shortcuts. You can go to favourites option from drop down menu directly and the clips can be shorted as well as organized with easy-to-use collections on the left side.
2.Custom Keyboard shortcuts for hidden features
Keyboard shortcuts can provide faster support to some common actions and this feature is well equipped in FCP. For example, it is possible to use H and G as shortcut commands to initiate the action of Trim End and Trim Start. You will be glad to know that FCP allows customization for shortcuts that means you can add something more than the default keys as per need. Simple go to Final Cut Pro and then visit Commands; here you need to click on Customize and soon you will be able to assign different keys for required tasks.
3.Live Trimming
When we start editing any media clip then one of our major needs is to make that clip shorter but not all available software tools assists in easy trimming. Users of FCP are blessed in this context as they can trim videos on real time basis by using Trim Start, Trim End and Trim Playhead facility.
4.Adjustment Layers
It is possible to create your own motion effects with the help of FCP and they can be also taken from online sources. But the special feature is the adjustment layer that helps to maintain shooting space of camera and apply automatic correction filters on footage so that every clip can be corrected individually with perfect colour blending.
5.Export Faster
Although this software tool is downplayed with the help of unique language but the encoding capabilities of FCP are observed to be very high. It offers rich quality as compared to all other competitive tool and when person is using it on any modern Mac systems then it becomes much faster.
You may also like:
Best Alternative to Final Cut Pro
If you are searching for an alternative to the Final Cut Pro video editing tool then Wondershare Filmora for Mac can be the best choice for you. It comes with a fully stacked type feature set and serves with potential functionality so that professionals can manage all their media editing needs with ease. Wondershare Filmora possesses a drag and drop type interface so that users can create stories in a very artistic manner without sending more time of tool search.
Some of the key features of Wondershare Filmora Includes:
- Titles and Text - Wondershare Filmora extends its support towards animated text.
- Music Library – It is possible to edit or customize music tracks as per need.
- Filters and Overlays – In order to provide professional touch to all edited media files, Wondershare Filmora platform is loaded with advanced overlays and filters.
- Elements – Supports classic graphic needs and various visual effects.
Download Mac Version ](https://tools.techidaily.com/wondershare/filmora/download/ )
Benjamin Arango
Benjamin Arango is a writer and a lover of all things video.
Follow @Benjamin Arango
Vegas Pro Not Your Cup of Tea? Try These 10 Mac-Friendly Alternatives
For creating high-grade dynamic videos, simply shooting or recording a clip is not enough. Finding the best Sony Ve gas alternatives for Mac is essential since the software mainly targets Windows users.
Thanks to developers, there are many free and paid options to start your video editing journey on a Mac. Let’s first have a look at alternative software you could consider.
- Lightworks
- Wondershare Filmora
- Adobe Premiere Pro
- HitFilm Express
- Kdenlive
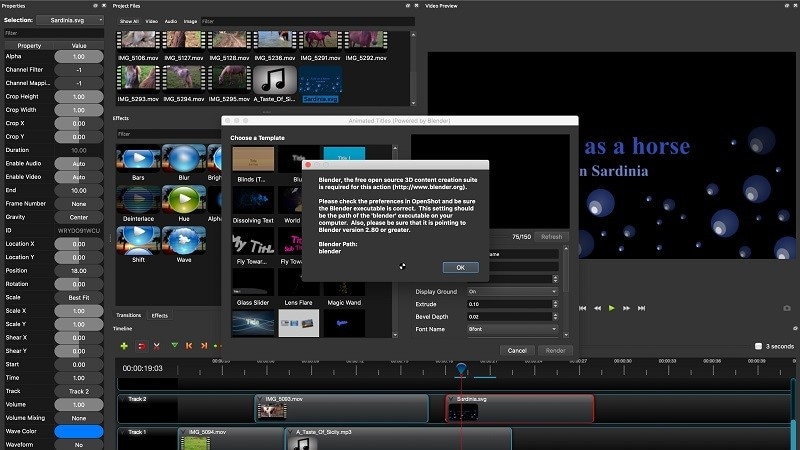
- OpenShot
- Blender
- Jahshaka
- Final Cut Pro
- Cyberlink PowerDirector 365
- What are the limitations when using Sony Vegas (Vegas Pro) on Mac?
- Hot FAQs about Vegas Pro Alternatives
Part 1: Sony Vegas Pro Alternatives & Competitors Overview
Here is a list of the top 10 tools we found after research. For an easier understanding, the following are the essential points of difference between alternative video editing software types for Sony Vegas Pro in a tabular form.
| Software | Supported OS | Price | Editor’s Verdict |
|---|---|---|---|
| Lightworks | Windows, Mac, Linux | Create-$9.99/month, Pro-$23.99/month | Medium-Difficult |
| Wondershare Filmora | Windows, Mac | Annual-$49.99, Perpetual-$79.99 | Easy |
| Adobe Premiere Pro | Windows, Mac | $20.99/month | Easy-Medium |
| HitFilm Express | Windows, Mac | Free | Easy |
| Kdenlive | Windows, Mac, Linux | Free | Medium-Difficult |
| OpenShot | Windows, Mac, Linux, OsX | Free | Medium-Difficult |
| Blender | Windows, Mac, Linux | Free | Easy |
| Jahshaka | Windows, Linux, OsX | Free | Easy-Medium |
| Final Cut Pro | Mac | Lifetime-$299.99 | Easy-Medium |
| Cyberlink PowerDirector 365 | Windows, Mac | Lifetime-$52.50 | Easy-Medium |
Part 2: Top 10 Sony Vegas (Vegas Pro) Alternatives & Competitors
Now that you know the primary differences between the Sony Vegas Pro alternatives. Are you find anything you like? Let’s move on to more details for your further consideration.
1. Lightworks
With Lightworks, using the independent timeline codec, format, and resolution alteration in videos is extremely simple. In addition, you can use the multi-cam editing feature for real-time, high-quality editing work. Moreover, drag and drop elements into videos for optimized video editing work, including pre-existing Storyboard points.
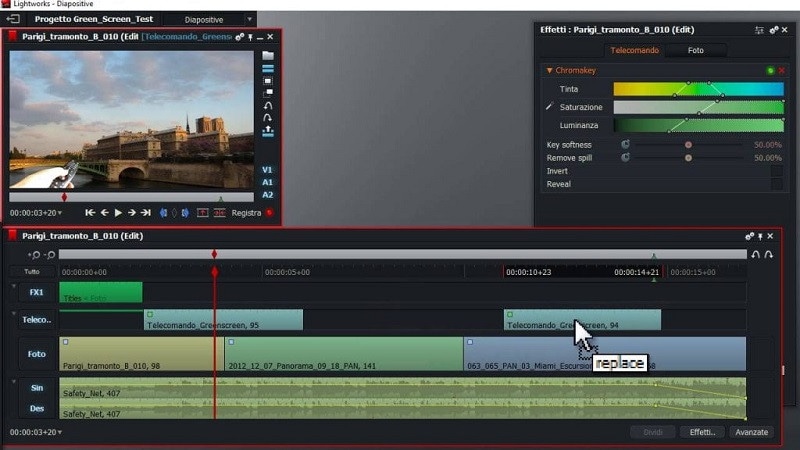
Main Features:
- Industry-grade features like QC, transcoding, and automated transfer are available.
- Edit files at different FPS limits and use three-point editing for recording/source files.
- Insert files and overwrite on a new project, replace, backfill, and fit to fill your video clips.
- Attach Storyboard tiles and match-frame clips/sub-clips easily.
Pros
- Flexible functionality and speedy transfers
- Edit files with professional movie-like quality
- Auto Sync feature for automatic timeline re-syncing is available
Cons
- Direct X is only available on the Windows version
- TotalFX plugin is not available for free- you have to upgrade to use them
OS Compatibility: Windows , Mac , Linux
Best For: Editing experts creating visually animated and professional-looking short videos can work with Lightworks.
What users say:
For professional-level video editing work, Lightworks brings a lot of resources and elements to users. According to reviews , people who have tried it have experienced better video editing functionality with these resources.
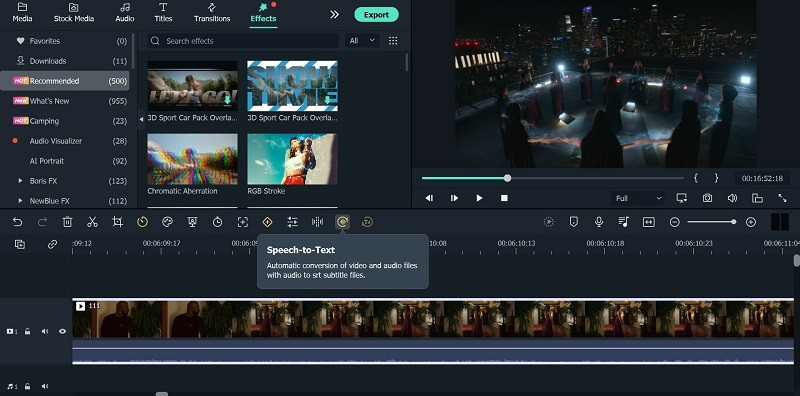
2. Wondershare Filmora
The top Vegas Pro alternative that both Windows and Mac users can opt for is Filmora. The software has advanced AI-incorporated editing functions for automated editing work, including preset effects from FX plugins. Besides that, you can easily add pre-set transitions, audio clips, text, images, and more.
Beginners find it simple to navigate through its interface and can opt for the Instant Mode function for automatic video edits .
Free Download For Win 7 or later(64-bit)
Free Download For macOS 10.14 or later

For a better idea of how this works, you should check out this tutorial video: https://filmora.wondershare.com/get-creative/make-a-video-quickly.html
Main Features:
- Instant Mode is available for automatic video/audio project editing out of 6 shorter clips.
- Support Advanced editing tools like Chroma Key and AI Portrait.
- Record voiceover, apply speech-to-text/text-to-speech functions, and more audio editing features.
- OpenFX plugins like BorisFX and NewBlue FX for a better list of pre-set effects.
Pros
- Simple to use and navigate on the editor timeline, especially with drag-and-drop support
- Output your editing files in different video/audio formats
- Quickly share the file on Vimeo or YouTube, besides downloading it on the local hard drive
Cons
- Free trial users cannot bring their Instant Mode-created videos into the editor timeline
- 4K support only with selected MKV, MOV, M4V (for Mac), and MP4 codecs
OS Compatibility: Windows , Mac
G2 Rating: 4.4 out of 5
Best For: All types of users like educators, students, homeowners, businesses, and video editors for comprehensive video editing tools and uses.
What users say:
Filmora is extremely simple to use, with advanced features available for top-level video editing work. Users mention in reviews how they have benefitted from the simple functionality and dynamic AI-based features available here for video editing.
3. Adobe Premiere Pro
If you are looking for high-quality programs like Sony Vegas, Adobe Premiere Pro is a reliable choice. This editing software allows you to easily create, delete, and move big video projects. Moreover, you can work on multiple files simultaneously and use shortcuts for faster editing work.
Preset filters and editing features are also available here, especially if they choose the Adobe Creative Cloud option.
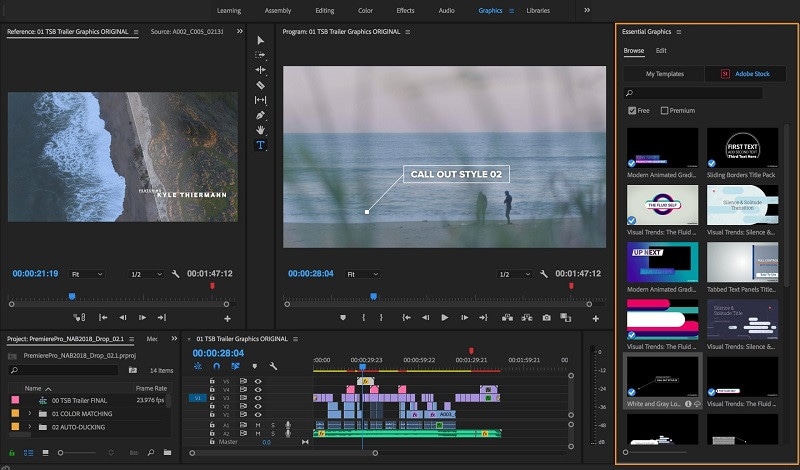
Main Features:
- Multiple pre-set transitions and effects are available for quick thematic changes.
- Add graphics, titles, and captions.
- Color grading and correction tools are available.
- It is possible to add keyframing and animation elements.
Pros
- Opting for group plans for video editing practice and learning using Adobe Premiere Pro is possible
- Aligns audio with videos instantly during editing
- Utilize Quick Export functionality for video files in some taps
Cons
- Windows High Contrast Mode is supported but to a limited extent, like with menus and title bars
- HDR workflows can only be handled on the Windows version with DisplayHDR 400 support
OS Compatibility: Windows , Mac
G2 Rating: 4.5 out of 5
Best For: Professional editors and trainers can use the various plans under Adobe Premiere Pro for video/audio editing.
What users say:
Advertisers and videographers enjoy high-grade video editing features and like the simple effects and interface quality. The motion graphics support in Adobe Premiere Pro is high-grade as well.
4. HitFilm Express
A capable Sony Vegas free alternative that you should check out is HitFilm Express. With this, you can expect many prepared designs for quick video edits. Additionally, you can manually customize the video files you are working on with high-grade personalization features available in the timeline.

Main Features:
- Pre-set customizable designs are available.
- Built-in sound effects and soundtracks are usable for free.
- Cache renders in timelines are optimized.
- The New Grade Clips feature allows users to apply varying effects to many video clips.
Pros
- Stable process of switching between timelines with an active orbit tool
- Easy to switch between 2D/3D timelines while using the text tool
- Simple to use for an unlimited period
Cons
- Does not work on older versions than Windows 10 and macOS 10.14
- Users cannot integrate this with Vegas Pro like before
OS Compatibility: Windows , Mac
TechRadar Rating: 4.5 out of 5
Best For: This software is a high-quality video editor for custom video editing work, fit for beginners and professionals alike.
What users say:
HitFilm Express is easy to use and efficient in the market for professional-level editing. The tutorial is available here for quick learning about the steps, and expandable features are well-admired by users.
5. Kdenlive
A high-quality Sony Vegas open-source variety that you should seriously consider is Kdenlive. The video editor comes with MLT framework support and holds many tools for optimizing video editing.
To simplify, you can arrange and adjust various video/audio tracks and mute or lock specific ones as needed. Add everything from filters, texts, and transitions using this editor for high-grade video projects.
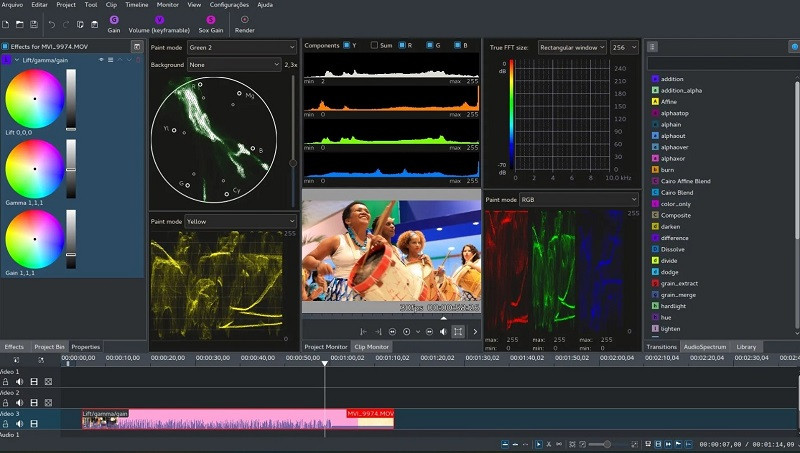
Main Features:
- Get an automatic backup of your video project while you are editing it.
- Use proxy editing to create low-resolution source clip copies and render them later on computers.
- Multiple video/audio scopes are available for monitoring projects like vectorscope, waveform, and RDB Parade.
- Many transition and effect choices to use.
Pros
- Flexibility with themes to add with multiple options
- Pre-render specific timeline parts for preview
- Effects are simple to use with keyframing quality
Cons
- Complex for completely non-technical users to adapt to
- Only supports 64-bit versions in regards to Windows-based compatibility
Trustpilot Rating: 3.7 out of 5
Best For: High-level editing experts who need strong video editing and monitoring features in an open-source platform.
What users say:
Kdenlive, as an open-source video editing software, assures quick and straightforward usability with projects. Per reviews , users like the ability to make simple video edits without bugs in this editor and quickly export finished projects.
6. OpenShot
OpenShot is a high-quality cross-platform video editor that you can use on different devices for quick but dynamic video project edits. Use keyframing ability here to adjust the animated elements you add to the file.
Moreover, cut the videos with simple steps and add many audio tracks/background videos/watermarks in layers. Also, get several video effects to optimize the video look easily.
Main Features:
- Adjust video speed in reverse motion, fast forward, and slow motion.
- Render effects and 3D animated elements into the video project.
- Get title templates and edit them as needed.
- Visualize the background audio beats with waveform support.
Pros
- Very user-friendly interface with a simple navigation guarantee
- Supports more than 70 languages that you can translate as well using LaunchPad
- Drag-and-drop functionality is supported for adding images, audio, and videos into the OpenShot editor timeline
Cons
- Some bug issues can occur
- Slightly complex learning curve
OS Compatibility: Windows , Linux , OsX
G2 Rating: 4.4 out of 5
Best For: Professional-level video editing experts can opt for this cross-platform free software for high-quality video creations.
What users say:
The OpenShot software is suitable for high-quality video editing across different devices and operating systems. Users like the lack of automated watermarks on all videos, its simple dashboard, and its multi-track editing ability, all available for free.
7. Blender
Blender is free video editing software like Sony Vegas that users can use for video editing, but it is also effective for game development with animations. Indeed, you can create and render dynamic-looking scenes with features like Cycles.
Furthermore, the software has a rich modelling toolset with solutions like curves and sculpting tools.

Main Features:
- Completely customization-friendly UI, shortcuts, and window layout here.
- Customization and scripting are possible to do with this software due to the Python API support.
- Supports access and integration of many pipeline tools for projects.
- Comes with advanced simulation-based features available in MantaFlow and Bullet libraries.
Pros
- Basic and advanced tools for quick video edits
- Strong composition and masking ability with object-based motion tracking benefits
- Easily create short animations with Blender
Cons
- Data under the standalone games created here fall under GPL conditions
- Strict licensing rules are applicable here
OS Compatibility: Windows , Mac , Linux
G2 Rating: 4.5 out of 5
Best For: Game developers and videographers for companies can use this open-source platform for creation and editing.
What users say:
Blender is a capable software for animation-based editing, with high-quality game-based features and interactive elements that make editing simple. As per reviews , users like the simple animation-based tools and fast rendering it offers.
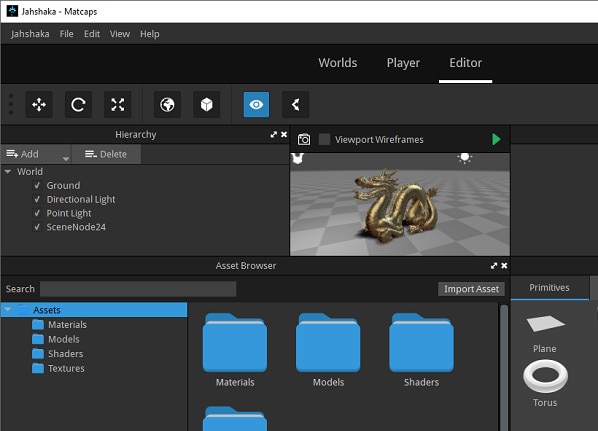
8. Jahshaka
Users of Jahshaka can experience an inclusive, collaborative environment for metaverse-level editing work. This free editing software, like Sony Vegas, focuses mainly on VR-based editing functions and comes with powerful tools for project management and content creation.
Take the help of other team members to collaborate on dynamic virtual world building, editing, and publishing.
Main Features:
- Compatible player for different desktop and mobile devices.
- Create diversified worlds and scenes with one comprehensive platform.
- Immersive software 3D video development.
- Access to pre-built content and libraries of scenes and assets
Pros
- Easily share and distribute your virtual projects
- Deliver final projects offline and online
- An interactive multi-user engine is available
Cons
- Usable for a niche audience and does not include standard video editing tools
- Jahshaka V2 legacy support is no longer active
OS Compatibility: Windows , Linux , OsX
SourceForge Rating: 4.4 out of 5
Best For: Professional video editors who want a collaborative experience in VR-based development and publishing.
What users say:
Jahshaka is a suitable program for optimized VR-based editing with many preset features and themes to choose from. Most users enjoy the new features and worlds and can work with them efficiently.
9. Final Cut Pro
One of the top Sony Vegas alternatives Mac users can safely turn to is Final Cut Pro, which has powerful modern video editing features. With this software, you will access Cinematic Mode, which you can use to create stylish and thematic video scenes.
Similarly, the Object Tracker features utilize ML technology to automatically detect objects and faces in moving videos. It can align effects and titles accurately with the graphical elements in videos.

Main Features:
- Object Tracker feature for using color correction and adding texts into moving videos.
- Accelerated functional for motion tracking with Apple Neural Engine.
- Add high-quality effects and titles into videos with Cinematic Mode support.
- Preset audio tracks and royalty-free sound effects are available for editing.
Pros
- Handle color grading for optimized scene quality
- Adjust the field depth and focus depth in clips
- Share projects across iOS and macOS platforms
Cons
- Not valid for Windows users
- Relatively high cost to avail the paid version with all advanced features
OS Compatibility: Mac
TrustRadius Rating: 4.8 out of 5
Best For: Professional video editors, students, and filmmakers who want to create cinematic-quality video projects.
What users say:
Final Cut Pro is an efficient Mac-based video editing tool with easy sharing and editing capabilities, rich effects/transitions options, and fast rendering ability. Customers enjoy the intuitive non-linear editor, easy accessibility to social media platforms for file exporting, and live scrubbing, as noted in one review .
10. Cyberlink PowerDirector 365
Another Sony Vegas mac alternative for Windows you should give a try is PowerDirector 365 from Cyberlink. This software removes or compiles video clips and uses masking features like image/custom masks.
Preset special effects, blending modes, and sound effects are available here for quick editing. Additionally, the AI-powered Motion Tracking traces objects in clips and adds graphics, animations, and text quickly in line with it.

Main Features:
- You can create and remove videos with masking features.
- Drag and drop the pre-set effects and texts into videos.
- Adjust video clips with tools for border, gradation, and shadowing.
- Multiple animations, callouts, graphics, and stickers to add to videos.
Pros
- Use green screen functionality for quick background removal or editing
- Automatic audio mastering and mixing functionality are available
- Keyframing benefits for customized animations like scaling and positioning
Cons
- Dolby Digital-centric audio codec is not available for users
- Users can try features like Room Echo Removal and NVIDIA A/V Denoise only on Windows 11
OS Compatibility: Windows
TechRadar Rating: 4.5 out of 5
Best For: Professional videographers and regular users who want a Windows-based video editing software for standard video clip editing.
What users say:
Cyberlink PowerDirector is a powerful video editor with standard editing functions many users have tried and benefited from. According to customers , the program has high-quality video and audio editing benefits for presentations, with additional effects/splitting/cropping features.
Part 3: What are the limitations when using Sony Vegas (Vegas Pro) on Mac?
Yes, with the given Sony Vegas alternatives, Mac and Windows users can benefit heavily. But why is it important to try for a replacement when Sony Vegas Pro is relatively efficient software?
To know the answer, you should take the time to understand its limitations, which do exist.
It only works for Windows users
The Sony Vegas Pro software is not available for Mac or other operating systems besides Windows. In addition, it’ll be really complex and time-consuming, even if you opt for virtual machine software or handle dual booting techniques to configure the software on your Mac or Linux.
You need to invest in other hardware
Sony Vegas Pro does do not work within one comprehensive platform like other capable video editing software types, like Wondershare Filmora . You have to acquire a powerful PC and tools to operate it separately. The software works very slowly on older devices.
Not incredibly unique
The functions of Sony Vegas Pro match somewhat with other options in the market. So, users would not expect much value in purchasing this software’s plans that they want to upgrade from their previous system, but on the other hand, the available features are mostly standard-level in functionality as well.
Hot FAQs about Vegas Pro Alternatives
After knowing these details, many users still have specific common queries about opting for a Sony Vegas Pro alternatively. So these are some common FAQs about this- answered.
1. Can Sony Vegas be used on a Mac?
No, it is impossible to directly use Sony Vegas on macOS devices since it does not support it. Instead, you have to separately use a dual boot strategy or virtual machine software to activate the video editor on Mac devices, but the process for that is complex.
2. Is Wondershare Filmora or Vegas Pro better?
Wondershare Filmora and Vegas Pro are top-level options in video and audio editing projects with professional-level editing accuracy. However, Filmora has a cohesive ecosystem with rich AI and standard functions and comes with Mac/Windows support. So, in that sense, Filmora is comparatively a better choice.
Final Words
In place of Sony Vegas Pro, any of these options would also give you a great user experience. Out of them, Filmora is one that we will recommend due to its multi-faceted benefits and features for Mac and Windows users. Ultimately, make your decision based on your particular needs.
Free Download For Win 7 or later(64-bit)
Free Download For macOS 10.14 or later
Part 1: Sony Vegas Pro Alternatives & Competitors Overview
Here is a list of the top 10 tools we found after research. For an easier understanding, the following are the essential points of difference between alternative video editing software types for Sony Vegas Pro in a tabular form.
| Software | Supported OS | Price | Editor’s Verdict |
|---|---|---|---|
| Lightworks | Windows, Mac, Linux | Create-$9.99/month, Pro-$23.99/month | Medium-Difficult |
| Wondershare Filmora | Windows, Mac | Annual-$49.99, Perpetual-$79.99 | Easy |
| Adobe Premiere Pro | Windows, Mac | $20.99/month | Easy-Medium |
| HitFilm Express | Windows, Mac | Free | Easy |
| Kdenlive | Windows, Mac, Linux | Free | Medium-Difficult |
| OpenShot | Windows, Mac, Linux, OsX | Free | Medium-Difficult |
| Blender | Windows, Mac, Linux | Free | Easy |
| Jahshaka | Windows, Linux, OsX | Free | Easy-Medium |
| Final Cut Pro | Mac | Lifetime-$299.99 | Easy-Medium |
| Cyberlink PowerDirector 365 | Windows, Mac | Lifetime-$52.50 | Easy-Medium |
Part 2: Top 10 Sony Vegas (Vegas Pro) Alternatives & Competitors
Now that you know the primary differences between the Sony Vegas Pro alternatives. Are you find anything you like? Let’s move on to more details for your further consideration.
1. Lightworks
With Lightworks, using the independent timeline codec, format, and resolution alteration in videos is extremely simple. In addition, you can use the multi-cam editing feature for real-time, high-quality editing work. Moreover, drag and drop elements into videos for optimized video editing work, including pre-existing Storyboard points.
Main Features:
- Industry-grade features like QC, transcoding, and automated transfer are available.
- Edit files at different FPS limits and use three-point editing for recording/source files.
- Insert files and overwrite on a new project, replace, backfill, and fit to fill your video clips.
- Attach Storyboard tiles and match-frame clips/sub-clips easily.
Pros
- Flexible functionality and speedy transfers
- Edit files with professional movie-like quality
- Auto Sync feature for automatic timeline re-syncing is available
Cons
- Direct X is only available on the Windows version
- TotalFX plugin is not available for free- you have to upgrade to use them
OS Compatibility: Windows , Mac , Linux
Best For: Editing experts creating visually animated and professional-looking short videos can work with Lightworks.
What users say:
For professional-level video editing work, Lightworks brings a lot of resources and elements to users. According to reviews , people who have tried it have experienced better video editing functionality with these resources.
2. Wondershare Filmora
The top Vegas Pro alternative that both Windows and Mac users can opt for is Filmora. The software has advanced AI-incorporated editing functions for automated editing work, including preset effects from FX plugins. Besides that, you can easily add pre-set transitions, audio clips, text, images, and more.
Beginners find it simple to navigate through its interface and can opt for the Instant Mode function for automatic video edits .
Free Download For Win 7 or later(64-bit)
Free Download For macOS 10.14 or later
For a better idea of how this works, you should check out this tutorial video: https://filmora.wondershare.com/get-creative/make-a-video-quickly.html
Main Features:
- Instant Mode is available for automatic video/audio project editing out of 6 shorter clips.
- Support Advanced editing tools like Chroma Key and AI Portrait.
- Record voiceover, apply speech-to-text/text-to-speech functions, and more audio editing features.
- OpenFX plugins like BorisFX and NewBlue FX for a better list of pre-set effects.
Pros
- Simple to use and navigate on the editor timeline, especially with drag-and-drop support
- Output your editing files in different video/audio formats
- Quickly share the file on Vimeo or YouTube, besides downloading it on the local hard drive
Cons
- Free trial users cannot bring their Instant Mode-created videos into the editor timeline
- 4K support only with selected MKV, MOV, M4V (for Mac), and MP4 codecs
OS Compatibility: Windows , Mac
G2 Rating: 4.4 out of 5
Best For: All types of users like educators, students, homeowners, businesses, and video editors for comprehensive video editing tools and uses.
What users say:
Filmora is extremely simple to use, with advanced features available for top-level video editing work. Users mention in reviews how they have benefitted from the simple functionality and dynamic AI-based features available here for video editing.
3. Adobe Premiere Pro
If you are looking for high-quality programs like Sony Vegas, Adobe Premiere Pro is a reliable choice. This editing software allows you to easily create, delete, and move big video projects. Moreover, you can work on multiple files simultaneously and use shortcuts for faster editing work.
Preset filters and editing features are also available here, especially if they choose the Adobe Creative Cloud option.
Main Features:
- Multiple pre-set transitions and effects are available for quick thematic changes.
- Add graphics, titles, and captions.
- Color grading and correction tools are available.
- It is possible to add keyframing and animation elements.
Pros
- Opting for group plans for video editing practice and learning using Adobe Premiere Pro is possible
- Aligns audio with videos instantly during editing
- Utilize Quick Export functionality for video files in some taps
Cons
- Windows High Contrast Mode is supported but to a limited extent, like with menus and title bars
- HDR workflows can only be handled on the Windows version with DisplayHDR 400 support
OS Compatibility: Windows , Mac
G2 Rating: 4.5 out of 5
Best For: Professional editors and trainers can use the various plans under Adobe Premiere Pro for video/audio editing.
What users say:
Advertisers and videographers enjoy high-grade video editing features and like the simple effects and interface quality. The motion graphics support in Adobe Premiere Pro is high-grade as well.
4. HitFilm Express
A capable Sony Vegas free alternative that you should check out is HitFilm Express. With this, you can expect many prepared designs for quick video edits. Additionally, you can manually customize the video files you are working on with high-grade personalization features available in the timeline.
Main Features:
- Pre-set customizable designs are available.
- Built-in sound effects and soundtracks are usable for free.
- Cache renders in timelines are optimized.
- The New Grade Clips feature allows users to apply varying effects to many video clips.
Pros
- Stable process of switching between timelines with an active orbit tool
- Easy to switch between 2D/3D timelines while using the text tool
- Simple to use for an unlimited period
Cons
- Does not work on older versions than Windows 10 and macOS 10.14
- Users cannot integrate this with Vegas Pro like before
OS Compatibility: Windows , Mac
TechRadar Rating: 4.5 out of 5
Best For: This software is a high-quality video editor for custom video editing work, fit for beginners and professionals alike.
What users say:
HitFilm Express is easy to use and efficient in the market for professional-level editing. The tutorial is available here for quick learning about the steps, and expandable features are well-admired by users.
5. Kdenlive
A high-quality Sony Vegas open-source variety that you should seriously consider is Kdenlive. The video editor comes with MLT framework support and holds many tools for optimizing video editing.
To simplify, you can arrange and adjust various video/audio tracks and mute or lock specific ones as needed. Add everything from filters, texts, and transitions using this editor for high-grade video projects.
Main Features:
- Get an automatic backup of your video project while you are editing it.
- Use proxy editing to create low-resolution source clip copies and render them later on computers.
- Multiple video/audio scopes are available for monitoring projects like vectorscope, waveform, and RDB Parade.
- Many transition and effect choices to use.
Pros
- Flexibility with themes to add with multiple options
- Pre-render specific timeline parts for preview
- Effects are simple to use with keyframing quality
Cons
- Complex for completely non-technical users to adapt to
- Only supports 64-bit versions in regards to Windows-based compatibility
Trustpilot Rating: 3.7 out of 5
Best For: High-level editing experts who need strong video editing and monitoring features in an open-source platform.
What users say:
Kdenlive, as an open-source video editing software, assures quick and straightforward usability with projects. Per reviews , users like the ability to make simple video edits without bugs in this editor and quickly export finished projects.
6. OpenShot
OpenShot is a high-quality cross-platform video editor that you can use on different devices for quick but dynamic video project edits. Use keyframing ability here to adjust the animated elements you add to the file.
Moreover, cut the videos with simple steps and add many audio tracks/background videos/watermarks in layers. Also, get several video effects to optimize the video look easily.
Main Features:
- Adjust video speed in reverse motion, fast forward, and slow motion.
- Render effects and 3D animated elements into the video project.
- Get title templates and edit them as needed.
- Visualize the background audio beats with waveform support.
Pros
- Very user-friendly interface with a simple navigation guarantee
- Supports more than 70 languages that you can translate as well using LaunchPad
- Drag-and-drop functionality is supported for adding images, audio, and videos into the OpenShot editor timeline
Cons
- Some bug issues can occur
- Slightly complex learning curve
OS Compatibility: Windows , Linux , OsX
G2 Rating: 4.4 out of 5
Best For: Professional-level video editing experts can opt for this cross-platform free software for high-quality video creations.
What users say:
The OpenShot software is suitable for high-quality video editing across different devices and operating systems. Users like the lack of automated watermarks on all videos, its simple dashboard, and its multi-track editing ability, all available for free.
7. Blender
Blender is free video editing software like Sony Vegas that users can use for video editing, but it is also effective for game development with animations. Indeed, you can create and render dynamic-looking scenes with features like Cycles.
Furthermore, the software has a rich modelling toolset with solutions like curves and sculpting tools.
Main Features:
- Completely customization-friendly UI, shortcuts, and window layout here.
- Customization and scripting are possible to do with this software due to the Python API support.
- Supports access and integration of many pipeline tools for projects.
- Comes with advanced simulation-based features available in MantaFlow and Bullet libraries.
Pros
- Basic and advanced tools for quick video edits
- Strong composition and masking ability with object-based motion tracking benefits
- Easily create short animations with Blender
Cons
- Data under the standalone games created here fall under GPL conditions
- Strict licensing rules are applicable here
OS Compatibility: Windows , Mac , Linux
G2 Rating: 4.5 out of 5
Best For: Game developers and videographers for companies can use this open-source platform for creation and editing.
What users say:
Blender is a capable software for animation-based editing, with high-quality game-based features and interactive elements that make editing simple. As per reviews , users like the simple animation-based tools and fast rendering it offers.
8. Jahshaka
Users of Jahshaka can experience an inclusive, collaborative environment for metaverse-level editing work. This free editing software, like Sony Vegas, focuses mainly on VR-based editing functions and comes with powerful tools for project management and content creation.
Take the help of other team members to collaborate on dynamic virtual world building, editing, and publishing.
Main Features:
- Compatible player for different desktop and mobile devices.
- Create diversified worlds and scenes with one comprehensive platform.
- Immersive software 3D video development.
- Access to pre-built content and libraries of scenes and assets
Pros
- Easily share and distribute your virtual projects
- Deliver final projects offline and online
- An interactive multi-user engine is available
Cons
- Usable for a niche audience and does not include standard video editing tools
- Jahshaka V2 legacy support is no longer active
OS Compatibility: Windows , Linux , OsX
SourceForge Rating: 4.4 out of 5
Best For: Professional video editors who want a collaborative experience in VR-based development and publishing.
What users say:
Jahshaka is a suitable program for optimized VR-based editing with many preset features and themes to choose from. Most users enjoy the new features and worlds and can work with them efficiently.
9. Final Cut Pro
One of the top Sony Vegas alternatives Mac users can safely turn to is Final Cut Pro, which has powerful modern video editing features. With this software, you will access Cinematic Mode, which you can use to create stylish and thematic video scenes.
Similarly, the Object Tracker features utilize ML technology to automatically detect objects and faces in moving videos. It can align effects and titles accurately with the graphical elements in videos.
Main Features:
- Object Tracker feature for using color correction and adding texts into moving videos.
- Accelerated functional for motion tracking with Apple Neural Engine.
- Add high-quality effects and titles into videos with Cinematic Mode support.
- Preset audio tracks and royalty-free sound effects are available for editing.
Pros
- Handle color grading for optimized scene quality
- Adjust the field depth and focus depth in clips
- Share projects across iOS and macOS platforms
Cons
- Not valid for Windows users
- Relatively high cost to avail the paid version with all advanced features
OS Compatibility: Mac
TrustRadius Rating: 4.8 out of 5
Best For: Professional video editors, students, and filmmakers who want to create cinematic-quality video projects.
What users say:
Final Cut Pro is an efficient Mac-based video editing tool with easy sharing and editing capabilities, rich effects/transitions options, and fast rendering ability. Customers enjoy the intuitive non-linear editor, easy accessibility to social media platforms for file exporting, and live scrubbing, as noted in one review .
10. Cyberlink PowerDirector 365
Another Sony Vegas mac alternative for Windows you should give a try is PowerDirector 365 from Cyberlink. This software removes or compiles video clips and uses masking features like image/custom masks.
Preset special effects, blending modes, and sound effects are available here for quick editing. Additionally, the AI-powered Motion Tracking traces objects in clips and adds graphics, animations, and text quickly in line with it.
Main Features:
- You can create and remove videos with masking features.
- Drag and drop the pre-set effects and texts into videos.
- Adjust video clips with tools for border, gradation, and shadowing.
- Multiple animations, callouts, graphics, and stickers to add to videos.
Pros
- Use green screen functionality for quick background removal or editing
- Automatic audio mastering and mixing functionality are available
- Keyframing benefits for customized animations like scaling and positioning
Cons
- Dolby Digital-centric audio codec is not available for users
- Users can try features like Room Echo Removal and NVIDIA A/V Denoise only on Windows 11
OS Compatibility: Windows
TechRadar Rating: 4.5 out of 5
Best For: Professional videographers and regular users who want a Windows-based video editing software for standard video clip editing.
What users say:
Cyberlink PowerDirector is a powerful video editor with standard editing functions many users have tried and benefited from. According to customers , the program has high-quality video and audio editing benefits for presentations, with additional effects/splitting/cropping features.
Part 3: What are the limitations when using Sony Vegas (Vegas Pro) on Mac?
Yes, with the given Sony Vegas alternatives, Mac and Windows users can benefit heavily. But why is it important to try for a replacement when Sony Vegas Pro is relatively efficient software?
To know the answer, you should take the time to understand its limitations, which do exist.
It only works for Windows users
The Sony Vegas Pro software is not available for Mac or other operating systems besides Windows. In addition, it’ll be really complex and time-consuming, even if you opt for virtual machine software or handle dual booting techniques to configure the software on your Mac or Linux.
You need to invest in other hardware
Sony Vegas Pro does do not work within one comprehensive platform like other capable video editing software types, like Wondershare Filmora . You have to acquire a powerful PC and tools to operate it separately. The software works very slowly on older devices.
Not incredibly unique
The functions of Sony Vegas Pro match somewhat with other options in the market. So, users would not expect much value in purchasing this software’s plans that they want to upgrade from their previous system, but on the other hand, the available features are mostly standard-level in functionality as well.
Hot FAQs about Vegas Pro Alternatives
After knowing these details, many users still have specific common queries about opting for a Sony Vegas Pro alternatively. So these are some common FAQs about this- answered.
1. Can Sony Vegas be used on a Mac?
No, it is impossible to directly use Sony Vegas on macOS devices since it does not support it. Instead, you have to separately use a dual boot strategy or virtual machine software to activate the video editor on Mac devices, but the process for that is complex.
2. Is Wondershare Filmora or Vegas Pro better?
Wondershare Filmora and Vegas Pro are top-level options in video and audio editing projects with professional-level editing accuracy. However, Filmora has a cohesive ecosystem with rich AI and standard functions and comes with Mac/Windows support. So, in that sense, Filmora is comparatively a better choice.
Final Words
In place of Sony Vegas Pro, any of these options would also give you a great user experience. Out of them, Filmora is one that we will recommend due to its multi-faceted benefits and features for Mac and Windows users. Ultimately, make your decision based on your particular needs.
Free Download For Win 7 or later(64-bit)
Free Download For macOS 10.14 or later
Unlock the Power: 5 Little-Known Secrets of 16X9 Ratio Calculators
5 Facts About 16x9 Ratio Calculator You Didn’t Know
An easy yet powerful editor
Numerous effects to choose from
Detailed tutorials provided by the official channel
This article explains major concepts about 16x9 ratio calculator and applies them even if you are a novice.
Read it to conclude the aspect ratio and the type of editing you need for your videos.
In this article
01 [What is Aspect Ratio?](#Part 1)
02 [What’s 16:9 Ratio Calculator?](#Part 2)
03 [Top 16:9 Resolutions](#Part 3)
04 [How to Calculate 16:9 Aspect Ratios?](#Part 4)
05 [How to Use Aspect Ratio Calculator?](#Part 5)
06 [How to Shift Through Aspect Ratio You Prefer in Filmora?](#Part 6)
Part 1 What is aspect ratio?
Aspect ratio is the proportionality ratio that relates between the width and height of the image. When you set your television screen, you often see something like 16:9 in the aspect ratio. These numbers are not related to the quality of the images whatsoever. They mean that the screen’s width will be almost twice as high as its height.
However, most television screens have an aspect ratio that looks like a square. The same does not apply to most cinema screens found in a hall. Thanks to the electricians who made those screens to be rectangular. That makes sure that you don’t miss out on any movie clip because of the low aspect ratio.
Initially, the aspect ratio mainly got restricted to Mathematical aspects like geometry. With time, the term got introduced in the films where it was used to relate the width and height of various images on screens, hence the16*9 aspect ratio calculator.
Usually, the aspect ratio refers to the long side concerning the shorter side of the shape. For example, it can be represented by two unknowns, x: y. The values do not mean much because numbers can substitute them.
Perhaps you have encountered these common aspect ratios: IMAX (1.43:1), Academy Film standard (1.43:1), and the famous golden video with an aspect ratio of 1.6180:1.
Having adequate knowledge about aspect ratios is of great importance. You will have to use an aspect ratio calculator when you want to resize your image to fit the specific location without cutting some sections.
Part 2 What is the 16:9 aspect ratio calculator?
The most significant similarity is the aspect ratio of 16:9. The 16:9 ratio dates back to 2009, when the ratio introduced was declared to be used globally. To prove it, take a minute and check the aspect ratios of your television screen or smartphone. Also, confirm the next time you go to the cinema to watch a movie.
You can take a beautiful photo with a nice image before posting on social media because of the 16:9 aspect ratio. Nowadays, this aspect ratio is a part of most screens and cameras. Even the HD videos always get recorded in the international format ratio.
The16 * 9 aspect ratiocalculator will help you operate correctly for high-quality images. It also helps in the conversion of inches to centimeters and vice versa. For a digital device, pixels are the most common units of images.
Part 3 Top 16:9 resolutions
These are the most common resolutions that are available. The units are in pixels, in descending order.
● 15360×8640 (16K UHD)
● 7680 × 4320 (8K UHD)
● 5120 × 2880 (5K)
● 3840 × 2160 (4K UHD)
● 3200 × 1800 (QHD+)
● 2560 × 1440 (QHD)
● 1920 × 1080 (Full HD)
● 1600 × 900 (HD+)
● 1366 × 768 (WXGA)
● 1280 × 720 (HD)
● 960 × 540 (qHD)
● 854 × 480 (FWVGA)
● 640 × 360 (nHD)
Part 4 How to calculate the 16:9 Aspect ratio?
First, let’s look at the correct pronunciation of the ratio. You can either say it as 16 by 9 or 16 × 9. It implies 16 units of the longest side for each shortest side. It could also mean 32 by 18 or higher values which can still simplify to 16:9. We can also represent the ratio differently when simplified. In this case, a decimal point separates the ratios. For example, 16:9 is represented as 1.78:1 after being simplified.
Earlier screens and monitors produced old ratios like the 4:3. After the recognition of the 16:9 ratios, have made replacements for them. The16*9 ratio calculatoris also the most common. Have you heard of 720p HD, 1080p HD, and others? All of them are still under the 16:9 ratios but expressed differently. For example, a screen of 1920 × 1080p. Check it out here: 2920/1080 equals 16:9.
First, here’s the formula that we will use in this section.
Width (W) /Height (H) = 1.778
Dividing the width and height gives you 1.778, which is still an aspect ratio of 16:9.
1.778 is a constant in the formula that you can use interchangeably to determine the width or height. Here is a couple of examples to illustrate this.
Example 1:
Ben’s video measures 32 panels wide. Find the number of panels he needs to build a 26:9 display.
W/H = 16/9
32/H = 16/9
H =32 × 9/16
H = 18
Therefore, Ben will need 18 panels to install the display unit.
Example 2
Nancy decides to design an image for a post in the ratio 16:9. If it has 720 pixels, calculate the width of the image needed.
W/H = 19/6
W/720 = 19/6
W = 730 × 19/6
Nancy will need 1280 pixels for her image.
Part 5 How to use an aspect ratio calculator?
These calculations may be easy when you’re used to them. Not interested in many calculations? Use the online aspect ratio calculator instead. That will make it easier and save on time. You will only need to have the width and height of the image that if needed. The 16 *9 ratio calculator will give the remaining distance.
Using the calculator is the most preferred method because it is very precise. Supposing you don’t have any idea about the width or height of your image, just key in the aspect ratio and wait for an instant answer. The aspect ratio will still give the same answer, but the calculator is convenient.
The better part, this calculator provides calculations for landscape and portrait orientation for images. Follow these steps to use the calculator:
Step 1: Go to https://insaneimpact.com/aspect-ratio-calculator/
Step 2: Enter units of width and height in the respective tabs provided and instantly get your aspect ratio.

Part 6 How to shift through aspect ratio you prefer in Filmora?
As you edit videos, adjust them to ensure they fit in an email as an attachment. That will help you upload them easily after you have used some video editing tools. This article elaborates more by using Wondershare Filmora.
Here’s why we recommend Wondershare Filmora Video Editor
The obvious reason is many features that will help you edit the video like a pro. For instance, you can resize, zoom and highlight the best parts of the video. These are some features of Wondershare Filmora’s video editing capabilities.
● Effortlessly resize the sizes of videos and aspect ratios
● Cropping the video to highlight an object
● Addition of effects and more videos
● Uploading edited videos online
● Supports diverse operating systems for smartphones and desktops
Navigating Through Various Aspect Ratios Using Wondershare Filmora

Wondershare Filmora - Best Video Editor for Mac/Windows
5,481,435 people have downloaded it.
Build unique custom animations without breaking a sweat.
Focus on creating epic stories and leave the details to Filmora’s auto features.
Start a creative adventure with drag & drop effects and endless possibilities.
Filmora simplifies advanced features to save you time and effort.
Filmora cuts out repetition so you can move on to your next creative breakthrough.
Different social media platforms will only allow users to upload videos of specified sizes. Therefore, it is imperative to know the right size for your videos. Let me take you through ways of changing an aspect ratio for the image to have the required height and width.
Step 1: Select your projects’ aspect ratio.

Upon opening Wondershare Filmora, a window will pop up on the screen to allow you to select the aspect ratio. There are three options to choose widescreen, standard, and portrait with aspect ratios of 16:9, 4:3, and 1.1, respectively. select the one that you require and click “New Project.”
Step 2: Set the new aspect ratio for the project

Go to File, choose a new project, and then aspect ratio in the editing panel. Please select the one you wish to use and alter it according to your desired format. For instance, you can select a video of 16:9 and reduce it to 1:1.
Step 3: Save the video

Select “Export” to export the video and save it in different formats in the Format tab. Do you feel like playing the video on your phone or any other device? Please move to the device tab and ply it on your smartphone or transfer it into a DVD drive format.
Filmora also provides more advanced features for video editing like rotating, cropping, and scaling. You can also match the colors on your videos, include animations, add effects, track the sounds and even record some background sounds for the video to look good. Go ahead and download for a free trial below to start editing your videos!
Key Takeaways from This Episode
● 1 – A detailed overview of the aspect ratio and aspect ratio calculator.
● 2 – Understanding how to calculate aspect ratios manually and through an aspect ratio calculator.
● 3 – Navigation through different aspect ratios via the wonderful editor, i.e., Wondershare Filmora.
● Finally, a16×9 aspect ratio calculatoris simple to use, provided you follow the steps given. However, an online calculator will make your videos fit in the equipped area. Use Wondershare Filmora for easy editing and changing of the aspect ratio. It is a pro image and video editor and the easiest to use. Start with its trial version by downloading it for free.
This article explains major concepts about 16x9 ratio calculator and applies them even if you are a novice.
Read it to conclude the aspect ratio and the type of editing you need for your videos.
In this article
01 [What is Aspect Ratio?](#Part 1)
02 [What’s 16:9 Ratio Calculator?](#Part 2)
03 [Top 16:9 Resolutions](#Part 3)
04 [How to Calculate 16:9 Aspect Ratios?](#Part 4)
05 [How to Use Aspect Ratio Calculator?](#Part 5)
06 [How to Shift Through Aspect Ratio You Prefer in Filmora?](#Part 6)
Part 1 What is aspect ratio?
Aspect ratio is the proportionality ratio that relates between the width and height of the image. When you set your television screen, you often see something like 16:9 in the aspect ratio. These numbers are not related to the quality of the images whatsoever. They mean that the screen’s width will be almost twice as high as its height.
However, most television screens have an aspect ratio that looks like a square. The same does not apply to most cinema screens found in a hall. Thanks to the electricians who made those screens to be rectangular. That makes sure that you don’t miss out on any movie clip because of the low aspect ratio.
Initially, the aspect ratio mainly got restricted to Mathematical aspects like geometry. With time, the term got introduced in the films where it was used to relate the width and height of various images on screens, hence the16*9 aspect ratio calculator.
Usually, the aspect ratio refers to the long side concerning the shorter side of the shape. For example, it can be represented by two unknowns, x: y. The values do not mean much because numbers can substitute them.
Perhaps you have encountered these common aspect ratios: IMAX (1.43:1), Academy Film standard (1.43:1), and the famous golden video with an aspect ratio of 1.6180:1.
Having adequate knowledge about aspect ratios is of great importance. You will have to use an aspect ratio calculator when you want to resize your image to fit the specific location without cutting some sections.
Part 2 What is the 16:9 aspect ratio calculator?
The most significant similarity is the aspect ratio of 16:9. The 16:9 ratio dates back to 2009, when the ratio introduced was declared to be used globally. To prove it, take a minute and check the aspect ratios of your television screen or smartphone. Also, confirm the next time you go to the cinema to watch a movie.
You can take a beautiful photo with a nice image before posting on social media because of the 16:9 aspect ratio. Nowadays, this aspect ratio is a part of most screens and cameras. Even the HD videos always get recorded in the international format ratio.
The16 * 9 aspect ratiocalculator will help you operate correctly for high-quality images. It also helps in the conversion of inches to centimeters and vice versa. For a digital device, pixels are the most common units of images.
Part 3 Top 16:9 resolutions
These are the most common resolutions that are available. The units are in pixels, in descending order.
● 15360×8640 (16K UHD)
● 7680 × 4320 (8K UHD)
● 5120 × 2880 (5K)
● 3840 × 2160 (4K UHD)
● 3200 × 1800 (QHD+)
● 2560 × 1440 (QHD)
● 1920 × 1080 (Full HD)
● 1600 × 900 (HD+)
● 1366 × 768 (WXGA)
● 1280 × 720 (HD)
● 960 × 540 (qHD)
● 854 × 480 (FWVGA)
● 640 × 360 (nHD)
Part 4 How to calculate the 16:9 Aspect ratio?
First, let’s look at the correct pronunciation of the ratio. You can either say it as 16 by 9 or 16 × 9. It implies 16 units of the longest side for each shortest side. It could also mean 32 by 18 or higher values which can still simplify to 16:9. We can also represent the ratio differently when simplified. In this case, a decimal point separates the ratios. For example, 16:9 is represented as 1.78:1 after being simplified.
Earlier screens and monitors produced old ratios like the 4:3. After the recognition of the 16:9 ratios, have made replacements for them. The16*9 ratio calculatoris also the most common. Have you heard of 720p HD, 1080p HD, and others? All of them are still under the 16:9 ratios but expressed differently. For example, a screen of 1920 × 1080p. Check it out here: 2920/1080 equals 16:9.
First, here’s the formula that we will use in this section.
Width (W) /Height (H) = 1.778
Dividing the width and height gives you 1.778, which is still an aspect ratio of 16:9.
1.778 is a constant in the formula that you can use interchangeably to determine the width or height. Here is a couple of examples to illustrate this.
Example 1:
Ben’s video measures 32 panels wide. Find the number of panels he needs to build a 26:9 display.
W/H = 16/9
32/H = 16/9
H =32 × 9/16
H = 18
Therefore, Ben will need 18 panels to install the display unit.
Example 2
Nancy decides to design an image for a post in the ratio 16:9. If it has 720 pixels, calculate the width of the image needed.
W/H = 19/6
W/720 = 19/6
W = 730 × 19/6
Nancy will need 1280 pixels for her image.
Part 5 How to use an aspect ratio calculator?
These calculations may be easy when you’re used to them. Not interested in many calculations? Use the online aspect ratio calculator instead. That will make it easier and save on time. You will only need to have the width and height of the image that if needed. The 16 *9 ratio calculator will give the remaining distance.
Using the calculator is the most preferred method because it is very precise. Supposing you don’t have any idea about the width or height of your image, just key in the aspect ratio and wait for an instant answer. The aspect ratio will still give the same answer, but the calculator is convenient.
The better part, this calculator provides calculations for landscape and portrait orientation for images. Follow these steps to use the calculator:
Step 1: Go to https://insaneimpact.com/aspect-ratio-calculator/
Step 2: Enter units of width and height in the respective tabs provided and instantly get your aspect ratio.
Part 6 How to shift through aspect ratio you prefer in Filmora?
As you edit videos, adjust them to ensure they fit in an email as an attachment. That will help you upload them easily after you have used some video editing tools. This article elaborates more by using Wondershare Filmora.
Here’s why we recommend Wondershare Filmora Video Editor
The obvious reason is many features that will help you edit the video like a pro. For instance, you can resize, zoom and highlight the best parts of the video. These are some features of Wondershare Filmora’s video editing capabilities.
● Effortlessly resize the sizes of videos and aspect ratios
● Cropping the video to highlight an object
● Addition of effects and more videos
● Uploading edited videos online
● Supports diverse operating systems for smartphones and desktops
Navigating Through Various Aspect Ratios Using Wondershare Filmora
Wondershare Filmora - Best Video Editor for Mac/Windows
5,481,435 people have downloaded it.
Build unique custom animations without breaking a sweat.
Focus on creating epic stories and leave the details to Filmora’s auto features.
Start a creative adventure with drag & drop effects and endless possibilities.
Filmora simplifies advanced features to save you time and effort.
Filmora cuts out repetition so you can move on to your next creative breakthrough.
Different social media platforms will only allow users to upload videos of specified sizes. Therefore, it is imperative to know the right size for your videos. Let me take you through ways of changing an aspect ratio for the image to have the required height and width.
Step 1: Select your projects’ aspect ratio.
Upon opening Wondershare Filmora, a window will pop up on the screen to allow you to select the aspect ratio. There are three options to choose widescreen, standard, and portrait with aspect ratios of 16:9, 4:3, and 1.1, respectively. select the one that you require and click “New Project.”
Step 2: Set the new aspect ratio for the project
Go to File, choose a new project, and then aspect ratio in the editing panel. Please select the one you wish to use and alter it according to your desired format. For instance, you can select a video of 16:9 and reduce it to 1:1.
Step 3: Save the video
Select “Export” to export the video and save it in different formats in the Format tab. Do you feel like playing the video on your phone or any other device? Please move to the device tab and ply it on your smartphone or transfer it into a DVD drive format.
Filmora also provides more advanced features for video editing like rotating, cropping, and scaling. You can also match the colors on your videos, include animations, add effects, track the sounds and even record some background sounds for the video to look good. Go ahead and download for a free trial below to start editing your videos!
Key Takeaways from This Episode
● 1 – A detailed overview of the aspect ratio and aspect ratio calculator.
● 2 – Understanding how to calculate aspect ratios manually and through an aspect ratio calculator.
● 3 – Navigation through different aspect ratios via the wonderful editor, i.e., Wondershare Filmora.
● Finally, a16×9 aspect ratio calculatoris simple to use, provided you follow the steps given. However, an online calculator will make your videos fit in the equipped area. Use Wondershare Filmora for easy editing and changing of the aspect ratio. It is a pro image and video editor and the easiest to use. Start with its trial version by downloading it for free.
Also read:
- New 2024 Approved The Ultimate List 12 Best Audio Converters for Seamless Music Enjoyment
- Updated In 2024, Master Video Editing on Mac with MKVtoolnix A Step-by-Step Guide 2023
- Updated 2024 Approved Best Time-Lapse Video Editing Software Free&Paid
- New Mac Video Creator The Ultimate Guide to Making Professional-Looking Videos for 2024
- 2024 Approved 4K Is Getting Popular These Days, While in This Article Introduces Top 10+ Free 4K Video Converters for Windows and Mac in Case that You Have Limited Access to 4K Video Playing
- New Facebook Video Aspect Ratios 101 A Complete Beginners Guide for 2024
- Updated 2024 Approved Videopad Video Editor Review and Comparison Best Video Editing Software
- Updated Free Video Editor Options for Beginners Desktop, Online, and Mobile for 2024
- The Ultimate Image Ratio Calculator Tips and Tricks
- In 2024, How to Resize and Crop Images in FCPX 2023 Update
- Updated Create Stunning Animations Top iOS and Android Stop Motion Apps
- New From Novice to Pro The Definitive Wav Converter Handbook
- Updated 2024 Approved Trim Your Videos for Free 10 Best Online Tools
- Updated Shrink Your MPEG2 Videos Download and Use VirtualDub Today for 2024
- Updated 2024 Approved Create Stunning Videos Anywhere Top Mobile Editors for iPhone and Android
- In 2024, Easy Peasy Animation 8 Best Tools for Animated Photos
- Updated 2024 Approved Avidemux Sound Repair Expert Solutions
- Updated Unlock the Power of Slow Mo A Kapwing Video Editing Tutorial
- Updated In 2024, Boost Video Quality Best Brightness Adjustment Tools Online and Offline
- New 2024 Approved Top 10 Photo Editing Software Options Beyond Windows 10 Photos
- New In 2024, How to Get Filmora Torrent for FREE? No Virus
- Updated Mastering Mobile Aspect Ratio A Guide to Vertical Content for 2024
- 2024 Approved 6 Essential Video Audio Dubbing Tools for PC Users
- In 2024, Best Mobile Apps to Extract Audio From Videos (iOS and Android)
- New Creative Freedom Best Video Dubbing Software for 2024
- New The Ultimate Guide to Gaming Intro Software for PC and Mac for 2024
- How Do You Get Sun Stone Evolutions in Pokémon For Nokia 130 Music? | Dr.fone
- How to Fix It Samsung Galaxy A15 5G Wont Turn On | Dr.fone
- Latest way to get Shiny Meltan Box in Pokémon Go Mystery Box On Apple iPhone 13 Pro | Dr.fone
- New 2024 Approved Mac Movie Making Made Easy A Beginners Guide to Top Video Editors
- How To Transfer Data From Apple iPhone 13 To Other iPhone 11 devices? | Dr.fone
- Can I recover permanently deleted photos from Poco C65
- Wondering the Best Alternative to Hola On Infinix Hot 30 5G? Here Is the Answer | Dr.fone
- How to Transfer Music from Xiaomi 13 Ultra to iPod | Dr.fone
- Unlocking the Power of Smart Lock A Beginners Guide for Xiaomi Redmi K70 Pro Users
- In 2024, Full Guide to Fix iToolab AnyGO Not Working On Vivo S18 | Dr.fone
- New Streamline Your Video Collection Best MP4 Tag Editors for 2024
- How to Bypass FRP on Vivo Y78t?
- In 2024, Top 5 Car Locator Apps for OnePlus Ace 2V | Dr.fone
- Pokemon Go Error 12 Failed to Detect Location On Tecno Spark 10 5G? | Dr.fone
- In 2024, How to Use Pokémon Emerald Master Ball Cheat On Vivo S18e | Dr.fone
- Apple ID is Greyed Out From iPhone 15 How to Bypass?
- Google Pixel 8 Pro Stuck on Screen – Finding Solutions For Stuck on Boot | Dr.fone
- The Best Android Unlock Software For Vivo V27 Pro Device Top 5 Picks to Remove Android Locks
- New In 2024, YouTube Live Selling Boost Your Sales With These Tips
- 4 Most-Known Ways to Find Someone on Tinder For Realme 11 Pro by Name | Dr.fone
- New Video Editing Tips to Know Before Editing First Draft
- Stuck at Android System Recovery Of OnePlus Ace 2 ? Fix It Easily | Dr.fone
- In 2024, What to do if your iPhone 11 Pro has bad ESN or blacklisted IMEI?
- Title: Updated From Camera to Computer Editing Nikon Videos with Confidence for 2024
- Author: Emma
- Created at : 2024-04-29 02:23:22
- Updated at : 2024-04-30 02:23:22
- Link: https://video-ai-editor.techidaily.com/updated-from-camera-to-computer-editing-nikon-videos-with-confidence-for-2024/
- License: This work is licensed under CC BY-NC-SA 4.0.
